Pages

Wednesday 31 May 2023

Colour Creations: Wild Wheat

 Hi!


Hello, and thanks for stopping by for the new Colour Creations Blog Hop. Tonight we are featuring the last of the new In Colours, Wild Wheat. I found it to be a tricky colour, and definitely not one that has stolen my heart! It's sort of a mustardy-gold colour that I found to work well with Early Espresso.

scissorspapercard, Colour Creations, Stampin' Up!, Biggest Wish, Fresh As A Daisy DSP, Stylish Shapes Dies

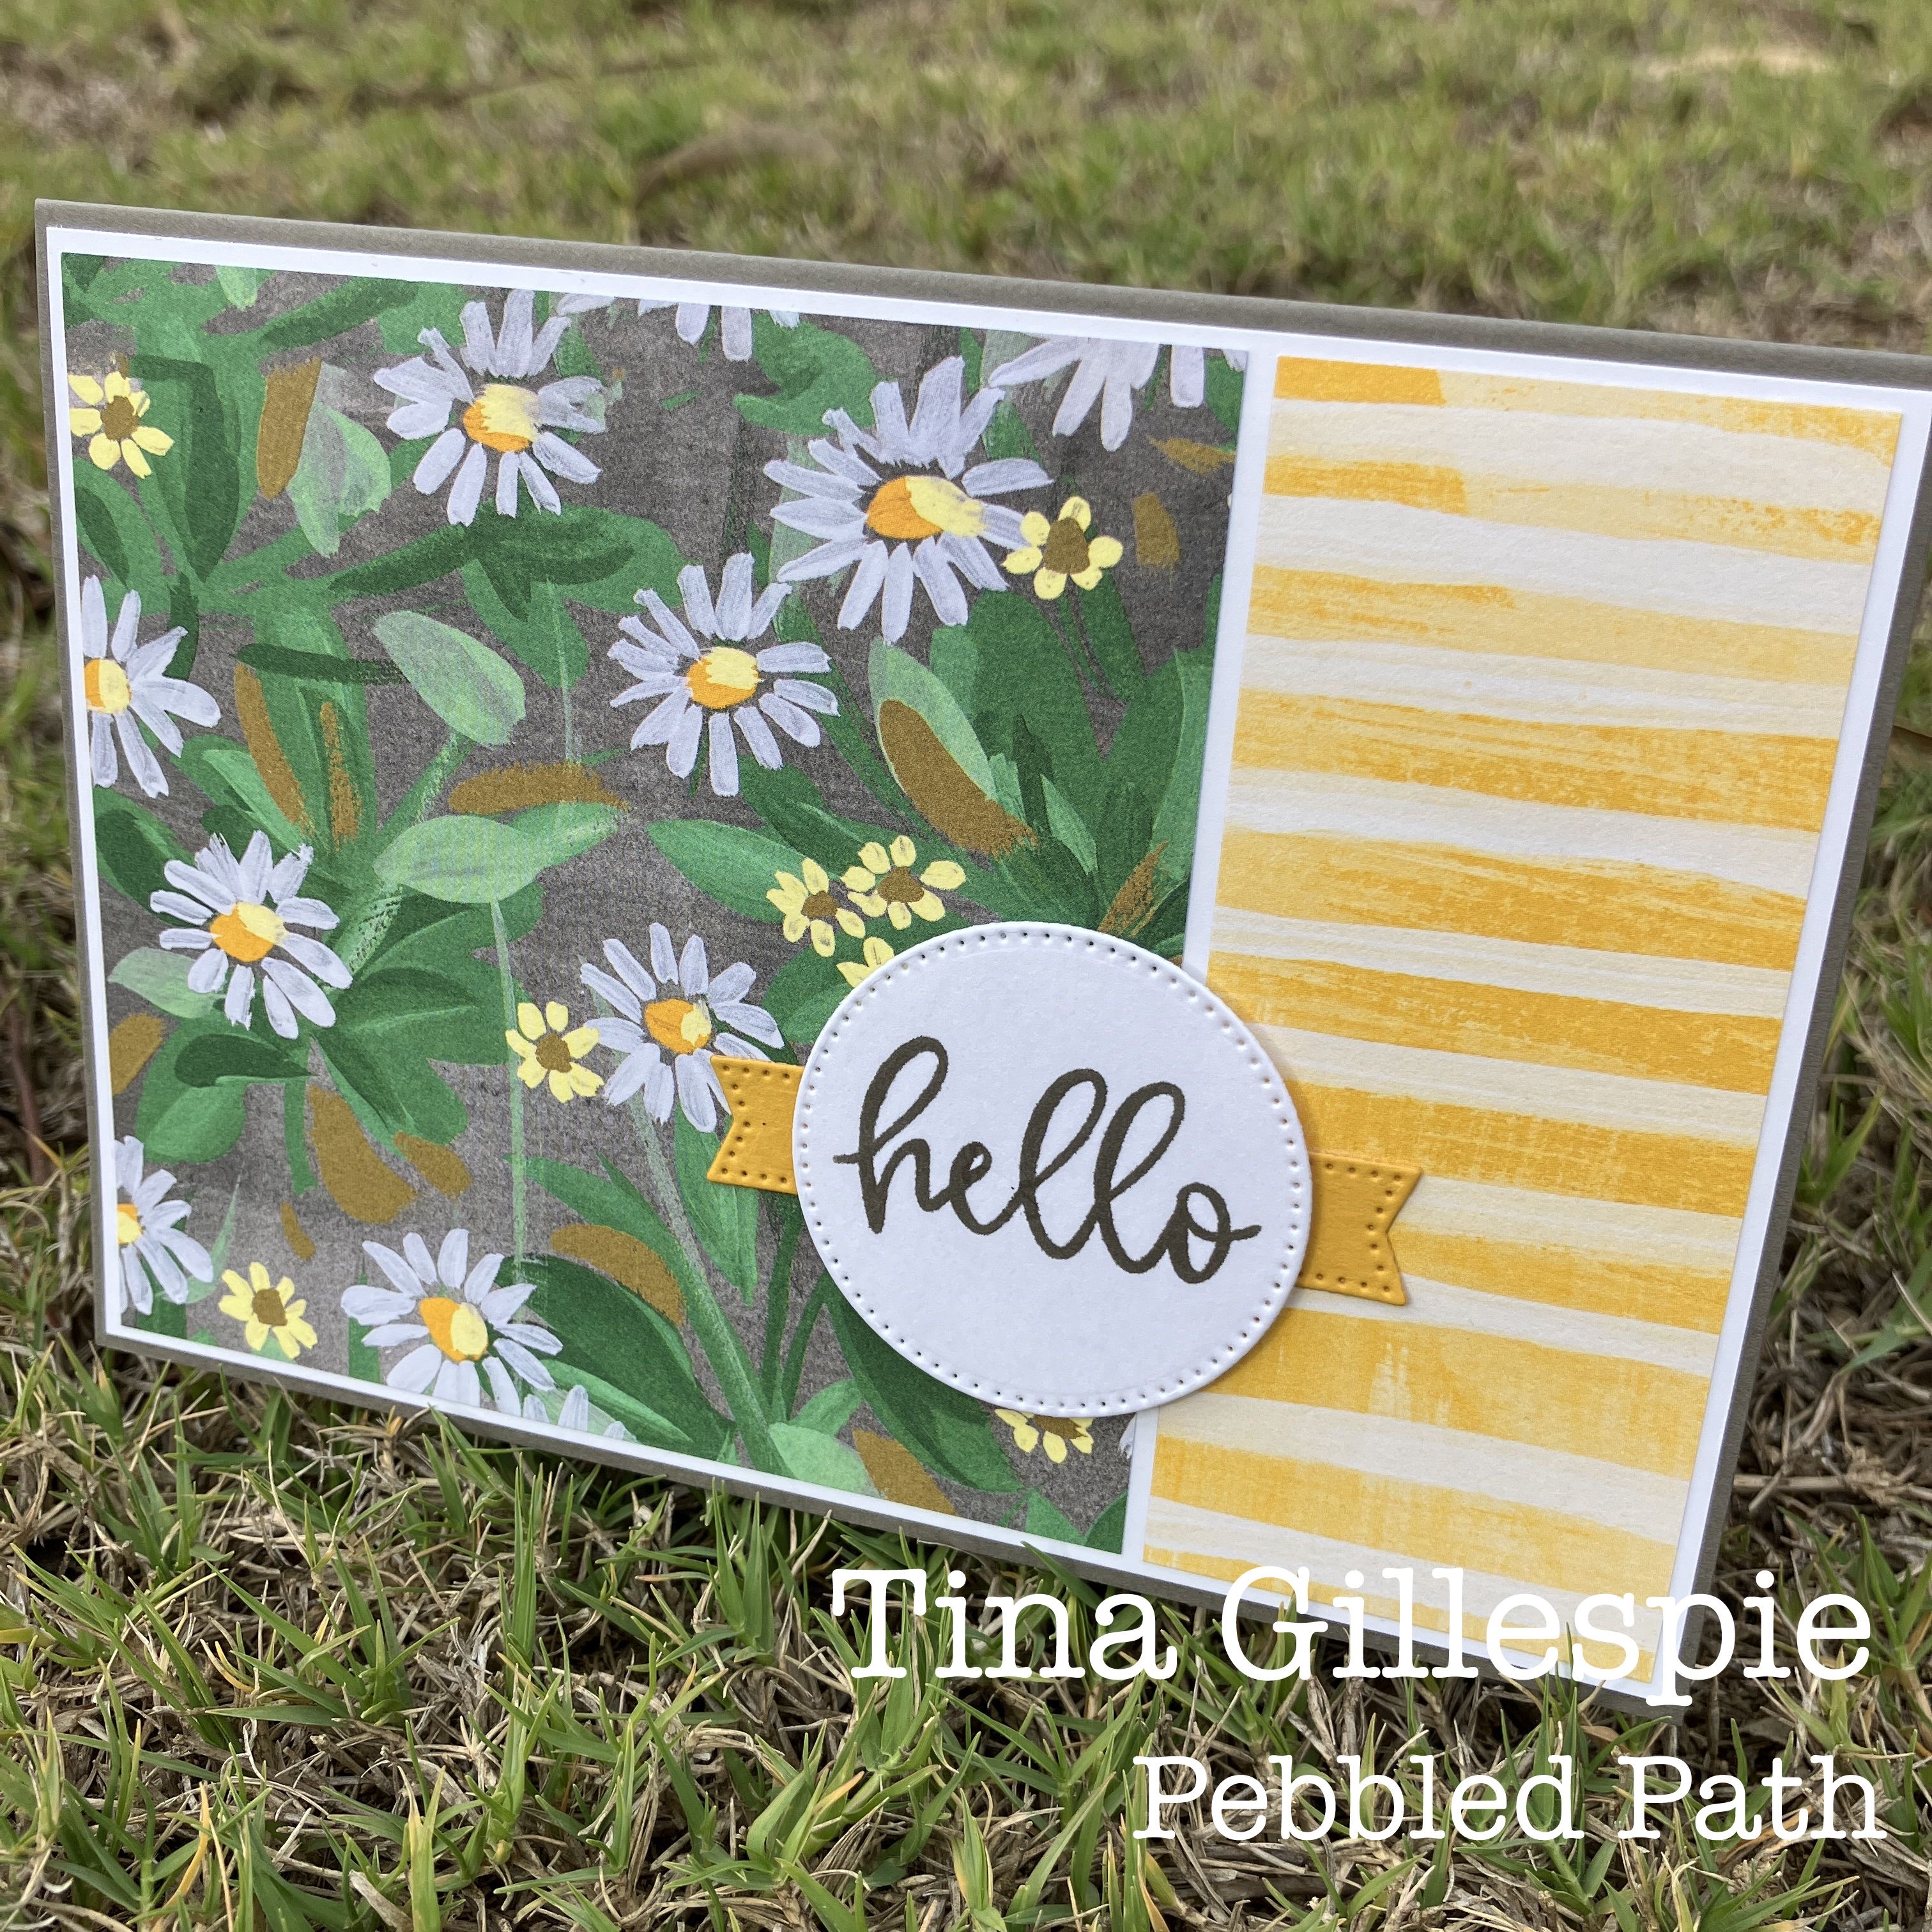
The DSP that I chose to use was one of the panels from the Fresh As A Daisy DSP. All I had to do was cut it from the sheet and decorate! It's size is more suited to an American A4 card, so I ended up cropping about a quarter of an inch from the bottom of my card base so that I had an even border all around.

scissorspapercard, Colour Creations, Stampin' Up!, Biggest Wish, Fresh As A Daisy DSP, Stylish Shapes Dies

I used some White Twine to decorate the card, as I don't think that it needed much. The sentiment is from Biggest Wish and is cropped using a Stylish Shapes Die.

scissorspapercard, Colour Creations, Stampin' Up!, Biggest Wish, Fresh As A Daisy DSP, Stylish Shapes Dies

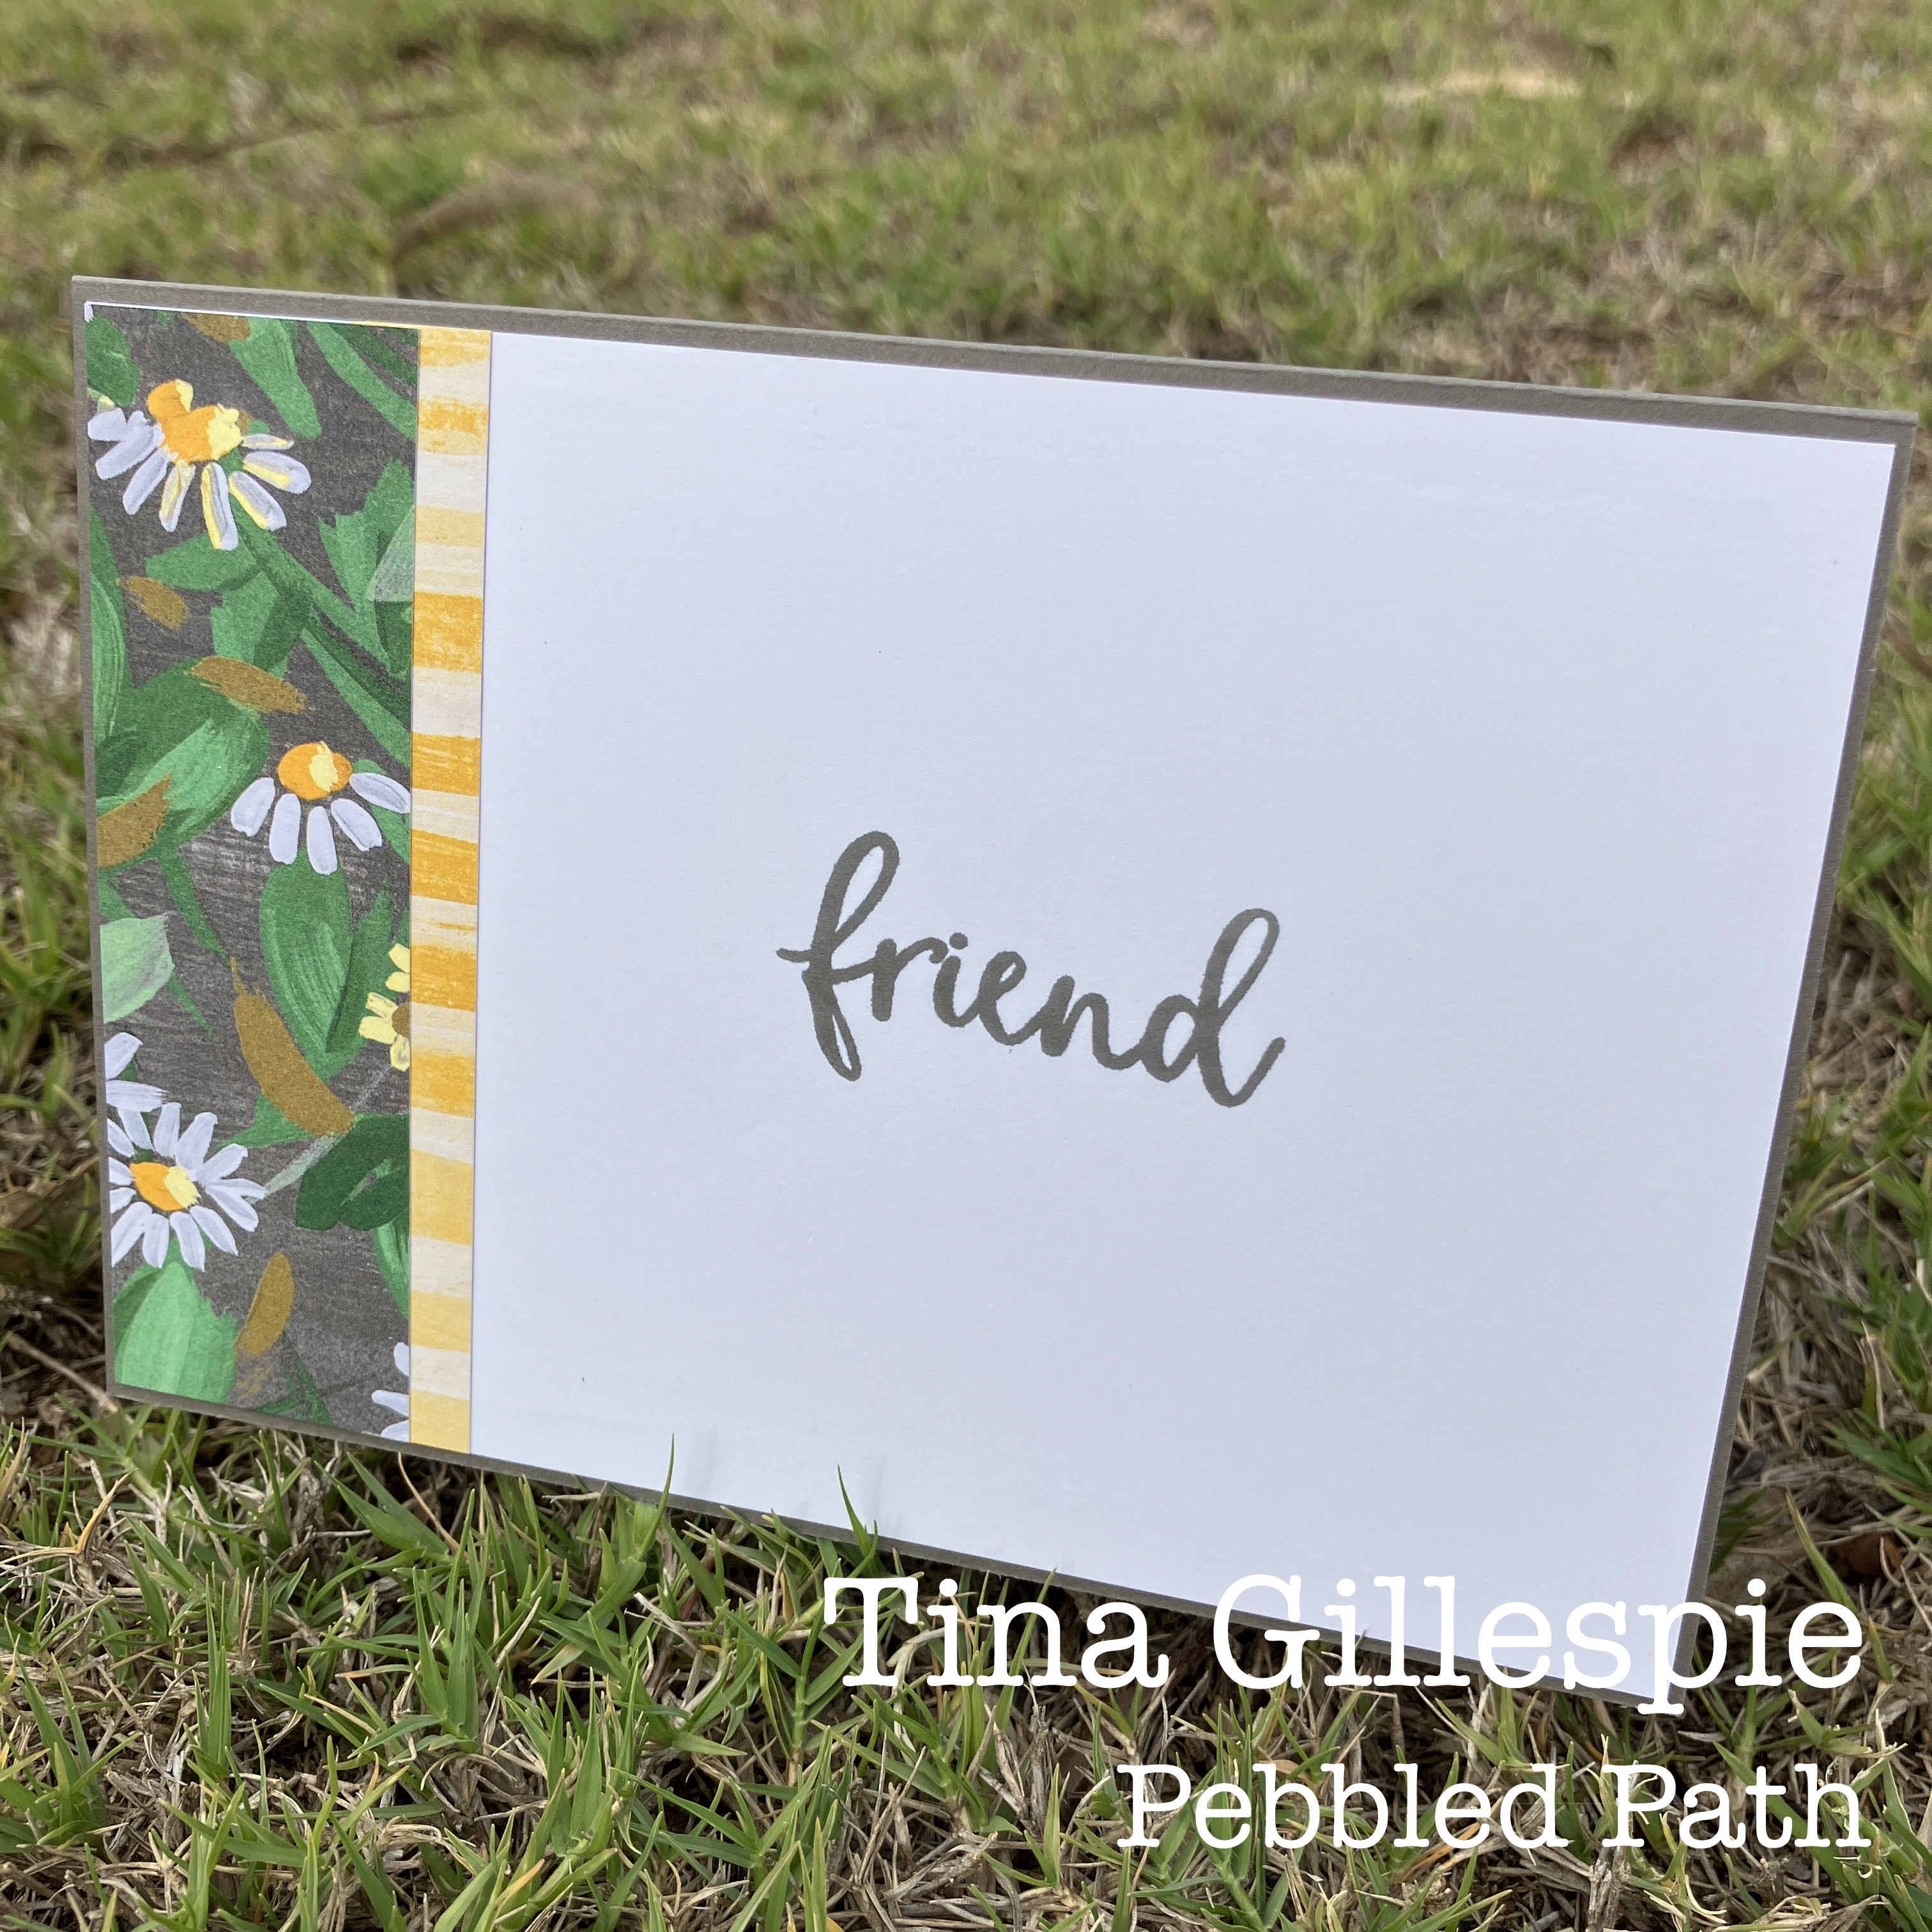
I fussy cut a daisy from a different sheet of the DSP for the inside of my card, along with a strip of a plainer Wild Wheat paper from the same pack.

There's lots more Wild Wheat inspiration to be found on tonight's blog hop, starting with my lovely friend, Kate Morgan. I'm sure that she's made something fabulous!


If at any time you find a broken link, please head to the blog of this week’s host of the Colour Creations Blog Hop, Cathy Proctor, and she will have the list of all participants.

Bye for now,

Tina

Sunday 28 May 2023

CTC 421: All Occasions

 Hi!


Hello Sunday! It's been a wet week here, so I've been happy to stay inside and do some crafting. This week at CASEing The Catty Sunday Challenges we are asking you to CASE a project from the All Occasions section of the catalogue.


It's a big section, but this Taco Fiesta series of cards caught my eye. It's been a while since I've played with this stamp set, and I liked the layout of these cards.


I don't use small cards very often, so I decided to challenge myself to convert the layout to a full sized card.

scissorspapercard, CASEing The Catty, Stampin' Up!, Taco Fiesta, Brights DSP, Indented Pencil Technique

All I really needed to do was to make the DSP section a bit longer! I decided to matt the panel on some Real Red cardstock, as I chose to use a Whisper White card base.

scissorspapercard, CASEing The Catty, Stampin' Up!, Taco Fiesta, Brights DSP, Indented Pencil Technique

The chilli and cactus were left over from a Stampin' Up! Demonstrator day that I went to in Adelaide recently. I demonstrated the Indented Pencil technique. You basically take a stylus and etch some lines into the stamped image. Then gently colour over the top with Watercolour Pencils (minus the water). The lines give a nice highlight to the image.

scissorspapercard, CASEing The Catty, Stampin' Up!, Taco Fiesta, Brights DSP, Indented Pencil Technique

I used another two on the inside of the card. I had plenty of samples to use up, as I demonstrated the technique eight times that day!

We'd love for you to play along with us this week. Which card in the All Occasions section catches your eye? Just CASE the card and add a photo to our Facebook group.


Before you race off to get creating, please do finish the blog hop. The next stop on the hop is the lovely Peta Stephen with a very elegant card.


Bye for now,

Tina

Thursday 25 May 2023

JAI 654: Just Add Colour

 Hi!


Thanks for joining me for the new Just Add Ink challenge. This week we have a colour combo for you, suggested to us by Rochelle.


I really love it! The bright colours are a little bit Summery (as I sit here on a miserable rainy day in late Autumn) and a little bit retro. I had some arch dies that I hadn't played with yet, and thought they'd go well with a retro theme. We used to have curtains with an arched pattern when I was a little kid in the late 70's.

scissorspapercard, Just Add Ink, Clearly Besotted Bedtime Story, WaffleFlower Layered Books Dies, Paper Rose Nesting Arches Dies, Stampin' Up! Timber 3DEF

The arched Dies are from Paper Rose, and are called Nesting Arches. I used the largest three to cut cardstock in the challenge colours and then layered them up over some Whisper White cardstock embossed using the Timber 3DEF.

scissorspapercard, Just Add Ink, Clearly Besotted Bedtime Story, WaffleFlower Layered Books Dies, Paper Rose Nesting Arches Dies, Stampin' Up! Timber 3DEF

The sentiment is from a Clearly Besotted stamp set, called Bedtime Story. It has a marvellous range of sentiments, all book-related. Speaking of books, I used my WaffleFlower Layered Books Dies to create the book for the front of my card.

scissorspapercard, Just Add Ink, Clearly Besotted Bedtime Story, WaffleFlower Layered Books Dies, Paper Rose Nesting Arches Dies, Stampin' Up! Timber 3DEF

I used the smaller version of the book and another arch and Clearly Besotted sentiment on the inside of my card. I like this sentiment - I definitely do not like being disturbed when I am engrossed in a book!

I realised today that the challenge colours were very similar to the block I just finished sewing in my current quilt. It you remove the pinks, you're just left with lime green, aqua, yellow, black and white.

Isn't it funny how hobbies can sometimes intersect? If you're interested, the quilt is Galaxy by Lilabelle Lane, and is English Paper Pieced using Tula Pink fabrics.

That's all from for now - I'm off to sew the next block in my quilt! Hopefully you're off to check out the Just Add Ink blog for more Design Team inspiration before making your card and adding it to our Linky for the challenge.

Bye for now,

Tina

Wednesday 24 May 2023

Colour Creations: Pebbled Path

 Hi!


It's time once again for the new Colour Creations Blog Hop. It's Pebbled Path week - one of our new In Colours. Hmm, I have to say that I haven't yet warmed to this colour, even after a play with it this week. Being a grey, it's a tricky colour to make the 'hero' colour on a card. I decided to go for the old faithful Fresh As A Daisy DSP, which features Pebbled Path.

scissorspapercard, Colour Creations, Stampin' Up! Biggest Wish, Fresh As A Daisy DSP, Stylish Shapes Dies

I saw this layout on a card made by Linda Dalke on Facebook, and I thought that it worked well for this paper. I think it would be a bit dreary without the pop of Crushed Curry and Lemon Lolly.

scissorspapercard, Colour Creations, Stampin' Up! Biggest Wish, Fresh As A Daisy DSP, Stylish Shapes Dies

I used Biggest Wish for my sentiment, and it was cropped with the Stylish Shapes Dies, as was the banner underneath.

scissorspapercard, Colour Creations, Stampin' Up! Biggest Wish, Fresh As A Daisy DSP, Stylish Shapes Dies

I used some left over pieces of DSP on the inside of my card. It's a nice change to add the DSP to the side rather than along the bottom of the insert.

That's all from me for tonight, but please keep on going around our blog hop. Next stop is my lovely friend, Christine Blain. She makes awesome masculine cards, so I'm sure that she's had no trouble being inspired by Pebbled Path!

As always, the very wonderful Cathy Proctor is keeping us all organised tonight, so please pop on over to her blog if you come across a broken link. She will have a list of all of tonight's participants to help get you back on track.

Bye for now,

Tina

Wednesday 17 May 2023

Colour Creations: Moody Mauve

 Hi!


Thanks for stopping by on your way around our Colour Creations Blog Hop. We re starting with the new In Colours, and this week it's Moody Mauve's turn. I wasn't a big fan of the colour, but after a play I'm starting to come around.

scissorspapercard, Colour Creations, Stampin' Up! Biggest Wish, Fresh As A Daisy, Stylish Shapes Dies

I've seen a few cards lately using strips of cardstock to create a background panel, so that was my starting point for this card. I alternated Moody Mauve with the new pink, Bubble Bath, and Whisper White. I quite like that combo! I layered it over some Gold Foil for a bit of extra zing.

scissorspapercard, Colour Creations, Stampin' Up! Biggest Wish, Fresh As A Daisy, Stylish Shapes Dies

To decorate, I cropped a daisy from the Fresh As A Daisy DSP with one of my circular Stylish Shapes Dies. The sentiment, from Biggest Wish, was cropped using one of the banner dies from the same pack. I used my Layering Circles Dies to add a matt of Gold Foil under the daisy. The gold works nicely with the Wild Wheat in the daisy DSP.

scissorspapercard, Colour Creations, Stampin' Up! Biggest Wish, Fresh As A Daisy, Stylish Shapes Dies

As always, when I made the front panel I made it a bit bigger than I needed for the front so that I could use the rest on the inside of my card. It ties it all together so nicely. The smaller daisy is a nice finishing touch, too.

That's all from me, but please do keep hopping your way around all of the blogs on tonight's hop. The next stop is Christina Barnes - I can't wait to see what she's made.


If you run into any issues with links on the hop, just pop on over to the wonderful Cathy Proctor's blog. She will have a list of all tonight's participants to help get you back on track.

Bye for now,

Tina

Sunday 14 May 2023

CTC 419: Love

 Hi!


Welcome to the new CASEing The Catty Sunday Challenge Blog Hop. It's a great way to end the week! 


This week we are asking you to CASE a love project. You can choose anything from the catalogue that makes you think of love.


I chose this Oceanfront card from page 85, with the obvious 'love you' sentiment. The watercolour scene really appealed to me, and it's been a while since I've inked up my Oceanfront stamp set, so that was as good a reason as any to choose this card to CASE.

scissorspapercard, CASEing The Catty, Stampin' Up!, Oceanfront, Easter Bunny, Stylish Shapes Dies

The catalogue samples used Blending Brushes to ink the stamps, with the watercolour paper wet to give the softer look. I chose to use the baby wipe technique instead. I applied some Blackberry Bliss and Calypso Coral ink to the baby wipe, and then used it like an inkpad to ink up my sky stamp. The rest of the scene (apart from the plants) were just stamped as usual onto the wet watercolour paper.

scissorspapercard, CASEing The Catty, Stampin' Up!, Oceanfront, Easter Bunny, Stylish Shapes Dies

Once the panel was dry, the plants were stamped over the top and the card was assembled and decorated.

scissorspapercard, CASEing The Catty, Stampin' Up!, Oceanfront, Easter Bunny, Stylish Shapes Dies

I recreated the scene on the inside, without the wet watercolour paper. The sentiments that I used on my card are from the Easter Bunny stamp set. They are sort of vague enough to be suitable for several different occasions.

We'd love for you to play along with us this week. All you need to do is make a suitable card, take a photo and upload it to our Facebook group. I can't wait to see which card you choose to CASE.


Before you go, please keep hopping your way around all of the Crew blogs. There's lots more 'love' inspiration to be seen, starting with Julia Quinn with a super sweet card.

Bye for now,

Tina

Thursday 11 May 2023

JAI 652: Just Add A Sketch

 Hi!


Thanks for joining me for the new Just Add Ink challenge.  This week it's a Sketch Challenge - designed by me!


It took me a while to decide what I was going to use to create a card using the sketch this week, but once I had an idea I was off and racing.

scissorspapercard, Just Add Ink, Altenew Mini Atlas, Uniquely Creative NESW Die, Stampin' Up! Watercolour World, Stylish Shapes Dies

I purchased this little world map stamp about 6 months ago. It's an Altenew set, called Mini Atlas. I wanted a world map stamp, and this was the best I could find. Would you believe, a couple of months later Stampin' Up! released Watercolour World. I love that I now have map stamps that are very different sizes. They work so well together.

scissorspapercard, Just Add Ink, Altenew Mini Atlas, Uniquely Creative NESW Die, Stampin' Up! Watercolour World, Stylish Shapes Dies

The die cut compass is from Uniquely Creative, and is called NESW Die. I made sure that I applied Adhesive Sheet to the back of the Pretty Peacock cardstock before I cropped it using the die.

scissorspapercard, Just Add Ink, Altenew Mini Atlas, Uniquely Creative NESW Die, Stampin' Up! Watercolour World, Stylish Shapes Dies

I used Mini Atlas again on the inside, this time in Pool Party ink. It's a great size for card inners.

That's all from me for tonight, but your job is just starting! Pop on over to the Just Add Ink blog, where you'll see lots more to inspire you from the rest of the Design Team. Then just get inky, and link up your card to the challenge when you're done. Easy!

Bye for now,

Tina

Wednesday 10 May 2023

Colour Creations: Copper Clay

 Hi!


Welcome back to Copper Clay week of the Colour Creations Blog Hop. I wasn't too keen on the coppery brown at first, but after playing with it, I think it's grown on me a little.

scissorspapercard, Colour Creations, Stampin' Up!, Biggest Wish, Fresh As A Daisy DSP, Stylish Shapes Dies, Basic Borders Dies

I kept my card nice and simple today. I cut a card front sized piece of the Fresh As A Daisy DSP and cropped it using my curved Basic Border Die. I made sure that I didn't cut off too much of that gorgeous big daisy at the bottom right.

scissorspapercard, Colour Creations, Stampin' Up!, Biggest Wish, Fresh As A Daisy DSP, Stylish Shapes Dies, Basic Borders Dies

Biggest Wish was the perfect choice for a sentiment for my card, cropped with a Stylish Shapes Die. I added a few Champagne Rhinestones before I realised that they have retired. They work well with Copper Clay though!

scissorspapercard, Colour Creations, Stampin' Up!, Biggest Wish, Fresh As A Daisy DSP, Stylish Shapes Dies, Basic Borders Dies

I never like to waste paper, so I used the offcut from the front of the card on the inside of my card. It's a great way to decorate the inside!

Thanks for stopping by, but please do keep going around out blog hop. There's so much more Copper Clay goodness to be seen. Next up is my lovely friend, Rachel Palmieri.


If you run into any problems with links, just pop on over to the wonderful Cathy Proctor's blog. She'll have a list of all of tonight's participants to help get you back on track.

Bye for now,

Tina

Sunday 7 May 2023

CTC 418: CASE The Annual Catalogue

Hi!


Thanks for joining me for the new CASEing The Catty Sunday Challenge Blog Hop. Has it been cold where you live? We have certainly had a little taste of what winter has in store here in Adelaide! The upside? It's perfect crafting weather 😁


We have a new Annual Catalogue, so naturally we are asking you to CASE from it! You can choose whichever project you'd like to CASE. If you've been following me for a while, you'd know that I like to flip through the catalogue, starting at the back page. I got to page 159 before I found this awesome card.


I really loved the simplicity of the layout, that it uses one of my must-have suites, and the cool flames at the back of the shuttle. I don't own this bundle (yet), but the flames did make me think of my Legendary Ride bundle. Perfect!

scissorspapercard, CASEing The Catty, Stampin' Up!, Legendary Ride Bundle, Rays Of Light

I started by creating my background. I stamped Rays Of Light onto Lost Lagoon cardstock using the matching ink. I am so loving that its back in the line-up. I cropped it with a Stitched Rectangle Die, but it wasn't quite as big as I'd like, so I added another layer of cardstock underneath.

scissorspapercard, CASEing The Catty, Stampin' Up!, Legendary Ride Bundle, Rays Of Light

My motorbike was created using Basic Black, Smokey Slate, Real Red and Silver Foil cardstocks, with a bit of Pumpkin Pie on the flame. I used Adhesive Sheets behind all of the small pieces (there are lots of them!), as it makes assembling the bike so much easier.

scissorspapercard, CASEing The Catty, Stampin' Up!, Legendary Ride Bundle, Rays Of Light

I stamped the large motorbike image on the inside. I think I'm going to have a lot of fun with this bundle!

To join in with our challenge, all you need to do is join our Facebook Group and add a photo of your project to the group. You don't need a blog or a fancy camera, we want to make it easy to play along.


Before you go, please continue your way around our Blog Hop. The next stop is my lovely friend, Judy May. I can't wait to see what she's made!


Bye for now,

Tina