Pages

Showing posts with label SSS Double Stitched Rectangle Dies. Show all posts

Thursday, 2 July 2020

JAI #512: Just Add A Sketch

Hi!


Yay, it's Friday, and the last day of term for my kids. Two weeks of holidays coming up, even my hubby who is having a well earned break from his work. Hehehe, little do they all know that I've started compiling a 'to-do' list of things that need to be done. Don't worry, there's some fun stuff on the list too!


This week at Just Add Ink we have a sketch challenge for you, and it's one designed by me! It's a fun one, with a few angles to play with. I toyed with the idea of doing a herringbone style background, but in the end I pulled out a pop culture stamp set that I've had for a while but hadn't yet seen ink. It's called Eat Your Heart Out, and is from Ink Road Stamps.

scissorspapercard, Stampin' Up!, Ink Road Stamps, Eat Your Heart Out, SSS Double Stitched Rectangle Dies

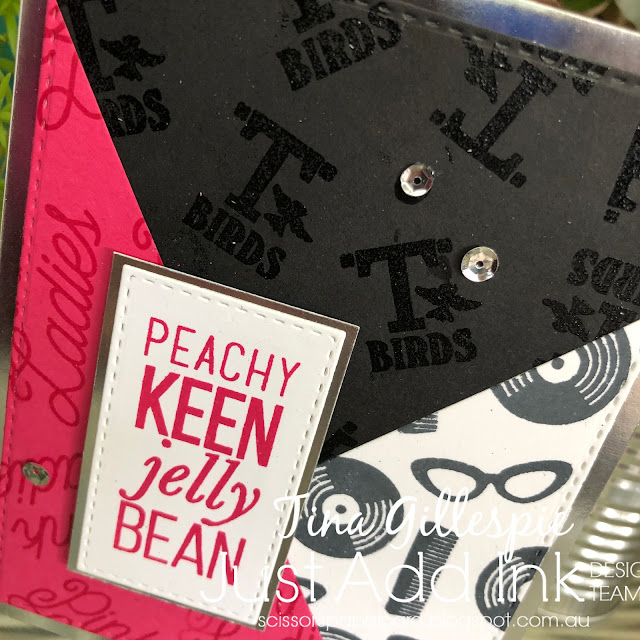
LOL, it shouldn't be too hard to work out which movie it references! I started by cutting a card front in Whisper White, Melon Mambo and Basic Black. Here's where I went wrong: I stacked them and used my guillotine to cut through all three layers at once. This way they are all the same shape and should fit back together easily when you mix and match the colours. My mistake? I should have stamped them first, before cutting! Oh well.

scissorspapercard, Stampin' Up!, Ink Road Stamps, Eat Your Heart Out, SSS Double Stitched Rectangle Dies

The rest of the plan worked perfectly - the pieces fit together very well. I glued them onto a piece of copy paper cut to card front size. I now have three card fronts, so I will have to play with the other two over the weekend and make them into cards. I cropped this front with my largest Stitched Rectangle Die and mounted it on my very last Silver Foil card. Sob! I will miss those cards - very handy when you need a silver foil border.

scissorspapercard, Stampin' Up!, Ink Road Stamps, Eat Your Heart Out, SSS Double Stitched Rectangle Dies

How fun is this hairdo of one of the main characters in the movie? I'm not sure what this style of artwork is called, but it's very cool. You'll notice that this card doesn't have a 'happy birthday' in sight. I'm not sure yet what I'll use it for, but it could be for nearly anything!

That's a wrap from me, I might go and watch the movie (and sequel!) now. You can head on over to the Just Add Ink blog, where you can see the rest of this week's Design Team cards inspired by my sketch. You can also link up your card for our challenge. Can't wait to see what you make!

Bye for now,

Tina

Tuesday, 18 December 2018

Getting Merry With Merlot

Hi!

Welcome to the final Colour Creations Blog Share for 2018. We are having a little break over the Christmas/New Year period, but we'll be back on January 8 with the next colour in our series. It's one of my favourites!


This wee, though, we are looking at the new Neutral, Merry Merlot. It's not a colour I've used much of - probably because my old high school uniform was maroon. I finished high school 25 years ago, so you'd think I'd be over it by now but apparently not! I did enjoy using it on my card though, so maybe I'm on my way to liking maroon.

scissorspapercard, Stampin' Up!, Art With Heart, Colour Creations, Incredible Like You, Varied Vases, Tin Tile 3DTIEF, SSS Double Stitched Rectangles

I tried and rejected all kinds of things until this card rose from the debris on my craft desk. Most of it was playing around with Stitched Rectangle dies, which are so much fun! I also used the new stamp set, Incredible Like You, available in January. Oh, and don't forget the Tin Tile 3DTIEF on the Sahara Sand layer - it's carrying over to the Occasions Catalogue, so we get it for at least a few more months. Yay!

scissorspapercard, Stampin' Up!, Art With Heart, Colour Creations, Incredible Like You, Varied Vases, Tin Tile 3DTIEF, SSS Double Stitched Rectangles

I'm still deciding if I like the flowers from the stamp set. They are pretty, and I love the way the two layers work together, but I find the flower to be a bit 'floaty'. I anchored this one by adding a Mint Macaron twine bow to the base.

scissorspapercard, Stampin' Up!, Art With Heart, Colour Creations, Incredible Like You, Varied Vases, Tin Tile 3DTIEF, SSS Double Stitched Rectangles

I used another flower and some more leaves on the inside. A couple of the leaves were stamped direct to the base cardstock and a few were fussy cut and layered underneath the flower. It adds a bit more dimension to the arrangement.

You can find the rest of this weeks cards over Catherine's blog. It's a small group on the Blog Share today, but still worth the look as everyone is so creative. Don't forget that we return on the 8th of January.

Bye for now,

Tina

Monday, 15 October 2018

Everything Is Awesome At Christmas

Hi!

Today's card is one I made for a challenge in the Kindred Stamps Facebook group. The challenge was to use a non-Christmas stamp set to make a Christmas card. The first temptation is to just whack a Santa hat on a person or animal, but I wanted to do something a bit more than that.

I wracked my brain for over a week, and then I just happened to walk past Alex's bedroom as he dug through his loose Lego. Bingo!

scissorspapercard, Stampin' Up!, Kindred Stamps, Building Blocks, Star Of Light, Santa's Workshop SDSP, Blends

When my kids were younger they used to make all kinds of shapes out of their Lego bricks, including Christmas trees. I decided to use my Kindred Stamp Building Blocks stamp set to make a Christmas tree.

scissorspapercard, Stampin' Up!, Kindred Stamps, Building Blocks, Star Of Light, Santa's Workshop SDSP, Blends

I started at the top with the double brick and then masked it before I stamped the larger brick in the second layer. I continued masking and stamping until I had the width I wanted for the tree, finally finishing with a trunk. I then stamped some flowers to represent the star on top and a few baubles.

scissorspapercard, Stampin' Up!, Kindred Stamps, Building Blocks, Star Of Light, Santa's Workshop SDSP, Blends

I couldn't make a Christmas card like this without Santa, so I made one for the inside. I stamped the basic man and then I used the stamp that is a top view of the single brick to create a belt buckle. I just used a marker to add lines to turn it onto a belt. Challenge completed!

Bye for now,

Tina

Thursday, 23 August 2018

JAI #423: Just Add Colour

Hi!


This week at Just Add Ink we have a colour challenge for you. Kim has given us the following colours to work with.


Just a note that our Colour Challenge rules have changed slightly. Where previously we allowed the addition of any of the Neutrals to the challenge colours, with the Colour Revamp at Stampin' Up! we are now only allowing the addition of any of the Basics or Metallics.

scissorspapercard, Stampin' Up!, Just Add Ink,A Little Wild, Animal Outing, Star Of Light, Balloon Celebration, Tufted DTIEF

I loved this colour combo, but I found Soft Suede the hardest to include. In the end, I decided to use it to make some earth for my sweet little elephant to stand on. Once I go my head around that, the rest came together easily! I used my Basic Grey Watercolour Pencil to colour the elephant and then blended (as usual!) with my Wink Of Stella pen. I think I've forgotten how to use the pencils with water!

scissorspapercard, Stampin' Up!, Just Add Ink,A Little Wild, Animal Outing, Star Of Light, Balloon Celebration, Tufted DTIEF

To bring some silver into the mix, I heat embossed some stars and the sentiment. I didn't feel like it was enough silver, so I decided to add some to the edges of the main panel and the card base. To do this I swiped my Versamark inkpad over the edges of the cardstock and then tipped the embossing powder over the edges. I then heat set the powder as usual. It's such a cool effect, as it's not uniform all the way around the edge. It was my first time trying this technique, but certainly not the last!

scissorspapercard, Stampin' Up!, Just Add Ink,A Little Wild, Animal Outing, Star Of Light, Balloon Celebration, Tufted DTIEF

I just had to include the back side of the elephant on the inside. It's hard to see in the photos, but I used my new Tufted DTIEF to emboss the Bermuda Bay cardstock on the front. I also embossed the smaller strip for the inside to tie them together.

That's ti for me today - you can see the gorgeous cards the rest of the team have created with Kim's colours over at the Just Add Ink blog. Don't forget our rules have changed slightly when you are making your masterpiece!

Bye for now,

Tina

Tuesday, 7 August 2018

Calypso Statements

Hi!

Welcome to the new Colour Creations Blog Share. This week we are featuring Calypso Coral.


Did you know that in Greek mythology Calypso was a nymph who was the daughter of Titan Atlas and Pleione and is famous for trying to keep Odysseus captive so she could marry him - sadly for Calypso, he was already married! Thanks, Wikipedia! Totally irrelevant to my card, but interesting nonetheless.

scissorspapercard, Stampin' Up!, Art With Heart, Colour Creations, Floral Statements, Flourishing Phrases, Stampin' Blends, Subtle DTIEF

I've had this image from Floral Statements stamped and ready to colour for over a year, and I decided that this week's Colour Creations was finally the time to use it. I coloured the flower with my Calypso Coral and Old Olive Blends.

scissorspapercard, Stampin' Up!, Art With Heart, Colour Creations, Floral Statements, Flourishing Phrases, Stampin' Blends, Subtle DTIEF

I also used my Light Cherry Cobbler Blend to add some darker highlights to the flowers, and finished by using my Light Pool Party Blend to draw an outline around the outside of the image. It's a simple trick that helps the image to pop against the white background.

scissorspapercard, Stampin' Up!, Art With Heart, Colour Creations, Floral Statements, Flourishing Phrases, Stampin' Blends, Subtle DTIEF

I finished the inside with a sentiment and some leaves from Flourishing Phrases. I found that the leaves were a bit stark for what I wanted, so I went over them with a Blender Pen (not to be confused with a Blend marker!). This pulled some of the colour into the veins of the leaves and softened them a little. Much better!

As always, you can find the links to the rest of the blogs over at Catherine's blog. It's always worth a look - the ladies do such a great job with the colours each week.

Bye for now,

Tina

Tuesday, 3 July 2018

Welcome Back, Blackberry Bliss

Hi!

Welcome back to the new Colour Creations Blog Share by some members of the Art With Heart team.


This week we are featuring a colour that has been welcomed back to the line up in the Colour Revamp - Blackberry Bliss. I know there were a lot of cheers when this was announced, as it was a favourite of many.

As Blackberry Bliss is such a rich, dark colour, I decided to have a bit of messy fun with it.

scissorspapercard, Stampin' Up!, Art With Heart, Colour Creations, Follow Your Dreams, Chase Your Dreams Framelits

I started by placing a sheet of Shimmery White cardstock in my Stamparatus and stamping the dream catcher from Follow Your Dreams in Call Me Clover ink. I then took my spritzer and spritzed the card with water, holding the cardstock vertically so that the ink would run off the bottom. When it had dried I stamped the image in Clover again (yay for the Stamparatus!), and spritzed it again, this time leaving the cardstock flat so that the colour wouldn't run, only spread a little from the image. Finally, when it dried again, I stamped the dream catcher in Blackberry Bliss over the image. Because I used the Stamparatus to stamp each time, I was able to line up the image perfectly - I especially love the effect where the dangly bits of the dream catcher are. Is there a technical name for the dangly bits? LOL

scissorspapercard, Stampin' Up!, Art With Heart, Colour Creations, Follow Your Dreams, Chase Your Dreams Framelits

The asymmetrical top wasn't a planned part of the card, but when I was stamping the dream catcher for the second time I accidentally got a green fingerprint to the top of the image. It looked pretty cool, but still a bit strange, and there was no way I could recreate the mistake to make it look like a part of the design. Cutting straight across wasn't an option, so asymmetrical it was! You can see that I stamped the flower image in Blackberry Bliss on the top of the card base to make it more of a feature. I love the way it turned out - a happy mistake in the end!

scissorspapercard, Stampin' Up!, Art With Heart, Colour Creations, Follow Your Dreams, Chase Your Dreams Framelits

It took me 3 days on and off to make the front of the card, so by the time I got to the inside I was more than ready to get the card finished. Rather than play around with ink and water a but more, I decided to play with my new Embossing Mats. Have you tried them? So much fun! In this case I cut the feather shape and then used the new mats to emboss the texture provided by the decorative ejection holes in the die. You'll be seeing more of this in the future, for sure!

You can find the rest of the team's Blackberry Bliss cards by visiting Catherine's blog. Be sure to leave comments - we all love a compliment!

Bye for now,

Tina

Thursday, 7 June 2018

JAI #412: Just Choose Two

Hi!

Yay for Friday, and double yay for a Long Weekend! Do you have plans? I need to sort out my youngest's wardrobe, but otherwise I'm hoping to craft as much as possible. I have a sewing project or two planned also.


This week for our Just Add Ink  challenge, Lou has tasked us to choose two on our cards.


Hmm, which two will you choose? I went with spots and splatters for my card.

scissorspapercard, Stampin' Up!, Just Add Ink, Picture Perfect Birthday, Swirly Bird, Wood Textures DSP

I decided to try a new to me technique on this card. I can't recall what it's called, but you basically ink up a mask and then press the cardstock to the mask. In this way, you get the reverse of the pattern you'd get by sponging ink onto the cardstock through the mask. I chose this spotty design from the now retired Seasonal Decorative Masks, inked it up with Mint Macaron ink, spritzed it with a tiny bit of water, and then pressed the card to the mask. I love how it turned out - the splotchy, grungy kind of look.

scissorspapercard, Stampin' Up!, Just Add Ink, Picture Perfect Birthday, Swirly Bird, Wood Textures DSP

To finish the front, I stamped some splatters in Early Espresso ink to layer under my sentiment. I really, really, really wanted to add some bling, but I was trying hard to keep this card more on the masculine side, so I ended up using a few retired Enamel Dots in Early Espresso to jazz it up a little.

scissorspapercard, Stampin' Up!, Just Add Ink, Picture Perfect Birthday, Swirly Bird, Wood Textures DSP

The bottom of the inside was created the same way as the front, but instead of inking the whole piece of cardstock, I gently bent the card so that only the bottom touched the mask. I pressed with my fingers to ink up the small section. Doing it this way gives a random, messy edge rather than a straight one, which would look a little odd.

As usual, the Design Team have risen to the challenge and produced some wonderful cards. You can see them over at the Just Add Ink blog, where you can also link up your cards. Which two will you choose?

Bye for now,

Tina

Thursday, 17 May 2018

JAI #409: Just Add Eclipse Technique

Hi!

Hooray for Friday! Are you as excited as I am? The Royal Wedding is in less than 48 hours!


Let's pass the time waiting by checking out the new Just Add Ink challenge. This week Rachael has challenged us to add the Eclipse Technique to our cards.


The Eclipse technique has been taking the paper crafting world by storm - it's so popular lately! Never heard of it? You basically die cut over the top of a stamped image. Easy!

scissorspapercard, Stampin' Up!, The Ink Road, Simon Says Stamp, The One With All The Stamps, Lovely Words, Stitched Shapes, Double Stitched Rectangles

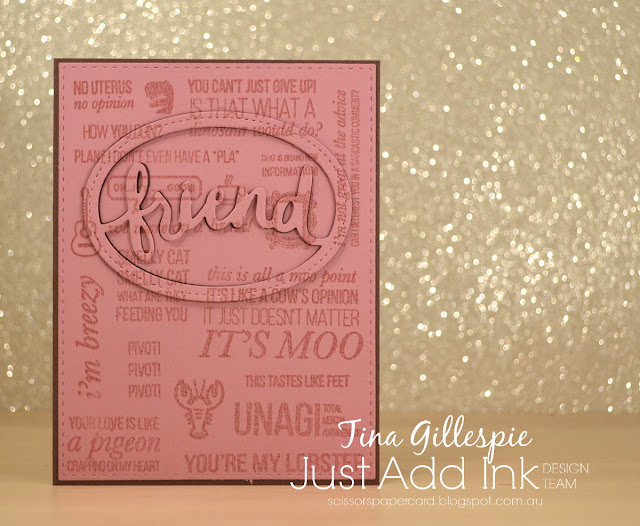
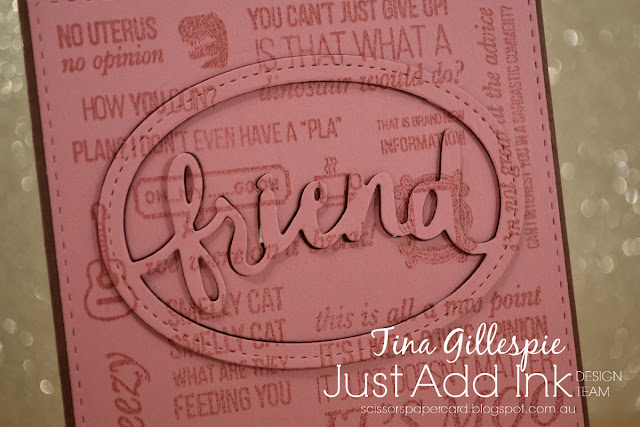
I just can't resist a lot of pop culture stuff, and when I found these Friends stamps by The Ink Road, they found their way into my shopping cart and in the post to my house. The set is called 'The One With All The Stamps', how cool is that? They are a whole lot of individual stamps that I used to make one big background. I placed the cardstock in my Stamparatus then laid the stamps all over and played until I was happy with the placement. I then used the Stamparatus plate to pick them all up, inked them and stamped all in one go.

scissorspapercard, Stampin' Up!, The Ink Road, Simon Says Stamp, The One With All The Stamps, Lovely Words, Stitched Shapes, Double Stitched Rectangles

To create the Eclipse effect, I die cut the 'friend' (what else?? LOL) from Lovely Words and then cut around the oval using a Stitched Shapes oval. This piece was then popped up using Mini Dimensionals. Can you see your favourite Friends quote on the front? How you doin'?, or Oh My God! would have to be some of the classics, and they are both on there.

scissorspapercard, Stampin' Up!, The Ink Road, Simon Says Stamp, The One With All The Stamps, Lovely Words, Stitched Shapes, Double Stitched Rectangles

I kept my two favourite stamps for the inside. I always longed to catch up with friends and drink a cuppa on that lounge. What about you?

I may have also purchased Pitch, Please from The Ink Road, so keep an eye out for that set in the future!

Now, we are just that little bit closer to watching the wedding of the year, but there's still plenty of time to pop on over to the Just Add Ink blog to check out the rest of the Design Team's cards. Will you craft while you watch the wedding? I will be sipping tea and eating scones with some of my friends. Can't wait!

Bye for now,

Tina

Monday, 5 February 2018

CTC #164: Occasions Catalogue Kits

Hi!

EDIT: I was so excited to be a Crew Pick for this card!


I'm pretty happy to be 4 for 4 with the CASEing The Catty Challenges this year. They are announced each Sunday evening, and I've been mostly able to get straight into the challenge and get a card made pretty quickly. This week the challenge is the kit cards from pages 14-17 of the Occasions Catalogue. I don't have either kit, so I had to improvise. My card is a CASE of one of the trio at the bottom of page 17.

scissorspapercard, Stampin' Up!, CASEing The Catty, Soft Sayings, Work Of Art, Bunch Of Blossoms, Dragonfly Dreams, Picture Perfect Birthday

The card in the catalogue is square, but I decided to make a full sized card. I used exactly the same colours and ribbon, but I had to use different stamps. I remembered that the Soft Sayings kit had a similar flower stamp, and so I decided to use it.

scissorspapercard, Stampin' Up!, CASEing The Catty, Soft Sayings, Work Of Art, Bunch Of Blossoms, Dragonfly Dreams, Picture Perfect Birthday

I stamped the swoosh from Work Of Art, the flower and the leaves from Soft Sayings, and then I spritzed the cardstock lightly with some water. Once it dried I stamped the sentiment from Bunch Of Blossoms. I finished it off with the Berry Burst ribbon and some retired Pearls for the centre of the flower. The dotty stamp from Dragonfly Dreams provides a nice background for the main panel.

scissorspapercard, Stampin' Up!, CASEing The Catty, Soft Sayings, Work Of Art, Bunch Of Blossoms, Dragonfly Dreams, Picture Perfect Birthday

I used a few of the same stamps on the inside to finish off the card. It's always so much nicer to have a finished inside, don't you think?

Bye for now,

Tina

Monday, 8 January 2018

A Scrappy Peacock

Hi!

I'm back for another year of blogging!

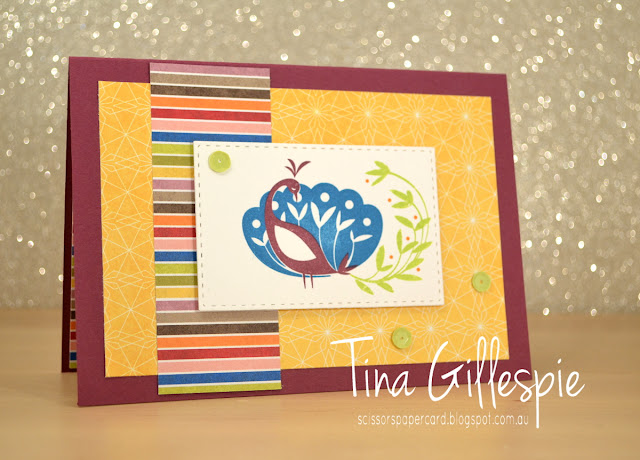
One of the things I try to get done each summer is a huge tidy up of my craft space. I got a little bit done before I came across some scraps of Birthday Memories DSP. I straight away thought that the colours would work well with the new Beautiful Peacock stamp set. Given that my new Stamparatus had just arrived, stamping won over more cleaning!

scissorspapercard, Stampin' Up!, Sale-A-Bration, Beautiful Peacock, Birthday Memories DSP

Do you agree? I think the bright, cheerful colours work nicely! My favourite paper from the Birthday Memories DSP pack is the striped sheet, so I wanted to make it a secondary feature of the card.

scissorspapercard, Stampin' Up!, Sale-A-Bration, Beautiful Peacock, Birthday Memories DSP

The peacock was so easy to stamp using the Stamparatus. You simply place the stamp where you want it, use the plate to pick it up, ink it and then stamp it exactly where you want it. If you're local to me and want to have a go, just get in touch! If you aren't, there are a heap of videos online showing how to use it.

scissorspapercard, Stampin' Up!, Sale-A-Bration, Beautiful Peacock, Birthday Memories DSP

The peacock in the middle was stamped free hand - no Stamparatus. You can definitely tell, as it's not lined up as well as on the front. Oh well!

Bye for now,

Tina