Hi!
I hope you are all staying safe and staying home - we certainly are! I thought it might mean more crafting time, but supervising the kids with their school work and being Rob's coffee lady is running me off my feet! I had a quick half hour to throw a card together for this week's Just Add Ink challenge though. Rachael has given us a soft, pretty colour combo to work with.
I'm not quite sure why, but every time I looked at the colours I immediately thought of gingham!
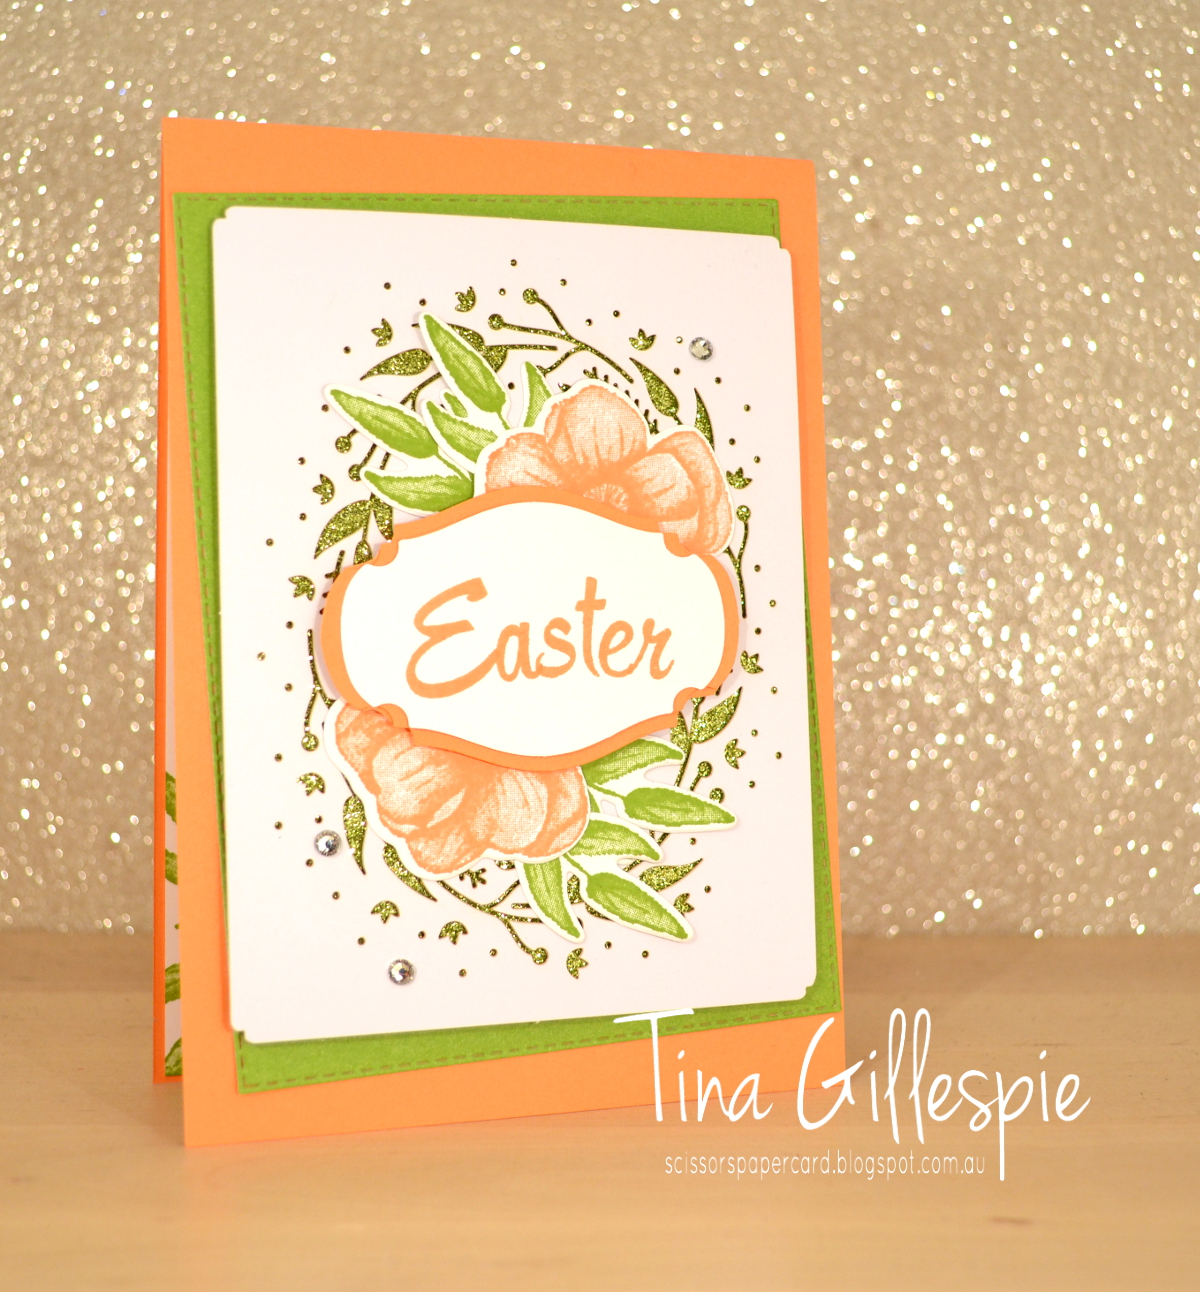
Thankfully each of the colour family DSP packs has this gorgeous gingham paper! I layered some Balmy Blue Gingham DSP under the rectangular die cut from the Nature's Thoughts Dies. I love the pretty stitching effect on the border of the die cut. The two layers were popped up on a Whisper White Notecard, which is smaller than a regular card base. The die cut rectangle fits perfectly!
I used my Balloon Bouquet Punch to create the Easter Eggs. All I had to do was snip off the bottom part of the balloon - the knotted bit - and turn the shapes upside down. Easy! The sentiment is from the new Timeless Tulips stamp set. The whole sentiment is not something I'd ever use, so I took my snips to the stamp and just chopped off the Happy Easter bit.
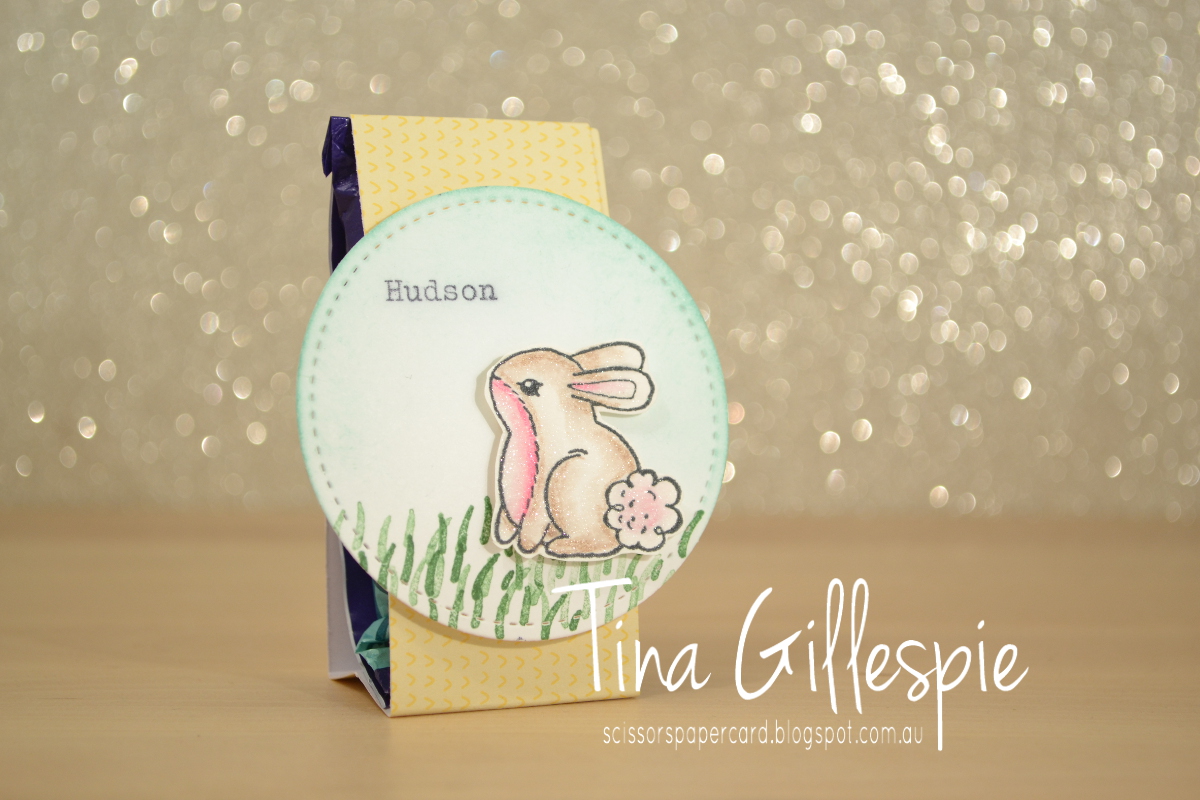
The Balloon Bouquet Punch crops two balloons each time, so I used the remaining three on the inside of my notecard. I didn't have a sentiment to put on the inside, so I just left it blank - more room for writing!
Please head on over to check out the Just Add Ink blog. You can find the links to the other Design Team cards, and you can also add your card to the challenge gallery. I can't wait to see what you do with these colours!
Bye for now,
Tina
Showing posts with label Easter. Show all posts
Thursday, 2 April 2020
Sunday, 29 March 2020
CTC #266 Week 1: Easter Cards
Hi!
Hello, and welcome back! I hope you're all coping well with the new social restrictions. It might be difficult but it's so important! My household is bunkered down, and so far so good! But anyway, on with the reason why you're here - the new CASEing The Catty Sunday Challenge Blog Hop! We are starting a new challenge this fortnight, just in time for Easter!
All you need to do is create an Easter project using our sketch to guide you! Easy!
I don't usually make Easter cards, so I actually found this one a little difficult!
I started by colouring the flowers from Flowering Foils. I'd fussy cut them a couple of weeks ago, which was very handy! I used Soft Sea Foam, Petal Pink and So Saffron Stampin' Blends, as I wanted a soft colour palette. I just coloured quickly, no blending, but using both Light and Dark markers.
The flowers became my rectangular element, as I cut an oval from the Soft Sea Foam So Very Vellum SDSP pack. It's very subtle, but that's how I wanted it to be. Speaking of subtle, I nearly reached for my Subtle 3DEF for the background, but them I recalled the Country Floral 3DEF, which I haven't used for ages! It fit the floral theme nicely.
I cropped the vellum oval for the front from a larger piece of Vellum, with the intention of using the left over piece on the inside. The writing panel was coped from the largest Stitched So Sweetly die. Do you remember the sentiments I've used? They are from a long retired set, called Well Scripted. I don't have any current Easter sentiments, so I had to reach into my retired stamp sets!
Our challenges are run through our Facebook group, so please pop on over there to join in with the fun. It's easy to join if you aren't already part of the group. When you've made your card, just add your picture to the group.
But now it's time to continue on with the Hop. Next up is the fabulous Judy May with her gorgeous card.
Bye for now,
Tina
Thursday, 28 March 2019
AWH BLog Hop: Easter
Hi!
This card uses the front of the kit card with the Granny Apple Green Glimmer paper peeking out from behind the wreath laser cut piece. Under that is part of the kit card base, cropped with the largest Rectangle Stitched Die. I originally cropped the front of the card, not realising that the back go the card was also printed. The front has a subtle wash effect and I didn't want to cover it with the wreath, so I ended up cropping the back and using it instead.
The word Easter was stamped using the Brushwork Alphabet stamp set, as I don't have any current stamp sets with an easter sentiment. I layered the Story Label Punch over a flower and foliage from the Painted Seasons Stamp set. You may notice there are two flowers, but I said 'a flower'. That's because I snipped one in half, as I'd already cleaned and put away the stamp before I realised I wanted a second flower for the front. A quick snip and it was problem solved!
I don't have Easter suitable inside sentiments, so I left the inside of this card blank, apart from some more Painted Seasons leaves and a flower.
So now I had one finished card and a cropped Rectangle Stitched panel, so I decided t make a second Easter card, using the other pieces of the kit card that I didn't use on the first card.
I wanted to keep the front of this card a bit more simple so that you can see the wash effect on the Granny Apple Green piece. It's subtle, but very nice! This time I used my Labeler Alphabet stamp set to make the front sentiment. The label, Twine and Grapefruit Grove striped circle were all parts from the kit, I just added a few Wooden Elements Butterflies.
The label has a silver border, so I decided to make the butterflies silver too. I simply took a silver Sharpie and coloured the wood. Done! It's a matte silver, but it looks really nice in real life.
I'll probably send this card to my mum, so I added the 'with love' to the inside. Now I just have to remember to send it!
Well, that's it from me, now it’s time to hop on over to our next participant, the very talented, Vicki Boucher.
If you find a broken link or have come to this blog hop from a different entry point, you can view the participants below:
Catherine Proctor
Caroline Manwaring
Sue Madex
Kate Morgan
Ros Davidson
Kathryn Mangelsdorf
Rachel Palmieri
Rebecca Jacovou
Judy May
Rachel Woollard
Christina Barnes
Tina Gillespie
Vicki Boucher
Bye for now,
Tina
Tonight the Art With Heart team are sharing creative projects with an Easter theme. Do you make Easter cards or gifts? I usually don't, but I decided to join in the Blog Hop anyway!
Don’t forget, Sale-A-Bration ends on March 31st! There is still time to earn free product with purchase or even join our Stampin’ Up! team. Ask any of the girls on the hop for more details.
I was a bit short for time this week, so I turned to a kit for inspiration. The Incredible Like You kit turned out to be fabulous for this hop. I chose the wreath card, but ended up chopping it up and making two cards. So much for time poor!
This card uses the front of the kit card with the Granny Apple Green Glimmer paper peeking out from behind the wreath laser cut piece. Under that is part of the kit card base, cropped with the largest Rectangle Stitched Die. I originally cropped the front of the card, not realising that the back go the card was also printed. The front has a subtle wash effect and I didn't want to cover it with the wreath, so I ended up cropping the back and using it instead.
The word Easter was stamped using the Brushwork Alphabet stamp set, as I don't have any current stamp sets with an easter sentiment. I layered the Story Label Punch over a flower and foliage from the Painted Seasons Stamp set. You may notice there are two flowers, but I said 'a flower'. That's because I snipped one in half, as I'd already cleaned and put away the stamp before I realised I wanted a second flower for the front. A quick snip and it was problem solved!
I don't have Easter suitable inside sentiments, so I left the inside of this card blank, apart from some more Painted Seasons leaves and a flower.
So now I had one finished card and a cropped Rectangle Stitched panel, so I decided t make a second Easter card, using the other pieces of the kit card that I didn't use on the first card.
I wanted to keep the front of this card a bit more simple so that you can see the wash effect on the Granny Apple Green piece. It's subtle, but very nice! This time I used my Labeler Alphabet stamp set to make the front sentiment. The label, Twine and Grapefruit Grove striped circle were all parts from the kit, I just added a few Wooden Elements Butterflies.
The label has a silver border, so I decided to make the butterflies silver too. I simply took a silver Sharpie and coloured the wood. Done! It's a matte silver, but it looks really nice in real life.
I'll probably send this card to my mum, so I added the 'with love' to the inside. Now I just have to remember to send it!
Well, that's it from me, now it’s time to hop on over to our next participant, the very talented, Vicki Boucher.
Catherine Proctor
Caroline Manwaring
Sue Madex
Kate Morgan
Ros Davidson
Kathryn Mangelsdorf
Rachel Palmieri
Rebecca Jacovou
Judy May
Rachel Woollard
Christina Barnes
Tina Gillespie
Vicki Boucher
Bye for now,
Tina
Thursday, 22 March 2018
AWH March Blog Hop: Easter
Hi!
Welcome to another Art With Heart team Blog Hop.
Tonight the Art with Heart team are sharing creative Easter projects. Don’t forget, Sale-A-Bration has just over a week left for us to earn free product with purchase. It is also a fabulous time to join Stampin’ Up! - just ask any of the girls on the hop for more details.
I don't really make Easter cards, but I do like to send a little something with Hudson to school to give to his school mates each year. He goes to a special school that only has 26 students, so it's not a huge task. Having said that, I do like to keep it simple!
I have used the Tutti-Frutti Cards & Envelopes Sale-A-Bration choice from the first round as the base for my chocolate treat holder. I started by trimming a 3.5cm strip from one card base and then scoring it to fit around the Freddo Frog chocolate that sits inside. I've provided a template at the end of the post so that you know where to score the strip.
From the side you can see that the base of the treat holder is a W for a little stability. It also helps to hold the chocolate in place. The Stitched Shapes Circle is held to the front with a Dimensional, and provides a little slot for the top tab to slide into. You can see the open top in the next photo.
Here you can see that I've stapled the chocolate to the back of the treat holder. I didn't want to add a belly band to each one, so this was a quick and easy way to hold the chocolate in place. Let's face it, the kids just want to rip into the chocolate, so I wanted to make it quick and easy to get to!
To finish, here's a closer look at the cute bunny from Garden Girl. I stamped him on Shimmery White cardstock using Momento ink. He's coloured using my Melon Mambo and Early Espresso Watercolour Pencils and then blended with Wink Of Stella. I typed the name on my typewriter, just for a bit of old school fun!
That's it for me - well, not really, as I still have another 24 of these to make! For you though, it’s time to hop on over to our next participant, the very talented Ros Davidson.
If you find a broken link or have come to this blog hop from a different entry point, you can view the participants below:
Monika O'Neill
Sharon Davern
Caroline Manwaring
Tina Gillespie
Ros Davidson
Rachel Woollard
Rebecca Jacovou
Catherine Proctor
Kathryn Mangelsdorf
Fiona Ryan
Judy May
I don't really make Easter cards, but I do like to send a little something with Hudson to school to give to his school mates each year. He goes to a special school that only has 26 students, so it's not a huge task. Having said that, I do like to keep it simple!
I have used the Tutti-Frutti Cards & Envelopes Sale-A-Bration choice from the first round as the base for my chocolate treat holder. I started by trimming a 3.5cm strip from one card base and then scoring it to fit around the Freddo Frog chocolate that sits inside. I've provided a template at the end of the post so that you know where to score the strip.
From the side you can see that the base of the treat holder is a W for a little stability. It also helps to hold the chocolate in place. The Stitched Shapes Circle is held to the front with a Dimensional, and provides a little slot for the top tab to slide into. You can see the open top in the next photo.
Here you can see that I've stapled the chocolate to the back of the treat holder. I didn't want to add a belly band to each one, so this was a quick and easy way to hold the chocolate in place. Let's face it, the kids just want to rip into the chocolate, so I wanted to make it quick and easy to get to!
Here's my template. Cutting the strip 3.5cm wide means that you can get 4 of these from one card base without any waste. The kit is American sizes, so you may need to adjust a bit if you're using a different sized card base. The score line third from the left is the one that comes pre-done on the card base.
To finish, here's a closer look at the cute bunny from Garden Girl. I stamped him on Shimmery White cardstock using Momento ink. He's coloured using my Melon Mambo and Early Espresso Watercolour Pencils and then blended with Wink Of Stella. I typed the name on my typewriter, just for a bit of old school fun!
That's it for me - well, not really, as I still have another 24 of these to make! For you though, it’s time to hop on over to our next participant, the very talented Ros Davidson.
Bye for now,
Tina
If you find a broken link or have come to this blog hop from a different entry point, you can view the participants below:
Monika O'Neill
Sharon Davern
Caroline Manwaring
Tina Gillespie
Ros Davidson
Rachel Woollard
Rebecca Jacovou
Catherine Proctor
Kathryn Mangelsdorf
Fiona Ryan
Judy May
Friday, 20 March 2015
JAI #255: Just Add Eggs or Ovals!
Hi!
This week at Just Add Ink we are challenging you to add Eggs or Ovals to your papercrafting. While at this time of year it is a chance for you to show us your Easter crafting, it doesn't have to be Easter related - any eggs or ovals are fine, as long as they are a feature on your card.
I don't usually make Easter cards, so I don't have any Easter stamp sets. It was an easy problem to solve though, I just browsed through my My Digital Studio downloads until I found something suitable. This little cutie came from the Eggstra Spectacular Stamp Brush set.
I coloured the images with my Blendabilites. I think the little sheep is so very super cute!
With a little bit of digital cropping and pasting I created the rows of Easter Eggs to liven up the inside of the card.
So what will you do with ovals or eggs? Pop on over to the Just Add Ink blog to see what the other Design Team members have created this week.
Bye for now,
Tina
Labels:
Blendabilities,
Challenge,
Design Team,
Easter,
Just Add Ink,
My Digital Studio
Friday, 29 March 2013
JAI #159: Just Add A Bunny
Hi!
Woo hoo! It's the long weekend - and an extra long weekend at that!
This week at Just Add Ink Kim has challenged us to Just Add A Bunny to your projects. While it's an obvious reference to Easter, you don't need to make an Easter Card, you just need to include a bunny.
I made this basket as a sample for my support group. They made two baskets each and the group facilitator provided some Easter Eggs to fill them. It was chaotic madness, but lots of fun!
The basket was made using 4 Scallop Envelope die cuts. It makes a sweet little basket, perfect for Easter.
I hope you can find some stamping time this extra long weekend so you can play along with us this week at Just Add Ink.
Bye for now,
Tina
Subscribe to:
Posts (Atom)