Hi!
Welcome to the new Just Add Ink challenge. This week Jo has found this gorgeous Inspiration photo for us to use to spark our creativity. Wouldn't your heart sigh when you met a friend at this cafe? It's so pretty!
I was particularly taken by the colours in the photo, so I pulled out my Petal Pink, Call Me Clover, Melon Mambo and Whisper White cardstock and off I went!
I started with the Beautifully Detailed Laser Cut panel. It's so pretty, and the opening in the middle made me think of a window like the one in the Inspiration Photo. I popped it up over a panel of Petal Pink and then set all that over lots of Call Me Clover layers.
I was very excited to realise that the Everyday Label punch is the perfect match for the opening in the laser cut paper. I don't know why I was surprised, as coordination is one of Stampin' Up!'s hallmarks! The Whisper White label on it's own wasn't enough, so I cropped an extra two from Call Me Clover card and layered them underneath to give a narrow border.
I used the Sprig punch on both the front and inside to provide a base for the flowers. Did you know that the punch had carried over from the Holiday Catalogue? Not long now 'til we know if it will appear in the new Annual Catalogue!
Why not pop on over to the Just Add Ink to see the rest of the Design Team's cards, and to link up yours? Can't wait to see how your creativity is sparked by the Inspiration photo.
Bye for now,
Tina
Showing posts with label Painted Seasons (SAB). Show all posts
Thursday, 4 April 2019
Thursday, 28 March 2019
AWH BLog Hop: Easter
Hi!
This card uses the front of the kit card with the Granny Apple Green Glimmer paper peeking out from behind the wreath laser cut piece. Under that is part of the kit card base, cropped with the largest Rectangle Stitched Die. I originally cropped the front of the card, not realising that the back go the card was also printed. The front has a subtle wash effect and I didn't want to cover it with the wreath, so I ended up cropping the back and using it instead.
The word Easter was stamped using the Brushwork Alphabet stamp set, as I don't have any current stamp sets with an easter sentiment. I layered the Story Label Punch over a flower and foliage from the Painted Seasons Stamp set. You may notice there are two flowers, but I said 'a flower'. That's because I snipped one in half, as I'd already cleaned and put away the stamp before I realised I wanted a second flower for the front. A quick snip and it was problem solved!
I don't have Easter suitable inside sentiments, so I left the inside of this card blank, apart from some more Painted Seasons leaves and a flower.
So now I had one finished card and a cropped Rectangle Stitched panel, so I decided t make a second Easter card, using the other pieces of the kit card that I didn't use on the first card.
I wanted to keep the front of this card a bit more simple so that you can see the wash effect on the Granny Apple Green piece. It's subtle, but very nice! This time I used my Labeler Alphabet stamp set to make the front sentiment. The label, Twine and Grapefruit Grove striped circle were all parts from the kit, I just added a few Wooden Elements Butterflies.
The label has a silver border, so I decided to make the butterflies silver too. I simply took a silver Sharpie and coloured the wood. Done! It's a matte silver, but it looks really nice in real life.
I'll probably send this card to my mum, so I added the 'with love' to the inside. Now I just have to remember to send it!
Well, that's it from me, now it’s time to hop on over to our next participant, the very talented, Vicki Boucher.
If you find a broken link or have come to this blog hop from a different entry point, you can view the participants below:
Catherine Proctor
Caroline Manwaring
Sue Madex
Kate Morgan
Ros Davidson
Kathryn Mangelsdorf
Rachel Palmieri
Rebecca Jacovou
Judy May
Rachel Woollard
Christina Barnes
Tina Gillespie
Vicki Boucher
Bye for now,
Tina
Tonight the Art With Heart team are sharing creative projects with an Easter theme. Do you make Easter cards or gifts? I usually don't, but I decided to join in the Blog Hop anyway!
Don’t forget, Sale-A-Bration ends on March 31st! There is still time to earn free product with purchase or even join our Stampin’ Up! team. Ask any of the girls on the hop for more details.
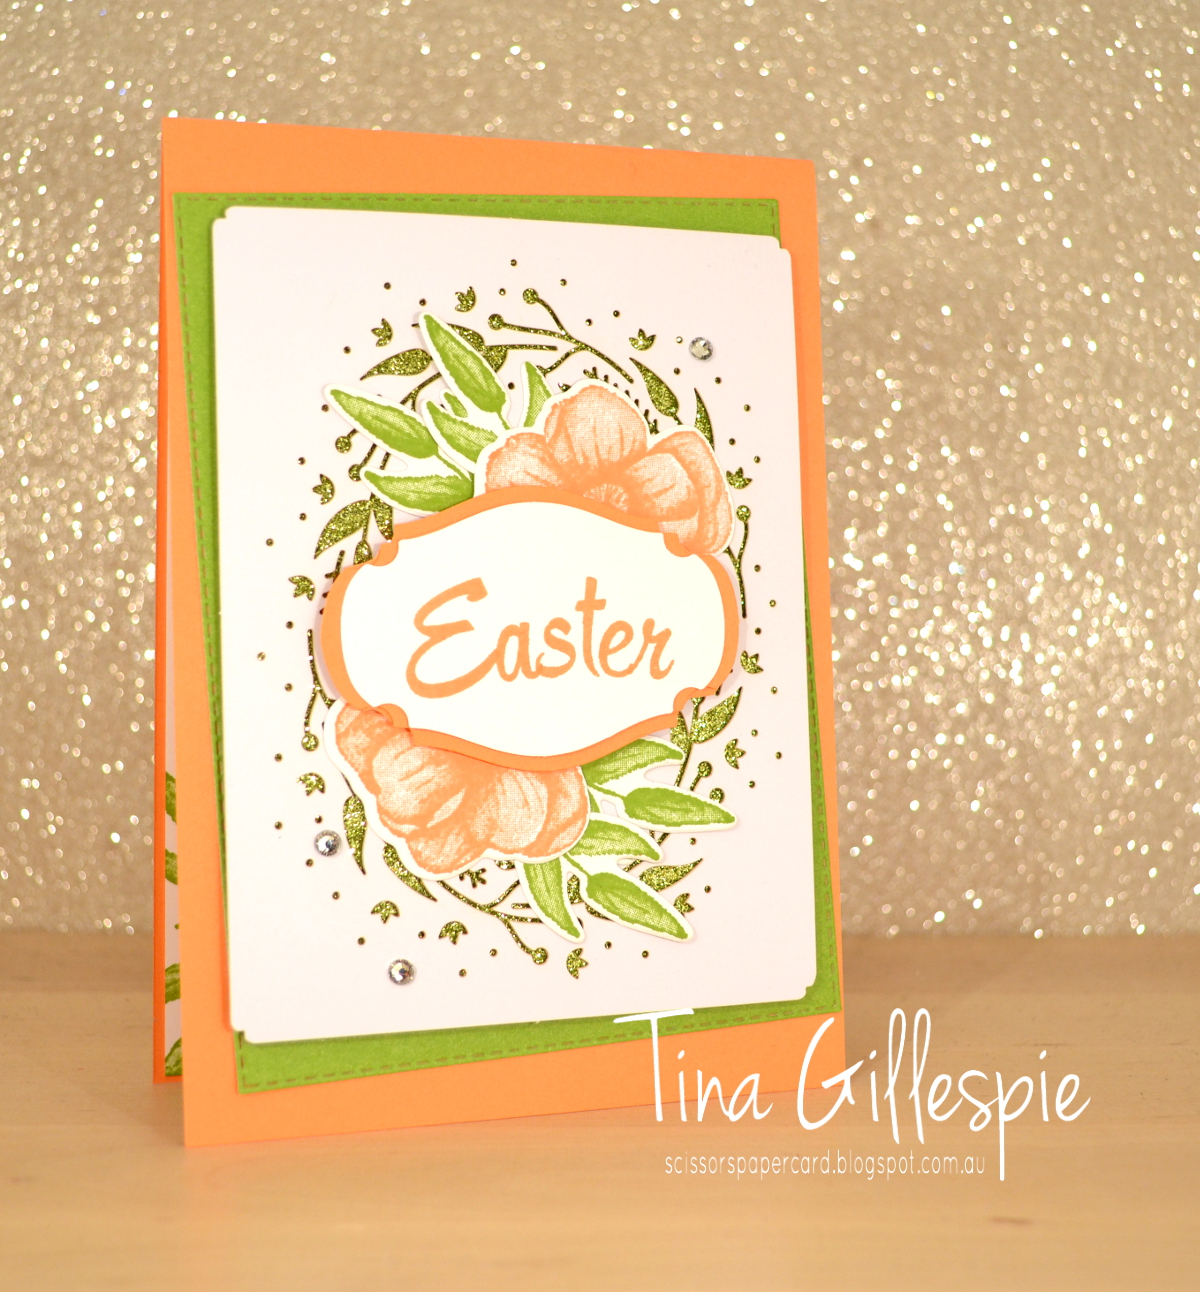
I was a bit short for time this week, so I turned to a kit for inspiration. The Incredible Like You kit turned out to be fabulous for this hop. I chose the wreath card, but ended up chopping it up and making two cards. So much for time poor!
This card uses the front of the kit card with the Granny Apple Green Glimmer paper peeking out from behind the wreath laser cut piece. Under that is part of the kit card base, cropped with the largest Rectangle Stitched Die. I originally cropped the front of the card, not realising that the back go the card was also printed. The front has a subtle wash effect and I didn't want to cover it with the wreath, so I ended up cropping the back and using it instead.
The word Easter was stamped using the Brushwork Alphabet stamp set, as I don't have any current stamp sets with an easter sentiment. I layered the Story Label Punch over a flower and foliage from the Painted Seasons Stamp set. You may notice there are two flowers, but I said 'a flower'. That's because I snipped one in half, as I'd already cleaned and put away the stamp before I realised I wanted a second flower for the front. A quick snip and it was problem solved!
I don't have Easter suitable inside sentiments, so I left the inside of this card blank, apart from some more Painted Seasons leaves and a flower.
So now I had one finished card and a cropped Rectangle Stitched panel, so I decided t make a second Easter card, using the other pieces of the kit card that I didn't use on the first card.
I wanted to keep the front of this card a bit more simple so that you can see the wash effect on the Granny Apple Green piece. It's subtle, but very nice! This time I used my Labeler Alphabet stamp set to make the front sentiment. The label, Twine and Grapefruit Grove striped circle were all parts from the kit, I just added a few Wooden Elements Butterflies.
The label has a silver border, so I decided to make the butterflies silver too. I simply took a silver Sharpie and coloured the wood. Done! It's a matte silver, but it looks really nice in real life.
I'll probably send this card to my mum, so I added the 'with love' to the inside. Now I just have to remember to send it!
Well, that's it from me, now it’s time to hop on over to our next participant, the very talented, Vicki Boucher.
Catherine Proctor
Caroline Manwaring
Sue Madex
Kate Morgan
Ros Davidson
Kathryn Mangelsdorf
Rachel Palmieri
Rebecca Jacovou
Judy May
Rachel Woollard
Christina Barnes
Tina Gillespie
Vicki Boucher
Bye for now,
Tina
Thursday, 14 March 2019
JAI #448: Just Add J
Hi!
It's time for a new Just Add Ink challenge. This week it's one of my alphabet challenges, with the letter J coming up for our inspiration. Hmmm, what can you do with the letter J? A stamp set, technique, colour?
I decided to go for a fancy fold and make a Joy Fold card. It's been a while since I've made one, I'm not sure why because they are so easy and have a huge impact. For some reason my mind went to Christmas (joyeux noel - another J!), so that's what I did for my card.
Once again I used the gorgeous Painted Seasons stamps and DSP for my card. I was a little worried that the green patterned paper would be too busy and dominate, but by the time I had adhered the second 'card' I realised that you can't actually see much of the DSP.
To make a Joy Fold card you take a tent fold card and chop off half of the front. Lay it on the side, decorate with DSP and then cut a smaller card and adhere it on the inside of the base with the fold facing the other way. Decorate this and you're done! I added the circle with the pinecone on the front so that the smaller card tucks under and keeps it shut.
So there you have it, a Joyous Noel Joy Fold card. What will you make? Join in the fun over at the Just Add Ink blog, where you can see what the rest of the Design team have created with J, and also link up your own J card.
Bye for now,
Tina
Tuesday, 5 March 2019
A Christmas Pool Party
Hi!
Welcome to the latest Colour Creations Blog Share. This week we are making cards using Pool Party. Thankfully it's a colour I love as it's been a busy week and I was struggling a bit for inspiration. If you're a regular visitor to my blog you may have seen this card that I made for CASEing The Catty. It happened to be sitting on my desk when I sat to make my card for Colour Creations and so I decided to CASE my CASE of a catalogue card!
It was so easy to do, as conveniently Pool Party is one of the colours in the Painted Seasons DSP. So instead of Sunday's wintery Christmas card, I now have a summery, succulent Christmas card.
I CASEd myself nearly exactly, only switching out the paper, stamps and colours. Why mess too much with something I was happy with? The stitched elements all work so well together, don't you think?
So, yay! Another Christmas card added to the stash, and it's only March. Haha, I don't think I'll keep up the pace though - it's always a mad rush in November, or even December if I'm being honest with myself LOL.
That's it from me, now you can hop on over to Catherine's blog to see the cards that the rest of the team have created using Pool Party.
Bye for now,
Tina
Sunday, 3 March 2019
CTC #218: Sale-A-Bration
Hi!
It's the end of the weekend - boo - so it's the for the new CASEing The Catty blog hop - yay! The blog before mine was the lovely Lauren and I'm the last stop if you started at the beginning. If not, just keep hopping - the link to the next blog will be at the end of the post.
This week we are back to CASEing the Sale-A-Bration catalogues. You can choose something from either of the two brochures. This week my eye was caught by the Christmas card in the second release brochure. Did you notice it?
The Painted Seasons suite covers all the seasons, and the concept artist has made a Christmas card for winter. Which is weird for Australia, but let's not let a little weird stop us!
I sort of reversed the card, by cropping a piece of Poppy Parade cardstock using the Rectangle Stitched Thinlits. I then popped it up over the top of a piece of the winter DSP and adhered the whole lot to my Poppy Parade base.
Keeping with the stitched theme, I cropped a circle and a long, skinny rectangle for the sentiment. The pine cones were stamped using the Painted Seasons stamp set - one in Soft Suede, the other in Crumb Cake.
This was then repeated for the inside of the card. Yay, one more Christmas card to add to the stash!
That's it from me. Don't forget our Facebook group, where you can add your card for the week's challenge. Just click on the image below.
First though, if you have't finished the hop, jump on over to see what the lovely Michelle has made this week.
Bye for now,
Tina
Thursday, 28 February 2019
AWH February Blog Hop: Sale-A-Bration
Hi!
Tonight the Art With Heart team are sharing creative projects using products available for FREE when you make a minimum purchase during Sale-A-Bration. For every $90 (AUD) you spend before postage, you can choose FREE products from the brochure.
• If you spend $90, you get one free level 1 product.
• If you spend $180, you get one free level 2 product, OR, you can choose two level 1 items.• If you spend $270, you have the option to choose three level 1 items or one level 1 item and one level 2 items.
The Sale-A-Bration promotion is current now until March 31st. Be sure to request your copy of the brochure today if you don’t already have one. Sale-A-Bration is also a great time to join our fabulous team - just ask any of the girls on the blog hop for more details!
Let's get straight into it! I made a card using quite a few Sale-A-Bration items, from both the first and second release brochures. I started with a Lovely Lipstick Foil Sheet, as I haven't really played much with them. You can earn them from the first release brochure, in a pack with Grapefruit Grove Foil sheets.
Sitting on the top of my desk was the new Country Floral DTIEF, so I thought, why not? The Foil looks amazing embossed in the floral design. It's so hard to capture in a photograph, as the light bounces off it everywhere! On my base card and a few scraps of Whisper White, I also stamped some leaves from the second release Painted Seasons bundle. The stamp set comes in a bundle with a gorgeous DSP pack, and it can be yours free with a spend of $180.
How cute is that little flower? You can see that the shape of it mimics some of the flowers in the Country Floral DTIEF. I've actually used a combination of a wooden flower from the Butterfly Elements (first release) and a retired flower punch. I can't recall the name of the set, but it came with a heart and a star, possibly even a circle in the punch pack. The punch is nearly the same shape as the wooden flower! I used a Sharpie to colour the wood and then glued the punched Lovely Lipstick Foil flower on top. Finally, I added a Basic Black Faceted Dot to finish it off.
I had a left over scrap of the embossed foil so, after stamping some more leaves, I added it to the inside. You know me - waste not, want not!
That's it for me - did you keep track of how many Sale-A-Bration items I used?
Now you're off to see what the lovely Ros Davidson has created.
If you find a broken link or have come to this blog hop from a different entry point, you can view the participants below:
Sue MadexTina GillespieRos Davidson Kathryn MangelsdorfRachel WoollardRebecca JacovouCaroline ManwaringClaire DalyKate MorganJudy MayCatherine Proctor
Bye for now,
Tina
PS: The answer was four Sale-A-Bration products 😉
Tonight the Art With Heart team are sharing creative projects using products available for FREE when you make a minimum purchase during Sale-A-Bration. For every $90 (AUD) you spend before postage, you can choose FREE products from the brochure.
• If you spend $90, you get one free level 1 product.
• If you spend $180, you get one free level 2 product, OR, you can choose two level 1 items.• If you spend $270, you have the option to choose three level 1 items or one level 1 item and one level 2 items.
The Sale-A-Bration promotion is current now until March 31st. Be sure to request your copy of the brochure today if you don’t already have one. Sale-A-Bration is also a great time to join our fabulous team - just ask any of the girls on the blog hop for more details!
Sitting on the top of my desk was the new Country Floral DTIEF, so I thought, why not? The Foil looks amazing embossed in the floral design. It's so hard to capture in a photograph, as the light bounces off it everywhere! On my base card and a few scraps of Whisper White, I also stamped some leaves from the second release Painted Seasons bundle. The stamp set comes in a bundle with a gorgeous DSP pack, and it can be yours free with a spend of $180.
How cute is that little flower? You can see that the shape of it mimics some of the flowers in the Country Floral DTIEF. I've actually used a combination of a wooden flower from the Butterfly Elements (first release) and a retired flower punch. I can't recall the name of the set, but it came with a heart and a star, possibly even a circle in the punch pack. The punch is nearly the same shape as the wooden flower! I used a Sharpie to colour the wood and then glued the punched Lovely Lipstick Foil flower on top. Finally, I added a Basic Black Faceted Dot to finish it off.
I had a left over scrap of the embossed foil so, after stamping some more leaves, I added it to the inside. You know me - waste not, want not!
That's it for me - did you keep track of how many Sale-A-Bration items I used?
Now you're off to see what the lovely Ros Davidson has created.
Sue MadexTina GillespieRos Davidson Kathryn MangelsdorfRachel WoollardRebecca JacovouCaroline ManwaringClaire DalyKate MorganJudy MayCatherine Proctor
Bye for now,
Tina
PS: The answer was four Sale-A-Bration products 😉
Subscribe to:
Posts (Atom)