Hi!
Gosh, these Sunday's seem to be rolling around quickly! That's good, though, as that means it's time for the CASEing The Catty Sunday Challenge Blog Hop. This week we are CASEing our Favourite Retiring Big Shot Project. Whether you came from Julia's blog, or are starting here, just keep hopping until you get back to where you started.
Once again, I have far too many favourites to pick just one, so I decided to go with a die set that I thought hadn't seen enough love from me - the Window Box Frameilts. They are a fun set that is designed to make a sweet octagonal box, but I mostly got the set so that I could make a pop up card with it. Sadly, I didn't ever make one, so this was my chance to do so.
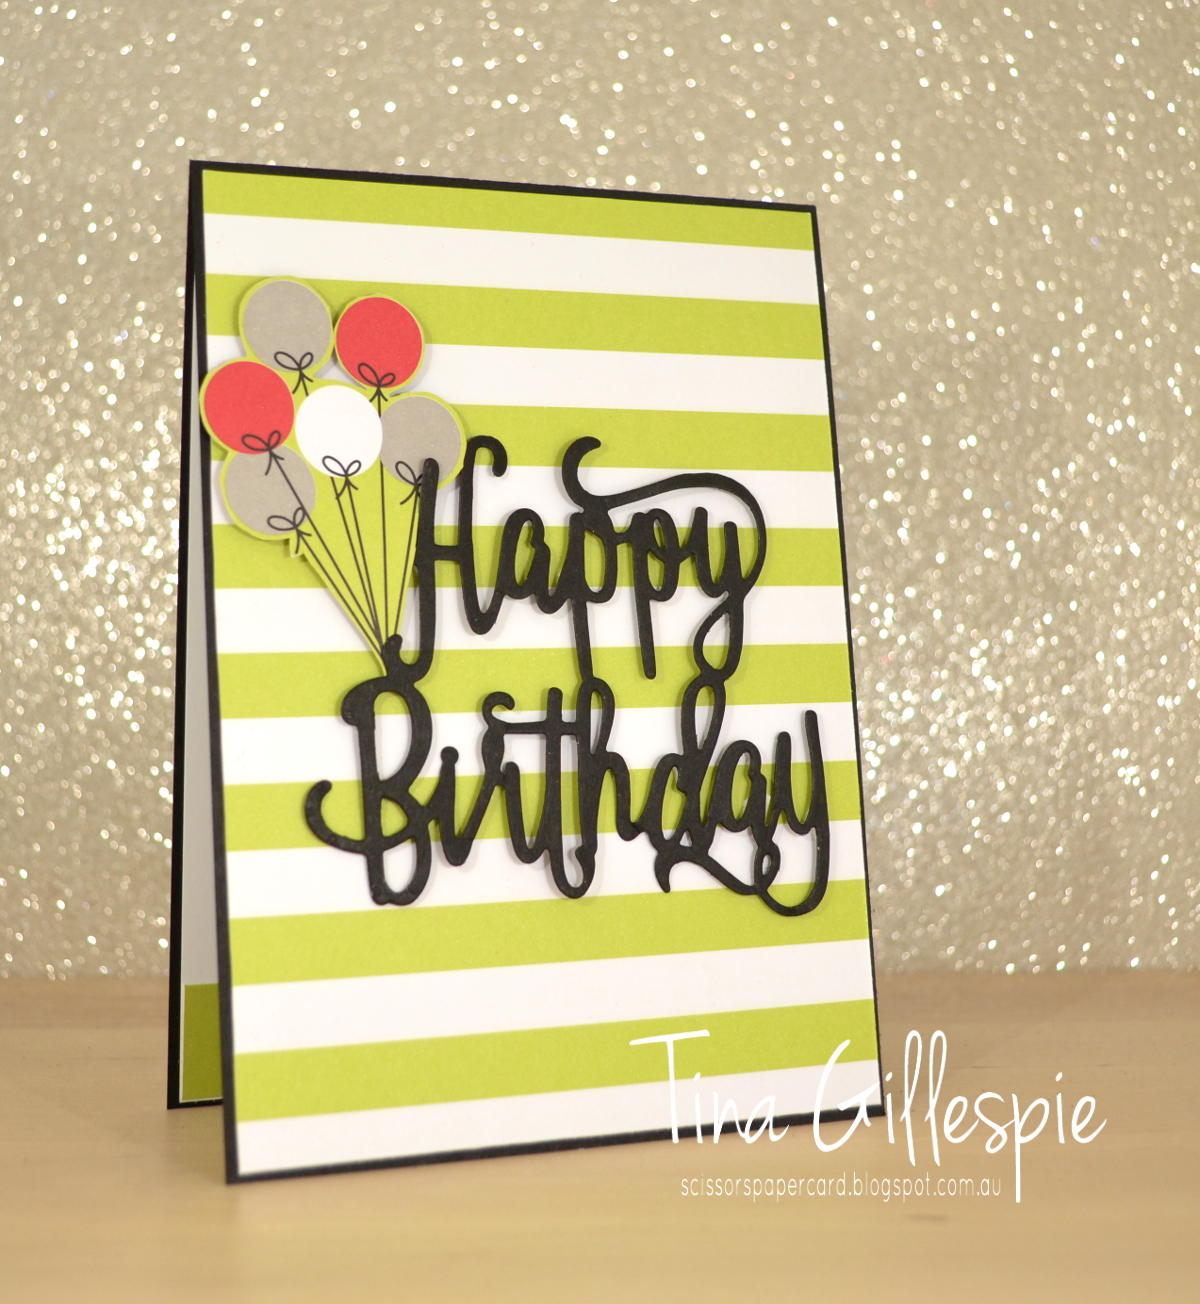
I have a friend trying 50 next month, so I decided that this would be an extra special card for him. I know his party colours are black and red, so the Broadway Bound SDSP was the perfect choice! I followed this tutorial to make the card base. It was very easy to follow, but she doesn't tell you which flaps to chop off, so do look at the pictures closely!
The word 'celebrate' is held up with two thin strips of Window Sheet. I cut two of the words and sandwiched the ends of the acetate between them. I then adhered the bottom the strips to the flap in the middle of the card.
I decided to add 50 balloons to the card - that's a lot of fussy cutting! I adhered some flat, but a lot of them were adhered using Dimensionals to give added dimension. Some even had two layers of Dimensionals to pop them out even further!
Here's a look at the back of the card - the only place to write a message! The writing panel also adds some strength to the back to keep it standing straight.
The beauty of this card is that it folds flat to allow it to be mailed. Well, flatish after all the Dimensionals I used! This card will be given in person, though, so I didn't mind that it got a bit bulky.
That's it for me! Will you join or challenge this week? What's your favourite retiring Big Shot item? Is it a die set, or maybe an embossing folder? Your can enter our challenge over in our Facebook group.
Before you do, don't forget to finish the blog hop. There's lots of lovely projects to see, including Michelle's Medallion card, which is up next!
Bye for now,
Tina
Showing posts with label Broadway Bound SDSP. Show all posts
Sunday, 26 May 2019
Thursday, 24 January 2019
JAI #441: Just Add Inspiration
Hi!
Yay for a new Just Add Ink challenge! This week Jo has found this gorgeous Inspiration Photo for our challenge. I'm hungry just looking at it!
Those cupcakes look very yummy, but I think I'd have to scrape half of the icing off! My kids would be more than happy to eat it for me, I think.
I've looked past the colours this week, and decided to give my new Birthday Cheer bundle a run.
As soon as I saw the Edgelits in the Occasions Catalogue, I knew I wanted to try an Easel card using them. I love how they pop off of the top of the page as an outline, but when you close the card they are filled in.
The Broadway Bound SDSP is a great pair for the bundle. I really love this metallic confetti paper.
The little heart on the inside has come from the cupcake on the right. It is just the right size to keep the easel card open, and is a cute addition to the inside of the card, don't you think?
The rest of this week's yummy cards can be found over at the Just Add Ink blog, where you can also link up your card for the challenge. Can't wait to see what you whip up (LOL!) using the picture as inspiration.
Bye for now,
Tina
Tuesday, 20 November 2018
Lemon Lime, But No Twist
Hi!
Welcome to the new Colour Creations Blog Share for this week.
This week we are looking at Lemon Lime Twist - a colour that I originally thought 'OMG, what are they thinking???', but have since come to love! It's such a bright, fresh colour.
I've been pondering over this card for the past 2 weeks or so. It's my first 'post Orlando trip' card, but I've been thinking about it on and off while I was away. I knew I'd be jet lagged, so I wanted a simple card that wouldn't take too much brain power to put together, but still looked fabulous. Hence, the 'Lemon Lime, but no Twist' title of my post, LOL.
The basic design was set pretty much from the start - the LLT stripes on a Basic Black card with the BB die cut. I liked the boldness of the colours and simplicity of the design.
I worried that it was a little too simple though, so I added the fussy cut balloons from the Broadway Bound SDSP pack (which is also where the striped DSP came from). Overall, I was pleased!
Oooh, did you notice that the inside contains a little sneak peek? The cupcake was also fussy cut from the Broadway Bound SDSP, but the sentiment is from a stamp set from the upcoming Occasions Catalogue called Amazing Life. It's a really fun birthday set.
As always, you can find the rest of this week's cards over at Catherine's blog. I can't wait to see what everyone has made!
Bye for now,
Tina
Wednesday, 10 October 2018
Saved!
Hi!
Welcome to the new Heart Of Christmas Blog Share. I think we are up to about week 9 now, and so far I've managed to make a card each week. It's so nice to be well on my way to having my Christmas cards finished for 2018.
Today's card came about after a little experiment didn't go as well as I'd hoped. I was wanting to see if I could used Isocol to activate Brushos powder over the top of an image stamped in Momento ink. Momento is designed to with with Blends, so water would have made the ink run. As it turns out, it does work, just differently than it would with water.
I chose the Brilliant Red Brushos because I was making a Christmas card, and red is Christmassy - right? Unfortunately, as one of my Facebook followers said, she was getting a serial killer vibe after I asked if it looked too much like blood splatter. LOL! Despite this, I was determined to make it work on a card, so after a bit of a think, this is what I made. The layout was a CASE of this card by my friend, Judy May.
Red ornament, minus the serial killer blood splatters! Yay! I recently hosted an ATC swap with a Glitter Window technique theme, so it seemed a brilliant solution to my problem. Basically, you cut a hole in your card, run some clear packing tape across the back so that the sticky side is up, and then dump glitter over the top. Our Dazzling Diamonds is perfect for this, because you can still see through it. Finally, you adhere a stamped image behind the window so that you can see it through the window.
A little bit of detail is lost when you do this technique, so to make the bauble look more like a bauble I took an old black marker (in case I ruined it) and coloured bits of the design to make them a lot bolder. I was pretty pleased with the overall effect. What do you think? Did I redeem the bauble?
The bauble had done my head in by this point, so a super simple inside was definitely in order!
You can see the rest of this week's cards over at Claire's blog. I love seeing what everyone makes each week.
Bye for now,
Tina
Monday, 8 October 2018
Broadway Bound CASE
Hi!
Today I have a card for you that I CASEd from another SU Demonstrator. I love how demos from all around the world share their work so that we can all be inspired!
The demo I CASEd from is Kristi Grey, and you can see her original card here. I didn't really change a lot, I just made it a little more 'class friendly' as I made it as a sample for a card class I ran.
How fabulous is the Broadway Bound SDSP? The Gold Foil accents through the paper are gorgeous. I especially love the confetti paper.
Kristi didn't show the inside of her card, so I just did what I liked there. It's a little tricky stamping on the Gold Foil paper as it's a glossy surface, so we used Stazon ink. The effort is worth it though - who doesn't like a bit of glam on a card?
Bye for now,
Tina
Subscribe to:
Posts (Atom)