Pages

Showing posts with label Work Of Art. Show all posts

Monday, 5 February 2018

CTC #164: Occasions Catalogue Kits

Hi!

EDIT: I was so excited to be a Crew Pick for this card!


I'm pretty happy to be 4 for 4 with the CASEing The Catty Challenges this year. They are announced each Sunday evening, and I've been mostly able to get straight into the challenge and get a card made pretty quickly. This week the challenge is the kit cards from pages 14-17 of the Occasions Catalogue. I don't have either kit, so I had to improvise. My card is a CASE of one of the trio at the bottom of page 17.

scissorspapercard, Stampin' Up!, CASEing The Catty, Soft Sayings, Work Of Art, Bunch Of Blossoms, Dragonfly Dreams, Picture Perfect Birthday

The card in the catalogue is square, but I decided to make a full sized card. I used exactly the same colours and ribbon, but I had to use different stamps. I remembered that the Soft Sayings kit had a similar flower stamp, and so I decided to use it.

scissorspapercard, Stampin' Up!, CASEing The Catty, Soft Sayings, Work Of Art, Bunch Of Blossoms, Dragonfly Dreams, Picture Perfect Birthday

I stamped the swoosh from Work Of Art, the flower and the leaves from Soft Sayings, and then I spritzed the cardstock lightly with some water. Once it dried I stamped the sentiment from Bunch Of Blossoms. I finished it off with the Berry Burst ribbon and some retired Pearls for the centre of the flower. The dotty stamp from Dragonfly Dreams provides a nice background for the main panel.

scissorspapercard, Stampin' Up!, CASEing The Catty, Soft Sayings, Work Of Art, Bunch Of Blossoms, Dragonfly Dreams, Picture Perfect Birthday

I used a few of the same stamps on the inside to finish off the card. It's always so much nicer to have a finished inside, don't you think?

Bye for now,

Tina

Monday, 6 June 2016

Black Mambo Swirls

Hi!


I've been having a lot of fun playing with the new Swirly Bird bundle. I'm sure you've seen a lot of cards made using the bundle on the internet! I especially love the scribbly circles in the Swirly Scribbles Thinlits. I've been wishing for a set like this for ages. For today's card, I decided to go for a bold colour combo and let the die cuts shine.


It's been a while since I've used Basic Black, Melon Mambo and Whisper White together. They work beautifully together. On this card the front of the card is not full sized. I adhered the wavy die cut a couple of centimeters in from the right edge and then trimmed carefully to give a thin black border. The white you see on the front is actually the inside of the card.


Here you can see the card open a little more, making it easier to see how it's not a full front. You can also see better that I used silver star sequins on the front, not black as it looks in the first photo. You can also see that the scribbly circle overlaps the new edge of the card.


I punched a 2" Circle to sit behind the scribbly circle and to stamp the sentiment on. It's not a perfect fit, but I still love the look.


I had to remember to stamp the inside sentiment all the way over to the left so that it can't be seen when the card it closed. That's tricky, when the natural inclination is to centre it! I also used some black star sequins to finish off the inside.


Stay tuned for lots more Swirly cards!


Bye for now,


Tina

Monday, 23 May 2016

An English Garden in Honey

Hi!


Today I have another card that was made as a class sample. The main colours used are the retiring Hello Honey, which I paired with Delightful Dijon for a tonal effect on the flowers and the cute little bee.


I tried to replicate the layered flowers in the English Garden DSP in the main stamped panel using the combination of Delightful Dijon and Hello Honey. The leaves were all Old Olive, with the filling image stamped off once first.


You can also see I used a piece of the Delightful Dijon Dotted Lace Trim along the bottom of the main panel. I placed a stripe of adhesive along the back of the panel and then ruffled the ribbon along the adhesive. There's not a lot of gather, but I don't think it needed a lot.


The little honey bees are so cute! I think I've used them every time I've used the Garden In Bloom stamp set - I just can't resist them!


Bye for now,


Tina

Friday, 29 April 2016

JAI #309: Just Add Inspiration

Hi!


Oops! Where did that week go? I'll blame it on school holidays. Ada is away on a Young Carers camp and Alex is doing a 4 day Jamie Oliver Ministry Of Food cooking course and I'm just all out of whack! It's been a bit strange with just Hudson and me home during the day.


But let's get into the Just Add Ink fun for this week. Jodene has given us this gorgeous Inspiration picture for our inspiration.


Can't you just imagine snuggling under that throw on a cold winter day? And the colours are just divine!


I started by choosing my colours. I went with Watermelon Wonder, Blushing Bride and Pool Party. I then used them with an Aqua Painter to create the chevron pattern on some watercolour paper. I was watching the final of MKR as I was painting the background, so it's probably a bit uneven as the excitement levels changed!


Once I finished the background I was a little stumped! I didn't want to stamp a sentiment on the watercolour paper as the texture in the paper can make getting a clear image tricky. I ended up using my Hello You Thinlits with some Watermelon Wonder cardstock. I used a few teeny tiny pieces of Dimensionals to pop it up off the background.


I cheated a little on the inside. I wanted to use more of the chevrons, but this time I decided to use the stamp from Work Of Art and my markers. The sentiments are from Endless Thanks.


The Just Add Ink Design Team has interpreted the inspiration picture in so many fabulous ways. You can see their cards over at the Just Add Ink blog. What inspires you?


Bye for now,


Tina

Friday, 15 January 2016

JAI #294: Just Add Something New Blog Hop

Hi!

http://just-add-ink.blogspot.com.au/2016/01/just-add-inkadd-something-new-blog-hop.html

At Just Add Ink we always like to start the year off with a blog hop to showcase the first challenge of the year.

This year Rochelle has suggested we all "Just Add Something New". Now I know that won't be hard for the Stampin Up! demonstrators out there as the new Occasions catalogue and Sale-a-bration promotions have started! If you don't have anything new from SU! please join us using whatever new product you have and be sure to let us know what it is.

To make the blog hop extra special the design team have donated new SU! SAB items as prizes to the winner and two honorable mentions participants. Please note, to be eligible, you must create a "NEW" project using "SOMETHING NEW TO YOU" and leave a comment on all the design team blogs, be or become a JAI follower and blog your project exclusively linked to Just Add Ink. Any entrants that link to additional challenges will be disqualified. (The prizes are open to both international and AUS/NZ participants).

We look forward to kicking the year off with a celebration of new crafty goodness and inspiration and hope you will join the challenge with us.

I've decided that my 'something new' is both the Beautiful Ride stamp set (from the Occasions Catalogue) and the Perfectly Artistic DSP pack (from the Sale-A-Bration Catalogue). Recently, on a very hot night where there was nothing much on the TV, I stamped a few of the Beetle images on Watercolour Paper and sat and coloured them with my Stampin' Write Markers and Blender Pen.  I decided to use one of them for this Hop, but when it came down to it I couldn't choose a favourite image to use, so I just used all three!

Colours used: Basic Black, Blackberry Bliss, Soft Sky and Crumb Cake
Stamp Sets: Beautiful Ride, Number Of Years


I love that this set is Photopolymer, which makes stamping the dog in the Blackberry Bliss version and the surf board in the Crushed Curry version super easy.

Colours Used: Basic Black, Crushed Curry, Soft Sky, Cucumber Crush, Pacific Point and Basic Grey


I hope the surf board on the inside looks like it's propped up against a wall, or similar. I was a little worried it looks a bit strange!

Colours Used: Basic Black, Soft Sky, Watermelon Wonder, Smokey Slate
Stamp Sets: Beautiful Ride, Work Of Art, Lighthearted Leaves


Whoops!  I used Lighthearted Leaves before I realised it has retired.


Here are the three together.  You can clearly see I've used the same layout for each, this was to keep things quick and simple.  By the time I'd coloured the images and then fussy cut them, quick and simple was looking good! I've used the 'Watercolour' side of the DSP rather than the 'Marbled' side as I wanted the softer look for the background.

You can begin the blog hop here on my blog or at any of the other design team members blog posts. Just follow the hop by clicking on the back or previous buttons you will find at the bottom of all the design team posts. Or you can start Here at the beginning.


http://springblossommusings.blogspot.com.au/2016/01/just-add-ink-294-just-add-something-new.html
Before you go, don't forget that there are prizes on offer for this challenge, but you must follow a few easy guidelines to qualify. You can find these at the top of my post, or at the Just Add Ink blog.

Bye for now,

Tina

Wednesday, 12 August 2015

Another Work Of Art CASE

Hi!

Last Wednesday I showed you a card I'd CASEd using the Work Of Art stamp set to create a flower.  Today I have another CASE that uses the stamps to create a sailboat.  Again - so very clever!


I really loved this card and was keen to make it when one of my class ladies showed me a picture of it.  I'm a bit of a blue person so all the blues really appealed!


We used the stars from the star border punch on the flag (I'm drawing a blank on it's name right now!).  They were a little fiddly to stick down but worth the effort.


The swooshy stamps are great for adding a subtle background to a sentiment.

Bye for now,

Tina

Wednesday, 5 August 2015

Work Of Art Flower CASE

Hi!

Is Work Of Art one of those stamp sets that you look at and think 'what on earth would I use that for'? Me too. Well, I used to think that.  Now I've seen so many fabulous cards that some very creative people have made using the stamps that I think it's a fantastic, versatile set.  Today's card is a CASE of one such creative use.  I don't even know where the idea started, as there are so many versions of the card out on the web.


I love the way the smaller swooshy stamp can be used to create a flower.  So clever!


You just stamp the swoosh 5 times.  Some of the time I didn't reink before stamping again.  Easy!


I liked the card so much that I did two versions - a Thank You and a Thinking Of You.


Bye for now,

Tina

Friday, 29 May 2015

JAI #264: Just Add A Sketch

Hi!

Are you ready for another Just Add Ink Challenge?


This week Kim has designed a sketch to inspire our creativity.


It's a fabulous sketch and the Design Team have done a great job with it.  I decided to use some of my new Bohemian DSP paired with Perfect Peacock.


I really love the jewel colours in the DSP and thought they worked perfectly with the peacock image.


Just for something different I popped only the stamped circle and left the Bermuda Bay circle flat against the card.  I contemplated putting the Bermuda Bay circle behind the Blacberry Bliss banner, but I don't think it looked as good.


I haven't stamped a sentiment on the inside yet - I'm not sure what I want to put there yet.

I hope you are inspired by Kim's sketch and have time to play along with us at Just Add Ink this week.

Bye for now,

Tina

Friday, 16 January 2015

Neutral Perfect Peacock

Hi!

Are you a lot like me? Do you waste spend a lot of time blog surfing and looking at cards on the Internet?  Sometimes too much time? Sigh....

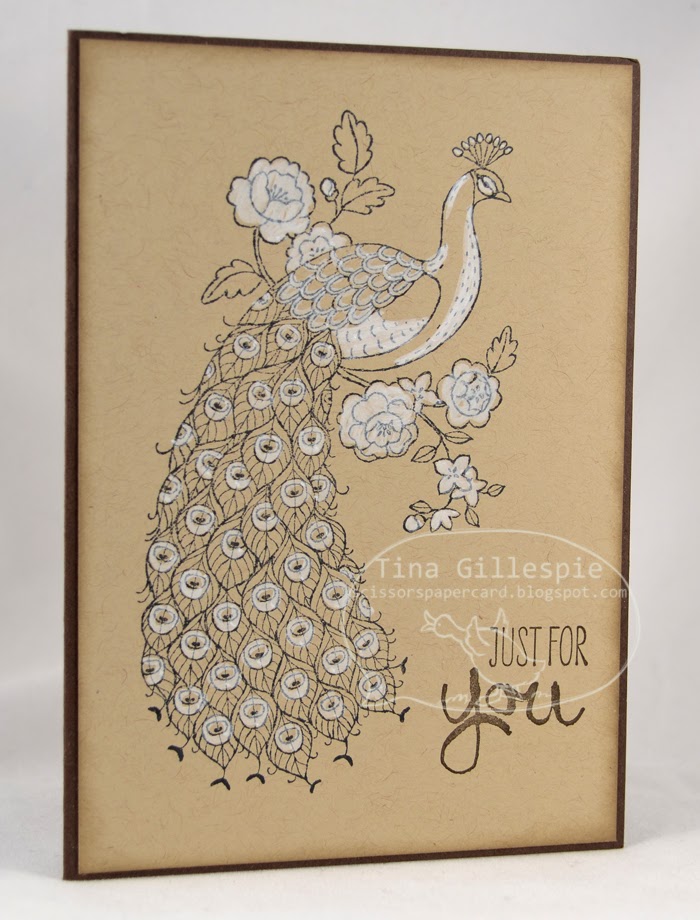
Often it is worth it as you find a lovely card to CASE.  The card I'm showing you today was made as a sample for a card class.  I found it while blog browsing, and it proved to be a popular one for my class ladies.


You can see the original card here. Sue is, in fact, my upline and I quite enjoy browsing her blog! There were a few differences, but only minor.  Sue coloured her card using a Blender Pen and Whisper White Craft Ink.  I used the Chalk Marker on mine.  I also stamped my sentiment straight onto the card, while Sue used some punches.


It's such a gorgeous stamp that it really doesn't need much to make it spectacular.


We stamped the peacock again on the inside in Crumb Cake ink on Crumb Cake cardstock to give a lovely, subtle image.  I think it looks really pretty.

Bye for now,

Tina

Monday, 12 January 2015

Shabby Chic Cards

Hi!

Last year in one of my card classes I had a request for a shabby chic card.  It's not a style I make often, but it is a style I enjoy doing, so I was quite happy to grant the request.


I used the Lullaby DSP pack to provide the background and colour scheme for the card.  I'm a bit of a fan of pink and brown colour schemes - in this case it was Baked Brown Sugar and Crisp Cantaloupe.


We stamped with the two best sets for shabby/grungy cards - Gorgeous Grunge and Work Of Art.  Shabby Chic also requires a feminine touch, hence the butterflies, doily and pearl.


The inside was finished off with a sentiment from Remembering Your Birthday and some more butterflies.


I liked the card so much that I decided to make a second version, this time using the Gold Soiree Specialty DSP as a background.  I'm not sure which one I like best.  What do you think?

Bye for now,

Tina

Friday, 9 January 2015

Work Of Art Sunflower

Hi!

It seems a little strange to be posting something on a Friday that isn't a Just Add Ink challenge.  The Design Team are having a well-earned break and will return later in the month, but I'm just getting back into the swing of regular blogging and I didn't want to stop the momentum.  So today I have for you a card I made as a RAK for a friend.  What's a RAK? It's a Random Act of Kindness - a card out of the blue for no reason at all other than to let someone know you are thinking of them.  Guaranteed to put a smile on the recipient's face!


This was the first card I made when I received my Work Of Art stamp set.  I've seen cards like this around the 'net heaps, so I can't remember which specific one I CASEd unfortunately.


I really love the effect of the 'halo' around the centre of the flower.  Not quite sure how I managed that, but hey, I think it's great!


I used the Hostess set Hello There to create another, far smaller sunflower on the inside.  I had someone in mind when I made this card who loves sunflowers so it was really a no-brainer to include as many as I could on the card!

By the way, she loved the card.

Bye for now,

Tina

Friday, 31 October 2014

JAI #238: Just Add A Sketch

Hi!

Happy Halloween, for those that celebrate the holiday. I don't really, but Rob and the kids do, so celebrate it I must!  Anyway, it's time for another Just Add Ink challenge, and this time Kim has designed a great sketch to inspire our creativity.


I had lots of fun with this sketch.  I cut quite a few Word Bubbles and played around with the positioning of them on the card.  None of it looked right though until I added the On Film film strip underneath.


The Tangello Twist background was created using the zig zag stamp out of Work Of Art, just stamped repeatedly.  I was quite impressed with how well I was able to line it up without the use of my Stamp-a-ma-Jig!


I was able to use the Word Bubbles I'd cut for the front and not used on the inside.  I hate to waste things, so it was a great solution!


I hope you have time to play along with us this week. The Design Team has had a lot of fun with the sketch.  Why don't you pop on over to the Just Add Ink blog to have a look?

Bye for now,

Tina