Pages

Thursday 29 October 2020

JAI #529: Just Add Colour

 Hi!


Welcome back to the new Just Add Ink challenge. This week we have a fabulous colour combo for you, suggested by Kelly.


I never would have thought of pairing Misty Moonlight with Magenta Madness, but I think it's a lovely combo now that I've tried it. And with my favourite metallic, it's just spectacular!

scissorspapercard, Stampin' Up!, Just Add Ink, Blossoms In Bloom, Many Layered Blossoms Dies, Stitched Rectangles Dies,

I started with one of the retired Silver Foil card bases and added a piece of Misty Moonlight cardstock that I'd cropped with the largest of the Stitched Rectangles Dies. I realised after I'd glued it down that I'd also planned to emboss it with the Subtle 3DEF. Oops!

scissorspapercard, Stampin' Up!, Just Add Ink, Blossoms In Bloom, Many Layered Blossoms Dies, Stitched Rectangles Dies,

The flower layers were cut from Magenta Madness and Silver Foil using the Many Layered Blossoms Dies. Thank goodness for the adhesive sheets especially the the foil layer! I popped up the whole piece over the Moonlight layer. It took a lot of Dimensionals, but it's worth it so that it doesn't sag. The sentiment is from the coordinating stamp set, Blossoms In Blooms, cropped using another Stitched Rectangle Die.

scissorspapercard, Stampin' Up!, Just Add Ink, Blossoms In Bloom, Many Layered Blossoms Dies, Stitched Rectangles Dies,

The inside was made with off cuts from the front! I had a spare corner in the sheets of Magneta and Foil, so I popped one of the single flowers in the space, to be die cut at the same time as the main flowers. It looked a little bare sitting straight over the Whisper White card, so I ended up stamping the flower in Misty Moonlight underneath. The Misty Moonlight frame around the writing panel is just the off cut from the front piece, with an extra Whisper White die cut in the middle.

That's all from me for now, so it's time to pop on over to the Just Add Ink blog, where you'll find the rest of this week's Design team cards. You can also add your card to our challenge linky. I can't wait to see what you make using this week's colours.

Bye for now,

Tina

Wednesday 28 October 2020

Colour Creations: Just Jade

 Hi!


Welcome back to this week's Colour Creations Showcase. This week we are highlighting one of the newest In Colours - Just Jade. It's what I'd call a dusky green, and is a shade that I really like. Despite that, I haven't used it much, yet. After this week's showcase, I may find myself reaching for it a little more!

scissorspapercard, Stampin' Up!, Colour Creations, Stitched Triangles Dies, Peace & Joy Bundle, Stitched Stars Dies, Subtle 3DEF, Dainty Diamonds 3DEF, Itty Bitty Christmas

I started by using my Stitched Triangles dies to cut a heap of isosceles triangles from Just Jade cardstock. I then threw them into my Subtle 3DEF and ran it though my Big Shot. I didn't want the embossing to go in the same direction on each triangle, although it seems that in trying to be random, two have ended up the same! Oh well.

scissorspapercard, Stampin' Up!, Colour Creations, Stitched Triangles Dies, Peace & Joy Bundle, Stitched Stars Dies, Subtle 3DEF, Dainty Diamonds 3DEF, Itty Bitty Christmas

I cut some tree trunks from Brushed Metallic foil, and also the word 'peace' from my Joy Dies. The stars are from the swirly die in the Stitched Stars set. All this was layered over the top of a Whisper White layer, embossed with the Dainty Diamonds 3DEF. I like how the pattern could be stars twinkling in the background.

scissorspapercard, Stampin' Up!, Colour Creations, Stitched Triangles Dies, Peace & Joy Bundle, Stitched Stars Dies, Subtle 3DEF, Dainty Diamonds 3DEF, Itty Bitty Christmas

I repeated the trees on the inside, just on a much smaller scale, and the finished off with a sentiment from Itty Bitty Christmas.

As is usual for our Colour Creations Showcase, the list of all participants is over on the lovely Catherine's blog. Please do pop on over to see what everyone has made.

Bye for now,

Tina

Sunday 25 October 2020

CTC #291: CASE A Mini Catalogue Bundle Card

 Hi!


Thank you for joining me for the new CASEing The Catty Sunday Challenge Blog Hop. This week we are asking you to CASE a project from pages 71-75 of the August-December Mini Catalogue, which just happen to be the pages that show all of the available bundles in the catalogue.


That gives you a whopping 30 different projects to choose from! I was a bit tempted to go back and have another go at the Have A Hoot card, which I CASEd a couple of weeks ago. In the end, I opted to try something new, and chose the Snowflake Wishes card on page 73.


I don't have this bundle (which I think is even better for imaginative CASEing!), but I loved the way that the front of the card was split, with the banner dividing the two sections. The designer also used Gold Foil on the card.

scissorspapercard, Stampin' Up!, CASEing The Catty, Peace & Joy, Itty Bitty Christmas, Joy Dies, Heartwarming Hugs DSP, Red Foil

My Heartwarming Hugs DSP has been feeing a little unloved lately, so I pulled it out and selected two of the more subtle patterns. The Real Red went at the bottom, as it was the heavier of the two patterns. I added a thin strip of Red Foil to separate the two DSPs.

scissorspapercard, Stampin' Up!, CASEing The Catty, Peace & Joy, Itty Bitty Christmas, Joy Dies, Heartwarming Hugs DSP, Red Foil

Instead of a banner for my sentiment, I opted to use all three layers of the 'bright' Joy Dies. I started with Pear Pizzazz, then Whisper White, and finally some more Red Foil (yay for adhesive sheets!). They were popped up over the join in the DSPs, and then some holly leaves from Peace & Joy were arranged around them. I had some left over foil with adhesive on the back, so I punched some small circles from the foil and used them for the holly berries.

scissorspapercard, Stampin' Up!, CASEing The Catty, Peace & Joy, Itty Bitty Christmas, Joy Dies, Heartwarming Hugs DSP, Red Foil

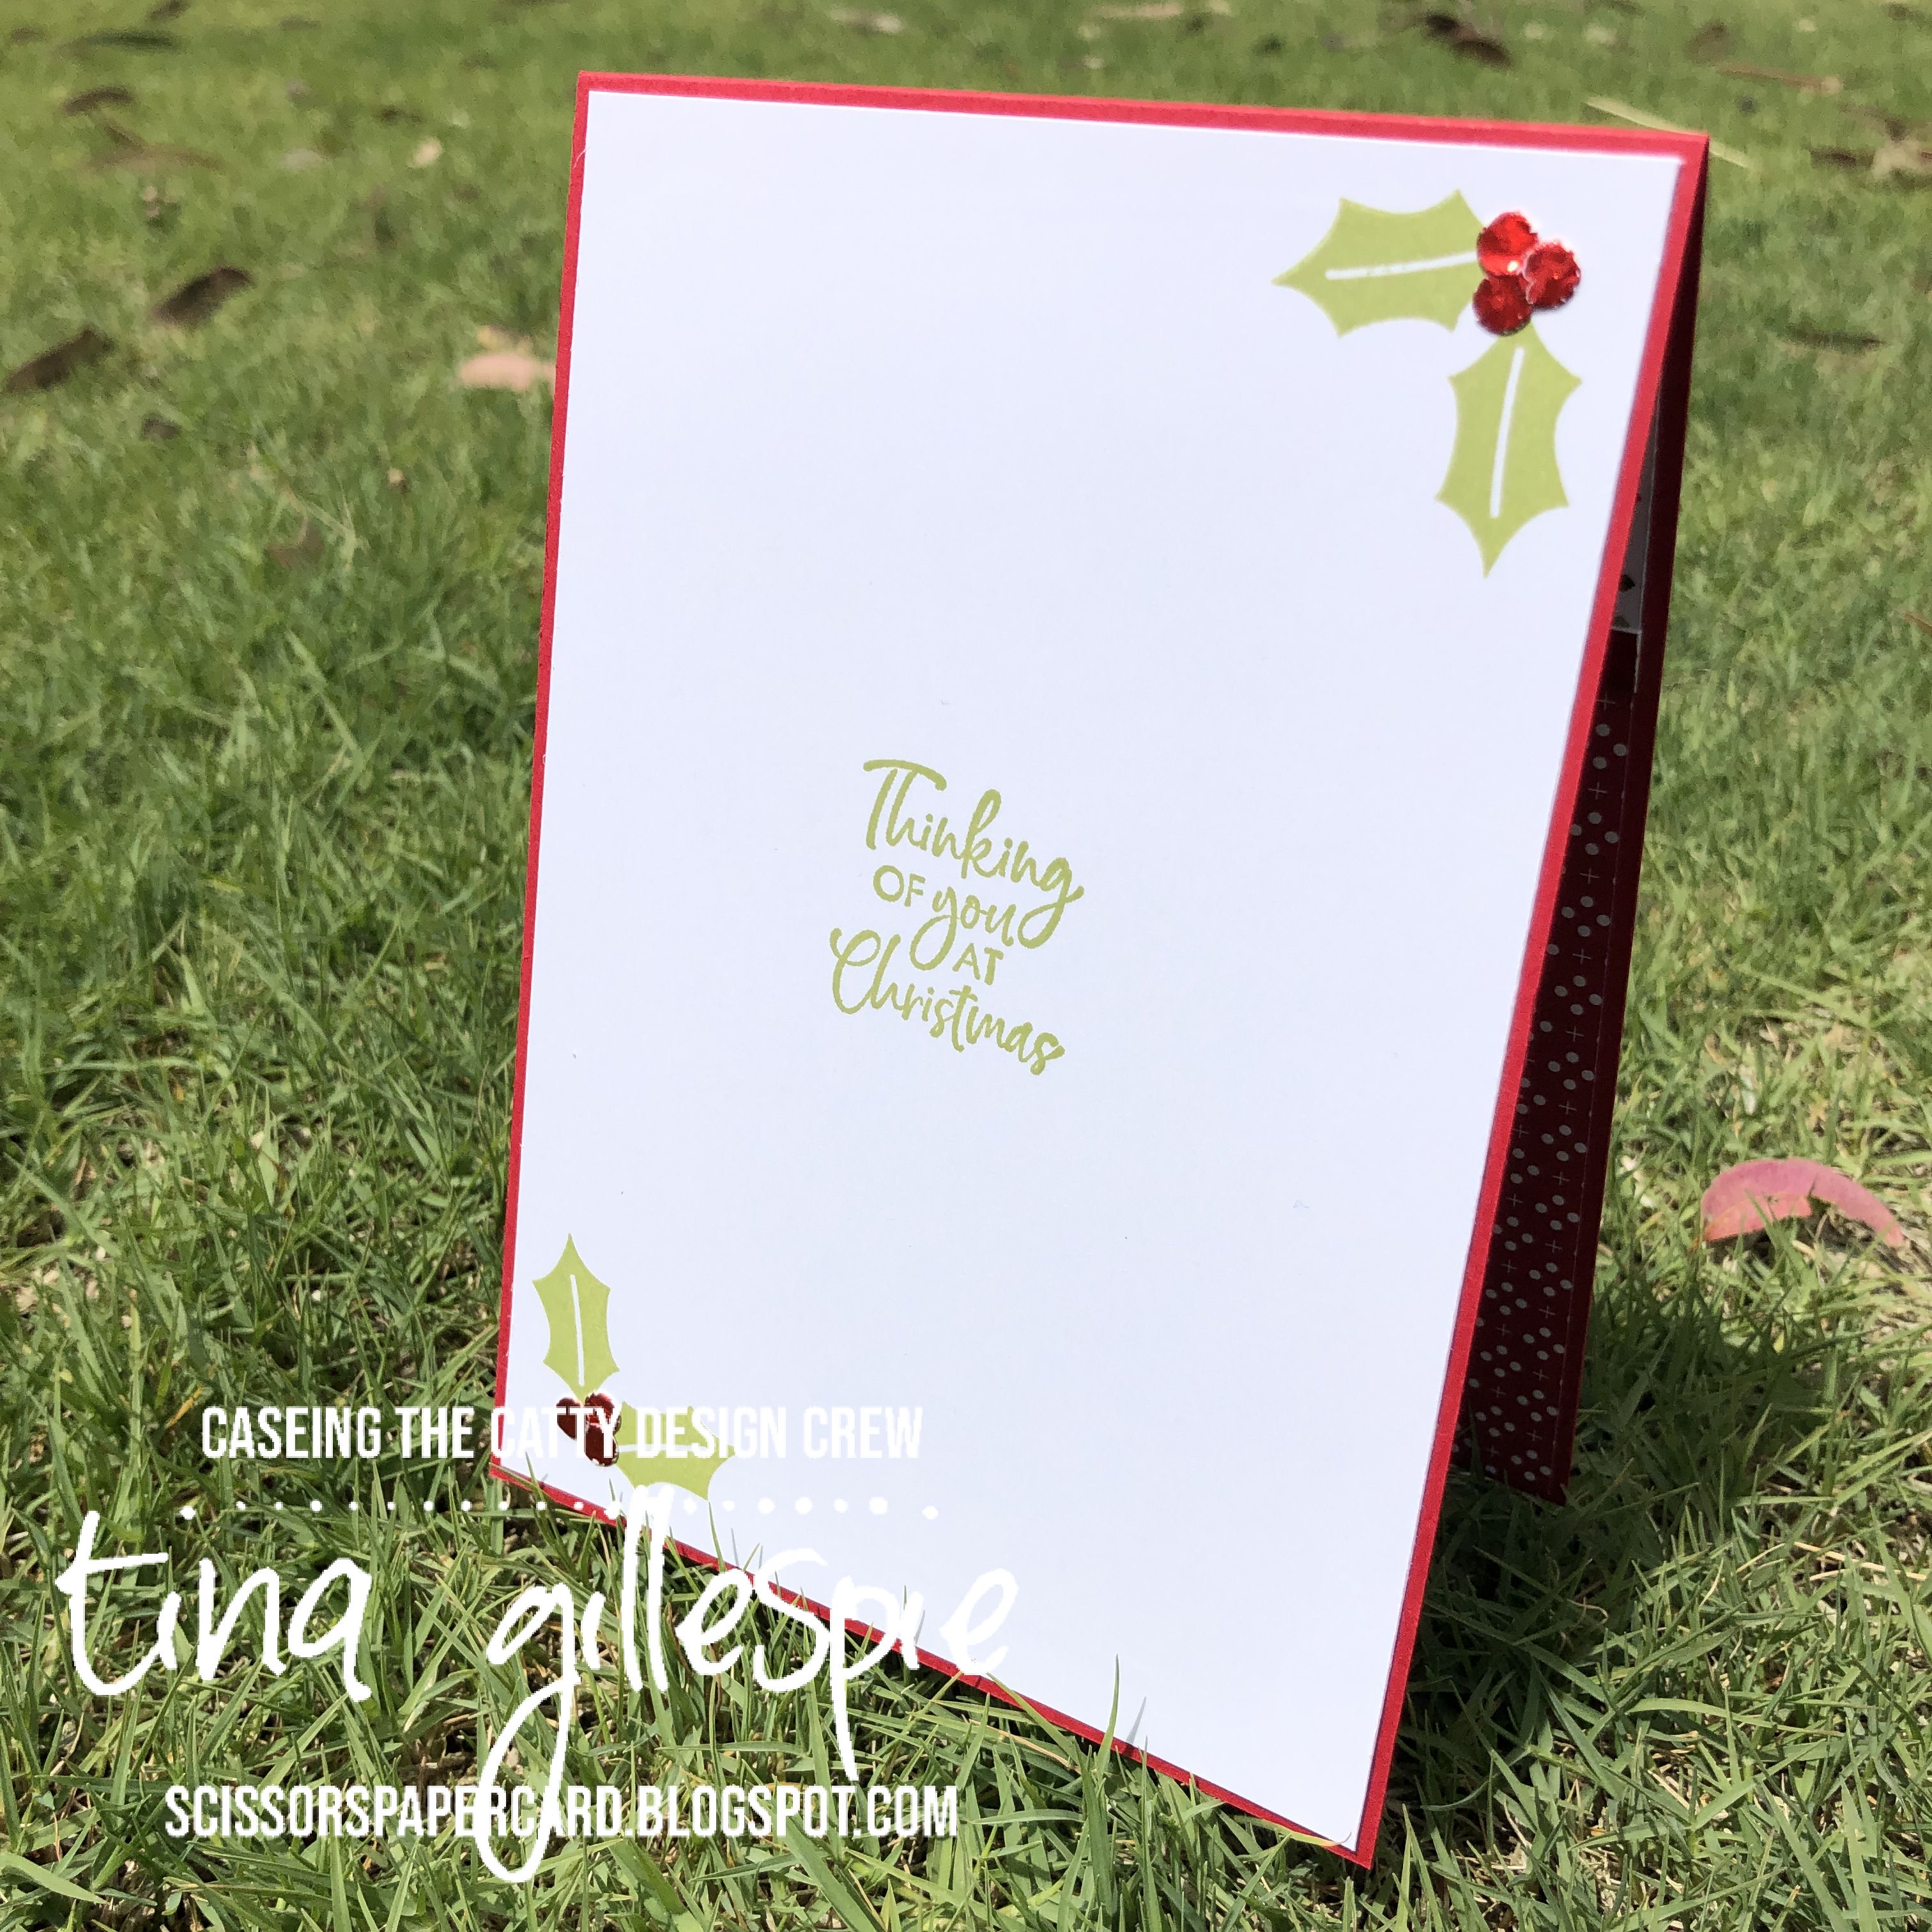
I like the look of the holly, so I repeated it on the inside, to accompany the sentiment from Itty Bitty Christmas. I quite like this card, I may have to try it with some other DSP packs. I think it would look great with the Brightly Gleaming DSP, too.

To enter our challenge - and we'd really love to see what you make - just join our Facebook group and add your picture to the group. You don't need a blog or any fancy camera or software, just snap a photos with your phone and post it in the group. 


Before you dash off to get creating, please do finish the Blog Hop. Next up is the lovely Peta, and her wondercat, Marvi. We all love seeing his adventures each week!

Bye for now,

Tina

Thursday 22 October 2020

JAI #528: Just Choose Two

 Hi!


Thanks for joining me for the new Just Add Ink challenge. This week our Birthday Girl, Jan, has set the challenge, which is to Just Choose Two of Sequins, Ribbon or Metallic Foil. What does that mean? You just choose at least two of the listed items to add to your card - easy!


I was initially going to choose sequins and foil, but my card led me in a different direction.

scissorspapercard, Stampin' Up!, Just Add Ink, Under My Umbrella, Shine On SDSP, Stampin' Blends, Stitched Nested Labels Dies

I started with the background DSP, which is from a retired pack called Shine On SDSP. The silver foil raindrops pair perfectly with Under My Umbrella, don't you think? The ribbon I selected is also retired, but only last year. It's the Granny Apple Green Textured Weave Ribbon.

scissorspapercard, Stampin' Up!, Just Add Ink, Under My Umbrella, Shine On SDSP, Stampin' Blends, Stitched Nested Labels Dies

The images from Under My Umbrella were stamped with Memento ink and coloured with my Blends. I used the Daffodil Delight, Granny Apple Green, Pumpkin Pie, Highland Heather and Flirty Flamingo combos.

scissorspapercard, Stampin' Up!, Just Add Ink, Under My Umbrella, Shine On SDSP, Stampin' Blends, Stitched Nested Labels Dies

I coloured some extra images to use on the inside. I haven't ever done the 'upside down umbrella with flowers inside' before, so this was the perfect time. It's a bit cute!

To enter our challenge, just link up your card over on the Just Add Ink Blog. The hardest part will be choosing which two of the three challenge elements you will use on your card! While you're thinking, check out the rest of the Design Team cards, there's lots of inspiration to be found.

Bye for now,

Tina

Wednesday 21 October 2020

Colour Creations: Highland Heather

 Hi!


It's time once again for the new Colour Creations Creative Showcase! This week we are up to Highland Heather, a soft purple from the Subtles colour family. It's a lovely purple, and the addition of it, and Gorgeous Grape, to the colour line up a few years ago made lots of people very happy.

A couple of months ago I participated in an ATC swap that featured the Faux Mother Of Pearl technique, and I thought it would be a good one to use again with Highland Heather.

scissorspapercard, Stampin' Up!, Colour Creations, Painted Poppies, Painted Labels Dies, Timeless Tulips, Shimmer Paint, Stampin' Blends, Faux Mother Of Pearl Technique

I started by masking off the strip along the bottom of my Thick Whisper White card base with some sticky notes. I then scrunched up some soft plastic wrap and dipped it onto some Frost White Shimmer Paint. I then dabbed the plastic all along the masked off section. You don't want the paint to completely cover the cardstock, so don't be too heavy handed. Once if was dry I sponged some Highland Heather ink over the top, and then peeled away the sticky notes.

scissorspapercard, Stampin' Up!, Colour Creations, Painted Poppies, Painted Labels Dies, Timeless Tulips, Shimmer Paint, Stampin' Blends, Faux Mother Of Pearl Technique

In this extreme side shot you can see the white of the shimmer paint a little better. The poppy was coloured with my Highland Heather Blends and cropped using a Painted Labels Die. The sentiment, from Timeless Tulips, was heat embossed with white embossing powder onto Highland Heather card and cropped with the Banners Pick A Punch.

scissorspapercard, Stampin' Up!, Colour Creations, Painted Poppies, Painted Labels Dies, Timeless Tulips, Shimmer Paint, Stampin' Blends, Faux Mother Of Pearl Technique

The bottom of the inside also has the Faux Mother Of Pearl treatment. I was unsure of how to proceed after applying the Highland Heather ink. I was going to stamp the same poppy as the front, but I though it might look too sparse. Luckily the Painted Poppies stamp set has the row of poppies. Perfect! I considered colouring the poppies that sit above the Faux Mother Of Pearl with my Blends, but I decide I liked them better plain. What do you think?

The rest of this week's links can be found over on Catherine's blog. I can't wait to see what everyone else has made with Highland Heather.

Bye for now,

Tina

Monday 19 October 2020

Heart Of Christmas: October

 Hi!


Once a month in the lead up to Christmas, the Art With Heart team participate in the Heart Of Christmas Creative Showcase. It's a great opportunity for me to build up my stash of Christmas cards - you can never have too many, I always seem to be scrambling to make extras right before Christmas.

scissorspapercard, Stampin' Up!, Heart Of Christmas, Trimming The Town DSP, Home Together Dies, Subtle 3DEF, Layering Circles Dies

If you haven't guessed by now, my favourite Christmas DSP (I think ever) is the Trimming The Town DSP. It has so many possibilities! This time I used the sentiment sheet as a feature. I like chopping it up to use the individual sentiments, but I wanted to stretch myself to use it in different ways. I laid a section of it over a Pool Party base, which I've embossed with the Subtle 3DEF.

scissorspapercard, Stampin' Up!, Heart Of Christmas, Trimming The Town DSP, Home Together Dies, Subtle 3DEF, Layering Circles Dies

I've also added a partial circle of Pool Party, over which I've adhered another circle of the same size in Whisper White that I've cropped with the coordinating Home Together Dies. The house was fussy cut from the Trimming The Town DSP and popped up over the snowy hill. I wasn't in the mood to stamp and colour today, and I love that the Coming Home Suite gives us both options - there's definitely something for all levels of crafters in the suite.

scissorspapercard, Stampin' Up!, Heart Of Christmas, Trimming The Town DSP, Home Together Dies, Subtle 3DEF, Layering Circles Dies

Something a little different on the inside - I usually decorate the bottom of the insert, but the dies are more compatible with decorating the top! Another house and a sentiment, both fussy cut from the DSP, were all that were needed.

As always, my wonderful friend Judy is hosting the Creative Showcase. Please hop on over to her blog, where you will find the rest of the links for this month. There's a lot of talent in the AWH Team, so you won't be disappointed!

Bye for now,

Tina

Sunday 18 October 2020

CTC #290: CASE The Colours of Plaid Tidings DSP

Hi! 

Thanks for joining me on a Sunday evening for the new CASEing The Catty Sunday Challenge Blog Hop. This week we are CASEing the colours of the Plaid Tidings DSP.


There are a lot of colours in the DSP, so there are plenty to choose from! I decided to go with some of the more jewel-like colours of Mango Melody, Melon Mambo, Rich Razzleberry and Pretty Peacock.

scissorspapercard, Stampin' Up!, CASEing The Catty, Well Said, Well Written Dies

I created a template from a piece of Window Sheet by die cutting a couple of circles from the sheet. I used the retired Circles Dies, as the smaller circles were the size I was after. I then just used blending brushes to apply the ink to the cardstock through the template. It's really interesting how the colours interacted where they overlapped.

scissorspapercard, Stampin' Up!, CASEing The Catty, Well Said, Well Written Dies

I cropped three of the 'birthday' dies, from my Well Written Dies, and stacked them to give them depth. I made sure I added a piece of Adhesive Sheet to the back of the Pretty Peacock cardstock before cutting so that I could layer them quickly and easily, without the fuss of liquid glue.

scissorspapercard, Stampin' Up!, CASEing The Catty, Well Said, Well Written Dies

I created the inside at the same time as the front so that I didn't have to keep cleaning the template. I can be a really lazy (or is it efficient?) crafter at times! The stamped sentiments (both on the front and inside) are from Well Said.

EDIT: I was asked about the Window Sheet template that I'd made to use in the creation of my circles. I just used circle dies to cut holes in the Window Sheet, and then applied the ink through the openings. I then shifted the template to add more circles, cleaning between each colour that I used. I hope that helps to explain a little better!


Our weekly challenges are so easy to enter - you just need a Facebook account. Make your card, join our Facebook group if you haven't already done so, and add your photo to the group. Done! We'd love to see what you make each week for our challenges.


I'm officially the last stop on the blog hop this evening, but if you've started part way though you can go back to the start to see what the lovely Siobhan has made. If I'm the last stop for you, go get creating!

Bye for now,

Tina

Thursday 15 October 2020

JAI #527: Just Add A Sketch

 Hi!


Woo Hoo for Friday and the newJust Add Ink challenge! This week Kim has drawn up a fun sketch for us to follow.


That little flourish at the top has so many possibilities!

scissorspapercard, Stampin' Up!, Just Add Ink, Peace & Joy, Joy Dies, World Map Dies, Tim Holtz Mini Globe Die, Glimmer Paper, Smooshing

I've CASEd myself a little bit for this card. I made a similar card in Granny Apple Green last week, and after I did I thought that it would also look great in blue. This sketch gave me the opportunity to try it!. The background is Blueberry Bushel ink smooshed onto Shimmery White cardstock. I kept hold of my Blueberry ink when it retired earlier this year, as it's a wonderful blue that stays blue when you add water. A lot of other blues go grey or purple.

scissorspapercard, Stampin' Up!, Just Add Ink, Peace & Joy, Joy Dies, World Map Dies, Tim Holtz Mini Globe Die, Glimmer Paper, Smooshing

The globe die is a Tim Holtz Sizzix die, called Mini Globe. I cut it twice - once in Basic Black with a layer of Foam Adhesive Sheet, and a second time in Gold Glimmer Paper. I just glued the Gold on top of the black once I'd popped out all the pieces - there were a lot to pop out!

scissorspapercard, Stampin' Up!, Just Add Ink, Peace & Joy, Joy Dies, World Map Dies, Tim Holtz Mini Globe Die, Glimmer Paper, Smooshing

I completed this inside just like my Granny Apple Card - why mess with a good thing? The smaller globe is from the World Map Dies.

You can find the rest of this week's Design team cards over on the Just Add Ink blog, where you can also link up your card once you've made it. Can't wait to see what you do with the sketch.

Bye for now,

Tina

Wednesday 14 October 2020

Colour Creations: Grey Granite

 Hi!


Thanks for joining me once again for the new Colour Creations Showcase. This week (I lose track of the week number) we are looking at Gray Granite. I want to say grey, but SU has said it's gray - it must be one of those colour/color, mum/mom things! Either way, it's a lovely soft grey that is a fabulous neutral.

I was all set to make a masculine card with Gray Granite, but somehow it morphed into a very feminine card!

scissorspapercard, Stampin' Up!, Colour Creations, Daisy Punches, Well Said, Poppy Moments Dies, Subtle 3DEF, Glimmer Paper

I really love the soft grey paired with Whisper White, and so I didn't even consider using anything else this week. I've seen houses painted in this combo, and I absolutely adore it. I started with the split panel under the daisy. It was noted last week that my Granny Apple Green card didn't use an embossing folder, so I have made sure I used on this week. Subtle is fabulous for either masculine or feminine cards. I embossed the whole panel and then cut it into four pieces, adhering each to a Whisper White layer. You will have to trust me on the four pieces - one is hidden under the daisy.

scissorspapercard, Stampin' Up!, Colour Creations, Daisy Punches, Well Said, Poppy Moments Dies, Subtle 3DEF, Glimmer Paper

The daisy has six layers- three of each of the two different punched shapes. I much prefer the fuller look. The petals are slightly curved up, and I've finished it off with some Silver Glimmer Paper. The leaves were cut using the Poppy Moments Dies. I flipped one over and cut from the back side of the Glimmer Paper so that it would curve in the other direction. This suited my layout a little better. A sentiment from Well Said finished off the front.

scissorspapercard, Stampin' Up!, Colour Creations, Daisy Punches, Well Said, Poppy Moments Dies, Subtle 3DEF, Glimmer Paper

I couldn't decide on a sentiment to go on the inside, so I have left it blank for now. I can easily add one (or not) when I decide to use the card. I had one last die cut leaf, so that will do for decoration for now.

The lovely Catherine is once again hosting the Colour Creations Creative Showcase. Pop on over to her blog to find the rest of this week's Gray Granite links.

Bye for now,

Tina

Sunday 11 October 2020

CTC #289: CASE a Halloween Project

 Hi!


Welcome back for the new CASEing The Catty Sunday Challenge Blog Hop. This week we are asking you to CASE a Halloween Project from either of the catalogues.


After a quick flick through both catalogues, I settled on this card from the August-December Mini Catalogue. I really liked the simplicity, and I'm a real sucker for a flicked ink background!


If you're like me, and don't do Halloween, you can still join in - you just need to be inspired by a card. It could be the colours, or a technique, or the layout, it does not have to be the theme. I changed the theme to make a Christmas card.

scissorspapercard, Stampin' Up!, CASEing The Catty, Coming Home, Itty Bitty Christmas, Home Together Dies, Trimming The Town DSP, Balmy Blue Glimmer Paper, Stampin' Blends

My card ended up not looking like the owl card at all! There are still elements of it, though. The flicked background became a Glimmer Paper sky. The moon turned into a house, and the sentiment banner became a sentiment strip. And if I really want to stretch it, there are trees on both cards, LOL.

scissorspapercard, Stampin' Up!, CASEing The Catty, Coming Home, Itty Bitty Christmas, Home Together Dies, Trimming The Town DSP, Balmy Blue Glimmer Paper, Stampin' Blends

Each of the elements were stamped using the Coming Home stamp set, coloured with Blends and then cropped using the Home Together Dies. I finished the front of the card with a sentiment cropped from the Trimming The Town DSP.

scissorspapercard, Stampin' Up!, CASEing The Catty, Coming Home, Itty Bitty Christmas, Home Together Dies, Trimming The Town DSP, Balmy Blue Glimmer Paper, Stampin' Blends

The inside was completed with left overs from the front of the card - an extra little strip of Glimmer Paper trimmed from the front and a few extra trees that I'd coloured but not used. The sentiment is from Itty Bitty Christmas. 

Our challenge is run though our Facebook group, which means that you don't need a blog to enter. Just make your card and upload a picture in the group. Easy! Which Halloween project will you choose to CASE - and how will you choose to CASE it? All the big questions this week!


Next up is the wonderful Siobhan, I wonder which direction she has gone with her Halloween CASEing? Only one way to find out - hop on over to her blog!

Bye for now,

Tina