Pages

Showing posts with label ABC-123 Sketch Alphabet and Numbers. Show all posts

Monday, 17 March 2014

Superman Punch Art

Hi!

A couple of weeks ago we were invited to a very special little boy's 6th Birthday party.  He's right into superheroes (aren't most 6 year old boys?) and so the party had a superhero theme.  Of course I had to make a card to suit the theme.  After scouring the 'net for ideas I found this card by Caroline Bennie with the most perfectly cute Superman.
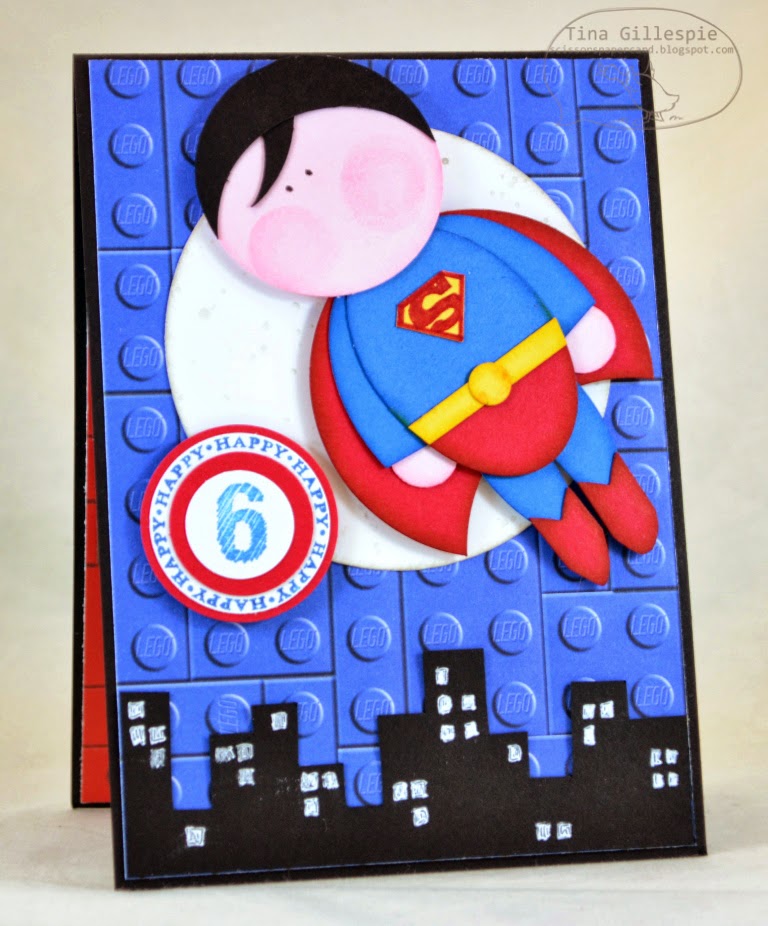

The Lego paper was from my stash, and I'd stuck it down before I realised that a blue Superman on a blue background was probably not going to work too well.  My solution was to make the moon for Superman to fly past.


I used a Circles Collection Framelit to cut the circle and then stamped it lightly with the small splatter stamp from Gorgeous Grunge.  I was trying give the effect of the craters on the moon.  I then created a cityscape by cutting the Basic Black cardstock to replicate buildings and using my white gel pen to add in some lights in windows.


I finished off the inside with a couple more scraps of Lego paper.  The birthday boy loved his card I'm pleased to report. Oh, and thanks to my hubby Rob for creating the logo for the front of Superman's costume.  He's a bit of a superhero nerd so I think he was the best person for the job.

Bye for now,

Tina

Sunday, 3 November 2013

JAI Scrap #23: Just Add Me

Hi!

Are you ready for another scrapbooking challenge from Just Add Ink?

http://just-add-ink.blogspot.com.au/search/label/Scrapbooking%20Challenge

This month it's my turn to set the challenge, and I have decided it's time we all stepped out from behind the camera and scrapped about ourselves.  Whether it's a self portrait, what you like/dislike or something else, the layout needs to be about YOU!


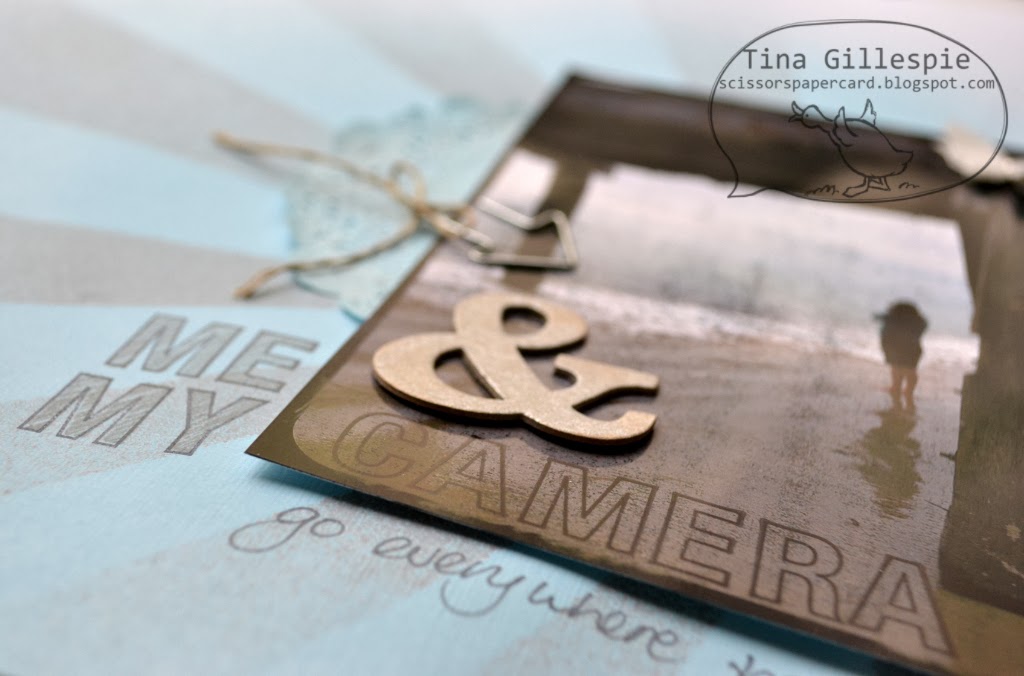
For me, one of my favourite things is my camera.  When we're out and about it's never far from my hands.  Rob took this photo of me on his iPhone. We were at the beach with the kids and spotted some dolphins.  While I was snapping the dolphins, Rob was snapping me!


The title was stamped using my ABC-123 Alphabet sets. I stamped in Basic Grey and Smoky Slate on the cardstock and Black Stazon on the photo.


The butterfly is cut from about 8 layers of Filter Paper using my Big Shot and the smallest butterfly on the Beautiful Butterflies Bigz Die.  I held it all together with a Candy Dot Brad Base, but used a Rhinestone instead of a Candy Dot in the center of the brad.  I finished it off by spritzing it with some Smooch Spritz.  I can't remember the name of it, but it's retired now.


To create the sunburst background I cut a template out of an old overhead projector sheet, laid it on my page and spritzed it with the Smooch Spritzer (still can't remember the name of it!).  I then removed the template and spritzed again with a mix of Isocol and Island Indigo reinker.  I really love how it turned out!  The doilies were spritzed with the same mix.

I hope you can play along with us this month at Just Add Ink.

Bye for now,

Tina

Sunday, 8 September 2013

JAI Scrap #21: Just Add Washi

Hi!

Here we are again, it's time for another Just Add Ink scrapping challenge.


This month Kim has challenged us to use Washi Tape on our layout.  It's great timing, with 2 sets of washi tape available in the Annual Catalogue and another two sets in the Holiday Catalogue. You don't need to use Stampin' Up! washi though, any washi is fine.


I just had to have the Witches Brew Designer Washi Tape from the Holiday Catalogue when I saw it.  I'm not really into Halloween, but I loved the designs on the washi. The photos of my family Trick Or Treating last year worked well with the washi.


I used Gorgeous Grunge to create my background, including stamping the lines behind the title.  I used the coordinating ABC-123 alpha stamps to create the title, which is popped up on Dimensionals.


The zig-zag washi border took me a while to create, but it's worth the effort.  I first scored a very light zig-zag line using my scoring tool and then adhered the first row of washi along the score line.  I then added the second and third line of washi to complete the border.


Here you can see that I used more of the washi to create 'hinges' for my hidden photos and journalling. I applied the washi to both sides of the photo to make the hinges a little stronger.


Well, there you go - a couple of easy ways for you to incorporate washi tape into your layouts.

Stamps: Gorgeous Grunge, ABC-123 Outline Alphabet and Numbers, ABC-123 Sketch Alphabet and Numbers
Ink: Pumpkin Pie, Basic Black
Cardstock: Pumpkin Pie, Basic Black, Whisper White
Other: Sponge Daubers, Dimensionals, Sanding Block, Simply Scored Scoring Tool, Simply Scored Borders Plate

I hope you can play along this month with us at Just Add Ink.

Bye for now,

Tina

Monday, 2 September 2013

Epic Day Father's Day Card

Hi!

Today I have a card for you that I made for a party I did recently.  The request from the hostess was male cards, and as Father's Day was only a week away at that time I decided to do a Father's Day card with the group.


The card was CASEd from this card. I really loved the card, and it was easy to change it to be a Father's Day card.


Some of the Epic Day DSP that I punched with the Hexagon Punch wasn't quite grungy enough, so I stamped over the top with the medium splotches stamp from Gorgeous Grunge.


I don't have any Father's Day stamps except the one from Teeny Tiny Sentiments, which is cute but not the right look or size for this card. MDS to the rescue!  I searched the stamps in My Digital Studio and found the one I used.  I just sized it to requirements and printed it onto some Crumb Cake cardstock.  Easy!

Stamps: Gorgeous Grunge, ABC-123 Sketch Alphabet and Numbers
Ink: Crumb Cake, Baked Brown Sugar
DSP/Cardstock: Epic Day DSP, Crumb Cake
Other: Hexagon Punch, Paper Snips, Sponge Daubers, Dimensionals, My Digital Studio

I'll be back later in the week with another Father's Day card.

Bye for now,

Tina