Hi!
It's time for the final Just Add Ink challenge of 2018 - it feels so weird to be saying that!! Patrice has challenged us to make a gift boxer very appropriate challenge for this time of year. Thos round will go for two weeks and is a just for fun round. The Design Team are taking a well earned break and will be back again in 2019 (another thing it feels weird to say!).
I struggled a bit with this challenge, in that I couldn't decide what to make! I had so many options, and in the end I reached for an old favourite, the Petal Cone Bigz Large Die. I can't remember how long ago it retired, but it's one I've not been able to part with.
The tag is made using current Stampin' Up! product though. The DSP is the Santa's Workshop Specialty DSP, with all the lovely flocking on the designs. I also used a stamped and die cut image from the Tags and Tidings Bundle. My lovely friend Ros stamped and cut them for me. This tag was on Whisper White, but I wanted a blue colour so I coloured it with my Light Pool Party Blend.
The box itself is also made from the Santa's Workshop SDSP. This piece has lots of flocking, so it was *just* heavy enough to use to make the box. If you recall, the box that the die makes comes to a point, which mine clearly does not have! I simply scored the cut pieces near the bottom and folded them in to make a flat bottom.
I used a piece of the gorgeous Black Glittered Organdy ribbon from the Holiday Catalogue to wrap around the box. It doesn't actually hold it closed, as the overlapping top flaps do that, but it's a lovely way to add a touch of glimmer to the box. I will miss this ribbon when it retires in January!
Thanks for joining me for the current Just Add Ink challenge. Remember, it's a just for fun round that will go until January 2. Plenty of time for post-christmas crafting, hopefully with some new goodies left by Santa!
Bye for now,
Tina
Showing posts with label Santa's Workshop SDSP. Show all posts
Thursday, 20 December 2018
Wednesday, 31 October 2018
Tags and Tidings At Christmas
Hi!
Are you ready for another week of Christmas inspiration? I think we are up to week 12, which means I have an extra 12 cards in may stash that I wouldn't usually have at this time of year.
I made this week's card last week while I was watching the movie 'Sully' on TV. Have you seen it? The movie tells the story of the plane that landed in the Hudson River and everyone survived. It was quite interesting and exciting, so I think my colouring suffered at times. Luckily I wasn't trying to work on a trickier card!
I used the Tags and Tidings bundle on this card. It's a cute little stamp and die set that makes a ton of sweet little tags. It's one large stamp and one large die, so you can stamp and cut 16 different tags in two quick steps. Nice!
I trimmed the tag loops off of the three picture images, as I didn't need them to be tags on this card. The Holly Jolly one I left, as I liked the shape and timing it would have looked strange to say the least. I coloured the images with my Poppy Parade, Shaded Spruce and Soft Suede Blends Markers. I then sponged some Pool Party ink onto the Whisper White squares behind them. I helps the tags to pop from the background.
It's tricky to see in the photo, but I also sponged the Pool Party ink on the inside before adhering the tag to the cardstock.
You can find the links for the rest of this week's Heart Of Christmas cards over at Claire's blog. I'm loving seeing what everyone makes each week, and I'm sure you are too.
Bye for now,
Tina
Are you ready for another week of Christmas inspiration? I think we are up to week 12, which means I have an extra 12 cards in may stash that I wouldn't usually have at this time of year.
I made this week's card last week while I was watching the movie 'Sully' on TV. Have you seen it? The movie tells the story of the plane that landed in the Hudson River and everyone survived. It was quite interesting and exciting, so I think my colouring suffered at times. Luckily I wasn't trying to work on a trickier card!
I used the Tags and Tidings bundle on this card. It's a cute little stamp and die set that makes a ton of sweet little tags. It's one large stamp and one large die, so you can stamp and cut 16 different tags in two quick steps. Nice!
I trimmed the tag loops off of the three picture images, as I didn't need them to be tags on this card. The Holly Jolly one I left, as I liked the shape and timing it would have looked strange to say the least. I coloured the images with my Poppy Parade, Shaded Spruce and Soft Suede Blends Markers. I then sponged some Pool Party ink onto the Whisper White squares behind them. I helps the tags to pop from the background.
It's tricky to see in the photo, but I also sponged the Pool Party ink on the inside before adhering the tag to the cardstock.
You can find the links for the rest of this week's Heart Of Christmas cards over at Claire's blog. I'm loving seeing what everyone makes each week, and I'm sure you are too.
Bye for now,
Tina
Wednesday, 24 October 2018
A CASE For Christmas
Hi!
Welcome to a new week's Heart Of Christmas Blog Share. Today's cards was actually a layout that I CASEd from this card by Chris Smith. The layout immediately appealed to me, so with a few tweaks I made my own version.
I didn't have any of the stamps or dies that Chris used, so I grabbed my trusty Santa's Workshop SDSP and my Merry Christmas To All stamp set and away I went. You probably can't see in the photo, but the white part of the card front is embossed using the Subtle DTIEF.
I love this sweet little elf - most of the others have a cheeky look, so this little guy stands out from the crowd. There wasn't a lot of room for a sentiment so I just went with the single word, Merry.
I trimmed a smaller triangle from the tree paper to finish off the inside, along with a group of gifts, fussy cut from the Santa's Workshop SDSP. I'm going to have to think hard about how to use the left over piece of the tree paper, as it's a wide, diagonal stripe. Could be interesting!
As always, you can find the rest of this week's cards over at Claire's blog. I find it easy to view each page by right clicking on the link and selecting to open the link in a new tab. That way I'm not jumping back and forth between each page.
Bye for now,
Tina
Welcome to a new week's Heart Of Christmas Blog Share. Today's cards was actually a layout that I CASEd from this card by Chris Smith. The layout immediately appealed to me, so with a few tweaks I made my own version.
I didn't have any of the stamps or dies that Chris used, so I grabbed my trusty Santa's Workshop SDSP and my Merry Christmas To All stamp set and away I went. You probably can't see in the photo, but the white part of the card front is embossed using the Subtle DTIEF.
I love this sweet little elf - most of the others have a cheeky look, so this little guy stands out from the crowd. There wasn't a lot of room for a sentiment so I just went with the single word, Merry.
I trimmed a smaller triangle from the tree paper to finish off the inside, along with a group of gifts, fussy cut from the Santa's Workshop SDSP. I'm going to have to think hard about how to use the left over piece of the tree paper, as it's a wide, diagonal stripe. Could be interesting!
As always, you can find the rest of this week's cards over at Claire's blog. I find it easy to view each page by right clicking on the link and selecting to open the link in a new tab. That way I'm not jumping back and forth between each page.
Bye for now,
Tina
Monday, 15 October 2018
Everything Is Awesome At Christmas
Hi!
Today's card is one I made for a challenge in the Kindred Stamps Facebook group. The challenge was to use a non-Christmas stamp set to make a Christmas card. The first temptation is to just whack a Santa hat on a person or animal, but I wanted to do something a bit more than that.
I wracked my brain for over a week, and then I just happened to walk past Alex's bedroom as he dug through his loose Lego. Bingo!
When my kids were younger they used to make all kinds of shapes out of their Lego bricks, including Christmas trees. I decided to use my Kindred Stamp Building Blocks stamp set to make a Christmas tree.
I started at the top with the double brick and then masked it before I stamped the larger brick in the second layer. I continued masking and stamping until I had the width I wanted for the tree, finally finishing with a trunk. I then stamped some flowers to represent the star on top and a few baubles.
I couldn't make a Christmas card like this without Santa, so I made one for the inside. I stamped the basic man and then I used the stamp that is a top view of the single brick to create a belt buckle. I just used a marker to add lines to turn it onto a belt. Challenge completed!
Bye for now,
Tina
Today's card is one I made for a challenge in the Kindred Stamps Facebook group. The challenge was to use a non-Christmas stamp set to make a Christmas card. The first temptation is to just whack a Santa hat on a person or animal, but I wanted to do something a bit more than that.
I wracked my brain for over a week, and then I just happened to walk past Alex's bedroom as he dug through his loose Lego. Bingo!
When my kids were younger they used to make all kinds of shapes out of their Lego bricks, including Christmas trees. I decided to use my Kindred Stamp Building Blocks stamp set to make a Christmas tree.
I started at the top with the double brick and then masked it before I stamped the larger brick in the second layer. I continued masking and stamping until I had the width I wanted for the tree, finally finishing with a trunk. I then stamped some flowers to represent the star on top and a few baubles.
I couldn't make a Christmas card like this without Santa, so I made one for the inside. I stamped the basic man and then I used the stamp that is a top view of the single brick to create a belt buckle. I just used a marker to add lines to turn it onto a belt. Challenge completed!
Bye for now,
Tina
Thursday, 20 September 2018
AWH September Blog Hop: Holiday Catalogue
Hi!
Tonight the Art With Heart team are sharing creative projects featuring products from the Holiday Catalogue. We hope our Blog Hop inspires you to get creative and make some fabulous Christmas creations. If you would like a copy of the Holiday Catalogue, contact any of the girls on the blog hop and we will get in touch with you.
One of my absolute favourite products from the Holiday Catalogue is the super cute Santa's Workshop SDSP. You've probably seen it a lot on my blog if you're a regular visitor!
I've fussy cut a Santa from the paper and layered him on some of my circle dies. What do you think about using black on a Christmas card? I don't usually, but I think it works well with this paper.
Are you thinking - where did the 'joy' die cut come from? It's actually the 'you' from the Celebrate You Thinlits with a bit trimmed off and adhered to the card flipped over. You may also have noticed that Santa is popped up off of the circles. I didn't use Dimensionals, rather I made a spring to go underneath so that Santa wobbles when he's given a bit of a shake. I love the effect - it looks like he's laughing!
Isn't that soooo cute? I used Bibi Cameron's YouTube video to learn how to make the springs. I wound my wire around the white neck of the scoring tool part of the Take Your Pick, so it was quite a thick coil.
I fussy cut another piece of the same DSP to go on the inside. If you don't mind a bit of fussy cutting, this DSP is fabulous for easy Christmas cards.
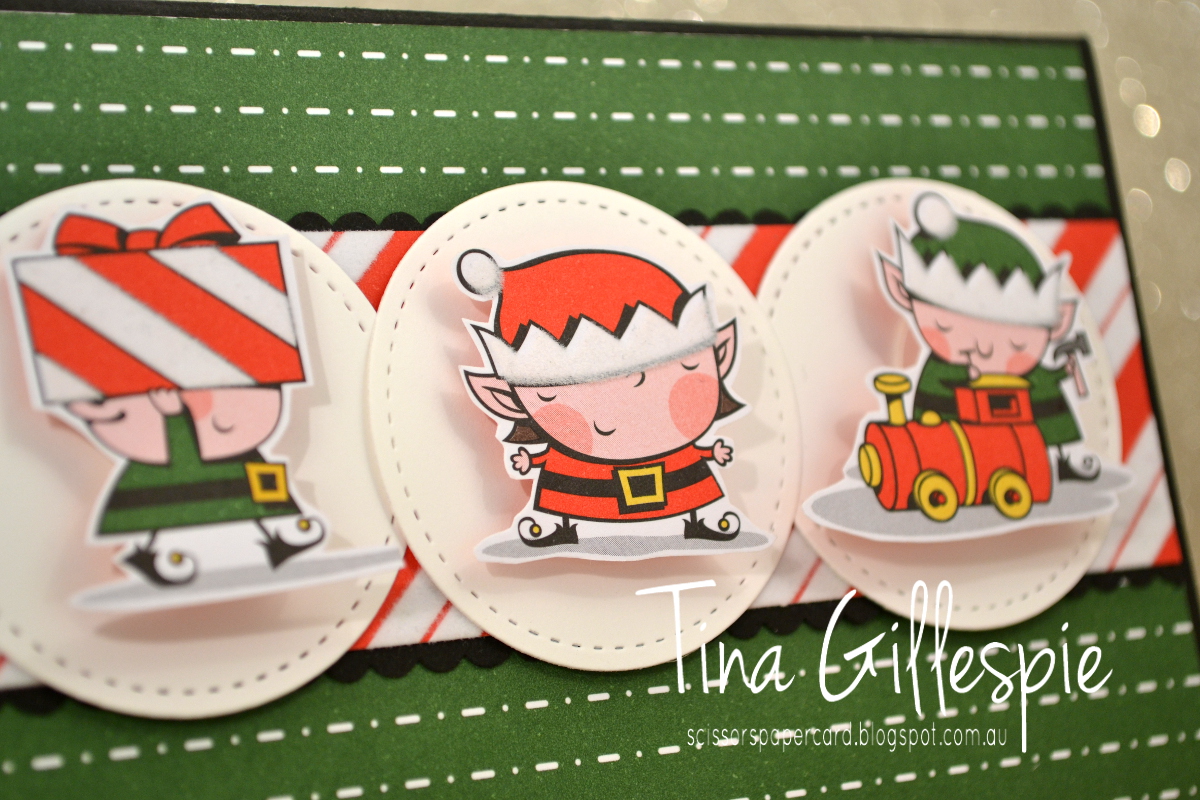
Because I had so much fun with the spring on the first card, I decided to make a second using them too. I couldn't resist bringing the cheeky elves to life!
Each one has a little spring behind him, which was made by winding the wire around the metal part of the scoring tool on my Take Your Pick. Because the springs are smaller there's not as much movement as there is with Santa, but it's still a fun effect. I think there are some children in my family who are going to LOVE these cards when I send them!
Well, that's it for me. Have you enjoyed my fun cards? I'm sure you'll love the card Ros Davidson has made for the Hop!
One of my absolute favourite products from the Holiday Catalogue is the super cute Santa's Workshop SDSP. You've probably seen it a lot on my blog if you're a regular visitor!
I've fussy cut a Santa from the paper and layered him on some of my circle dies. What do you think about using black on a Christmas card? I don't usually, but I think it works well with this paper.
Are you thinking - where did the 'joy' die cut come from? It's actually the 'you' from the Celebrate You Thinlits with a bit trimmed off and adhered to the card flipped over. You may also have noticed that Santa is popped up off of the circles. I didn't use Dimensionals, rather I made a spring to go underneath so that Santa wobbles when he's given a bit of a shake. I love the effect - it looks like he's laughing!
I fussy cut another piece of the same DSP to go on the inside. If you don't mind a bit of fussy cutting, this DSP is fabulous for easy Christmas cards.
Because I had so much fun with the spring on the first card, I decided to make a second using them too. I couldn't resist bringing the cheeky elves to life!
Each one has a little spring behind him, which was made by winding the wire around the metal part of the scoring tool on my Take Your Pick. Because the springs are smaller there's not as much movement as there is with Santa, but it's still a fun effect. I think there are some children in my family who are going to LOVE these cards when I send them!
Well, that's it for me. Have you enjoyed my fun cards? I'm sure you'll love the card Ros Davidson has made for the Hop!
If you find a broken link or have come to this blog hop from a different entry point, you can view the participants below:
Caroline Manwaring
Sharon Davern
Tina Gillespie
Ros Davidson
Caroline Manwaring
Sharon Davern
Tina Gillespie
Ros Davidson
Bye for now,
Tina
Thursday, 13 September 2018
JAI #426: Just Add A Sketch
Hi!
Hooray for Friday!
This week at Just Add Ink we have a fabulous sketch challenge, designed by Kim. I love this one, because there's so much scope to play.
When I sat down to make a card for this challenge I'd just received my Holiday Catalogue preorder, which included the super cute Santa's Workshop SDSP. It's a Specialty DSP because it has flocking on some of the sheets.
I chose the image of Santa in his sleigh. The trim on Santa's hat and the white present at the top of the pile all have flocking on them. I had better stop running my fingers over it, or there'll be none left by Christmas!
The sentiment is also a new stamp set called Merry Christmas To All. It comes with matching dies and I'm sure you'll see a lot more of it on my blog!
I fussy cut Mrs Claus from another piece of DSP from the Santa's Workshop pack. Her apron is also flocked - it's such a fun element to the paper!
The rest of the Design Team have used this sketch so creatively! You can see their cards over at the Just Add Ink blog, where you can also link up your card. I can't wait to see it!
Bye for now,
Tina
Hooray for Friday!
This week at Just Add Ink we have a fabulous sketch challenge, designed by Kim. I love this one, because there's so much scope to play.
When I sat down to make a card for this challenge I'd just received my Holiday Catalogue preorder, which included the super cute Santa's Workshop SDSP. It's a Specialty DSP because it has flocking on some of the sheets.
I chose the image of Santa in his sleigh. The trim on Santa's hat and the white present at the top of the pile all have flocking on them. I had better stop running my fingers over it, or there'll be none left by Christmas!
The sentiment is also a new stamp set called Merry Christmas To All. It comes with matching dies and I'm sure you'll see a lot more of it on my blog!
I fussy cut Mrs Claus from another piece of DSP from the Santa's Workshop pack. Her apron is also flocked - it's such a fun element to the paper!
The rest of the Design Team have used this sketch so creatively! You can see their cards over at the Just Add Ink blog, where you can also link up your card. I can't wait to see it!
Bye for now,
Tina
Wednesday, 5 September 2018
A Juggling Act in Santa's Workshop
Hi!
Welcome back to a new week of Heart Of Christmas. I am loving the new Santa's Workshop SDSP from the Holiday Catalogue, so I'm playing with it again for today's card. I love that so many of the images can be fussy cut to go on a card. If you're not a colourer it can be a great option instead of the stamp set.
How cute is the juggling snowman? I roughly trimmed around him so that I could drop him with one of my Stitched Shapes Circles Thinlits - yay for not having to fussy cut! Unfortunately the first time I roughly cut him too close and I couldn't fully cut the circle. I've popped him aside to use on another card where I can hide the chopped off part of the circle!
I used paper from two different packs to go on the front and inside of the card. Did you notice that the front of the card wasn't a full card? I trimmed a strip off the front so that the gorgeous candy striped flocked paper from Santa's Workshop could be seen from both the inside and outside. The green star paper is from the Dashing Along pack, which is a promotional item for September only.
Here's the inside. I thought the snowman might be a little tuckered out after all that juggling, so I popped a fussy cut sleeping snowman on the inside. When the card is closed you can't see him because he's tucked behind the juggling snowman.
As always, you can see the rest of this week's Heart Of Christmas cards over at Claire's blog. Are you finding inspiration each week - I certainly am!
Bye for now,
Tina
Welcome back to a new week of Heart Of Christmas. I am loving the new Santa's Workshop SDSP from the Holiday Catalogue, so I'm playing with it again for today's card. I love that so many of the images can be fussy cut to go on a card. If you're not a colourer it can be a great option instead of the stamp set.
How cute is the juggling snowman? I roughly trimmed around him so that I could drop him with one of my Stitched Shapes Circles Thinlits - yay for not having to fussy cut! Unfortunately the first time I roughly cut him too close and I couldn't fully cut the circle. I've popped him aside to use on another card where I can hide the chopped off part of the circle!
I used paper from two different packs to go on the front and inside of the card. Did you notice that the front of the card wasn't a full card? I trimmed a strip off the front so that the gorgeous candy striped flocked paper from Santa's Workshop could be seen from both the inside and outside. The green star paper is from the Dashing Along pack, which is a promotional item for September only.
Here's the inside. I thought the snowman might be a little tuckered out after all that juggling, so I popped a fussy cut sleeping snowman on the inside. When the card is closed you can't see him because he's tucked behind the juggling snowman.
As always, you can see the rest of this week's Heart Of Christmas cards over at Claire's blog. Are you finding inspiration each week - I certainly am!
Bye for now,
Tina
Wednesday, 22 August 2018
Elves On Parade
Hi!
Welcome back to the second week of the Heart Of Christmas Blog Share. I've gone super cute this week with some paper from the Santa's Workshop SDSP pack. It's such fun paper!
See what I mean? How cute is that parade of elves? They are so funny with their gifts. The best part about this DSP? It's got flocked bits!
Can you see the flocking on the presents and the hats? I can't stop running my fingers over it! I used my Wink Of Stella pen to add some glitter to the Garden Green parts of the design, it's just hard to see in the photo.
Another sheet of the DSP has the same design only smaller, so I used a strip of it on the inside of the card.
Have you started your Christmas cards yet? Maybe our Blog Share will inspire you to get started. You can see the rest of this week's cards over on Claire's blog.
Bye for now,
Tina
Welcome back to the second week of the Heart Of Christmas Blog Share. I've gone super cute this week with some paper from the Santa's Workshop SDSP pack. It's such fun paper!
See what I mean? How cute is that parade of elves? They are so funny with their gifts. The best part about this DSP? It's got flocked bits!
Can you see the flocking on the presents and the hats? I can't stop running my fingers over it! I used my Wink Of Stella pen to add some glitter to the Garden Green parts of the design, it's just hard to see in the photo.
Another sheet of the DSP has the same design only smaller, so I used a strip of it on the inside of the card.
Have you started your Christmas cards yet? Maybe our Blog Share will inspire you to get started. You can see the rest of this week's cards over on Claire's blog.
Bye for now,
Tina
Subscribe to:
Posts (Atom)