Pages

Showing posts with label Sewing. Show all posts

Thursday, 8 February 2018

JAI #395: Just Add Inspiration

Hi!


Are you ready for a new Just Add Ink challenge? I am! This week Kelly found this gorgeous Inspiration photo for us to base our cards on.


Isn't it stunning? It made me think of two very special places - my hometown, where the cherry blossoms in Spring made the streets come alive with gorgeous pink colour. It also reminded me of my time with Rob in Paris, where we strolled through parks and gardens that were so lush with foliage and so immaculately maintained. Two sets of very happy memories!

scissorspapercard, Stampin' Up!, Just Add Ink, Swirly Bird, Dragonfly Dreams, Beautiful Bouquet, Flourishing Phrases

The picture is very romantic to me, so I decided it was best to make a wedding card. The sentiment suits the picture so well!

Here's how I made it: first, I masked the top two thirds of the card and sponged Crumb Cake ink on the bottom third using my Sponge Brayer, trying to get the colour darker along the edge of the path. I then stamped the splatter from Swirly Bird over the top. Next, I masked off the middle section of the card. I used my sponge brayer to add Tranquil Tide ink, again trying to make it darker along the edges. I then removed the bottom mask and stamped the dotty stamp from Dragonfly Dreams along the edge of the colour, making sure that some of the stamping fell in the Crumb Cake section. I was trying to blur the hard lines created by the masking.

scissorspapercard, Stampin' Up!, Just Add Ink, Swirly Bird, Dragonfly Dreams, Beautiful Bouquet, Flourishing Phrases

I then repeated the process with the top section of the card, this time with Flirty Flamingo ink. I used the largest floral stamp in Beautiful Bouquet over the top, and also the dotty stamp from Dragonfly Dreams to soften the edge. I then stitched around the vellum sentiment and the edge of the card. It still needed more, so I ended up adhering some clear heart shaped sequins to the front. You may just be able to see them to the bottom left and top right of the sentiment panel.

scissorspapercard, Stampin' Up!, Just Add Ink, Swirly Bird, Dragonfly Dreams, Beautiful Bouquet, Flourishing Phrases

I was a bit sponge brayered out by the time I got to the inside, so a few of the dotty stamps had to do!

I've been astounded at the variety of ways the Design Team have interpreted this image, and I'm sure you will be too! Pop on over to the Just Add Ink blog to check it all out, and to link up your card.

Bye for now,

Tina.

Friday, 31 May 2013

JAI #167: Just Add Fabric!

Hi!

I'm certainly back into this swing of things with my blogging this week, and how about we round off the week with another Just Add Ink challenge? Perfect!


This week I chose the theme and it's fabric!  Yes, we want you to add some fabric to your projects.  Please note that it must be fabric and not ribbon.  I used the Summer Smooches Fabric on my project.


This piece of fabric is such a cheerful, happy print and I have been hoarding it saving it for a special project. I decided it was time to cut into it.


You can see here I used a narrow strip of the coordinating fabric to make a ruffle for the front.  I also used some of the Canvas Creations sheet to make a label for the front. I love the textured look it gives to the stamped sentiment.


Did you notice that my project wasn't actually a card? It's a little notebook, and it's been something that I've been wanting to try for a couple of months now.  You see, I made the WHOLE thing from scratch!  I cut the papers, bound them using needle and thread and then created the cover to go around them.  I thoroughly enjoyed making it, and I can see myself making lots more in the future.


One final photo of the inside of the note book.  I used some of the matching Summer Smooches DSP for my end pages.  The actual pages are from my stash and are plain white for ease of writing on.

Stamps: Feel Goods
Ink: Real Red
DSP: Summer Smooches DSP
Other: Summer Smooches Fabric, Canvas Creations, Crystal Effects, Sewing Machine, Chipboard

What do you think you'll make for the Just Add Ink challenge this week? Can't wait to see it.

Have a great day,

Tina

Monday, 7 May 2012

Paris Week Day 1

Hi!

You may have guessed from the title of my post that I'm doing a week's worth of posts about my recent trip to Paris.  You'd be almost right - I'm doing 4 days worth of posts, as I have a new Festive Friday card for you on Friday.

Before I left for Paris I made a Smash Album to take along as a travel journal and a place to keep the memorabilia we collected on our way.  You can see my original post of the finished Album here.  Before we left on the trip I was able to make a Cover for the Album to protect it and also to help keep the bits and pieces from falling out.  Today's post is about the Album Cover.


I used the gorgeous Deck the Halls Designer Series Fabric to make the Album Cover.  I had received the fabric as a Secret Santa gift and wanted to use it on something special. This certainly fit the bill! I had a scrap of Pink Pirouette 1 1/4" Grosgrain Ribbon left in my stash that I used to keep it all closed.  I tied the ribbon a bit loosely so that I could just slip it on and off rather than having to untie and retie the ribbon all the time.


This is the Album Cover half open.  It has flaps on each side to make sure that nothing can fall out of the Album.  The pages were made with Mini Lunch Sacks and things were just tucked inside, so I thought the Cover was a necessity.


Here is the Album Cover fully open.  You can see that it's a big 't' shape.  To make the Cover I just cut some chipboard to size, lay it out on my fabric and cut around it so that the fabric was all one piece.  I then used that piece as a template to cut the second piece of fabric.  I used a different pattern in the fabric pack for the inside.  I then laid out the chipboard on the fabric, placed the other piece of fabric over the top and pinned where I wanted the seams to go.  I sewed between each section of chipboard to stop them from moving around.  It probably wasn't a very technical way to make the Cover, but I'm a fairly proficient sewer so I was confident I could make it work.  If you want any more details about how I sewed the Cover just email me or leave a comment.


Here's the Album closed again, but from the side.  I used two of my precious (retired) jumbo brads so that I could thread some ribbon through the Cover to attach to the Album and keep it from slipping out of the Cover when it was open.

Stay tuned, tomorrow I will be back with some photos of how the Smash Album and Cover looked when we got back from Paris.  Later in the week I'll have some of my favourite photos out of the 3500+ we took!

Supplies: Deck The Halls Designer Series Fabric, Very Vanilla Satin Ribbon, Pink Pirouette 1 1/4" Grosgrain Ribbon (retired), Pewter Jumbo Brads (retired), Crop-A-Dile, Chipboard (I used some backing from the Glitter Paper packs), Sewing Machine and Thread.

Bye for now,

Tina

Monday, 2 January 2012

Just Add Ink 99: Just Add Fancy Packaging

Hi!

I hope everyone had a Happy New Year.  I love the New Year - the new beginnings and new opportunities that await are endless!  I thought I'd start off the New Year by entering the latest challenge at Just Add Ink, which is to Just Add Fancy Packaging.


I decided to sew a project tote, which at the moment is the fancy packaging for my unfinished projects. When I no longer have any UFO's (yeah right!) this will become the home for my mini albums.  Here's a look at the inside.


I have already made one of these totes, which you can see the post for here.   You'll find the link for the pattern in the previous post.  In that post I mentioned I wanted to try doubling the measurements, which I did for this newest tote.  Here's the two together for a comparison in size.


I'll be making some more of these when I have some time.  They are so cute and so very useful!

Bye for now,

Tina

Sunday, 20 November 2011

Sewing with Stampin' Up! Fabric

Hi!

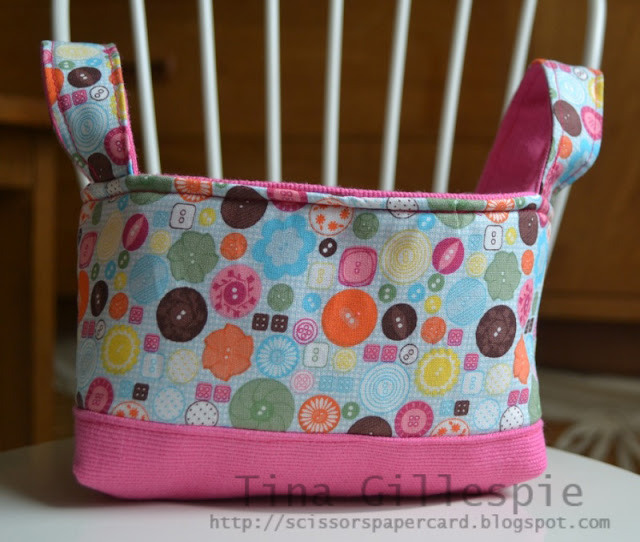
I got a chance on Friday to sit down and do some sewing.  I had a particular project in mind that I've been wanting to sew for about 6 months.  Can't believe it's taken that long for me to find the time to sew it up!


Isn't it a cute little bag?  It's called a project tote, and I think it would look adorable on a craft desk with things like your snail, paper snips, bone folder, etc tucked away inside.


The button fabric is Stampin' Up!, but it is not available in Australia.  You could make this tote with any of the fabrics we stock though.  The tote is quite small, and if you make it as I have with the contrasting fabric you would be able to make 24 of these bags using one pack of fabric.


I popped the ribbons in to give you an idea of the size.  I'm currently using mine to store ribbons, but I think I will use it for bits and pieces at my classes and workshops.  I'm also going to try doubling the measurements to make myself a bigger bag.  Hopefully it won't take another 6 months to find some more sewing time!

If you are a sewer and would like to have a go at this tote you can find the pattern here.

Catch you later,

Tina

Thursday, 24 February 2011

Craft Caddy

Hi!

I came across a pattern for making this cute craft caddy while browsing the Crafty Storage blog.  It's so cute, and folds up flat when it's not in use.  It uses the Big Shot and the Scallop Square die, currently available in the Summer Mini Catalogue.


Here it is with a few things in it:


Don't forget the Sale-A-Bration blog hop on Saturday!

Catch you later,

Tina