Pages

Showing posts with label Endless Birthday Wishes. Show all posts

Friday, 23 September 2016

JAI #330: Just Add A Sketch

Hi!


Welcome back to another Just Add Ink Challenge!


http://just-add-ink.blogspot.com/2016/09/just-add-ink-330sketch.html

This week Kim has designed a fantastic sketch for us to use in our card making.


I love the layered circle and square - it's nice to mix up the shapes a little sometimes!


I made this card for my son, Hudson. He turned 9 last week and absolutely loves In The Night Garden, especially the Tombliboos! He watches it and laughs and says 'uh-oh' when they do silly things like fall over and lose their trousers. Sometimes he gets so excited he shouts 'uh-oh' - that's just how much he loves it, so of course I had to make his card using one.


Ignore my terrible colouring, I was in a rush!


I actually coloured two images - one was a test to see how the colours worked. I liked the end result, so I included the 'test' image on the inside of the card.


What will you do with Kim's sketch? I hope I see you over at Just Add Ink!


Bye for now,


Tina


Sunday, 12 June 2016

Happy 13th Birthday Tyson!

Hi!


We have just got back from a birthday party for one of Hudson's friends, Tyson. As you can tell by the post title, he turned 13.  Such a milestone! I made a card for him last night using my new favourite colour - Dapper Denim.


Inspiration for this card came from a card on page 22 of the new Annual Catalogue. It's the Sweet Sugarplum card on the right. I quite liked the idea of stamping the cake multiple times on the background. My cakes were a bit more widely spaced though, and looked a little funny, so I added the sentiment to fill each gap. What a happy accident!


The largest scribble swirl was cut from the Silver Foil Paper. It's such a cool die cut, I've used it heaps! It helps to make the '13' stand out more from the background also.


LOL, when I use the 'hip hip hooray' on my cards, I'm always cheering it in my head as I read it - what about you?


I'm entering this card in the CASEing the Catty monthly challenge. It's been ages since I've been able to play along with another challenge, so it's great to finally find the time.


Bye for now,


Tina

Monday, 30 May 2016

Endless Birthday Wishes

Hi!


Today I have a little bit of a controversial card for you.  Only a little bit, I promise! It's a card I made as a class sample. Can you guess what part of this card caused a stir in class?


Did you guess that it was the placement of the main panel? OK, so maybe 'controversy' was a bit strong of a word to describe the reactions! As always, my class ladies are free to change the cards as they like, and quite a few changed the position of that panel.


When I first made the card, it only had the large Crushed Curry star. It needed something more though, and the popped up Basic Black star worked nicely. The little star punch is retiring  -sob!


I love the way you mix and match the sentiments in the Endless Birthday Wishes stamp set. It's carrying over, so I'm sure you'll see a lot more of it this year!


Bye for now,


Tina

Monday, 16 May 2016

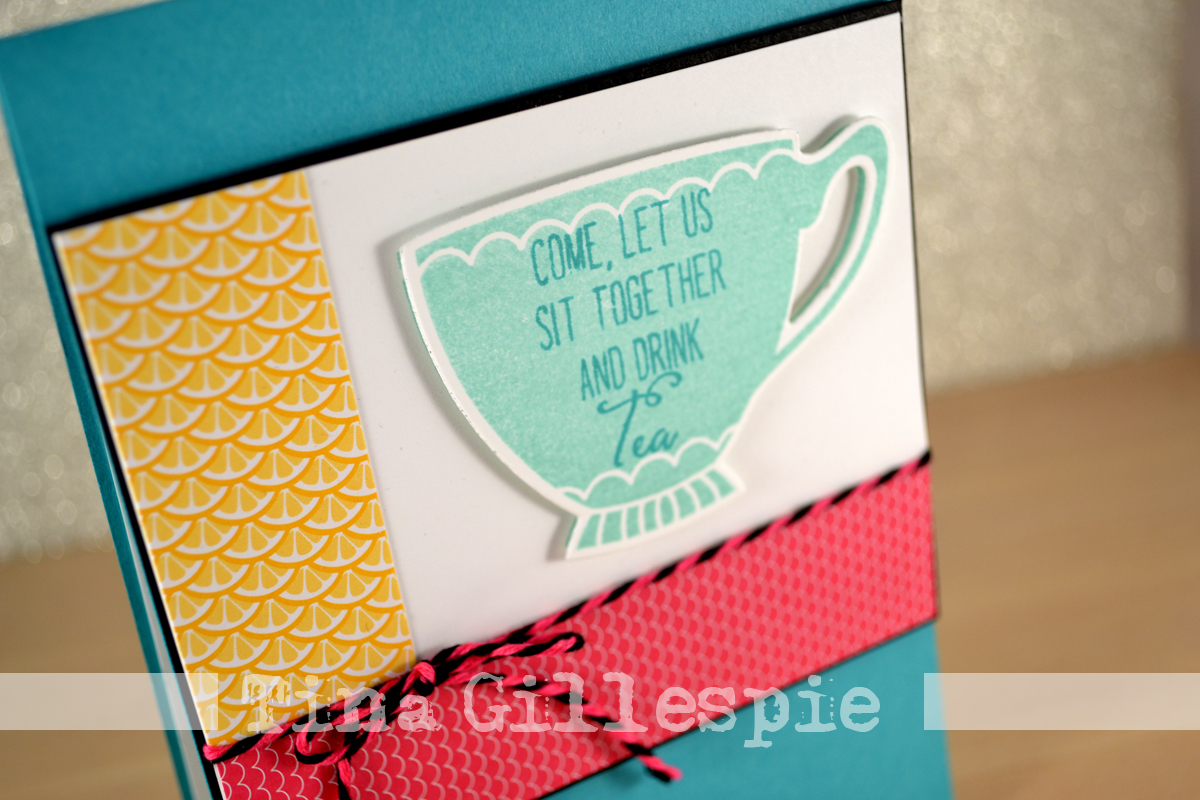
A Nice Cuppa CASE

Hi!


The Have A Cuppa bundle can be found in the Occasions Catalogue. It was one I fell in love with instantly, as I'm a big tea drinker, as are quite a few of my friends. My first cup of tea was loose leaf, made in a teapot and sipped from one of my Grandmother's gorgeous tea cups. I had good company that day - two of my sisters and my aunt - so it's a lovely memory for me.


Anyway, I digress! Today's card is a CASE of one by Teneale Williams. She used the Tap, Tap, Tap stamp set, which is also retiring with the Have A Cuppa Bundle.


This card was made as a sample for a card class. Some of the ladies made some variations, including stamping 'coffee' instead of 'tea', and even stamping the sentiment in the bottom right hand corner of the card. I really enjoy seeing the variations they come up with!


When I first made the card I didn't use the Basic Black layer on the main panel, but when I went to put the card together it didn't look quite right, so I ended up adding it. The black adds a little definition to the main panel.


And of course, you can't have tea without cake!


Bye for now,


Tina

Friday, 13 November 2015

JAI #288: Just Add A Sketch

Hi!

Here we are at the end of the working week, time for some "it's nearly the weekend" fun!This week at Just Add Ink Narelle has designed a fabulous sketch for us.

Isn't it great?  I needed to make a card for a wedding I was attending, so I decided to switch the stars for hearts.


The wedding stationery was black with hints of white and silver, so I went with that colour scheme for my card.  I'd been playing with glitter and Heat and Stick powder for my classes, so I kept it out to use with my Dotty Angles stamp.


Doesn't it give a fabulous shimmer?


They are a little difficult to see, but I also used a few small hearts on the inside to tie in with the front of the card.

What will you do with this sketch? Why don't you pop on over to the Just Add Ink blog and see what the rest of the Design Team have done with the sketch?

Bye for now,

Tina

Friday, 16 October 2015

JAI #284: Just Add A Fancy Fold

Hi!

Wow, it's been a week full of blog hops for me, and now I can finish up with my Just Add Ink card.


This week Di has challenged us to use a Fancy Fold in our creations.  I have been eyeing off these TeePee cards for yonks (a very long time for the non-Aussies!), so this was a great excuse to have a go.  They are so easy!!! I really don't know why I didn't try one sooner.


I have two great nephews who are turning one in the next couple of months so I decided to use this challenge to make a card for the first of the boys.


I really love this elephant stamp from Zoo Babies - in the bright Pacific Point it's a great option for those 'nearly a toddler' cards.


There's not a huge amount of space for writing on the card unless you use the inside, so the smaller sentiment from Endless Birthday Wishes was great.


Here's the card opened flat so you can see how it's put together.  I used 3 squares of cardstock cut to 4 1/8 inches and scored diagonally through the middle. The DSP is cut to 4 inches square and then cut on the diagonal, just slightly in from the middle on each side so you end up with a tiny strip that you toss out.  I cut the Whisper White cardstock the same way and then just rimmed off the bottom corner so it doesn't show when the card is closed.

To post you just open it flat and then fold it down the middle.  Easy!

The Design Team have done a fantastic job with this challenge.  You can see their Fancy Folds over on the Just Add Ink blog.  I hope to see yours there too!

Bye for now,

Tina

Friday, 25 September 2015

JAI #281: Just Add Colour

Hi!

This week at Just Add Ink we have a colour challenge with a difference: YOU get to choose the colours you use! The very tricky Di came up with this challenge, and gave us a limit: you can only use THREE colours. Which three will you choose?


I decided to go with one of my favourite colours, which is blue. This card is Hudson's 8th Birthday card.  We gave him a water play table and a few little rubber duckies to go in it, so I ran with that for his card.


You can see that my two other colours are yellow (Daffodil Delight) and orange (Tangelo Twist).  The blues I used are Marina Mist and Soft Sky.  There's a bit of Basic Black and Whisper White in the card, but technically they aren't colours, so I think I'm ok!


To make the duckie I just googled 'duck punch art Stampin' Up!', clicked on Images and just went from there.  He's a bit of a cutie!  I made the water by just punching along the edge of the cardstock with my smallest circle punch.


Which three colours will you choose for your card? Pop on over to the Just Add Ink blog to see the gorgeous combos the other girls have selected.

Bye for now,

Tina

Monday, 17 August 2015

Bokeh Technique

Hi!

Have you become a member of the Bokeh fan club yet? I'd seen lots and lots of cards on the web using the technique but I'd been too scared to give it a go - it looked so hard!  Then my stamping ladies asked to try the technique so I gulped and said 'sure'. I was so wrong about it being hard! It's a great technique, a little time consuming, but certainly not difficult at all.


We used Washi Tape to secure the cardstock to the work surface.  As well as giving you stability while you work, it adds a lovely white border to the piece.  We sponged Wisteria Wonder, Daffodil Delight and Blushing Bride (I think!) ink over the cardstock and then, using various sized circle templates, sponged White Craft Ink over the top.


It's such a pretty effect!  We found that we needed to sponge the White Craft Ink on much thicker than we expected to get the effect we needed. The Congratulations was actually stamped over the top, it just looks like it was stamped underneath the White Craft Ink.


I used the dotty stamp from Dotty Angles in the same colour inks as on the front.  It's not really bokeh, but I hope you can see where I was going with it.

Bye for now,

Tina

Thursday, 16 July 2015

AWH Blog Hop: Christmas In July

Hi!


Today some of the Art with Heart Stampin' Up! team girls are presenting some fabulous Christmas projects to inspire you. This year we already have new Christmas sets to play with in the 2015 Stampin' Up! Annual Catalogue, and some old favourites too. We also have a brand new 2015 Holiday catalogue coming soon. If you would like a copy of any of our catalogues, to attend a Stampin' Up! class or join a large fabulous group of crafty women by becoming part of the team (hobby demonstrators welcome), be sure to contact me.

So I decided to go with some old favourite stamp sets for this Blog Hop. I'm pairing them with the new Thick Whisper White cardstock.  I really love this new cardstock - it's perfect for making single layer white cards as it holds its weight well.I decided to make a pair of window cards, firstly with the Festival Of Trees stamp set and the matching Tree punch.


I started by punching the Tree shape in the front of the card.  I then masked off the bottom of the card using sticky notes that I trimmed to a curve. I then sponged over the top with Soft Sky ink and a sponge.  Finally I stamped a sentiment and the snowflakes using the spotty stamp in the Endless Birthday Wishes stamp set.


I then stamped the tree through the window I'd created earlier.  It was a little tricky to line up, but the photopolymer stamps make the job a lot easier! When the card is closed you get the full effect of the window.


And that's how the inside looks.

Next I decided to use another old favourite, Wondrous Wreath, to make a second window card. This time I used the coordinating Wonderful Wreath Framelits to create my window.


I actually used a few of the Framelits on the front of this card!


I really struggled with what image to use on this inside that could be seen from the front.  The obvious answer is the flower stamp but I didn't think it would work, so in the end I just opted to stamp a sentiment that wouldn't be visible though the window unless you look at it from an angle, as it the photo.


That's it for me for this month's Blog Hop. Next you're off to Kayleen McLean's blog for lots more Christmas in July fabulousness.


If you find a broken link or have come to this blog hop from a different entry point, you can view the participants below:
  1. Ros Davidson
  2. Rachel Woollard
  3. Tina Gillespie
  4. Kayleen McLean
  5. Claire Daly
  6. Kathryn Ruddick
  7. Judy May
  8. Kathryn Mangelsdorf
  9. Kate Morgan 
Bye for now,

Tina

Thursday, 18 June 2015

AWH Blog Hop: New Annual Catalogue

Hi!


Today I bring you another AWHT blog hop with some of the awesome ladies in the Art With Heart Stampin’ Up! Team. Today our focus is on our New Annual Catalogue!

I would also like to highlight the joining special for the month of June. Our group is one
of the largest teams in Melbourne and offer support, fun and friendship to anyone who would like to join us; from Hobby demonstrators to Business demonstrators to anyone in between. And for the month of June, there is a bonus special, you get to choose any two stamp sets of your choice for free along with your starter kit ($169). What are you waiting for, contact me today to find out more.


My card for this Blog Hop uses three new items: one of the new In Colours, Mint Macaron, a new stamp set called Endless Birthday Wishes, and the new Essentials Piercing Template.  I think Mint Macaron is about to become my favourite green - it's a really pretty, dusky green.

On a side note: do you pronounce it macaron or macaroon? I use the former, but everyone seems to have differing opinions!


I also used some old favourites - the confetti stamp from Dotty Angles and some Dazzling Details.  I used the Dazzling Details to highlight the icing trim on the cake and also some random dots in the confetti background.  It adds a lovely feature to the card without introducing a third colour.


Endless Birthday Wishes is a photopolymer stamp set, which means it's totally clear.  They cling brilliantly to the clear blocks, and lining up your images is a breeze!  There are a ton of words and phrases in both the printed and handwritten fonts that you can mix and match to make a custom sentiment.  Too easy!


Now you're off to see the work of the fabulous Judy May.

If you find a broken link or have come to this blog hop from a different entry point, you can view the participants below:
  1. Kathryn Ruddick
  2. Jenny Van Dijk
  3. Kathryn Mangelsdorf
  4. Nikki Sadler
  5. Ros Davidson
  6. Kate Morgan
  7. Kayleen McLean
  8. Genna Gifford
  9. Tina Gillespie
  10. Judy May