Pages

Sunday 30 August 2020

CTC #283: CASE The Colours Of The Trimming The Town DSP

 Hi!


Thanks for joining me on a cold and wet Sunday evening, or at least it's cold and wet here in Adelaide, which is doubly rude of the weather gods after giving us a very Spring-like day yesterday! Hopefully we starting having more of those sorts of days as we come out of Winter.


This week the CASEing The Catty Sunday Challenge Crew are asking you to CASE the colours in the Trimming The Town DSP. This simply means make something using Misty Moonlight, Old Olive, Pool Party, Poppy Parade, Early Espresso and Whisper White. You can use all of the colours, or just a few. I managed to get all the colours on my card.

scissorspapercard, Stampin' Up!, CASEing The Catty, Peace & Joy Bundle, Coming Home Bundle, Stitched Rectangles Dies, Dainty Diamonds 3DEF, Stampin' Blends

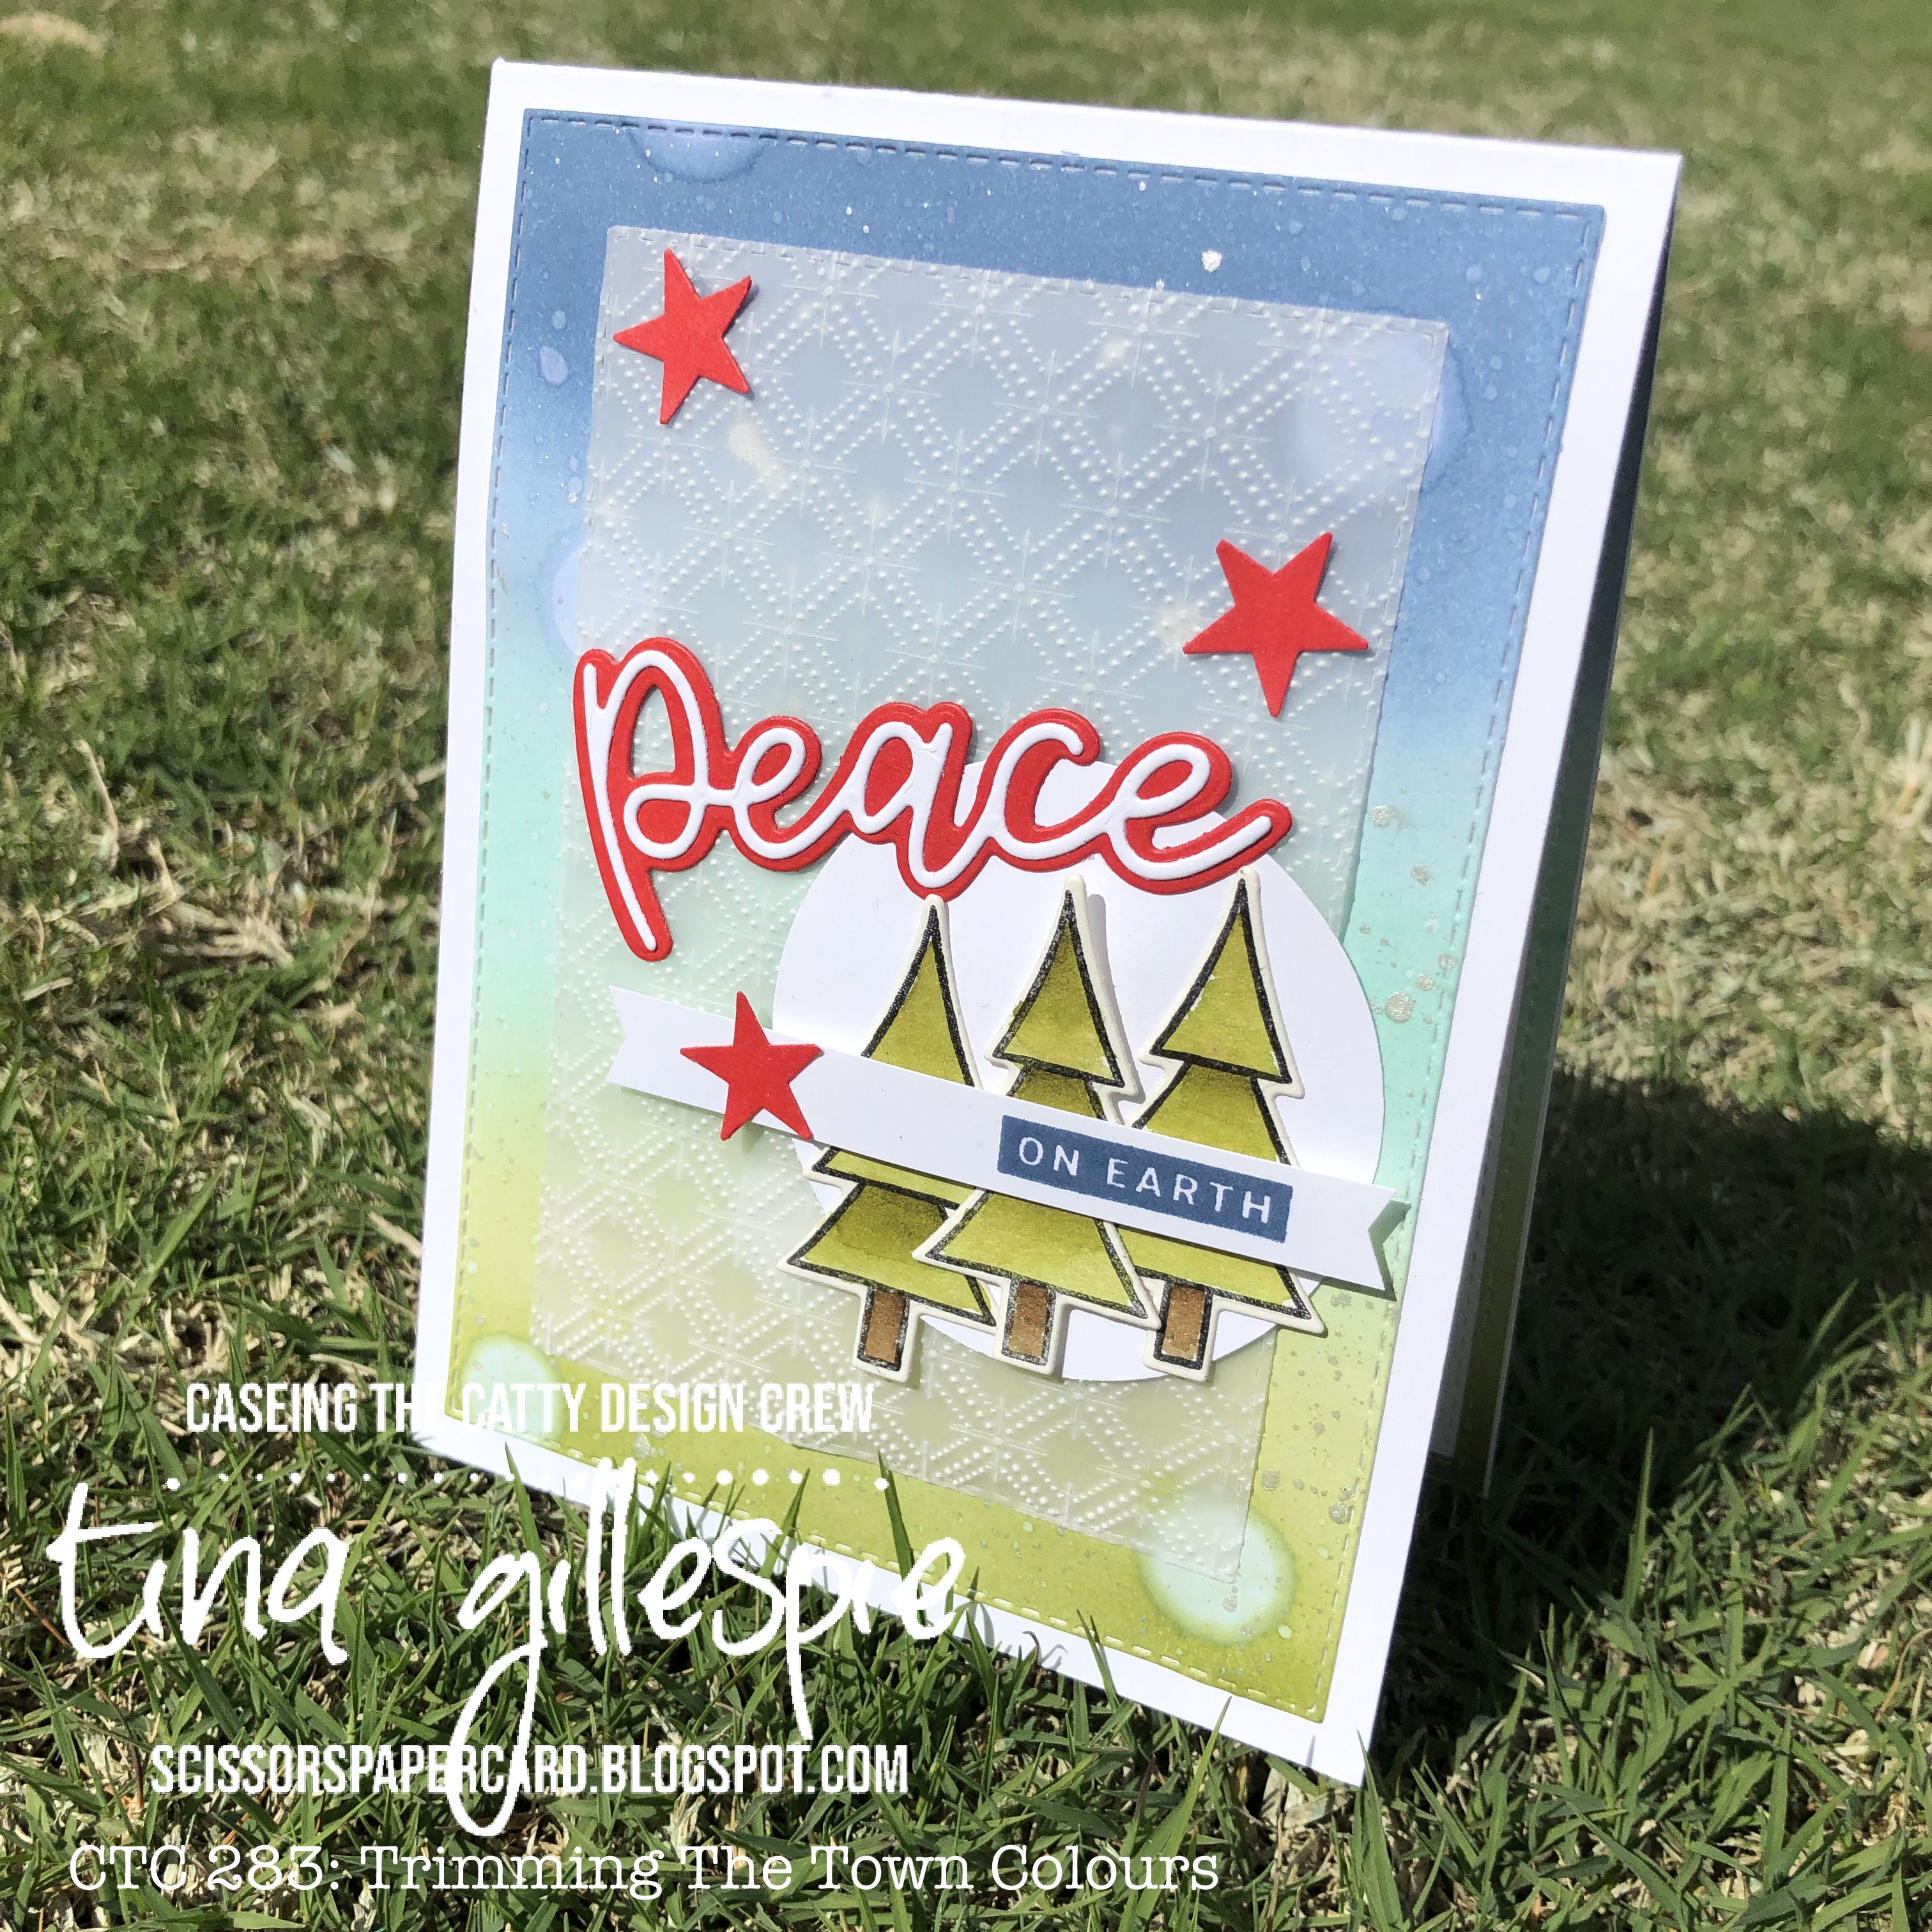
I started by creating my background, which used blending brushes to apply ink to Whisper White card. I started with Pool Party in the middle third, then added Old Olive to the bottom third and Misty Moonlight to the top third. I then splattered some water over the top, followed by some Frost White Shimmer Paint. I did some big blobs of water, which I regretted straight away, so I've tried to hide them under my Dainty Diamonds embossed Vellum layer!

scissorspapercard, Stampin' Up!, CASEing The Catty, Peace & Joy Bundle, Coming Home Bundle, Stitched Rectangles Dies, Dainty Diamonds 3DEF, Stampin' Blends

I had originally planned to have the 'peace on earth' sentiments on my circle layer, but then I realised that the only colour I hadn't used was Early Espresso. The trees from Coming Home solved that problem! They were stamped on watercolour paper and watercoloured, as there aren't Early Espresso Blends.

scissorspapercard, Stampin' Up!, CASEing The Catty, Peace & Joy Bundle, Coming Home Bundle, Stitched Rectangles Dies, Dainty Diamonds 3DEF, Stampin' Blends

When I was making my background for the front, I made it slightly larger so that I could use the offcut for the inside. I die cut a Whisper White Stitched Rectangle the same size as the background and then nestled it inside the offcut on the inside of the card. This time I used Blends on the trees on the inside. I cheated a little and used Bronze for the trunks!

That's all from me for tonight. As always, you can join in with the fun over in our Facebook Group. You just need to make a card based on the challenge, take a photo and upload it to the group. Easy!


Please do continue on with the Blog Hop. Next you're off to see the absolutely adorable card that Siobhan has made. It really is cute!


Bye for now,

Tina

Thursday 27 August 2020

JAI #520: Just Add Guys

 Hi!


Phew! I just squeaked in for this week's Just Add Ink challenge. I've had a busy week, with several appointments for Hudson. I was a little sad to come away from the dentist, as he's now lost all his baby teeth. He's my youngest, so no more tooth fairy in my house.


Anyway, on with the challenge! This week Nikki has challenged us to Add Guys to our cards. Now, I know she meant masculine cards, just in time for Father's Day next month, but I had some new pop culture stamps land in my mailbox this week and one set had the perfect sentiment for this challenge!

scissorspapercard, Stampin' Up!, Ink Road Stamps, The Sassy Club, Just Add Ink, I Smell Ice Cream, Pirate's Gold, Treasure Hunters, World Of Good SDSP

The sentiment, logo and skulls are all from a set by Ink Road Stamps, called I Smell Ice Cream. The logo was stamped on some DSP from the World Of Good SDSP pack that was conveniently already distressed. All I had to do was sponge some extra ink around the edges! The character was from a Sassy Club stamp set, called Treasure Hunters.

scissorspapercard, Stampin' Up!, Ink Road Stamps, The Sassy Club, Just Add Ink, I Smell Ice Cream, Pirate's Gold, Treasure Hunters, World Of Good SDSP

The pirate ship and 'x marks the spot' image are from another Sassy Club set, called Pirate's Gold. As. fun fact, the x literally marks the spot on the map where this story was set! The map DSP is also from the World Of Good SDSP, also sponged and stamped with the pirate images.

scissorspapercard, Stampin' Up!, Ink Road Stamps, The Sassy Club, Just Add Ink, I Smell Ice Cream, Pirate's Gold, Treasure Hunters, World Of Good SDSP

Hehe, I had to finish off the inside with another classic quote and character. The character and his pile of gold are Sassy Club stamps, and the sentiment is from Ink Road Stamps. It's awesome when stamps from two different companies work together so seamlessly!

Now to decide if Rob gets this one for Father's Day or not... LOL! He would love it, so I reckon it will end up in his collection of cards!

That's all rom me today, but please do head on over to the Just Add Ink blog, where you can see the rest of this week's 'Guy' cards from the Design Team. You can also add your card to our gallery. 

Bye for now,

Tina

Wednesday 26 August 2020

Colour Creations: Crushed Curry

Hi! 


It's Colour Creations Showcase time! Yay! Although, I must admit that I find it difficult to get excited about this week's colour - Crushed Curry. I really am not a big fan of yellow, so I found it difficult to start creating this week. In the end I was inspired by my own card from last time we did the Colour Creations, where I used Crushed Curry Ink to colour the negative space on the card.

scissorspapercard, Stampin' Up!, Colour Creations, Ornate Style, Peaceful Moments

Last time I watercolored to apply the ink - this time I masked the large floral image from Ornate Style and used a blending brush to apply the ink, but just in a 'halo' around the flowers.

scissorspapercard, Stampin' Up!, Colour Creations, Ornate Style, Peaceful Moments

Making the masks was quite fiddly. I had to make two so that I could cover both sets of flowers. I stamped the image on two fully adhesive sticky notes. If you can find these they are fabulous, as the entire mask will stick down, not just one edge. The masks were fiddly because I snipped out all the tiny sections without flowers so that the colour would be applied there too. Fiddly, but worth it, I think!

scissorspapercard, Stampin' Up!, Colour Creations, Ornate Style, Peaceful Moments

I repeated the technique again on the inside. You can see that on each set of flowers I coloured the centres with my Crushed Curry Marker. The white of the flowers was a little too white, and needed a touch of something to break up all the white.

Even though I find Crushed Curry a tricky colour, I'm very pleased with this card! You can find the rest of this week's Crushed Curry cards over on Catherine's Blog. She does a wonderful job of keeping us all organised every week!

Bye for now,

Tina

Sunday 23 August 2020

CTC #282: CASE Your Favourite Mini Catalogue Bundle

 Hi!


Wowee! Where did that weekend go? I had a very lovely weekend, because it was my birthday yesterday, but gee, it has flown by! The end of the weekend means that it's time for the new CASEing The Catty Sunday Challenge Blog Hop. Woo Hoo!


This week we are asking you to CASE your favourite bundle from the August - December Mini Catalogue. Don't have one of the bundles? Then just CASE your favourite project made with that bundle, but using what you have. Easy!


My favourite bundle (suite, actually!) is the Coming Home bundle. I really love house stamps and dies, and this is one of the best that Stampin' Up! have released. Even better, for every stamp set sold, SU is donating money to charities that support people through adoption, foster care and infertility.

scissorspapercard, Stampin' Up!, CASEing The Catty, Coming Home Bundle, Trimming The Town DSP

I decided to use this opportunity to try something that I've wanted to do since seeing the bundle - a double opening card. It's a great way to make a scene with a lot of dimension, but it can still be flat enough to mail easily. I started with a slightly smaller than card front pice of Whisper White card. I then  cut a flap from Pear Pizzazz cardstock using the sloped die with no trees. I folded a small section of the right side of the card around to the back and adhered it to the bottom right side of the Whisper White piece, ensuring that it lined up at the bottom. I then decorated with the house, wreath and trees.

scissorspapercard, Stampin' Up!, CASEing The Catty, Coming Home Bundle, Trimming The Town DSP

The second flap was cut from Old Olive cardstock using the sloped die with trees. It was scored on the left and adhered to the left side of the Whisper White card, and again decorated with a house, wreath, trees and a card on a road. Most of the elements on the card were cropped from the DSP, but the car and wreaths were stamped and coloured before being added to the card.

scissorspapercard, Stampin' Up!, CASEing The Catty, Coming Home Bundle, Trimming The Town DSP

When both side flaps are opened, the card reveals yet another house, this time with the mountains as a backdrop. The second storey of the house was cropped from the edge of the DSP. It was missing it's bottom half, but by turning it into a second level of another house it can still be useful. Conveniently, the stripes on both houses matched! 

scissorspapercard, Stampin' Up!, CASEing The Catty, Coming Home Bundle, Trimming The Town DSP

All of these layers were attached to a card front sized piece of Misty Moonlight cardstock. It isn't a folding card base, just a flat piece. The flaps on the front will support the card to stand up, so it didn't need a folding base. I created another little scene on the back so that there was somewhere to write a message. It's not your usual card, but I'm thrilled with how it turned out.

As always, you can join in with our challenge by taking a photograph of your card and adding it to our Facebook Group. You don't need a blog or any fancy equipment, so it's super easy to enter!


Before you race off to get creating, don't forget to finish the blog hop! Next up is the wonderful Michelle, who just happened to have celebrated her birthday yesterday, too!

Bye for now,

Tina

Thursday 20 August 2020

JAI #519: Just Add Colour

 Hi!


Yay for Friday and Just Add Ink time! This week Jo has provided us with this wonderful colour combination to guide our creativity.


I'm definitely a blue girl, so this combo was right up my alley!

scissorspapercard, Stampin' Up!, Ink Road Stamps, Just Add Ink, Robin Inked Girl, Golden Honey SDSP, Stampin' Blends, Copics, Stitched Rectangles Dies

I stared by taking a piece of the retired Golden Honey SDSP and coloured the white stripes with my Stampin' Blends. I coloured every second stripe with Purple Posy and then alternated between Seaside Spray and Misty Moonlight for the rest of the stripes.

scissorspapercard, Stampin' Up!, Ink Road Stamps, Just Add Ink, Robin Inked Girl, Golden Honey SDSP, Stampin' Blends, Copics, Stitched Rectangles Dies

The images and sentiments are from an Ink Road Stamps set called Robin - named after one of the 'Roadies', which is very cool! Roadies are fans of the company. I had to cheat a little and use some brown Copics for her hair, because the person this is going to would not have liked a girl with blue or purple hair! She does like her bling though, so I added a length of the sparkly ribbon to make her happy. The main image and sentiment are also matted in retired Black Foil.

scissorspapercard, Stampin' Up!, Ink Road Stamps, Just Add Ink, Robin Inked Girl, Golden Honey SDSP, Stampin' Blends, Copics, Stitched Rectangles Dies

This card was for a group of people to sign, so to leave enough space, I made a trifold card. The corkscrew was stamped on the first flap in both Purple Posy and Seaside Spray, and then in Memento coloured with Misty Moonlight for the main image. 

scissorspapercard, Stampin' Up!, Ink Road Stamps, Just Add Ink, Robin Inked Girl, Golden Honey SDSP, Stampin' Blends, Copics, Stitched Rectangles Dies

This strip of DSP was left over from the front. I had deliberately made the front pice wider than I needed it when I coloured it so that I could trim off this piece to use on the inside, which can also be seen the the first flap is opened. My friend will love this card, and the sentiments. In fact, I purchased this set solely to make cards for her, as she's my wine and cheese buddy. That's on hold a bit for now, but hopefully it won't be long before we can raise a glass.

On that note, it's time to head on over to the Just Add Ink blog, where you can find the rest of this week's Design Team cards. What do you see in these colours? I can't wait to see what you create.

Bye for now,

Tina

Wednesday 19 August 2020

Colour Creations: Crumb Cake

Hi!


It's that time of week again - the Colour Creations Showcase! This week we are featuring everyone's favourite Neutral, Crumb Cake. Well, It's certainly my favourite Neutral!

I've been toying with the idea of doing a sort of sepia toned card for a couple of months now, and this seemed like the perfect opportunity to play.

scissorspapercard, Stampin' Up!, Colour Creations, Bloom and Grow, Blossoms In Bloom, Ornate Layers Dies, Stitched Rectangles Dies, Subtle 3DEF, Stampin' Blends, Neutrals DSP, Chalk Marker

I started by stamping the floral image from Bloom And Grow in Memento ink on Crumb Cake cardstock. I tried Crumb Cake ink, but I just couldn't get it to work. I then coloured the image with my Light and Dark Stampin' Blends. I have to say that I was pleasantly surprised with how well the Crumb Cake cardstock stood up to the colouring that I did with the markers. I then used my Chalk Marker to add some highlights to the berries and to outline the image so that it popped from the page. I wish I had the confidence to add some more highlights to the flowers with the Chalk Marker. A good excuse to play with the technique some more!

scissorspapercard, Stampin' Up!, Colour Creations, Bloom and Grow, Blossoms In Bloom, Ornate Layers Dies, Stitched Rectangles Dies, Subtle 3DEF, Stampin' Blends, Neutrals DSP, Chalk Marker

The Whisper White card base was stamped with the same floral image in stamped-off Crumb Cake. I then ran it through my Big Shot twice using the Subtle 3DEF, once in each direction. The main image was cropped using a die from the Ornate Layers Dies.

scissorspapercard, Stampin' Up!, Colour Creations, Bloom and Grow, Blossoms In Bloom, Ornate Layers Dies, Stitched Rectangles Dies, Subtle 3DEF, Stampin' Blends, Neutrals DSP, Chalk Marker

The sentiments on this card are both from the Blossoms In Bloom stamp set.

I had a lot of fun with the sepia effect. I think it would look great with larger floral images, like Ornate Style, or the large sunflower stamp (I forgot the name!). Hopefully I get a chance to try it out.

The links to the rest of this week's Crumb Cake cards can be found at the lovely Catherine's blog. She does a wonderful job of hosting the Showcase each week.

Bye for now,

Tina

Monday 17 August 2020

Heart Of Christmas: August

Hi!


Welcome to August's Heart Of Christmas Showcase! The Art With Heart team are participating in a Monthly event in the lead up to Christmas. It's never too early to start on our Christmas cards, and so we hope we can inspire you to get creating!

This month I have a group of four cards that were once again inspired by my friend, Rachel Palmieri. She's been amazing at getting out of her comfort zone and doing Facebook videos, and I saw this technique in one of her videos.

scissorspapercard, Stampin' Up!, Heart Of Christmas, Brightly Gleaming SDSP, Joy Dies, Painted Labels Dies, Subtle 3DEF, Christmas Card

Basically, you take a 6 inch (15cm) square piece of DSP (non-directional is best), and measure in about 1 3/4 inch (3-4cm) from each side. You then cut the piece in half twice, from mark to mark, skipping one mark. You end up with four pieces of DSP that are a fun shape, ready to glue onto a card base. I went one step further and cut some cardstock the same way (but slightly bigger) to matt the DSP.

scissorspapercard, Stampin' Up!, Heart Of Christmas, Brightly Gleaming SDSP, Joy Dies, Painted Labels Dies, Subtle 3DEF, Christmas Card

I embossed the Thick Very Vanilla card base with my Sublte 3DEF before gluing on the DSP. I then used my Painted Labels and Joy Dies to create the sentiment panel. The label was cut from Copper Foil, which matches the DSP. I cut the word 'Joy' from the inside of the label, where I knew it would be covered by the layered die cuts. You can see that on the inside I used a little strip of the same DSP and Pretty Peacock cardstock as decoration.

scissorspapercard, Stampin' Up!, Heart Of Christmas, Brightly Gleaming SDSP, Joy Dies, Painted Labels Dies, Subtle 3DEF, Christmas Card

The best part about this cutting method is that, for not much more effort than it would take to make one card, you get four cards! It's a great way to boost your card stash very quickly. I will certainly be trying it with other papers. This paper is the gorgeous Brightly Gleaming SDSP, which has carried over from last year's Holiday Catalogue.

Tat's all from tonight, but please do pop on over to my lovely friend, Judy's blog, where you can find the rest of this month's cards.

Bye for now,

Tina

Sunday 16 August 2020

CTC #281: CASE The Punch Bundles

Hi!


Is it just me, or did this weekend go by super quickly? I had a busy day yesterday, sewing the backing for a quilt for my son, Alex. It's all packed up, ready to go off to the quilter now. Today I decided to have a lovely relaxing day reading on the lounge. So relaxing, the I nearly forgot to write this blog post! I've started it with 40 minutes until it is due to go live. Oops!


This week the CASEing The Catty Sunday Challenge are looking at the Punch Bundles section of the Annual Catalogue, which is on pages 168 and 169. I settled on this gorgeous floral card fro the bottom of page 169.


My friend, Rachel Palmieri has made a few cards lately with the Bloom and Grow bundle, which had me itching to pay with mine again. This was the perfect opportunity.

scissorspapercard, Stampin' Up!, CASEing The Catty, Peaceful Blooms, Bloom and Grow, Subtle 3DEF, Budding Blooms Dies, Stitched Shapes Dies, Stampin' Blends, Banners Pick A Punch, Champagne Foil

I started with a Thick Whisper White card base, and used my paper trimmer to score two lines at the top and bottom of the card. I then used a blending brush to apply some Pool Party ink to the space in between, but only in the centre, under where the flowers were going to sit.

scissorspapercard, Stampin' Up!, CASEing The Catty, Peaceful Blooms, Bloom and Grow, Subtle 3DEF, Budding Blooms Dies, Stitched Shapes Dies, Stampin' Blends, Banners Pick A Punch, Champagne Foil

The flowers were colour with Stampin' Blends, but just straight colouring. I wasn't in the mood for fancy blending, so I didn't! I used Purple Posy, Petal Pink, Highland Heather, Pear Pizzaz and So Saffron, and then went around the edge with Pool Party. I went for softer colours than I usually use, but I really liked how it turned out. A bit of Champagne Foil and some Champagne Rhinestones finished off the front.

scissorspapercard, Stampin' Up!, CASEing The Catty, Peaceful Blooms, Bloom and Grow, Subtle 3DEF, Budding Blooms Dies, Stitched Shapes Dies, Stampin' Blends, Banners Pick A Punch, Champagne Foil

I stamped and coloured the inside of the card at the same time as I coloured the front. I realised about half way through that the alcohol ink would probably show through to the back. Thankfully my decision to use straight colours rather than blending meant that the ink didn't bleed though. Phew!

Our challenge is hosted through our Facebook group. It's easy to join, and then you can add your photo to the group for the week's challenge.


That's all from me tonight. I have about 50 pages left in my book, so I'm off to finish that! But I'd love for you to finish the Blog Hop, starting with the wonderful Peta. She's been in Christmas card mode! I wonder what Marvi thinks of that?


Bye for now,

Tina

Thursday 13 August 2020

JAI #518: Just Add T

Hi!


Yay for Friday and the new Just Add Ink challenge. This week it's one of my Alphabet challenges, and the letter selected for this week is T.
I recently received a stamp set from Kindred Stamps that I have been wanting for a long time - Strong Maiden. I used it to make a Triple Easel Card for my sister's birthday. I'm a bit ashamed to say that her birthday was back in March - that's how long I've been waiting for the stamp! She's a big fan of the TV show that this stamp is a homage to.
scissorspapercard, Stampin' Up!, Kindred Stamps, Just Add Ink, Strong Maiden, In Good Taste DSP, Rainbow Builder Dies, Stampin' Blends
I started by using my cloud template to create the stormy clouds on the back piece of the card. I used Smokey Slate ink and a blending brush. The next two sections were created using the In Good Taste DSP. I used my blending brush to apply Early Espresso ink to the DSP, as it was far too white for the look I was after.
scissorspapercard, Stampin' Up!, Kindred Stamps, Just Add Ink, Strong Maiden, In Good Taste DSP, Rainbow Builder Dies, Stampin' Blends
The footpath was hand drawn and coloured using my Smokey Slate Stampin' Blends. I added another little homage to the TV show - a hidden sentiment!
scissorspapercard, Stampin' Up!, Kindred Stamps, Just Add Ink, Strong Maiden, In Good Taste DSP, Rainbow Builder Dies, Stampin' Blends
Here you can see how the card lays flat for posting. Starting with the front section, you just lay each one down flat. Easy! This sentiment is also a little hidden when the card is open, but it adds a little weight to hep the easel part of the card sit nicely.
scissorspapercard, Stampin' Up!, Kindred Stamps, Just Add Ink, Strong Maiden, In Good Taste DSP, Rainbow Builder Dies, Stampin' Blends
The base of the card is the best place for writing a message. I decorated it with another character from the TV show. I hope my sister loves the card, and forgives me for it being so very late!

That's all from me for now, please pop on over to the Just Add Ink blog, where you can find the rest of this week's T cards. What will you make? You can use a technique, stamp set, colour, theme, embellishment - anything as long as it starts with T! I can't wait to see what you make.

Bye for now,

Tina