Hi!
Have you earned yourself a Sale-A-Bration freebie yet? One of the first stamp sets I chose was Delicate Details. I love the different lacy patterns, and thought they'd look perfect on a vintage style card.
I made this card for a card class, and decided after I'd made it that I probably should have stamped the lace down both sides of the flower panel. It was all stuck down, so I couldn't pull it up to stamp it, nor did I have time to make it again. I still like it this way though!
I ended up with two spare kits, so I decided to have a play and actually make it with the second lace border. What do you think? It's a definite improvement, I think.
I stamped it with a bit more splatter the third time. I probably went a little overboard on this one though!
Here's the inside of the card. I left it the same for all three versions. What do you think of the lace in Elegant Eggplant? I love it!
Bye for now,
Tina
Showing posts with label Papillion Potpourri. Show all posts
Monday, 30 January 2017
Thursday, 14 August 2014
Papillion Potpourri Tag
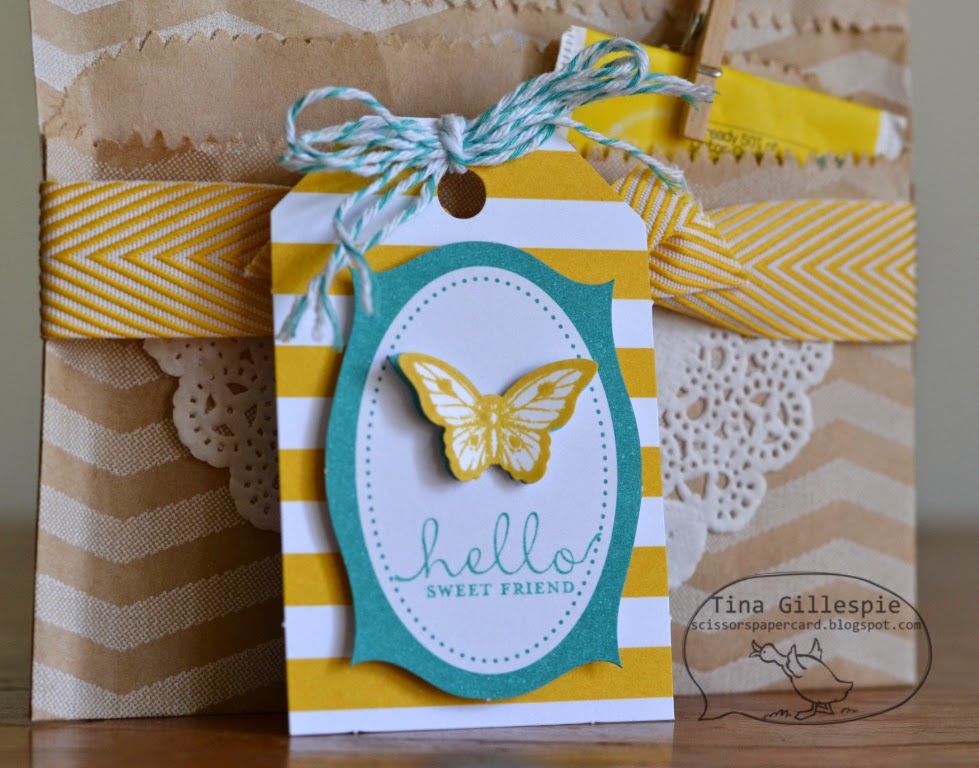
Hi!
A quick post today, as I missed posting yesterday and I'm flat out today. Phew!
I made this tag as a second Make and Take project for a party a few months ago. The party was quite large and I wanted a second project to keep everyone busy and not waiting around for supplies to be passed around the table. It uses a few retired products and colours, but I thought I'd post it anyway as it's so cute, and a really quick and easy project to put together.
It's a bit hard to see, but the tag was embossed with the retired frames embossing folders. The Oval punchie fit perfectly inside the embossing. We also used the Mosaic and Butterfly punches to create the layers. The Papillion Potpourri stamp set is a lovely one and I sold a few that night!
Bye for now,
Tina
A quick post today, as I missed posting yesterday and I'm flat out today. Phew!
I made this tag as a second Make and Take project for a party a few months ago. The party was quite large and I wanted a second project to keep everyone busy and not waiting around for supplies to be passed around the table. It uses a few retired products and colours, but I thought I'd post it anyway as it's so cute, and a really quick and easy project to put together.
It's a bit hard to see, but the tag was embossed with the retired frames embossing folders. The Oval punchie fit perfectly inside the embossing. We also used the Mosaic and Butterfly punches to create the layers. The Papillion Potpourri stamp set is a lovely one and I sold a few that night!
Bye for now,
Tina
Wednesday, 23 July 2014
Some More Stamped Candles
Hi!
A little while ago I showed you some stamped candles I'd made as a gift on commission. Well, when the recipient's friend saw them she loved them, and so I was asked to make another set for her birthday. Because they were for the friend of the first recipient I had to make them differently.
This time I used the floral stem from Thoughts And Prayers as well as a small butterfly from Papillion Potpourri. My brief was flowers and butterflies so I thought these two in combination worked well.
The DSP on this card was from the retired Modern Medley DSP that I brayered over with Melon Mambo ink to match the pink in the stamping.
I used my markers on the floral stem stamp to give the two colour effect. It's a great trick!
Here is the candle and the card together. I actually made 4 candles and boxed them up in a set. Silly me forgot (again!) to take a photo of the gift box.
Bye for now,
Tina
A little while ago I showed you some stamped candles I'd made as a gift on commission. Well, when the recipient's friend saw them she loved them, and so I was asked to make another set for her birthday. Because they were for the friend of the first recipient I had to make them differently.
This time I used the floral stem from Thoughts And Prayers as well as a small butterfly from Papillion Potpourri. My brief was flowers and butterflies so I thought these two in combination worked well.
The DSP on this card was from the retired Modern Medley DSP that I brayered over with Melon Mambo ink to match the pink in the stamping.
I used my markers on the floral stem stamp to give the two colour effect. It's a great trick!
Here is the candle and the card together. I actually made 4 candles and boxed them up in a set. Silly me forgot (again!) to take a photo of the gift box.
Bye for now,
Tina
Friday, 11 July 2014
JAI #222: Just Add Colour
Hi!
It's Friday so I'm here with the new Just Add Ink Challenge. This week we have a gorgeous colour combination for you courtesy of Mae.
It took me a little while to think of what to do with this card, but once I got an idea it came together pretty quickly. I used a lot of retired product on this card - some recently retired, some has been retired for a while.
I started with the DSP on the base. It's from the long retired Twitterpated DSP - a favourite of mine. I didn't have enough to cover the entire front so I trimmed it into four pieces. To soften the gaps I covered the bottom one with the retired Flower Trim and the top ones with the leaf die cuts.
I was a little worried that the Bermuda Bay would be too strong a colour for the rest of the card so I stamped it off once before I stamped on the card.
I liked the leaves so I added a few more to the inside to finish it off.
I hope you can play along with us at Just Add Ink this week - it's a great colour combination.
Bye for now,
Tina
It's Friday so I'm here with the new Just Add Ink Challenge. This week we have a gorgeous colour combination for you courtesy of Mae.
It took me a little while to think of what to do with this card, but once I got an idea it came together pretty quickly. I used a lot of retired product on this card - some recently retired, some has been retired for a while.
I started with the DSP on the base. It's from the long retired Twitterpated DSP - a favourite of mine. I didn't have enough to cover the entire front so I trimmed it into four pieces. To soften the gaps I covered the bottom one with the retired Flower Trim and the top ones with the leaf die cuts.
I was a little worried that the Bermuda Bay would be too strong a colour for the rest of the card so I stamped it off once before I stamped on the card.
I liked the leaves so I added a few more to the inside to finish it off.
I hope you can play along with us at Just Add Ink this week - it's a great colour combination.
Bye for now,
Tina
Friday, 13 June 2014
JAI #218: Just Add Colour
Hi!
This month we say goodbye to retiring products from the current Annual Catalogue, so at Just Add Ink we though we'd challenge you to use some of your retiring colours. Your creation should use three of the retiring In Colours. Kim is the brains behind this fabulous challenge!
I decided to go with Raspberry Ripple, Primrose Petals and Midnight Muse on my card.
I was really pleased with how the background turned out on this card. After I made it though I was a bit stumped as to what to put over the top of it. Hubby suggested I go with a curved shape to offset all of the angles of the hexagons. I think he was right!
The larger butterfly is from the retiring Beautiful Butterflies Bigz Die, which I will miss a lot.
I think the two pinks look very pretty layered together on the butterflies - what do you think?
I hope you can play along with us this week. Which are your favourite colours from the retiring In Colours? See you over at Just Add Ink.
Bye for now,
Tina
This month we say goodbye to retiring products from the current Annual Catalogue, so at Just Add Ink we though we'd challenge you to use some of your retiring colours. Your creation should use three of the retiring In Colours. Kim is the brains behind this fabulous challenge!
I decided to go with Raspberry Ripple, Primrose Petals and Midnight Muse on my card.
I was really pleased with how the background turned out on this card. After I made it though I was a bit stumped as to what to put over the top of it. Hubby suggested I go with a curved shape to offset all of the angles of the hexagons. I think he was right!
The larger butterfly is from the retiring Beautiful Butterflies Bigz Die, which I will miss a lot.
I think the two pinks look very pretty layered together on the butterflies - what do you think?
I hope you can play along with us this week. Which are your favourite colours from the retiring In Colours? See you over at Just Add Ink.
Bye for now,
Tina
Monday, 19 May 2014
Papillion Potpourri Mother's Day Card
Hi!
I'm back today with another of the Mother's Day cards I made this year. This one was made as a class sample, and was made to be versatile. It could easily be made into a birthday card by changing the sentiment in the middle.
I CASEd this card, not changing much. Why mess with a great card?
I thought the use of the butterflies was perfect for a lovely, soft feminine card.
Bye for now,
Tina
I'm back today with another of the Mother's Day cards I made this year. This one was made as a class sample, and was made to be versatile. It could easily be made into a birthday card by changing the sentiment in the middle.
I CASEd this card, not changing much. Why mess with a great card?
I thought the use of the butterflies was perfect for a lovely, soft feminine card.
Bye for now,
Tina
Wednesday, 7 May 2014
Sweet Sorbet Card Box
Hi!
As I mentioned on Monday, I found 2 Sale-A-Bration projects that I hadn't blogged yet, so I decided to blog them this week. Are you missing the Sweet Sorbet DSP as much as I am? I have stashed away a few packs for a future project!
This box was my monthly class project in March. The ladies got to construct the box using the Envelope Punch Board and then made some cards to go inside.
It was a fabulous project. I ended up making a few more cards (it easily fit 5) and gave it as a gift to my mum. Now she has a small stash of cards to use for a variety of occasions.
Here are the two cards we made in class. I used some more of the Sweet Sorbet DSP on them, as well as the Papillion Potpourri stamp set.
I deliberately kept the cards nice and flat with no embellishments to stick out so that they slide in and out of the box easily.
Bye for now,
Tina
As I mentioned on Monday, I found 2 Sale-A-Bration projects that I hadn't blogged yet, so I decided to blog them this week. Are you missing the Sweet Sorbet DSP as much as I am? I have stashed away a few packs for a future project!
This box was my monthly class project in March. The ladies got to construct the box using the Envelope Punch Board and then made some cards to go inside.
It was a fabulous project. I ended up making a few more cards (it easily fit 5) and gave it as a gift to my mum. Now she has a small stash of cards to use for a variety of occasions.
Here are the two cards we made in class. I used some more of the Sweet Sorbet DSP on them, as well as the Papillion Potpourri stamp set.
I deliberately kept the cards nice and flat with no embellishments to stick out so that they slide in and out of the box easily.
Bye for now,
Tina
Monday, 28 April 2014
Tag A Bag Kits
Hi!
I was browsing through my "To Blog" folder on my computer and found these Tag A Bag kit gift bags that I'd made as a class sample. I thought it was about time I blogged them!
I'm sure I got the inspiration for these somewhere online, but it's been so long since I made them that I can't remember where. The bags are folded, not quite in half, to form a couple of pockets.
In the back pocket I had a tasty treat - I think it was a home made biscuit. The kids ate them before I had a chance to photograph them! In the front pocket was a tea bag and a tag, which you can see in the next picture.
These were so quick and easy to put together, and make a lovely "thinking of you" type gift. Who doesn't like sitting down to a cuppa and bikkie knowing that a friend is thinking of them?
Bye for now,
Tina
I was browsing through my "To Blog" folder on my computer and found these Tag A Bag kit gift bags that I'd made as a class sample. I thought it was about time I blogged them!
I'm sure I got the inspiration for these somewhere online, but it's been so long since I made them that I can't remember where. The bags are folded, not quite in half, to form a couple of pockets.
In the back pocket I had a tasty treat - I think it was a home made biscuit. The kids ate them before I had a chance to photograph them! In the front pocket was a tea bag and a tag, which you can see in the next picture.
These were so quick and easy to put together, and make a lovely "thinking of you" type gift. Who doesn't like sitting down to a cuppa and bikkie knowing that a friend is thinking of them?
Bye for now,
Tina
Labels:
3D Projects,
Bag A Tag,
Papillion Potpourri,
Six Sided Sampler
Monday, 12 August 2013
Strawberry Slush Modern Medley
Hi!
I really love the Modern Medley DSP in the new catalogue. I decided to have a play one day and see what the paper looked like in colour. What do you think?
To get the colour I simply brayered the Strawberry Slush ink over the Modern Medley DSP. I love the result. I think the card looks a bit like lingerie - I think it's the lace and black ribbon!
A bit different to my usual card making style, but sometimes it's fun to experiment.
I hope you have a great week.
Bye for now,
Tina
I really love the Modern Medley DSP in the new catalogue. I decided to have a play one day and see what the paper looked like in colour. What do you think?
To get the colour I simply brayered the Strawberry Slush ink over the Modern Medley DSP. I love the result. I think the card looks a bit like lingerie - I think it's the lace and black ribbon!
A bit different to my usual card making style, but sometimes it's fun to experiment.
I hope you have a great week.
Bye for now,
Tina
Wednesday, 7 August 2013
With Sympathy
Hi
Firstly, apologies for the long blog absence. And that's about where I stop knowing what to write.
Sadly, a day after writing my last post we got the shocking news that Rob's dad Neil had died suddenly while visiting family in the UK. And so began the long and emotional task of bringing him home for burial. We were finally able to lay him to rest on Saturday in a beautiful, heart wrenching ceremony.
We miss him so much, and it's going to take a long time to recover and for life to feel normal again. Part of that is getting back into my papercrafting and blogging again. One step at a time.
Ironically, I'd made this card in the weeks before Neil's passing. It was meant to be my Just Add Ink Design Team entry for the challenge after he died. I hadn't made a Sympathy card for a very long time prior to this one. Funny how the universe works sometimes.

Bye for now,
Tina
Firstly, apologies for the long blog absence. And that's about where I stop knowing what to write.
Sadly, a day after writing my last post we got the shocking news that Rob's dad Neil had died suddenly while visiting family in the UK. And so began the long and emotional task of bringing him home for burial. We were finally able to lay him to rest on Saturday in a beautiful, heart wrenching ceremony.
We miss him so much, and it's going to take a long time to recover and for life to feel normal again. Part of that is getting back into my papercrafting and blogging again. One step at a time.
Ironically, I'd made this card in the weeks before Neil's passing. It was meant to be my Just Add Ink Design Team entry for the challenge after he died. I hadn't made a Sympathy card for a very long time prior to this one. Funny how the universe works sometimes.
Bye for now,
Tina
Monday, 24 June 2013
Farewell First Edition
Hi!
For the rest of the month I'm going to be doing some farewell posts, saying goodbye to some of my favourite retiring products and stamps. First off the ranks is the First Edition Specialty DSP. I guess I was a little lucky with this DSP as it was current for two years rather than the typical one year.
I loved the versatility of the DSP as a background paper for both male and female cards. This post should also include the Rose Red Seam Binding Ribbon, for sadly it too is being retired. Thankfully there will still be other colours of Seam Binding available.
The butterfly was stamped with Papillion Potpourri and then punched using the Elegant Butterfly punch. I also used some Dazzling Details on the body of the butterfly for some subtle shimmer.
Some more butterflies to finish off the inside.
So farewell to First Edition SDSP (and Rose Red Seam Binding) but as I still have nearly a whole pack of it I'm sure you'll see bits of it here and there on my blog.
Stamps: Papillion Potpourri, Field Flowers, Creative Elements
Ink: Rose Red, Wisteria Wonder
DSP/Cardstock: First Edition SDSP, Rose Red, Very Vanilla
Other: Big Shot, Ovals Collection Framelits, Elegant Butterfly Punch, Rose Red Seam Binding Ribbon, Dazzling Details, Dimensionals
Bye for now,
Tina
For the rest of the month I'm going to be doing some farewell posts, saying goodbye to some of my favourite retiring products and stamps. First off the ranks is the First Edition Specialty DSP. I guess I was a little lucky with this DSP as it was current for two years rather than the typical one year.
I loved the versatility of the DSP as a background paper for both male and female cards. This post should also include the Rose Red Seam Binding Ribbon, for sadly it too is being retired. Thankfully there will still be other colours of Seam Binding available.
The butterfly was stamped with Papillion Potpourri and then punched using the Elegant Butterfly punch. I also used some Dazzling Details on the body of the butterfly for some subtle shimmer.
Some more butterflies to finish off the inside.
So farewell to First Edition SDSP (and Rose Red Seam Binding) but as I still have nearly a whole pack of it I'm sure you'll see bits of it here and there on my blog.
Stamps: Papillion Potpourri, Field Flowers, Creative Elements
Ink: Rose Red, Wisteria Wonder
DSP/Cardstock: First Edition SDSP, Rose Red, Very Vanilla
Other: Big Shot, Ovals Collection Framelits, Elegant Butterfly Punch, Rose Red Seam Binding Ribbon, Dazzling Details, Dimensionals
Bye for now,
Tina
Monday, 7 January 2013
More CAS Butterflies
Hi!
On Friday I blogged a CAS Birthday card that I had CASEd from Mary Fish. You can see that card here. I also mentioned I'd made two in the one sitting. Today's card is the second card I made, which was a get well soon card for a friend who was recovering from surgery on her arm.
The cards are identical, only the sentiments are different. It's a handy trick to make two cards at once, a great time saver, and a god way to boost your stash of 'just in case' cards.
Bye for now,
Tina
Friday, 4 January 2013
Clean and Simple Butterflies
Hi!
A quick card today, at 44 degrees in Adelaide it's too hot for much else!
I love the clean look of the white on white layering. I think I CASED this card from Mary Fish as it's very much in her CAS style, but I didn't save a link and I'm too hot to be bothered going looking for it.
EDIT: The temperature has cooled off and so while the kids were watching a movie I went hunting for the card I CASEd. You can find it here.
I made a second similar card at the same time, but I'm saving that one for another day!
Bye for now,
Tina
Friday, 30 November 2012
JAI #146: Just Add Colour
Hi!
Doing a happy dance here, because it's Friday!
Time for another challenge at Just Add Ink. This week Kim has challenged us with this very pretty colour combination.
I decided to make a pretty, feminine card.
The papers were from the Festival Of Prints DSP Stack and the Comfort Cafe DSP pack. They look so pretty together! The butterflies are from the Papillion Potpourri stamp set. I stamped the centre one twice, punched out one with my Elegant Butterfly Punch and curled the wings to give it some depth.
The Basic Jewel Pearls really finish off the butterflies.
Some more butterflies and Pool Party Baker's Twine to finish off the inside.
I hope you can play along this week at Just Add Ink.
Bye for now,
Tina
Doing a happy dance here, because it's Friday!

I decided to make a pretty, feminine card.
The papers were from the Festival Of Prints DSP Stack and the Comfort Cafe DSP pack. They look so pretty together! The butterflies are from the Papillion Potpourri stamp set. I stamped the centre one twice, punched out one with my Elegant Butterfly Punch and curled the wings to give it some depth.
The Basic Jewel Pearls really finish off the butterflies.
Some more butterflies and Pool Party Baker's Twine to finish off the inside.
I hope you can play along this week at Just Add Ink.
Bye for now,
Tina
Saturday, 22 September 2012
New Annual Catalogue Blog Hop
Hi!
Here we are once again on another blog hop. I love blog hops - they are such a wonderful way to spend some time gaining lots of inspiration. The only thing better is stamping time!!! There are 7 of us on this hop today so it won't take you long, but you're bound to find some fabulous ideas along the way. We are all focusing on products from the New Annual Catalogue The blog before mine is the clever Margaret Knoops. Start or stop anywhere, it doesn't matter - just keep following the links to hop round the circle until you get back to where you started. Please leave some comments along the way - we all love to know what you think of our projects.
My projects today were made for a special purpose. My youngest finished preschool last week so they were made as gifts to give to his teachers and aides.
I made each teacher a card and decorated a candle to go in a goodie bag with some wine and chocolate. I used the Floral District DSP as the basis for all my cards. Here's a closer look at the stamped panel, cut using a Floral Frames Framelit.
The butterfly from Papillion Potpourri was stamped directly onto the panel, and then a second time onto a scrap of cardstock without reinking. This gives a more muted effect with the colour. I then punched it with the new Elegant Butterfly punch, curled the wings and adhered it with a glue dot over the top of the first butterfly.
The handprint isn't a stamp - it's Hudson's actual handprint. I rubbed his hand on my Daffodil Delight ink pad and then stamped his hand onto the cardstock. He had great fun 'helping' me. I did it just before bathtime so I didn't have to worry about inky handprints everywhere!
Here's the same card and candle, just in Rose Red. I made three sets at the same time in a bit of a production line.
The candles were bought as a set of three, I just cut a small strip of DSP to stick to the glass and tied some coordinating ribbon around the DSP. I popped them in a cellophane bag and tied the top with more ribbon. How lucky to find candles that colour matched the DSP so well!
Finally, the Baja Breeze card. This one was for the Director of the centre, who is a man, so I tried to tone down the 'girliness' of the cards. I kept the butterfly though, as I thought it was a great symbol of how Hudson has grown and changed while he's been at preschool.
Here they are together. I had fun making these special gifts, and I hope the recipients love them. It's hard to say but I think I like the Baja Breeze set the most - but I am a bit partial to blue!
Stamps: Notable Alphabet, Papillion Potpourri, Daydream Medallions, For My Family
Ink: Rose Red, Rich Razzleberry, Baja Breeze, Daffodil Delight
DSP/Cardstock: Floral District DSP, Confetti White (retired), Rose Red, Rich Razzleberry, Baja Breeze, Whisper White
Other: Big Shot, Floral Frames Framelits, Elegant Butterfly Punch, Rose Red Seam Binding Ribbon, Whisper White Stitched Grosgrain Ribbon, Rich Razzleberry Stitched Grosgrain Ribbon, Basic Jewels Rhinestones, Glue Dots
Non-SU: Scented Candles, Cellophane Bags
Now you're off to see the fabulous creations over at Di Dunk's blog. Please remember to leave a comment before you go, just click on the but below that says "Comments".
Bye for now,
Tina
Here we are once again on another blog hop. I love blog hops - they are such a wonderful way to spend some time gaining lots of inspiration. The only thing better is stamping time!!! There are 7 of us on this hop today so it won't take you long, but you're bound to find some fabulous ideas along the way. We are all focusing on products from the New Annual Catalogue The blog before mine is the clever Margaret Knoops. Start or stop anywhere, it doesn't matter - just keep following the links to hop round the circle until you get back to where you started. Please leave some comments along the way - we all love to know what you think of our projects.
My projects today were made for a special purpose. My youngest finished preschool last week so they were made as gifts to give to his teachers and aides.
I made each teacher a card and decorated a candle to go in a goodie bag with some wine and chocolate. I used the Floral District DSP as the basis for all my cards. Here's a closer look at the stamped panel, cut using a Floral Frames Framelit.
The butterfly from Papillion Potpourri was stamped directly onto the panel, and then a second time onto a scrap of cardstock without reinking. This gives a more muted effect with the colour. I then punched it with the new Elegant Butterfly punch, curled the wings and adhered it with a glue dot over the top of the first butterfly.
The handprint isn't a stamp - it's Hudson's actual handprint. I rubbed his hand on my Daffodil Delight ink pad and then stamped his hand onto the cardstock. He had great fun 'helping' me. I did it just before bathtime so I didn't have to worry about inky handprints everywhere!
Here's the same card and candle, just in Rose Red. I made three sets at the same time in a bit of a production line.
The candles were bought as a set of three, I just cut a small strip of DSP to stick to the glass and tied some coordinating ribbon around the DSP. I popped them in a cellophane bag and tied the top with more ribbon. How lucky to find candles that colour matched the DSP so well!
Finally, the Baja Breeze card. This one was for the Director of the centre, who is a man, so I tried to tone down the 'girliness' of the cards. I kept the butterfly though, as I thought it was a great symbol of how Hudson has grown and changed while he's been at preschool.
Here they are together. I had fun making these special gifts, and I hope the recipients love them. It's hard to say but I think I like the Baja Breeze set the most - but I am a bit partial to blue!
Stamps: Notable Alphabet, Papillion Potpourri, Daydream Medallions, For My Family
Ink: Rose Red, Rich Razzleberry, Baja Breeze, Daffodil Delight
DSP/Cardstock: Floral District DSP, Confetti White (retired), Rose Red, Rich Razzleberry, Baja Breeze, Whisper White
Other: Big Shot, Floral Frames Framelits, Elegant Butterfly Punch, Rose Red Seam Binding Ribbon, Whisper White Stitched Grosgrain Ribbon, Rich Razzleberry Stitched Grosgrain Ribbon, Basic Jewels Rhinestones, Glue Dots
Non-SU: Scented Candles, Cellophane Bags
Now you're off to see the fabulous creations over at Di Dunk's blog. Please remember to leave a comment before you go, just click on the but below that says "Comments".
Bye for now,
Tina
Subscribe to:
Posts (Atom)