Pages

Showing posts with label SSS Double Stitched Circle Dies. Show all posts

Sunday, 14 July 2019

CTC #237: CASE A Layout

Hi!


It's time for the new CASEing The Catty Sunday Challenge Blog Hop! It's a circle of blogs that you can hop your way around to see what the Design Team have made for this week's task. You may have come from Julia's blog, or you may be starting here. It doesn't matter! To paraphrase Dory - just keep hopping!


This week we are challenging you to CASE a layout of one of the cards on page 151 of the Annual Catalogue. There are four to choose from, or five if you count the tin, which you definitely can! I couldn't choose just one card, I ended up using elements from two - the card at the top left with the boats, and the card at the bottom left with the fish.

scissorspapercard, Stampin' Up!, CASEing The Catty, A Good Man, Itty Bitty Birthdays, In Colour DSP, Stampin' Blends

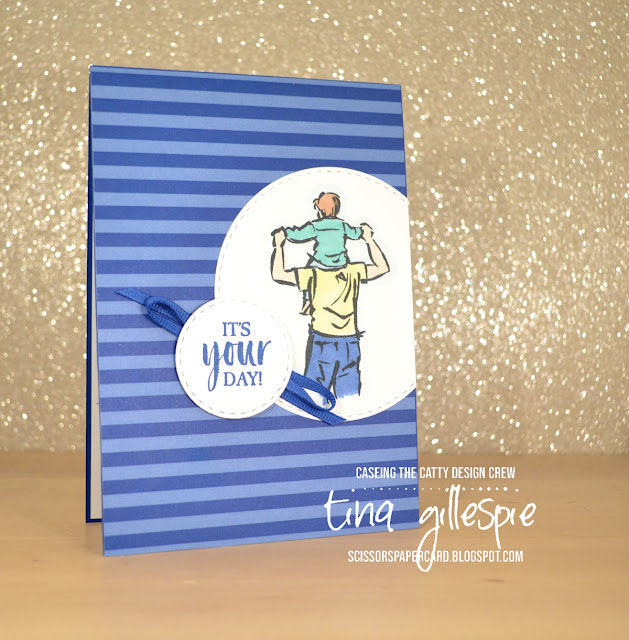
I started with the stripes on the top card. I don't have a striped stamp, so I used some DSP instead. It's a sheet from the retired In Colours DSP pack in Blueberry Bushel. I liked the circle feature from the bottom card, so that's where I went next. Instead of chopping into my DSP layer, I added the circle on top. Truthfully, I'd already adhered my DSP to my card base, so I had no choice but to layer on top!

scissorspapercard, Stampin' Up!, CASEing The Catty, A Good Man, Itty Bitty Birthdays, In Colour DSP, Stampin' Blends

I coloured my image with my Stampin' Blends, just using one shade of each colour. A tip when colouring this image - don't leave a straight line at the bottom of the image. Make it a bit uneven so it looks less like an amputation, and more like the image has just faded off.

The sentiment circle kind of steals from both cards. I used the same sentiment as on the fish card, but I added some ribbon underneath as is the case on the boat card under the ship's wheel.

scissorspapercard, Stampin' Up!, CASEing The Catty, A Good Man, Itty Bitty Birthdays, In Colour DSP, Stampin' Blends

I finished the inside by stamping the man again, but in stamped off Balmy Blue and then the sentiment over the top of the man. I love how low-fuss I can be on men's cards, don't you?

That's it from me this week! Have you entered our challenges yet? It's so easy - just make a card based on the challenge and then upload your photo to our Facebook group. Done!


Before you get creating, don't forget to continue the hop! Next up is my friend Rachel, who put her sewing machine to use for her card!


Bye for now,

Tina

Thursday, 6 June 2019

JAI #460: Just Add Emboss Resist

Hi!


Tina for the new Just Add Ink challenge! This week Lou has challenged us to add the Emboss Resist technique to our cards. I do enjoy a good technique, and this one's a fun one!


Now it just happens that I ran an ATC swap last month that used an Emboss Resist technique, called Joseph's Coat. I think it's also called Emerging Colour. It was a complete coincidence, but I'm not one to look a gift horse in the mouth, so I just made extra so I'd have something to make into a card.

scissorspapercard, Stampin' Up!, Kindred Stamps, Just Add Ink, Treasure Hunter, Tropical Chic Bundle, Joseph's Coat Technique, Emboss Resist Technique

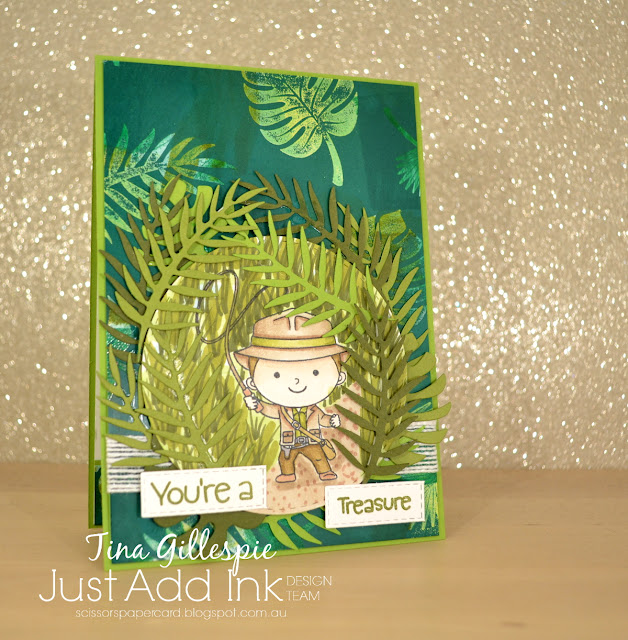
To create a Joseph's Coat panel, you take some glossy cardstock and add some colour. The tutorial I read said to sponge, but I just took some ink spots and rubbed them over the cardstock. Much quicker! You then heat emboss using clear embossing powder over the top. I used some palm fronds from Tropical Chic. Once again I took a short cut by putting all three stamps on one block so that I covered my cardstock much faster. Finally, you take a dark colour (usually black) and brayer ink all over, buffing it away from the embossed areas. The black inks we have aren't great for this technique, so I used Shaded Spruce. It still allowed some of the underlying ink to show though, but I was ok with that. It's brighter under the leaves, and the variegation adds to the jungle look.

scissorspapercard, Stampin' Up!, Kindred Stamps, Just Add Ink, Treasure Hunter, Tropical Chic Bundle, Joseph's Coat Technique, Emboss Resist Technique

How fun is this Treasure Hunter image from Kindred Stamps? I coloured him with my Blends, and then set about creating the background for him. I started by adding in the Light Crumb Cake path through the jungle, making sure it disappeared off to the right. I then coloured the rest of the background with Light Granny Apple Green, with a few splashes of Light Balmy Blue to add hints of the sky. I then used the brush end of my Light Old Olive Blend to create some grass by using a flicking upward motion in groups of 2-4 in random places over the GAG. Finally, I used the thin end of my Light Mossy Meadow Blend to repeat the flicking 'grass'. It's a really cool effect. I the added layers of die cut palm leaves over the top to further simulate the jungle. Phew, that was a lot of work! Worth it though, I think it's a fun card!

scissorspapercard, Stampin' Up!, Kindred Stamps, Just Add Ink, Treasure Hunter, Tropical Chic Bundle, Joseph's Coat Technique, Emboss Resist Technique

I had just enough of a scrap of the Joseph's Coat cardstock left to complete the inside. I also love the subtle snark of the inside sentiment. I will have to think hard about who to give this card to!

That's it from me, you can pop on over to the Just Add Ink blog to see the rest of the Design Team's cards for our Emboss Resist challenge. There's an amazing variety just using this one technique, so well worth a look. Hopefully we inspire you to enter the challenge!

Bye for now,

Tina

Sunday, 3 February 2019

CTC #214: Sale-A-Bration

Hi!


Sigh, the end of the weekend is always a little sad, but not anymore, as it's also when the CASEing the Catty blog hop happens! This week you may have come to me from Lauren's blog, or you may have started here. Does't matter, just keep hopping until you've visited everyone.


This week we are CASEing from the Sale-A-Bration catalogue. This card, with it's stunning colouring, caught my eye.


Isn't it gorgeous? I don't have that stamp set, nor any stamp set to replicate the card, so I had to think a bit laterally this week. The card uses the Spotlight Technique, where you cut away part of the image and just colour that part, so that's where I went with my card.

scissorspapercard, Stampin' Up!, CASEing The Catty, Soft Sayings, Botanical Butterfly DSP, Stampin' Blends, Spotlight Technique

I've been wanting to colour this sheet of the Botanical Butterfly DSP since I first saw it, but found it very overwhelming to start - it's such busy paper! This was the perfect way to do it. After cutting my front piece, I used the Stitched Shapes Circle die to crop a section and then sat with my Blends to colour.

scissorspapercard, Stampin' Up!, CASEing The Catty, Soft Sayings, Botanical Butterfly DSP, Stampin' Blends, Spotlight Technique

I didn't bother with shading using the Blends, it's just straight colouring. I ended up with quite a pile of markers after I'd finished! I then cropped another circle in Balmy Blue and popped up the two circles on Dimensionals. The sentiment banner is a nod to the original card.

scissorspapercard, Stampin' Up!, CASEing The Catty, Soft Sayings, Botanical Butterfly DSP, Stampin' Blends, Spotlight Technique

I trimmed a small part of the DSP for the inside, and just decided to colour a couple of flowers rather than attempt the Spotlight Technique on such a small strip of paper!

Are you going to play along this week? I hope so! You can join in the fun over at our Facebook group, where you can add your card for the challenge.


But first, you need to hop on over to the next blog, which belongs to the wonderful Kathryn Mangelsdorf.


Bye for now,

Tina

Thursday, 20 December 2018

JAI #439: Just Add A Gift Box

Hi!


It's time for the final Just Add Ink challenge of 2018 - it feels so weird to be saying that!! Patrice has challenged us to make a gift boxer very appropriate challenge for this time of year. Thos round will go for two weeks and is a just for fun round. The Design Team are taking a well earned break and will be back again in 2019 (another thing it feels weird to say!).


I struggled a bit with this challenge, in that I couldn't decide what to make! I had so many options, and in the end I reached for an old favourite, the Petal Cone Bigz Large Die. I can't remember how long ago it retired, but it's one I've not been able to part with.

scissorspapercard, Stampin' Up!, Just Add Ink, Santa's Workshop SDSP, Tags & Tidings Bundle, Petal Cone Big Die, SSS Double Stitched Circles

The tag is made using current Stampin' Up! product though. The DSP is the Santa's Workshop Specialty DSP, with all the lovely flocking on the designs. I also used a stamped and die cut image from the Tags and Tidings Bundle. My lovely friend Ros stamped and cut them for me. This tag was on Whisper White, but I wanted a blue colour so I coloured it with my Light Pool Party Blend.

scissorspapercard, Stampin' Up!, Just Add Ink, Santa's Workshop SDSP, Tags & Tidings Bundle, Petal Cone Big Die, SSS Double Stitched Circles

The box itself is also made from the Santa's Workshop SDSP. This piece has lots of flocking, so it was *just* heavy enough to use to make the box. If you recall, the box that the die makes comes to a point, which mine clearly does not have! I simply scored the cut pieces near the bottom and folded them in to make a flat bottom.

scissorspapercard, Stampin' Up!, Just Add Ink, Santa's Workshop SDSP, Tags & Tidings Bundle, Petal Cone Big Die, SSS Double Stitched Circles

I used a piece of the gorgeous Black Glittered Organdy ribbon from the Holiday Catalogue to wrap around the box. It doesn't actually hold it closed, as the overlapping top flaps do that, but it's a lovely way to add a touch of glimmer to the box. I will miss this ribbon when it retires in January!

Thanks for joining me for the current Just Add Ink challenge. Remember, it's a just for fun round that will go until January 2. Plenty of time for post-christmas crafting, hopefully with some new goodies left by Santa!

Bye for now,

Tina