Pages

Showing posts with label Technique. Show all posts

Thursday, 11 April 2024

JAI 697: Just Add A Sketch

 Hi!


Welcome to the new Just Add Ink challenge. This week Di has a sketch for us to use as inspiration for our cards.


I love that she's used hexagons, but they could easily be substituted for other shapes. I've gone for butterflies!

scissorspapercard, Just Add Ink, Stampin' Up! Sending Smiles Bundle

My card is made using a serviette that I liberated from a morning tea that I attended recently. It's far too pretty to wipe a dirty mouth or fingers on! I adhered a portion of the serviette to a piece of Whisper White cardstock for the background of my card.

scissorspapercard, Just Add Ink, Stampin' Up! Sending Smiles Bundle

I roughly cut some butterflies, adhered them to more cardstock and then fussy cut them once the glue dried. I love the slightly wrinkled effect of the glued serviette.

scissorspapercard, Just Add Ink, Stampin' Up! Sending Smiles Bundle

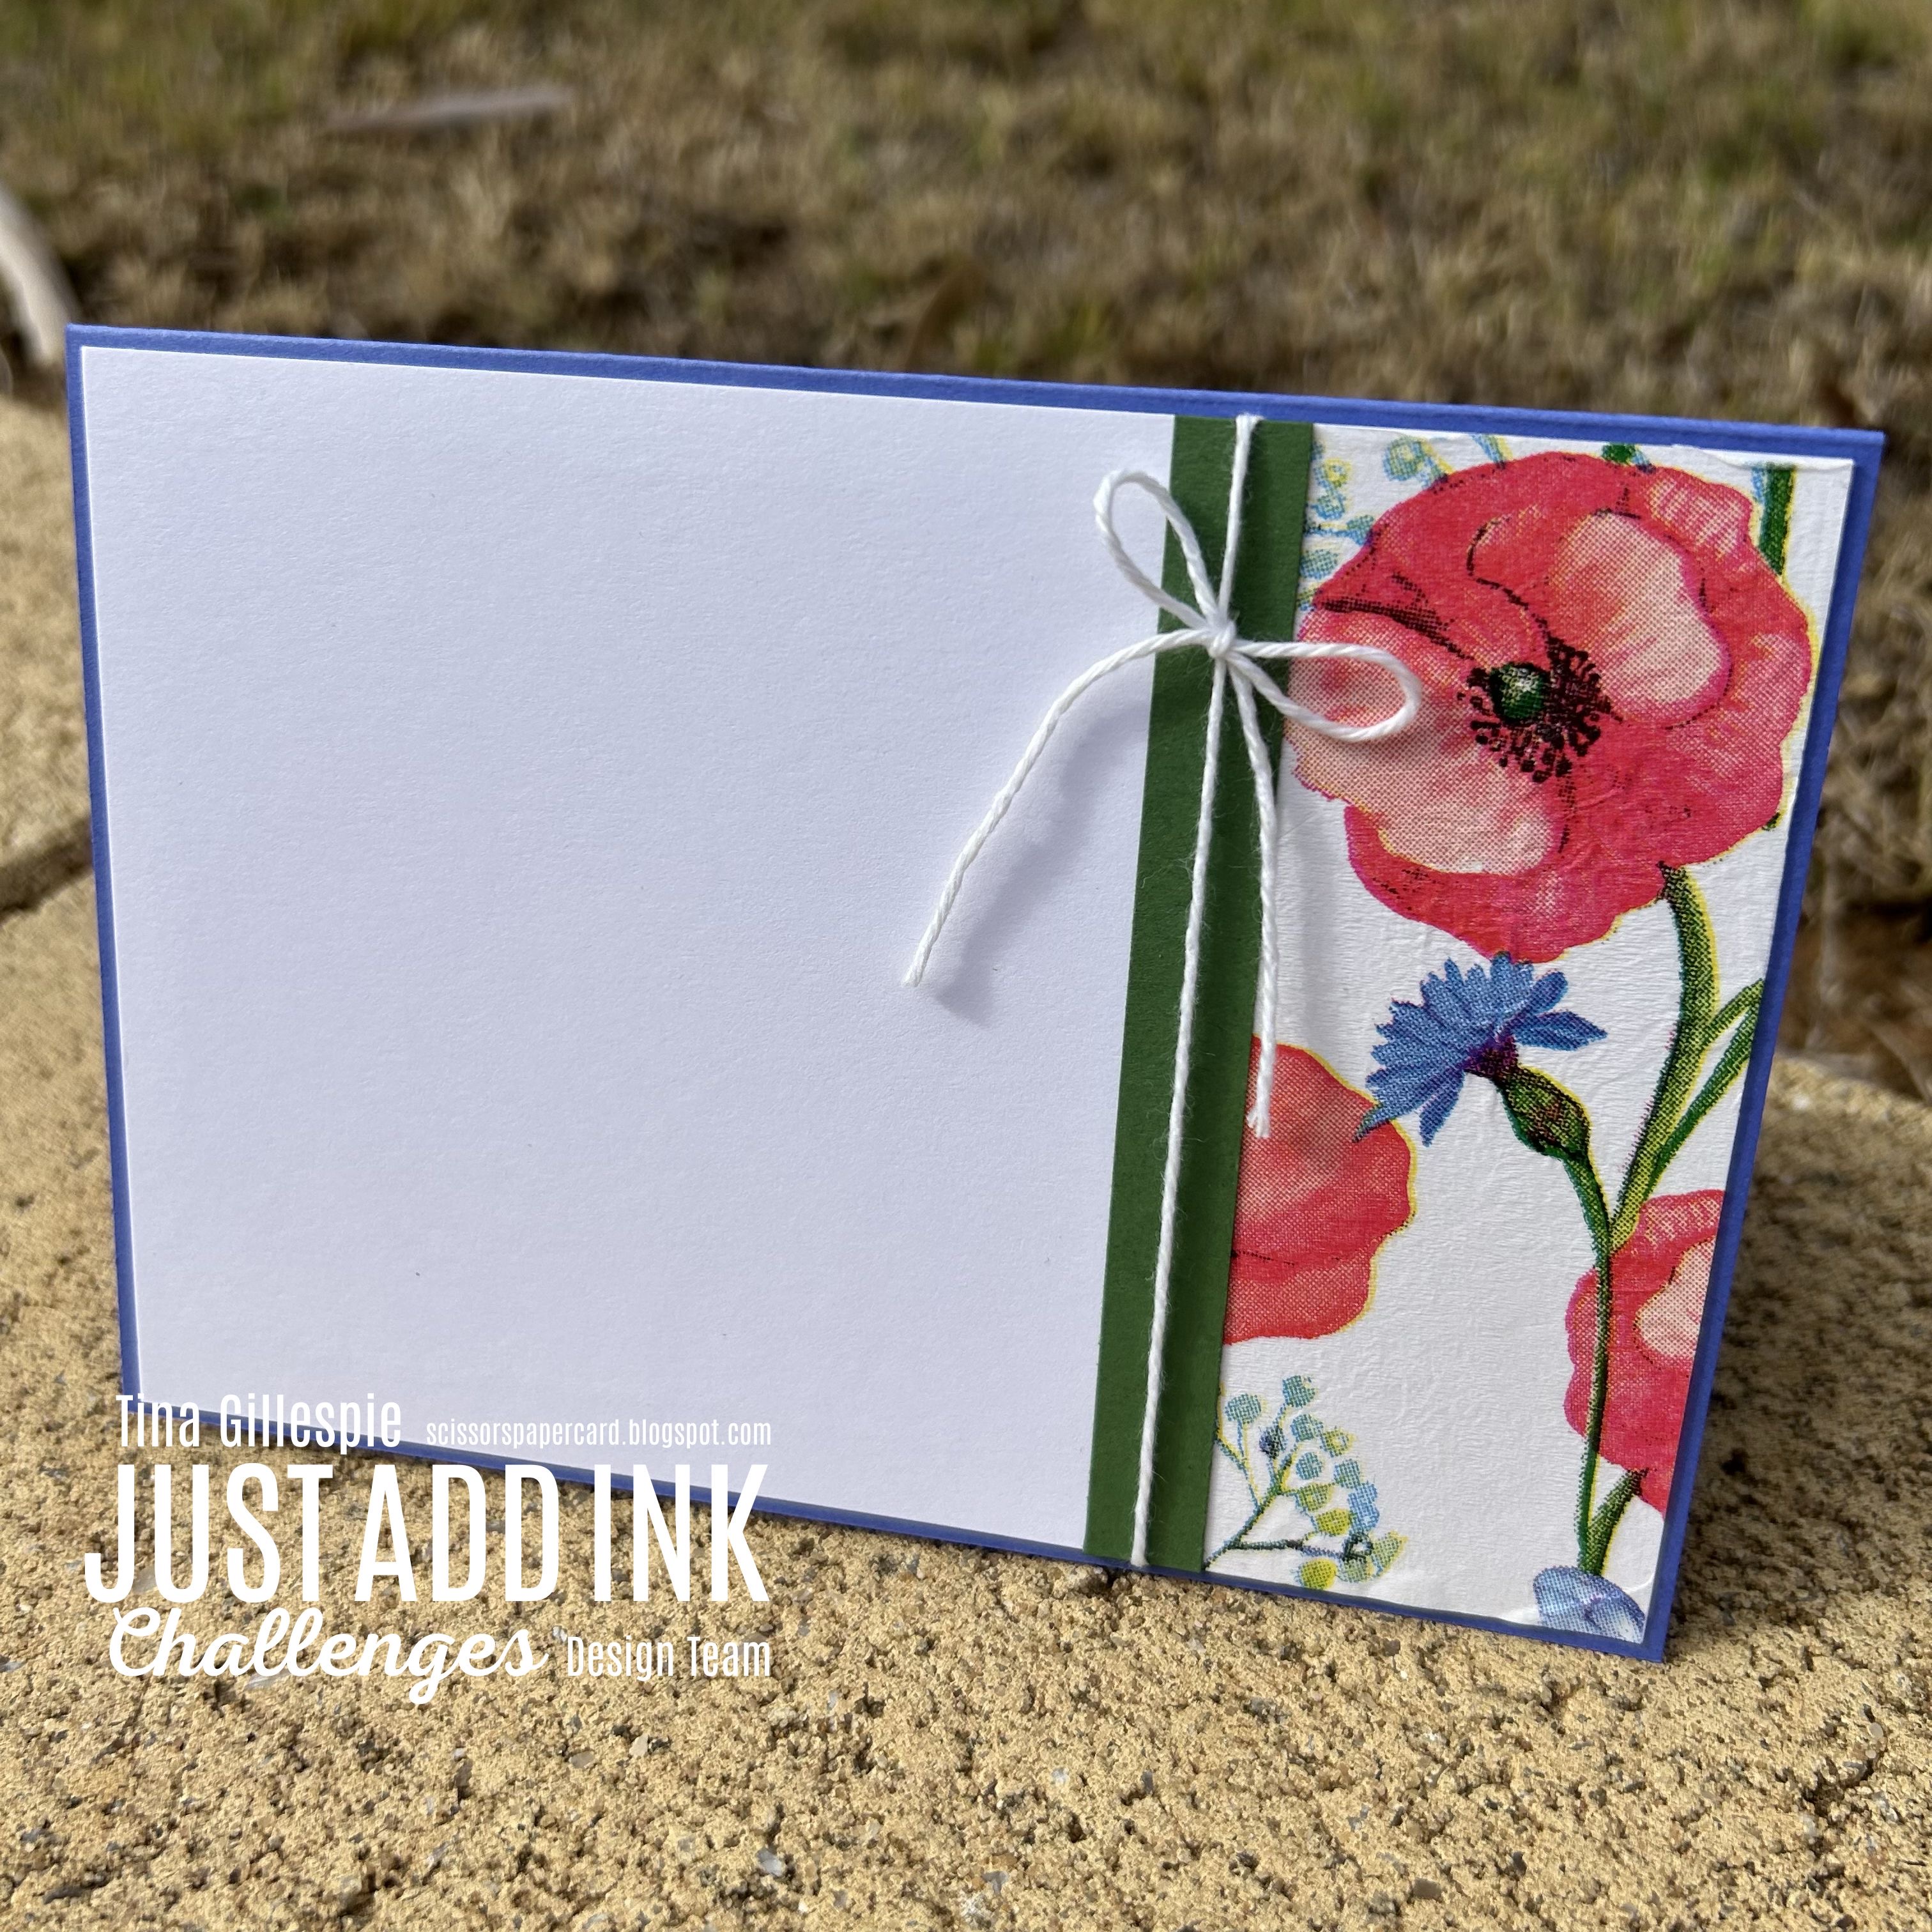
I used another portion of the serviette for the inside of my card. The flowers are just as pretty as the butterflies, so I definitely wanted to feature some.

We'd love to see what you do with Di's sketch. Pop on over to the Just Add Ink blog, where you'll see what the rest of the Design Team have made with the sketch. You can add your card to our Linky when you're ready.

Bye for now,

Tina

Thursday, 8 June 2023

JAI 656: Just Add Inspiration

 Hi!


Hooray for Friday on a Long Weekend! Do you have any crafty plans? I have a few cards that I need to make, but I also have plans to get a lot of sewing done. Wish me luck - best laid plans, LOL!


This week at Just Add Ink we have an Inspiration Photo as our challenge, suggested to us by Kim. I struggled a lot with ideas and had just decided to watercolour a background using the colours in the photo. As I was taping the paper down I remembered the alcohol ink backgrounds, and decided that I'd rather do that!

scissorspapercard, Just Add Ink, Altenew Family Matters, Stampin' Up! Brilliant Wings Dies, Stampin' Blends

I used my Dark Calypso Coral Blend on a piece of vellum first, scribbling some splotches and then dripped some isopropyl alcohol over the top, blowing to get some movement in the ink. Once it was. dry, I repeated the process with my Dark Night Of Navy Blend.

scissorspapercard, Just Add Ink, Altenew Family Matters, Stampin' Up! Brilliant Wings Dies, Stampin' Blends

The Inspiration photo has a strong horizontal line through the middle. I flipped it to vertical with the addition of some black twine. The Black Glimmer butterfly die cut serves as the silhouettes in the image. I was quite pleased with how it turned out!

scissorspapercard, Just Add Ink, Altenew Family Matters, Stampin' Up! Brilliant Wings Dies, Stampin' Blends

I had an offcut of vellum left over from the front - I always make the fronts too big so that I have an offcut to work with on the inside. It was just he right size for the inner of my card, with some more twine and a smaller Glimmer butterfly. The stamp set that I used is from Altenew, called Family Matters.

That's all from me for now, but we'd love for you to play along with our Inspiration challenge. The Design team have done a marvellous job with using different elements of the photo to create their cards. Pop on over to the Just Add Ink blog to see their cards. You'll also find out linky there when you're ready to add your card to our challenge. I can't wait too ee what you make.

Bye for now,

Tina

Sunday, 28 May 2023

CTC 421: All Occasions

 Hi!


Hello Sunday! It's been a wet week here, so I've been happy to stay inside and do some crafting. This week at CASEing The Catty Sunday Challenges we are asking you to CASE a project from the All Occasions section of the catalogue.


It's a big section, but this Taco Fiesta series of cards caught my eye. It's been a while since I've played with this stamp set, and I liked the layout of these cards.


I don't use small cards very often, so I decided to challenge myself to convert the layout to a full sized card.

scissorspapercard, CASEing The Catty, Stampin' Up!, Taco Fiesta, Brights DSP, Indented Pencil Technique

All I really needed to do was to make the DSP section a bit longer! I decided to matt the panel on some Real Red cardstock, as I chose to use a Whisper White card base.

scissorspapercard, CASEing The Catty, Stampin' Up!, Taco Fiesta, Brights DSP, Indented Pencil Technique

The chilli and cactus were left over from a Stampin' Up! Demonstrator day that I went to in Adelaide recently. I demonstrated the Indented Pencil technique. You basically take a stylus and etch some lines into the stamped image. Then gently colour over the top with Watercolour Pencils (minus the water). The lines give a nice highlight to the image.

scissorspapercard, CASEing The Catty, Stampin' Up!, Taco Fiesta, Brights DSP, Indented Pencil Technique

I used another two on the inside of the card. I had plenty of samples to use up, as I demonstrated the technique eight times that day!

We'd love for you to play along with us this week. Which card in the All Occasions section catches your eye? Just CASE the card and add a photo to our Facebook group.


Before you race off to get creating, please do finish the blog hop. The next stop on the hop is the lovely Peta Stephen with a very elegant card.


Bye for now,

Tina

Sunday, 14 May 2023

CTC 419: Love

 Hi!


Welcome to the new CASEing The Catty Sunday Challenge Blog Hop. It's a great way to end the week! 


This week we are asking you to CASE a love project. You can choose anything from the catalogue that makes you think of love.


I chose this Oceanfront card from page 85, with the obvious 'love you' sentiment. The watercolour scene really appealed to me, and it's been a while since I've inked up my Oceanfront stamp set, so that was as good a reason as any to choose this card to CASE.

scissorspapercard, CASEing The Catty, Stampin' Up!, Oceanfront, Easter Bunny, Stylish Shapes Dies

The catalogue samples used Blending Brushes to ink the stamps, with the watercolour paper wet to give the softer look. I chose to use the baby wipe technique instead. I applied some Blackberry Bliss and Calypso Coral ink to the baby wipe, and then used it like an inkpad to ink up my sky stamp. The rest of the scene (apart from the plants) were just stamped as usual onto the wet watercolour paper.

scissorspapercard, CASEing The Catty, Stampin' Up!, Oceanfront, Easter Bunny, Stylish Shapes Dies

Once the panel was dry, the plants were stamped over the top and the card was assembled and decorated.

scissorspapercard, CASEing The Catty, Stampin' Up!, Oceanfront, Easter Bunny, Stylish Shapes Dies

I recreated the scene on the inside, without the wet watercolour paper. The sentiments that I used on my card are from the Easter Bunny stamp set. They are sort of vague enough to be suitable for several different occasions.

We'd love for you to play along with us this week. All you need to do is make a suitable card, take a photo and upload it to our Facebook group. I can't wait to see which card you choose to CASE.


Before you go, please keep hopping your way around all of the Crew blogs. There's lots more 'love' inspiration to be seen, starting with Julia Quinn with a super sweet card.

Bye for now,

Tina

Thursday, 29 September 2022

JAI 623: Just Add Colour

Hi! 


Thanks again for joining me on a Friday for the new Just Add Ink Challenge. This week we have a colour combo for you, suggested to us by Di Barnes.


Isn't it fabulous? I love the mix of bright colour from the new 2022-24 In Colour range. I initially had thoughts of making a floral card with this combo, but I ended up going in a completely different direction!

scissorspapercard, Just Add Ink, Music From The Heart, Rugged Icons Dies, Stylish Shapes Dies, Masculine Card

The colours are so bold, I wanted to see how they'd pop against a black background. Boy, do they ever!! The white guitar, cropped using the Rugged Icons Dies, is a nice contrast.

scissorspapercard, Just Add Ink, Music From The Heart, Rugged Icons Dies, Stylish Shapes Dies, Masculine Card

The panel using the coloured cardstock was made using scraps from my stash. I can't recall the name, but I used the technique where you adhere the cardstock to a Window Sheet, crop it, and pop it up on Dimensionals so that it looks like it's floating. In this case, I used the largest Stylish Shapes square die.

scissorspapercard, Just Add Ink, Music From The Heart, Rugged Icons Dies, Stylish Shapes Dies, Masculine Card

Some left over scraps of card were used on the inside. Both sentiments on my card are from the retired Music From The Heart, but they fit well with the musical theme of my card.

What would you make with our colour combo this week? We'd love to see your card. Jump on over to the Just Add Ink blog, for more Design Team inspiration. You'll also find the linky to allow you to enter your card in our challenge.

Bye for now,

Tina

Wednesday, 21 September 2022

Colour Creations: Fresh Freesia

 Hi!


Thanks for once again joining me for the new Colour Creations Blog Hop. It's Fresh Freesia week, one of the 2021-23 In Colours. It's a lovely, soft purple that I will miss once it retires in mid-2023.


I chose Brian King's combo that paired it with the other softer colours in the 2021-23 In Colour family - Pale Papaya and Soft Succulent. I had plans to make a floral card, but then I had the need to make a sympathy card and decided to turn the colours into a sunset scene.

scissorspapercard, Stampin' Up!, Colour Creations, Rays Of Light, Trees For Sale, Heal Your Heart (SAB), Sympathy Card

I started by working out where the sun part of the Rays Of Light stamp would go on my card and then used a Blending Brush to apply some Pale Papaya ink. Fresh Freesia was used for the rest of the sky, and Soft Succulent for the forest. I then spritzed water onto my Rays Of Light stamp and stamped the inked panel. The water lifts the colour, giving this gorgeous effect. I use my Stamparatus to do this, by laying the stamp on the bed of the platform and adhering my cardstock to the plate. I didn't want to get drips of water in the wrong place, and this was a good way to avoid it.

scissorspapercard, Stampin' Up!, Colour Creations, Rays Of Light, Trees For Sale, Heal Your Heart (SAB), Sympathy Card

The trees are from Trees For Sale. I stamped them on a strip of cardstock and then fussy cut the top edge. It was popped up over the main panel using Dimensionals. The back layer were stamped off, and the front were full strength Soft Succulent ink.

scissorspapercard, Stampin' Up!, Colour Creations, Rays Of Light, Trees For Sale, Heal Your Heart (SAB), Sympathy Card

Of course, my inside was stamped and inked to match. 

That's all from me for tonight, but please do keep hopping around our blog hop tonight. The next stop along the way is Theresa Gerrard, with what I'm sure will be a gorgeous card.


Catherine Proctor does a wonderful job of keeping us all organised each week, so jump on over to her blog is you run into any problems with links. She'll have a list of all participants on her blog.

Bye for now,

Tina

Thursday, 23 June 2022

JAI 609: Just Add Flowers

 Hi!


Welcome back for another Just Add Ink challenge. It really is the best way to start the weekend.


This week, Annie has asked us to add flowers to our cards. I'd be nearly willing to bet that there isn't a stamper without at least one floral stamp in their collection!

scissorspapercard, Stampin' Up!, WaffleFlower, Just Add Ink, Sunflower Love, Simply Said 1, Butterflies & Flowers Layering Decorative Masks, Happy Birthday To You, Floral Card

The flowers on this card are from a WaffleFlower set, called Sunflower Love. The sentiment is also WaffleFlower, called Simply Said 1, and was cropped with the coordinating dies. I coloured the flowers with my Copic Markers.

scissorspapercard, Stampin' Up!, WaffleFlower, Just Add Ink, Sunflower Love, Simply Said 1, Butterflies & Flowers Layering Decorative Masks, Happy Birthday To You, Floral Card

To create the background, I used a Blending Brush to apply some Picked Raspberry Distress Oxide ink to the Whisper White cardstock. I then spritzed some water onto the floral background stencil from the Butterflies and Flowers Layering Decorative Masks set, and laid it wet side down on the inked card. After a few seconds, I removed it. The water lifts some of the ink, giving a lovely, subtle look.

scissorspapercard, Stampin' Up!, WaffleFlower, Just Add Ink, Sunflower Love, Simply Said 1, Butterflies & Flowers Layering Decorative Masks, Happy Birthday To You, Floral Card

I used the same mask on the inside, but this time I brushed the ink through the stencil.

That's all from me for now, but please head on over to the Just Add Ink blog, where you'll find the rest of this week's Design Team cards - you won't want to miss them! You can also link up your card there when you've made your flower card.

Bye for now,

Tina

Wednesday, 10 November 2021

Colour Creations: Magenta Madness

 Hi!


Hello, and welcome to another week of the Colour Creations Blog Hop. This week we are featuring Magenta Madness, one of the soon-to-retire In Colours. It's one I won't be sad to see go - it's a tad bright for me!!

scissorspapercard, Stampin' Up!, Colour Creations, Words Of Cheer, Wonderful Snowflakes, Stampin' Blends, Suit & Tie Dies, Christmas Card

To tone it down a lot, I decided to play with my Dark Magenta Madness Blend and Vellum with Isocol. I didn't really have much of a plan, so I started by scribbling a few circles on the vellum with the Blend. I then dipped a small paintbrush into the Isocol and dropped one drip into the centre of each scribbled circle. As each one dried, I scribbled and dripped some more until I was happy. It was interesting to see that, despite the same technique on all the scribbled circles, as the Isocol spread the colour some stayed in perfect circles, and others were jagged or wobbly edged. 

scissorspapercard, Stampin' Up!, Colour Creations, Words Of Cheer, Wonderful Snowflakes, Stampin' Blends, Suit & Tie Dies, Christmas Card

I finished the front of the card with a few Wonderful Snowflakes topped with a  Magenta Madness Square Gem. I've just received the snowflakes in an order, and they are so shimmery and pretty! The sentiment is from Words Of Cheer, cropped with a Suit & Tie Die.

scissorspapercard, Stampin' Up!, Colour Creations, Words Of Cheer, Wonderful Snowflakes, Stampin' Blends, Suit & Tie Dies, Christmas Card

I coloured this last snowflake with my Dark Magenta Madness Blend. I coloured on the shimmery side, which has a slick coating. This gave the ink from the Blend a watery effect, which I liked very much! Now I just need to work out who will receive this very pink Christmas card from me.

Thanks again for joining me, but please do continue your way around our Magenta Madness Blog Hop. The next cab off the rank is my wonderful friend, Andrea Sargent. She's bound to have a stunner (or two) for you to see!

The also very wonderful Catherine Proctor is our Hostess for tonight's blog hop. If you find a broken link, or some other problem, just pop on over to her blog, where you'll find a complete list of tonight's hoppers to hep you get back on track.

Bye for now,

Tina

Thursday, 19 August 2021

JAI 568: Just Add A Sketch

 Hi!


Hooray for Friday - right? It's been a long week, and I am more than ready for the weekend. I hope to spend a lot of time crafting, and I hope you do too, especially if it means that you enter our new challenge at Just Add Ink. This week it's a sketch, designed by Lou.


Isn't it great? I decided to use the sketch to make a birthday card for my husband, who celebrated his special day early in August. 

scissorspapercard, Stampin' Up!, Kindred Stamps, Just Add Ink, I Need Some Space, It's About Time, Copic Markers, Stampin' Blends, Alcohol Vellum Technique

I started the card with the Alcohol Ink background. I used my Night Of Navy and Rich Razzleberry Blends on Vellum. To move the ink around, I blew through a short straw. It was fun seeing how short, hard breaths versus long, gentle breaths gave different results with the ink. I flicked some Vegas Gold Shimmer Paint over the top when it was dry.

scissorspapercard, Stampin' Up!, Kindred Stamps, Just Add Ink, I Need Some Space, It's About Time, Copic Markers, Stampin' Blends, Alcohol Vellum Technique

My hubby really loves the fandom this character comes from, and according to my daughter, this is one of his favourite characters. Do you know the show? The blue phone box might have given it away! I coloured them both with my Copic markers. The stamps are all from a Kindred Stamps set, called I Need Some Space.

scissorspapercard, Stampin' Up!, Kindred Stamps, Just Add Ink, I Need Some Space, It's About Time, Copic Markers, Stampin' Blends, Alcohol Vellum Technique

I couldn't resist adding the little canine robot on the inside. I don't know if he's a part of the new fandom, or if he's strictly retro. Either way, he's fun and deserved a spot on my card. The sentiment is from a coordinating Kindred Stamps set, called It's About Time.

That's all from me for tonight, but your part in the challenge is just beginning! Pop on over to the Just Add Ink blog, where you'll find lots more Design Team inspiration. Then make your card and add it to our gallery. It's that easy!

Bye for now,

Tina