Hi!
One of the comments left on my blog for the Sale-A-Bration asked for the instructions for the little purse I made. I will do my best! I did NOT design this purse myself, but I cannot give credit for it. I have a notebook that I scribble ideas and instructions in and this is one such scribbling. I did not however scribble the designer's details - not very clever of me! If you know who designed it, please let me know so I can link to it. It was a free template I found while surfing somewhere on the www.
Anyway, you need cardstock cut to 9 13/16 inches by 12 inches for the base. With the 9 13/16 inch side at the top and scoring down the cardstock score at almost 4 inches and again at a fraction over 6 inches. The 'almost' and 'fraction' equates to about 3/32of an inch (not quite 1/8th of an inch).
Rotate the cardstock so the 12 inch side is at the top. Score at 4 inches and 8 inches, but ONLY in between the score lines in the first step.
Also, along both of the 12 inch sides, draw a little mark at 3 inches and 9 inches. Cut from these points in a straight line to where the closest score lines intersect. This should give you the shape of the front and back of the box. You now need to cut in from the shorter sides. Cut about 1 inch away from each of the score lines and parallel to the score lines. You should now have a kind of 't' shaped piece.
Fold and burnish all score lines. Apply double sided tape to the flaps and assemble the purse base.
For the flap of the purse you need a piece of cardstock cut to 4 1/4 inches by 7 1/2 inches. With the 4 1/4 inch side at the top, score down the cardstock at 1/2 and 2 1/2 inches. Turn and score again at 1 1/4 and 7 1/4 inches.
You now need to cut the flap into the right shape. Along the 7 1/2 inch side with the widest scored area draw little marks at 2 inches and 5 1/2 inches. Cut from these marks to where the nearest score marks intersect. This section forms the front flap of the box. You now need to make similar cuts on the remaining 3 sides of the flap. These don't need to be as precise as the tuck into the box.
Fold and burnish all score lines. The flap adheres to the inside of the back of the base section, so apply double sided tape to the correct section of the flap piece. BEFORE you adhere the flap to the base you will need to cut 2 slots into the top of the flap to hold the handle. These need to be 1 1/8 inch long and parallel to the sides of the purse.
The handle is a piece of cardstock cut to 1 inch by 10 1/2 inches and scored at 1 inch from either end. Slide the handle into the slots as far as the score lines and adhere to the inside of the flap. Adhere the flap to the inside of the back of the purse.
To close, the side flaps get tucked into the box and the front flap is on the outside. I held mine closed with some ribbon, but you could also use velcro or magnets, or anything else really!
I hope these instructions are clear enough. If not either email me or leave a comment with your email address and I will try to make them clearer for you.
Catch you later,
Tina

Monday, 28 February 2011
Saturday, 26 February 2011
Sale-A-Bration Blog Hop
Hi!
Welcome to another inspirational blog hop. Some very talented Stampin' Up! Demonstrators have put together a bunch of wonderful projects to inspire you to stamp, stamp, stamp! (As if you needed an excuse!) There are 11 beautiful projects for you to feast your eyes on as you hop your way around the circle. Di Dunk owns the blog before mine in the hop - her creations are always amazing!
My project uses a stamp from the Punch Bunch set. Totally loving the way every image matches a punch as it makes cutting out a breeze! Anyway, here's my creation.

I decided to go 3D for this hop so I made a cute little purse using the For You stamp as a tag on the front. Isn't the Sweet and Sour Speciality DSP wonderful? It is a heavier weight than our regular DSP so it is perfect for 3D projects, and the gloss on some of the patterns is gorgeous.

I also decided to make a little set of 5 cards to match the purse. They all use the same stamp and DSP and are sized at 3 1/2" square to fit inside the purse. I also made envelopes but forgot to photograph them. Oops!

Here's a closer look at one of the cards. A simple design - I just stamped the image in Pumpkin Pie and again in Rose Red and then punched them with the Scallop Circle or 1 1/4" Circle punches to give a two colour image. A dimensional between the two layers for a bit of pop, a piece of ribbon and it's done! The tag on the purse was made the same way.
Stamps: Punch Bunch
Ink: Pumpkin Pie, Rose Red
DSP/Cardstock: Sweet and Sour Speciality DSP, Very Vanilla, Pumpkin Pie, Rose Red
Other: Pumpkin Pie 5/8" Satin Ribbon, Pumpkin Pie 1/4" Grosgrain Ribbon, Very Vanilla 1/4" Grosgrain Ribbon, 1 3/4" Scallop Circle XL Punch, 1 1/4" Circle L Punch, Crop-A-Dile, Dimensionals, Paper Snips, Beige Embroidery Cotton
Now you're off to see what wonderful creation the lovely Kathryn Mangelsdorf has for you. I'm sure you'll be inspired!
Catch you later,
Tina
Here are the other blogs in case a link is broken along the way:
Kathryn Mangelsdorf
Judy May
Amy Buchanan
Kathryn Ruddick
Alisha Watson
Ros Davidson
Nikki Sadler
Christine Blain
Sue Madex
Di Dunk
Thursday, 24 February 2011
Craft Caddy
Hi!
I came across a pattern for making this cute craft caddy while browsing the Crafty Storage blog. It's so cute, and folds up flat when it's not in use. It uses the Big Shot and the Scallop Square die, currently available in the Summer Mini Catalogue.

Here it is with a few things in it:

Don't forget the Sale-A-Bration blog hop on Saturday!
Catch you later,
Tina
Wednesday, 23 February 2011
Layout 16: Pony Ride
Hi!
Some more scrapbooking for you today. I used some photos I'd taken at the Novita Christmas Party. Novita is a wonderful charity that supports a lot of South Australian children who have disabilities. The kids had a wonderful time doing a whole range of activities but I think their favourite was the pony rides.

I went a bit all out with the stitching on this layout! I was trying to use up the last of my scraps of Jolly Holiday DSP so I punched a whole lot of circles. I traced a circle template on the 12x12 cardstock several times. Each time I moved it slightly to get a rougher look to the layout. I then adhered the circle punchies around the circle and used my sewing machine to stitch another large circle in a straight stitch. I also used a zig zag stitch to stitch down the circles behind the main photo and also some stitching in each corner.

I also used my colour spritzer to spritz the cardstock before I started adhering things to the page. In a few places I spritzed really close to the page to give a different, rougher effect. You can see this under the letter 'd' in the title.
Ink: Old Olive Marker
DSP/Cardstock: Jolly Holiday DSP, Cherry Cobbler, Very Vanilla, Pear Pizzazz
Other: Big Shot, Timeless Type Alphabet Die, 1 1/4" Circle L Punch, 1" Circle M Punch, Crystal Effects, Paper Snips, Sewing Machine
Don't forget Saturday's Sale-A-Bration blog hop!
Catch you later,
Tina
Tuesday, 22 February 2011
Punch Bunch For You
Hi!
As promised, I'm back with another Sale-A-Bration card. This one uses a stamp from the Punch Bunch set. I love the way all the images in this set coordinate with Stampin' Up! Punches - makes cutting them out a breeze!

I stamped the image twice - once in Chocolate Chip and again in Baja Breeze. I punched the Baja Breeze image using the 1 1/4" Circle punch and layered it over the Choc Chip image with a dimensional.

Nice and easy!
Stamps: Punch Bunch
Ink: Chocolate Chip, Baja Breeze
DSP/Cardstock: Elegant Soiree DSP, Chocolate Chip, Very Vanilla
Other: Chocolate Chip 1/4" Grosgrain Ribbon, Very Vanilla 5/8" Satin Ribbon, Dimensionals, 1 3/4" Scallop Circle XL Punch, 1 1/4" Circle L Punch
Don't forget to pop back on Saturday for the Sale-A-Bration blog hop.
Catch you later,
Tina
Monday, 21 February 2011
Layout 15: Jean & Keith
Hi!
Back again with some more Sale-A Bration inspiration - this time some scrapbooking. I have used the Bliss set again, but this time I have used the adorable little flower image. My layout is about my paternal grandparents.

Love the Basic Black and Very Vanilla with a few splashes of Riding Hood Red!

I'm not sure when a lot of these photos were taken, they were chosen as I loved each photo. My Grandma looks like a movie star and my Grandfather fought in the RAAF during WW2.

It was a bit hard to juggle the odd sized photos. I would have preferred to arrange them in a more chronological manner, but I just couldn't get it to look right on the DSP. I finally settled for what you see.
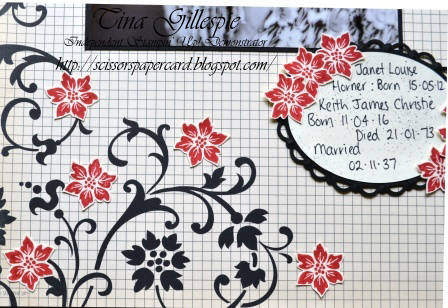
I couldn't believe it when I placed the stamped and fussy cut Bliss flower images amongst the flourish on the Love Letter DSP. The flowers in each are a perfect match! It was a very happy coincidence as I had chosen the DSP and stamp set without noticing they were a match.
I also used my colour spritzer and Basic Black marker on the journalling boxes to give them a more vintage feel.
Stamps: Bliss
Ink: Riding Hood Red, Basic Black Marker
DSP/Cardstock: Love Letter DSP, Very Vanilla, Basic Black
Other: Big Shot, Timeless Type Alphabet Dies, Paper Snips, Scallop Edge Border Punch, Colour Spritzer
Catch you later,
Tina
Sunday, 20 February 2011
Bliss Butterfly Card
Hi!
I finally got my first Sale-A-Bration order last week. One of the free sets I chose was Bliss. It's such a pretty set - what a shame it will retire forever at the end of March. The Bliss sets seems to be quite popular and my card was inspired by lots of cards I have seen in blogland.

I love the way the gorgeous flourish can be used as both a background stamp and a feature image. After I cut out the butterfly I sponged around the edge with Marina Mist ink. I did this to soften the edges of the image. The Very Vanilla cardstock looked a little stark around the edges of the butterfly without the sponging.

I'll be back in the next few days with some more Sale-A-Bration creations. If you're after a whole lot of inspiration please pop back on Saturday - a few demonstrators are doing a Sale-A-Bration blog hop that's bound to have you reaching for your stamps and inkpads!
Stamps: Bliss (SAB)
Ink: Crumb Cake, Marina Mist
Cardstock: Crumb Cake, Marina Mist, Very Vanilla
Other: Sponge Daubers, Dimensionals, Paper Snips
Catch you later,
Tina
Friday, 18 February 2011
Layout 14: A Day At The Zoo
Hi!
Well, I'm mostly staying on track with my 100 layouts in 2011. This is about Week 7 of the year and I've completed 14 layouts - not too bad!
Today's layout is another double page about Hudson and I at the Adelaide Zoo. We were invited to attend the Special Children's Christmas Party in 2010 and we had a fantastic time. Hudson got very spoilt!

Here's the left hand side of the layout. Not sure what's going on with the weird faded look on the bottom of the photo - it certainly doesn't look like that in real life.

These photos of the animals were so vibrant. The Chocolate Chip Woodland Walk DSP really makes the colours in the pop right off the page.

Stamps: Cottage Garden
Ink: Wild Wasabi, Garden Green, Crumb Cake Marker
DSP/Cardstock: Woodland Walk DSP, Garden Green, Wild Wasabi, Crumb Cake, Very Vanilla
Other: Big Shot, Timeless Type Alphabet Die, Scallop Border Punch Paper Snips
Catch you later,
Tina
Wednesday, 16 February 2011
A Male Birthday Card
Hi!
Today I'm back with another birthday card. The person who will receive this card is very much into cars, so I decided to use the Travel Journal DSP with the car image on it.

And how convenient that there is a matching stamp in the Sentimental Journey set for decorating the inside of the card!

Stamps: Sentimental Journey, A Word For You
Ink: Chocolate Chip, Crumb Cake
DSP/Cardstock: Travel Journal DSP, Garden Green, Pumpkin Pie, Crumb Cake
Other: Stamp Positioner, Sponge Dauber
Catch you later,
Tina
Monday, 14 February 2011
Happy Valentine's Day!
Hi!
My husband Rob and I have never really been ones to celebrate Valentine's Day. It's all a bit too much commercial for us. I don't often give him a card on the day, but this year I decided I would. It's our 13th Valentine's Day as a couple.

My husband Rob and I have never really been ones to celebrate Valentine's Day. It's all a bit too much commercial for us. I don't often give him a card on the day, but this year I decided I would. It's our 13th Valentine's Day as a couple.

Happy Valentine's Day!
Stamps: Punch Potpourri (Level 1 Hostess), Well Scripted
Ink: Rich Razzleberry, Melon Mambo
Cardstock: Rich Razzleberry, Melon Mambo, Basic Black, Whisper White
Other: Big Shot, Vintage Wallpaper Embossing Folder, Perfect Polka Dots Embossing Folder, Scallop Square Die, Full Heart XL Punch,Corner Rounder Punch, Rich Razzleberry Polka Dot Grosgrain Ribbon (retired), Sponge Daubers
Catch you later,
Tina
Saturday, 12 February 2011
Some More Altered Tins
Hi!
A little while ago I altered a wafer tin for my daughter Ada, whose hair ties and clips had got out of control. You can see that tin here. When A friend saw the tins she loved them and asked me to make one for her daughter and a second one to give as a birthday gift. Luckily I had more tins!

I used Funky Four to decorate Scarlett's tin. I also used this lovely silver ribbon tied in a bow. I pleated the same ribbon around the top of the lid.

Zahli's tin used the DSP and stickers from the retired Love Sparkles Simply Scrappin' Kit. She has a scrunched Scallop Circle flower on the lid of her tin.
Catch you later,
Tina
Thursday, 10 February 2011
Punch Potpourri Butterfly
Hi!
Today's card is a birthday card for a niece. The Sweet and Sour Speciality DSP was already out on my craft desk, so I decided to use it on the card. Lots of layering on this one!

Here's a closer look at the butterfly. I used three layers all held together with a rhinestone brad. The top layer is a stamped butterfly from the Punch Potpourri Hostess set, the second is more of the DSP and the bottom layer is Rose Red cardstock. I drew some flight lines on the card freehand.

I needed a pocket for a gift card so I used more of the DSP. It is adhered to the inside of the front of the card.

Finally, the inside of the card. I have been trying to make sure I do the insides of my cards as well as the front. Mostly I just stamp a coordinating image on the inside, as I have done here. it doesn't take long to do and really adds to the card.

Stamps: Punch Potpourri (Level 1 Hostess set), Well Scripted
Ink: Rose Red, Pumpkin Pie
DSP/Cardstock: Sweet and Sour Speciality DSP, Rose Red, Pumpkin Pie, Very Vanilla
Other: Fire Rhinestone Brad (Pumpkin), Dimensionals, Stamp Positioner, Butterfly XL Punch
Catch you later,
Tina
Tuesday, 8 February 2011
Layout 13: Where's Hudson?
Hi!
Today my first non-challenge layout as a member of the Stamp A Memory Design Team is over on the Stamp A Memory blog. Pop on over and have a look - I'd love to know what you think about it! In the meantime, here's a little sneak peek:

Catch you later,
Tina
Today my first non-challenge layout as a member of the Stamp A Memory Design Team is over on the Stamp A Memory blog. Pop on over and have a look - I'd love to know what you think about it! In the meantime, here's a little sneak peek:

Catch you later,
Tina
Monday, 7 February 2011
Stamp A Memory February Challenge: u & me
Hi!
Today I'm excited to participate in my first Stamp A Memory challenge as a part of the Design Team.
As it's February naturally the challenge is to focus on the colour RED. What a fantastic opportunity to scrap about my husband Rob and I. This Valentine's Day will be our 13th together and while we don't usually celebrate Valentine's Day, it's nice to remind each other of the fantastic team we make.

I scraplifted this layout from one created by Stacy Cohen and published in Creating Keepsakes magazine on the 19th October. I loved her layout and wanted to recreate it with my own spin.

There is quite a lot of detail in this layout compared to my usual style. Lots of pleated ribbon and layering. I also used a lot of shimmer paint mixed as a spritzer. I spritzed the little heart punchies with Champagne Mist shimmer spritz and then covered them with Crystal Effects to give a bit of oomph to the hearts. I also used Crystal Effects on the title.
DSP/Card Stock: Love Letter DSP, Basic Black, Very Vanilla, Riding Hood Red
Other: Basic Black and Very Vanilla Satin Ribbon, Scallop Trim, Full Heart, Heart to Heart, 1 3/4" Circle and Photo Corner Punches, Champagne Mist Shimmer Paint spritzer, Crystal Effects.
So go on, hop on over to the Stamp A Memory blog and see what the other girls have come up with to inspire you. I'd love to see your layout based on the colour red entered in the challenge.
Catch you later,
Tina
Today I'm excited to participate in my first Stamp A Memory challenge as a part of the Design Team.
As it's February naturally the challenge is to focus on the colour RED. What a fantastic opportunity to scrap about my husband Rob and I. This Valentine's Day will be our 13th together and while we don't usually celebrate Valentine's Day, it's nice to remind each other of the fantastic team we make.
I scraplifted this layout from one created by Stacy Cohen and published in Creating Keepsakes magazine on the 19th October. I loved her layout and wanted to recreate it with my own spin.

There is quite a lot of detail in this layout compared to my usual style. Lots of pleated ribbon and layering. I also used a lot of shimmer paint mixed as a spritzer. I spritzed the little heart punchies with Champagne Mist shimmer spritz and then covered them with Crystal Effects to give a bit of oomph to the hearts. I also used Crystal Effects on the title.
DSP/Card Stock: Love Letter DSP, Basic Black, Very Vanilla, Riding Hood Red
Other: Basic Black and Very Vanilla Satin Ribbon, Scallop Trim, Full Heart, Heart to Heart, 1 3/4" Circle and Photo Corner Punches, Champagne Mist Shimmer Paint spritzer, Crystal Effects.
So go on, hop on over to the Stamp A Memory blog and see what the other girls have come up with to inspire you. I'd love to see your layout based on the colour red entered in the challenge.
Catch you later,
Tina
Saturday, 5 February 2011
Layout 11: January
Hi!
Today's layout is the first in a series - one for every month of the year. Last year I did a weekly 8x8 album where I recorded what my family did and the funny things that they said. I didn't want to take on such a big project again this year, so I decided to do a monthly double layout instead.
Here's the layout. I decided to go with a summery theme as we spent a lot of time swimming or outdoors during January.

Here's the left hand page. I used one 4x6 photo as the main focus of the page, and then used smaller wallet sized photos for the rest. I took inspiration from a layout by Lori Anderson in Creating Keepsakes magazine (page 66 Nov/Dec 2010 issue). I loved the linear, grid like feel of her layout and thought it suited my purpose wonderfully.

I love the way that even though there are 17 photos on this layout there is still plenty of white space and the layout doesn't look cluttered at all.

Once again I took inspiration from Creating Keepsakes magazine for the suns. Megan Klauer used them on her layout on page 100 of the January 2011 issue. The top circle is raised on Dimensionals for a little added interest. Each section is sponged with Chocolate Chip ink to help it pop.

Ink: Peach Parfait Marker, Chocolate Chip
DSP/ Card Stock: Greenhouse Gala DSP, Peach Parfait Textured 12x12, Whisper White
Other: Dimensionals, Sponge Dauber, Circle Punches and Circle Cutter, Chipboard Alphabet
Catch you later,
Tina
Thursday, 3 February 2011
Faux Tiling with Razzle Dazzle
Hi!
Today's card showcases a technique that was new to me - faux tiling. There are a couple of ways to achieve similar looks and I think they all look great.
 I stamped the main Razzle Dazzle image on Very Vanilla cardstock using Marina Mist ink. I was after the blue and cream look that I associate with country-style kitchenware. The corners of the cardstock looked a little bare so I stamped a bit of the image in each corner. I then cut the cardstock into 9 equal squares, sponged the edges with River Rock ink, covered them in Crystal Effects and let them dry. I then mounted each square on River Rock cardstock leaving a small gap between each tile to give the effect of grout.

The River Rock panel is raised on dimensionals. I randomly stamped the main image over the base card and sponged the edges to give an added subtle tone on tone effect.

I also stamped the inside of the card. Adds a nice finishing touch to the card.
Stamps: Razzle Dazzle
Ink: Marina Mist, River Rock
Card Stock: Very Vanilla, Marina Mist, River Rock
Other: Marina Mist 1/8" Taffeta Ribbon, Word Window Large Punch, Crystal Effects, Dimensionals, Crop-A-Dile, blue eyelet.
Catch you later,
Tina
Today's card showcases a technique that was new to me - faux tiling. There are a couple of ways to achieve similar looks and I think they all look great.


The River Rock panel is raised on dimensionals. I randomly stamped the main image over the base card and sponged the edges to give an added subtle tone on tone effect.

I also stamped the inside of the card. Adds a nice finishing touch to the card.
Stamps: Razzle Dazzle
Ink: Marina Mist, River Rock
Card Stock: Very Vanilla, Marina Mist, River Rock
Other: Marina Mist 1/8" Taffeta Ribbon, Word Window Large Punch, Crystal Effects, Dimensionals, Crop-A-Dile, blue eyelet.
Catch you later,
Tina
Tuesday, 1 February 2011
Layout 10: Crazy Face
Hi!
I'm sure there are many parents out there that can relate to the inspiration behind this layout. I can never manage to get a decent photo of my son Alex. It is an incredibly frustrating experience - he either tilts his head, pulls a silly face or won't look at the camera. Sometimes all three!

As you can see though, it is worth the frustration as when I get a good picture it's a really good picture. He's one handsome little man!
Ink: Soft Suede Marker
DSP/Card Stock: Greenhouse Gala DSP, Soft Suede, Daffodil Delight, Poppy Parade
Other: Spiral Border Punch, Colour Spritzer, Big Shot, Timeless Type Alpha Dies
Catch you later,
Tina
I'm sure there are many parents out there that can relate to the inspiration behind this layout. I can never manage to get a decent photo of my son Alex. It is an incredibly frustrating experience - he either tilts his head, pulls a silly face or won't look at the camera. Sometimes all three!
As you can see though, it is worth the frustration as when I get a good picture it's a really good picture. He's one handsome little man!
Ink: Soft Suede Marker
DSP/Card Stock: Greenhouse Gala DSP, Soft Suede, Daffodil Delight, Poppy Parade
Other: Spiral Border Punch, Colour Spritzer, Big Shot, Timeless Type Alpha Dies
Catch you later,
Tina
Subscribe to:
Posts (Atom)