Pages

Showing posts with label Peaceful Petals. Show all posts

Friday, 19 September 2014

JAI #232: Just Add Inspiration!

Hi!

How did you like our colour combination last week?  It was a fantastic combo!  This week we have just as fabulous a challenge for you at Just Add Ink.  Kim has found these gorgeous pictures to inspire our creativity.


Aren't they pretty?  I really loved how the flowers are the vibrant pink with the gold through them as well, so that's what I started with on my card.


I made some simple scrunched flowers using my scallop circle punch.  I took some Strawberry Slush cardstock and punched the scallop circles.  Next I scrunched the cardstock to soften it and then I split the cardstock to make it thinner and give it a suede, soft look.  I also punched some of the new Natural Filter Paper with the same punch and then layered it in between the layers of cardstock.  I was really pleased with how these flowers turned out!


The do make the card quite bulky though, so it will be a hand delivered card only!


I really like how the inside turned out too!

I hope you can play along with us this week at Just Add Ink!  See you over there on the blog.

Bye for now,

Tina

Wednesday, 23 July 2014

Some More Stamped Candles

Hi!

A little while ago I showed you some stamped candles I'd made as a gift on commission.  Well, when the recipient's friend saw them she loved them, and so I was asked to make another set for her birthday. Because they were for the friend of the first recipient I had to make them differently.


This time I used the floral stem from Thoughts And Prayers as well as a small butterfly from Papillion Potpourri.  My brief was flowers and butterflies so I thought these two in combination worked well.


The DSP on this card was from the retired Modern Medley DSP that I brayered over with Melon Mambo ink to match the pink in the stamping.


I used my markers on the floral stem stamp to give the two colour effect.  It's a great trick!


Here is the candle and the card together.  I actually made 4 candles and boxed them up in a set.  Silly me forgot (again!) to take a photo of the gift box.


Bye for now,

Tina

Friday, 11 July 2014

JAI #222: Just Add Colour

Hi!

It's Friday so I'm here with the new Just Add Ink Challenge.  This week we have a gorgeous colour combination for you courtesy of Mae.


It took me a little while to think of what to do with this card, but once I got an idea it came together pretty quickly.  I used a lot of retired product on this card - some recently retired, some has been retired for a while.


I started with the DSP on the base.  It's from the long retired Twitterpated DSP - a favourite of mine.  I didn't have enough to cover the entire front so I trimmed it into four pieces.  To soften the gaps I covered the bottom one with the retired Flower Trim and the top ones with the leaf die cuts.


I was a little worried that the Bermuda Bay would be too strong a colour for the rest of the card so I stamped it off once before I stamped on the card.


I liked the leaves so I added a few more to the inside to finish it off.

I hope you can play along with us at Just Add Ink this week - it's a great colour combination.

Bye for now,

Tina

Friday, 13 June 2014

JAI #218: Just Add Colour

Hi!

This month we say goodbye to retiring products from the current Annual Catalogue, so at Just Add Ink we though we'd challenge you to use some of your retiring colours.  Your creation should use three of the retiring In Colours.  Kim is the brains behind this fabulous challenge!


I decided to go with Raspberry Ripple, Primrose Petals and Midnight Muse on my card.


I was really pleased with how the background turned out on this card.  After I made it though I was a bit stumped as to what to put over the top of it.  Hubby suggested I go with a curved shape to offset all of the angles of the hexagons.  I think he was right!


The larger butterfly is from the retiring Beautiful Butterflies Bigz Die, which I will miss a lot.


I think the two pinks look very pretty layered together on the butterflies - what do you think?

I hope you can play along with us this week.  Which are your favourite colours from the retiring In Colours?  See you over at Just Add Ink.

Bye for now,

Tina

Friday, 16 May 2014

JAI #215: Just Add Colour

Hi!

Are you ready for another Just Add Ink Challenge?  This is a super challenge - it will go for 2 weeks, so you will have plenty of time to enter.  Most of the Design Team will be heading to Melbourne next week for Stampin' Up!'s Convention (me included!) so we thought we'd allow some extra time for the challenge.

Enough chat - time for the Challenge.  This week Mae has given us a very challenging Colour Combination to work with.


I thought this combo was going to be a huge challenge for me, but once I had an idea it all came together beautifully.  Don't you love it when that happens?


The flower from Peaceful Petals was stamped in Stazon on Water Colour paper and then coloured using my Aqua Painter with Cherry Cobbler ink. I love the way that water colouring softens the colours.  I also water coloured a few of the leaves in Garden Green to pop behind the flower.


I used my last piece of this Cherry Cobbler ribbon on my card. I think I've been through two rolls of this ribbon!


Of course, I always decorate the inside of the card to match the outside.

Have fun playing along with us at Just Add Ink this fortnight, and if you're going to Convention come and say Hi!  We love to put faces to names :)

Bye for now,

Tina

Monday, 12 May 2014

Peaceful Petals for Mother's Day

Hi!

Did you have a lovely weekend?  I celebrated Mother's Day with my family yesterday.  I had a wonderful day and received lots of fabulous handmade gifts from my beautiful children. I was very spoilt!  Today I have a Mother's Day card to show you that I made for my Mother-In-Law.


I made this card as a class sample.  Not all of the ladies wanted to make a Mother's Day card so I tried to make it a bit more generic for them.  A Thinking Of You sentiment on the front makes a great all purpose card.


We stamped the main flower on some Blushing Bride cardstock and then trimmed around it and popped it up on Dimensionals over the top of some stamped and trimmed leaves.


I didn't get a good picture of the inside of the card, but this is a close up of the centre of the inside.  I stamped the flower in Blushing Bride and then the sentiment in Primrose Petals.

I'll be back on Wednesday with another Mother's Day card.

Bye for now,

Tina

Wednesday, 7 May 2014

Sweet Sorbet Card Box

Hi!

As I mentioned on Monday, I found 2 Sale-A-Bration projects that I hadn't blogged yet, so I decided to blog them this week.  Are you missing the Sweet Sorbet DSP as much as I am?  I have stashed away a few packs for a future project!


This box was my monthly class project in March.  The ladies got to construct the box using the Envelope Punch Board and then made some cards to go inside.


It was a fabulous project.  I ended up making a few more cards (it easily fit 5) and gave it as a gift to my mum.  Now she has a small stash of cards to use for a variety of occasions.


Here are the two cards we made in class.  I used some more of the Sweet Sorbet DSP on them, as well as the Papillion Potpourri stamp set.


I deliberately kept the cards nice and flat with no embellishments to stick out so that they slide in and out of the box easily.

Bye for now,

Tina

Saturday, 3 May 2014

JAI 213: Just Add Inspiration!

Hi!

Here we are with another gorgeous Just Add Ink Challenge to sink your teeth into.  This week Nikki has put together this beautiful set of images to inspire you to create.


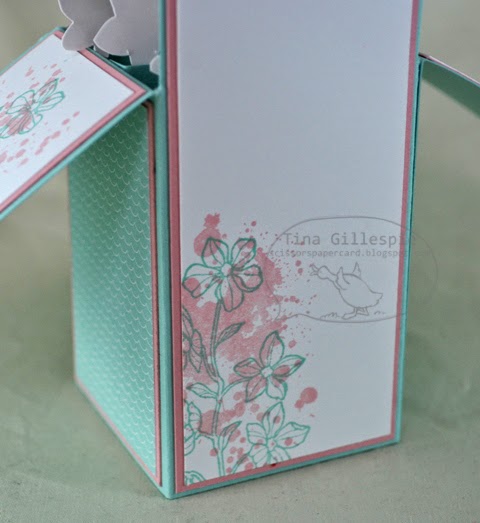
Isn't it lovely?  The colour palette is so pretty!  I decided to use the colours to create my very first card in a box.  It was lots of fun to create, and very easy too.


It was quite difficult to get a lovely picture of the card, especially of all the flowers in the top.  Being a gloomy day didn't help either!


I was a bit lazy creative in colouring the flowers.  I stamped the flower in Pool Party and then stamped one of the splodge stamps from Gorgeous Grunge over the top in Blushing Bride.


I'm not really a gold person, but I wanted to include some on my card.  I stamped the sentiment in gold and then clear embossed over the top of it.  I also used some of the thick gold Baker's Twine.


The back of the card in a box is where you write your sentiment, so of course it had to be stamped too!

What will you pull out of the inspiration photos to inspire your creativity?  The design team have a wide variety of cards to inspire you too.  Why don't you pop on over to Just Add Ink to check them all out?

Bye for now,

Tina

Friday, 18 April 2014

JAI #211: Just Add A Sketch

Hi!

Happy Easter!  I'm really looking forward to spending some time scrapbooking this long weekend.  What will you be doing?  Hopefully finding some time to create a card for our Just Add Ink Challenge.  This week Paula has designed a fabulous sketch for us.


I switched a few things around with the sketch to create my card.


To create the larger scallops under the flag I cut a second Floral Frames die cut, and then used a Circles Collection Framelit to cut a circle out of the middle.  I then cut between two of the scallops so that I could stretch the circular shape into a straight line.  Easy!


This card did double duty as a class sample for my stamping ladies this month. They'd wanted to do a technique so we did the baby wipe background technique. You can see the colours behind the stamped tree.


I hope you have a relaxing weekend, with plenty of papercrafting time.  See you over at Just Add Ink!

Bye for now,

Tina

Monday, 24 March 2014

Petite Petals Notecard

Hi!

Today I have for you a sweet little note card that I made as a sample for several classes I ran last month.


The stamp set is such a cute little set, and the coordinating punch makes cropping it a breeze!


I stamped the more solid flower stamp in Pistachio Pudding on the Whisper White cardstock.  My aim was to make it look like the leaves on a bush, and I quite like the effect.  By overlapping the stamping you get lighter and darker areas, which look a bit more realistic.


I repeated this effect on the inside.

Bye for now,

Tina
Friday, 28 February 2014

JAI #204: Just Add Colour

Hi!

Here we are once again - it's Friday and time for another Just Add Ink challenge!


This week Nikki has given us this gorgeous colour combination to play with.  I was pleasantly surprised with how much I enjoyed this combination.  I don't often use gold so I was worried about how to include it on my card.  Thankfully the Watercolour Wonder washi tape ion the new Occasions Catalogue worked beautifully!


I started with a base of Whisper White cardstock and stamped a few splatters from Gorgeous Grunge in Crumb Cake. The washi was applied over the top of the stamping.


The leaves from Peaceful Petals were stamped and fussy cut.  I adhered the top leaves to the card with Dimensionals but I adhered the bottom leaves flat.  I love the effect it gives.


Nice and simple on the inside, plenty of room for a heartfelt message.

I hope you can play along with us this week at Just Add Ink.

Bye for now,

Tina

Friday, 31 January 2014

JAI #200: Just Add Inspiration

Hi!

How are you all on this lovely Friday?  Have your children survived the first week back at school? Have you survived your children's first week back at school?  It can be a bit of a shock to the system after the lazy days of summer holidays!  How about trying the new Just Add Ink challenge to give you back your sanity?


Nikki found these gorgeous images to inspire our card making this week.  Wouldn't you just love to sit at that table and enjoy a cup of tea?


I saw this gift box and tutorial by Connie Collins a long time ago and have been meaning to try out the flower ever since.  This challenge seemed the perfect time.  Isn't it a beautiful flower?  It's not difficult to make at all, but it does take a while as you need to wait for it to dry.


This isn't a card you would want to post as the flower sits out quite a way from the card. Sending it in the post would squash that beautiful flower. Luckily I have plenty of friends I can hand deliver this card to.


I was a bit stumped as to what to do on the inside. I don;t have any daisy stamps, so I ended up stamping a leaf from Peaceful Petals and lightly coloured it with a blender pen.

Stamps: Field Flowers, Sassy Salutations, Peaceful Petals
Ink: Wild Wasabi, So Saffron
Cardstock: Pistachio Pudding, So Saffron, Wild Wasabi, Chocolate Chip, Whisper White
Other: Big Shot, Floral Frames Collection Framelits, Decorative Dots TIEF (SAB), Scribbles Swirls Sizzlit (retired), White Baker's Twine, 1 1/4" Circle Punch, 1" Circle Punch, Blender Pen

I hope you can join in this week at Just Add Ink, we'd love to see what you create.

Bye for now,

Tina

Monday, 13 January 2014

Thank You In Blue

Hi!

It's good to be back blogging again after a bit of a break over Christmas and New Year's.  I meant to be back a bit sooner, but school holiday play dates and illness scuttled those plans.  I received my preorder goodies from the upcoming Sale-A-Bration and Occasions Catalogues and I've been dying to have a play.  I finally found some time over the weekend.

Today's card was made on commission.  The brief was a thank you card for a girl who likes blue.


Look hard for the sneak peeks!  There's a new stamp set, DSP and twine.


The flower was stamped in Coastal Cabana and then given a very gentle wash with Pool Party using an Aqua Painter.  I say a very gentle wash because if you use too much water you're just going to end up with a blurry mess.  Ask me how I know!


Here's the inside with an old favourite, Sweet Essentials.  The orange cardstock is Tangerine Tango. Not colours I would have put together, but I really like the combo with the blues.

Bye for now,

Tina