Pages

Showing posts with label First Edition DSP. Show all posts

Friday, 25 July 2014

JAI #224: Just Add Inspiration

Hi!

Do you ever have one of those days where your memory plays little tricks on you? It seems I had one of those days while making my Design Team sample for this week's Just Add Ink Challenge.  Sigh...


This week Kim found these gorgeous images to inspire our creations.  Most of the DT went with the Christmas in July theme, and so did I.  I think poinsettias and Christmas are nearly inseparable for me!  I have had a foam wreath lying around since Christmas waiting to be decorated, so now was the time to do it.


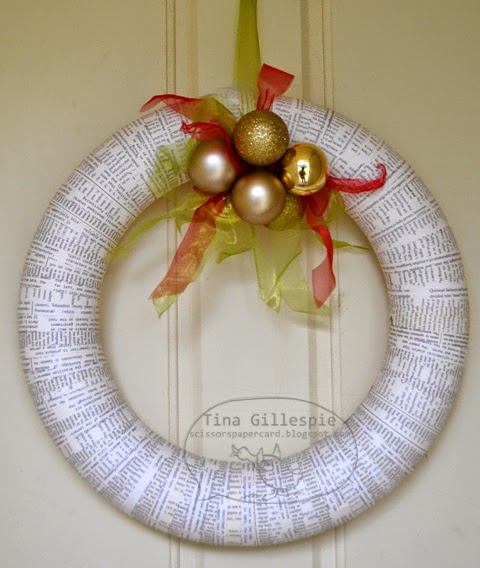
I cut a whole lot of strips from the retired First Edition SDSP and spent a long evening in front of the telly gluing them onto the wreath.  Each strip was only half an inch wide, so it took a lot of time and a lot of strips!  Thankfully it was a good telly night so I was able to watch while I glued.


Here's where the dodgy memory comes in.  Firstly I forgot where I'd stashed the baubles I'd put aside for this project way back in January.  Took me half an hour to find them.  The dodgy memory came in again when I finally found than and realised they were gold, not red like I'd imagined them to be.  Sigh...  It was too late to go back, so I decided to add the red and green ribbon to bring in the colours from the inspiration pic.

Overall I'm really happy with the wreath, dodgy memory and all.  It's not OTT, it's just my style and I'm going to love displaying it at Christmas time.  So - what do you see in the picture?  The DT have come up with a huge variety of ideas for your inspiration.  You can see them over at Just Add Ink.

Bye for now,

Tina

Monday, 19 May 2014

Papillion Potpourri Mother's Day Card

Hi!

I'm back today with another of the Mother's Day cards I made this year.  This one was made as a class sample, and was made to be versatile.  It could easily be made into a birthday card by changing the sentiment in the middle.


I CASEd this card, not changing much.  Why mess with a great card?


I thought the use of the butterflies was perfect for a lovely, soft feminine card.


Bye for now,

Tina

Monday, 24 June 2013

Farewell First Edition

Hi!

For the rest of the month I'm going to be doing some farewell posts, saying goodbye to some of my favourite retiring products and stamps.  First off the ranks is the First Edition Specialty DSP.  I guess I was a little lucky with this DSP as it was current for two years rather than the typical one year.


I loved the versatility of the DSP as a background paper for both male and female cards.  This post should also include the Rose Red Seam Binding Ribbon, for sadly it too is being retired. Thankfully there will still be other colours of Seam Binding available.


The butterfly was stamped with Papillion Potpourri and then punched using the Elegant Butterfly punch.  I also used some Dazzling Details on the body of the butterfly for some subtle shimmer.


Some more butterflies to finish off the inside.

So farewell to First Edition SDSP (and Rose Red Seam Binding) but as I still have nearly a whole pack of it I'm sure you'll see bits of it here and there on my blog.

Stamps: Papillion Potpourri, Field Flowers, Creative Elements
Ink: Rose Red, Wisteria Wonder
DSP/Cardstock: First Edition SDSP, Rose Red, Very Vanilla
Other: Big Shot, Ovals Collection Framelits, Elegant Butterfly Punch, Rose Red Seam Binding Ribbon, Dazzling Details, Dimensionals

Bye for now,

Tina

Monday, 10 June 2013

Thinking Of You With Flowering Flourishes

Hi!

Last week I was asked to make a card for my daughter's teacher.  Her husband had been very unwell and she had been off work for a long time looking after him.  The mums just wanted to let her know that we were thinking of her.


I wanted the card to be pretty and elegant, but most of all the Thinking Of You sentiment to stand out. I really love the Raspberry Ripple and Basic Black combination, and the splash of Old Olive helps give the sentiment panel a lift.


I incorporated some bling into the stamped Flowering Flourish image by adhering some Basic Jewels Rhinestones.


I continued the same theme on the inside of the card with more stamping and more bling. From all accounts she loved the card.

Stamps: Flowering Flourishes, Thoughts And Prayers
Ink: Raspberry Ripple
DSP/Cardstock: First Edition Specialty DSP, Raspberry Ripple, Old Olive, Basic Black, Very Vanilla
Other: Big Shot, Paper Doily Sizzlit, Decorative Label Punch, Basic Jewels Rhinestones, Very Vanilla Satin Ribbon (retired)

Bye for now,

Tina

Wednesday, 6 February 2013

A Pinterest Inspired CASE

Hi!

Today's card is one I found inspiration for on Pinterest. Yes, I finally created an account and now I'm pinning all kinds of great ideas.  One day I'll get around to doing some of them!

Anyway.... today's card is a CASE of this card. I love, love, love the original! However because the card I was making as to teach at a class I had to simplify a little.  No stitching and no buttons.


I still LOVE how this card turned out.  As I told my class ladies, it's a design and colour scheme that could easily be male or female.  In fact, some of my ladies switched the punchies for stars and other more masculine ones.


For interest I used some Dimensionals for layering.  The two circles are popped up, but in the middle the scallop circle is stuck flat and the butterfly is popped up.  Did you notice this new Bitty Butterfly Punch? You can find it on page 13 of the new Seasonal Catalogue. It's super cute and coordinates perfectly with the butterfly images in Papillion Potpourri and Bloomin' Marvelous.

I haven't stamped the inside of this card - I'm not sure how I will use it just yet! The sentiment on the front leaves it open for a whole range of uses, from birthday to thanks to just because.

Bye for now,

Tina

Monday, 17 December 2012

Another Masculine Birthday Card

Hi!

Today I have another birthday card for you.  It was made at the same time as this card, and as I had my Distressing Essentials Kit out I decided to use it on this card too.


I've used the Clockworks stamp set to stamp a collage type design on the front of the card. I also used the retired Happiest Birthday Wishes for the sentiment, which is stamped on some Cotton Ribbon.


I continued the collage stamping on the inside too. I'm quite liking this stamp set now that I've had a play with it!

Bye for now,

Tina

Saturday, 23 June 2012

Baker's Twine Blog Hop

Hi!

Well, this blog hop snuck up on me very quickly and quietly!  Funny how some months are like that...   A small but talented group of friends are hosting a blog hop today to showcase one of our fabulous newish products  -Baker's Twine.  The blog before mine on the hop was Kathryn Ruddick's, but you can stop and start wherever you'd like.  What a lovely way to spend a wintry, rainy Saturday morning.

If you haven't had a chance to play with our Baker's Twine you seriously need to get some.  It is so cheap and there are dozens of ways you can use it on your projects.  I have made 2 mini albums using twine as a feature on both.


The first album is made using the Flirtatious DSP.  It's unfinished for now, and is for my daughter.  We've been having lots of "mummy/daughter" dates lately and this records some of them. We playing on my iPhone and taking 'selfies' while we're out.  I have mostly used the Baker's Twine in a single strand in this album as I wanted a light, soft look to compliment the pretty papers.


A great way to use up some smaller pieces of Baker's Twine is to tie knots or bows around other ribbons, like I have in the photos above and below.


The second album features the Cherry Cobbler/White Baker's Twine.  I mostly used it in three strands throughout this album as I felt it suited the darker, more distressed look of this album.


This album is also unfinished, as I haven't even decided what to do with it!  I think it may end up being an album of my husband and I.


There was a lot going on on this page, so I used the Baker's Twine in a single strand.  I used a couple of scraps of the Twine to tie on the tags.


Here I've just used a triple strand as a bow feature on the side of the die cut window.  I've only adhered the top of the panel to the page so I can slip a photo in underneath when I decide which photo to use.


I thought I"d shake it up a bit with the page below and do a triple strand with a single bow.  Not sure if I like it as much as the triple bow but it may grow on me! Again, only the top is adhered so I can slip a photo in later.


Well, that's it for me, now you're off to see the wonderful creations of Ros Davidson.

Bye for now,

Tina

Blog Hop Participants:

Ros Davidson http://www.rosdavidson.typepad.com

Christine Blain http://www.christineblain.blogspot.com

Alisha Watson http://www.ratherbstamping.blogspot.com.au

Di Dunk http://www.stampartbydi.typepad.com

Kathryn Ruddick http://www.katlodesigns.com

Sunday, 6 May 2012

JAI Scrapbooking Challenge #5: Just Add Heritage

Hi!


It's the first Sunday of the month, which means it's time for a new scrapbooking challenge at Just Add Ink. This month we are challenging you to use a heritage photo in your layout.  I selected a photo that my grandfather took in 1926.


This photo has always stuck in my memory, so this challenge provided to perfect opportunity to scrap it.  Can you see in the photo - everyone is sitting on the beach in their Sunday best?  I also love that the people in the photo are so relaxed, not the usual stiffly posed photo of the era.


I used some more of the gorgeous Joanne Leddy flowers on my layout, they are such a statement but in an understated way!


I kept my layout fairly monochromatic in keeping with the Heritage theme of the challenge.  How are you going to interpret this challenge this month?  I can't wait to see your layout over at Just Add Ink.

Ink: Wisteria Wonder
DSP/Cardstock: In Colour Patterns DSP, First Edition Specialty DSP, Concord Crush Textured 12x12 Cardstock, Basic Black, Wisteria Wonder, Very Vanilla
Other: Big Shot, Simple Numbers Bigz Dies, Swirls Scribbles Sizzlits Die, Top Note Bigz Die, Fancy Flower Punch, 5-Petal Flower Punch, Boho Blossoms Punch, Vintage Brads, Paper Snips

Bye for now,

Tina

Monday, 26 March 2012

First Edition Sale-A-Bration Card

Hi!

Today I have a card for you that I made using the Sale-A-Bration stamp set Fresh Vintage, combined with some of the gorgeous First Edition Speciality DSP and touches of the fabulous Silver Glimmer Paper.


For some reason I have made a lot of Sale-A-Bration cards using Poppy Parade!  I think it's a colour that looks gorgeous with the Fresh Vintage Stamp Set.  Here's a closer look at the main panel.


Here's the inside of the card.  I left it blank so that I could stamp a sentiment when I knew what I was going to use the card for.


Stamps: Fresh Vintage (SAB)
Ink: Poppy Parade
DSP/Cardstock: First Edition SDSP, Poppy Parade, Very Vanilla, Silver Glitter Paper
Other: Bird Builder Punch, Poppy Parade Double Stitched Poly Twill Ribbon, Dimensionals

Bye for now,

Tina

Friday, 17 February 2012

Festive Friday #6

Hi!

I'm back with another Design Team card for Nicole Derendorf's Festive Friday Challenge #6.  We're still on the Christmas cards.  I'm loving getting my Christmas cards done one by one like this - I can spend more time on each and it won't be a mad rush to churn out the cards at the end of the year.  Here's my card for this week's challenge:

Here's a closer look at the front.  I used the new Postage Stamp punch, layered with our square punches.  The fussy-cut ornament was popped up on Dimensionals and adorned with some Rhinestones.

And of course the inside, done to match the outside.

I hope you can find time to play along at Festive Friday Challenges this week.  I can't wait to see your Christmas card.

Stamps: Snow Swirled, Tree Trimmings
Ink: Old Olive, Early Espresso
DSP/Cardstock: First Edition Specialty DSP, Letters To Santa DSP, Early Espresso, Old Olive, Riding Hood Red, Very Vanilla
Other: Big Shot, Petal Cone Die, Postage Stamp Punch, 1 1/4" Square Punch, 1" Square Punch, Early Espresso Baker's Twine, Basic Jewels Rhinestones, Dimensionals, Paper Snips, Chit Chat Rub Ons (retired)

Bye for now,

Tina

Friday, 30 December 2011

Layout 99: Up On Daddy's Shoulders

Hi!

I wanted to scrap some gorgeous photos of Rob and Hudson on the beach.  We'd taken the kids for a walk on the beach a couple of weeks ago.  We thought it was too cold for a swim, but the kids had other ideas!  Rob had Hudson up on his shoulders while we walked.  The beach is no place for a stroller!  I had been taking photos of the kids in the water, and then just happened to turn around and snap a few of Rob and Hudson.  They are some of my favourite photos from that walk on the beach.


Isn't that an awesome quote to go with the photos?  I did a quick google search for daddy's shoulders quotes and found this one.  It's actually the title of a children's book by Matt Berry.  It took me forever to cut out, but the end result was worth the effort.


I love that look of sheer happiness on Hudson's face!

Ink: Real Red and Pacific Point Stampin' Write Markers
DSP/Cardstock: First Edition Specialty DSP, Real Red, Pacific Point, Very Vanilla
Other: Big Shot, Timeless Type Alphabet Dies, Large Star Punch (retired)

Tomorrow I have my 100th layout for 2011 to show you.  I'm thrilled that I met my target for the year, and I actually made it a few days early, as I completed the layout on the 27th.  Hmmm, I wonder what goals I should set for myself in 2012?

Catch you later,

Tina

Monday, 12 December 2011

Layout 79: The Boy In The Box

Hi!

Waaaaaayyyyy back in January I challenged myself to complete 100 layouts in 2011.  I was going really well until November got swallowed into a black hole of sickness.  So here I am, mid way through December, and I'm up to layout 79.  Not too bad considering, but I still want to complete my challenge.  You're going to be seeing a lot of layouts before the end of the year!


This layout has been floating around on my desk half finished for about 2 months.  I had the DSP and the photos stick down, but I just couldn't finish it.  I think I was stuck on a title.  I eventually settled on The Boy In The Box for the title and then the rest of the layout was easy to finish.  It's so frustrating getting stuck on one little detail like that!


I got out an old favourite stamp set for this layout - Baroque Motifs.  It was one of the very first stamp sets I purchased, but it hasn't seen much ink lately.  I love the way the textured cardstock has an effect on the image.  I was after this rough kind of look and it worked perfectly!


The shape of the DSP came from a piece of paper I had in my stash.  I just traced it onto the DSP and hand cut it out.  I liked the curves in the paper and how they offset the angular photos and title.

Stamps: Baroque Motifs
Ink: Basic Black
DSP: First Edition Speciality DSP, Real Red Textured 12 x 12, Basic Black, Very Vanilla, Real Red
Other: Big Shot, Timeless Type Alpha Dies, Decorative Label Punch, Spiral Border Punch (retired), Small Alpha Stickers (non SU)

Catch you later,

Tina

Monday, 28 November 2011

Need For Speed Birthday Card

Hi!

Today I have a card for you that I made for my Uncle's Birthday  I decided to use the new stamp set, Need For Speed, which is perfect for adult male cards.


I kept the layout fairly simple to let the car be the star of the show!


Another car to finish off the inside too. I chose my colour combination based on the Well Worn DSP, as I already had it all out on my desk after making a birthday card for my brother in law.  I'll post his card later in the week.

Stamps: Need For Speed, Happiest Birthday Wishes (Hostess)
Ink: Not Quite Navy, Cajun Craze
DSP/Cardstock: First Edition Speciality DSP, Very Vanilla, Not Quite Navy, Cajun Craze
Other: Blue Denim Jean Ribbon, Jumbo Eyelets (retired), Crop-a-Dile, Dimensionals

Catch you later,

Tina

Saturday, 26 November 2011

Christmas Blog Hop

Hi!

Welcome to our last blog hop of the year.  We're doing a Christmas theme this month to give you some inspiration in the final charge into Christmas.  Did you know there are only 29 days to go????

The blog before mine was Ros Davidson's, but you can start anywhere and just keep hopping 'til you get back to where you started.  I'm sure you're going to see a heap of lovely ideas along the way.

I decided to do a scrapbook layout of the family putting up the Christmas tree. In Adelaide it seems to be the tradition that the tree goes up on Pageant Day (the second Saturday in November).  Most families either go into the city to watch the parade and then come home to put up the tree, or they stay at home and watch the parade on TV while putting up the tree.  The advantage of putting the tree up this early is that you have plenty of time to scrap the photos before the craziness that is December!


There are some sneak peeks on this layout of products coming out in the upcoming Summer Mini Catalogue.  The postage stamp shaped layout was inspired by a new punch.  I just used my 1" Circle punch to create the 'perforations' aroun d the edge of the layout.


I kept the postage stamp theme going with a fussy cut postage stamp image from the Letters To Santa DSP.  The baubles were also fussy cut from the same DSP pack, and there's another peek - some gorgeous Baker's Twine from the Mini catalogue.


More fussy cut baubles and Baker's Twine to decorate the journalling spot.  I decided to 'hang' one of the baubles from the letter 'e' in the title.


A little more Baker's Twine and another bauble to finish off the layout.  Can you tell how much I love the twine?

Ink: Early Espresso Stampin' Write Marker
DSP: Letters To Santa DSP, First Edition Specialty DSP, Early Espresso, Riding Hood Red, Whisper White
Other: Big Shot, Timeless Type Junior Alphabet Dies, Top Note Die, 1" Circle Punch, Early Espresso Baker's Twine, Early Espresso Taffeta Ribbon,  Paper Snips, Dimensionals
Digital: PS5, Photo Booth Photo Frame

I'd love for you to hop off to Nikki Sadler's blog now to continue the Blog Hop.

Catch you later,

Tina

Blogs in the hop:

Nikki Sadler
http://www.inkyart.com.au/

Sue Madex
http://www.madexcreations.com/

Di Dunk
http://www.stampartbydi.typepad.com/

Judy May
http://www/judymay.typepad.com

Kathryn Mangelsdorf
http://klm55.blogspot.com/

Alisha Watson
http://www.ratherbstampin.typepad.com/

Christine Blain
http://www.christineblain.blogspot.com/

Ros Davidson
http://www.rosdavidson.typepad.com/

Saturday, 5 November 2011

Chinese Whispers Stampin' Up! Style

Hi!

Today I have a blog hop for you, but a bit of a different blog hop.  A couple of months ago I was chopping up some DSP for a share and let my mind wander as I chopped.  It wandered to Sarah Klass's blog where she had blogged about how a group of her friends had all created cards one after the other, each inspired by the card before them.  She called it "Chinese Whispers of the Stampin' Up! kind". 

So as my mind wandered I thought it sounded like a great idea and proposed a game of Chinese Whispers to a group of Stampin' Up! friends.  They were keen to get on board and so I began the "whisper".


I made this card, and then emailed a photo to Kathryn Mangelsdorf.  She then made a card based on mine and emailed her photo to the next person on the list, and so on.  Each person only saw the card before theirs.  When the "whisper" reached the last person on the list I was able to reveal all the cards.  It was amazing to see how the "whisper" evolved as it went around the circle, and we wanted to share the fun and gorgeousness we all created.  There are 15 cards to show you, so please join in and hop around the blogs to see how the "whisper" progressed.


Here are the other blogs on the hop.  I recommend that you do the hop in order so that you can follow the evolution of the "whisper".  Some blogs feature more than one card as not all of the ladies who participated have blogs.

Kathryn Mangelsdorf
Sue Madex
Christine Blain
Ros Davidson
Nikki Sadler
Kathryn Ruddick
Di Gill
Alisha Watson

Stamps: Just Believe, Curly Cute
Ink: Basic Black
DSP/Cardstock: First Edition Specialty, Very Vanilla, Basic Black
Other: Basic Black Satin Ribbon, Modern Label Punch, Basic Jewels Pearls, Sponge Dauber

Happy Hopping!  Now you're off to Kathryn Mangelsdorf's blog where you'll find both Kathryn's card and Christine Henderson's card.  Don't forget to leave comments along the way - we'd love to know what you think of our game and our cards!

Catch you later,

Tina

Monday, 10 October 2011

More Swirls Scribbles Die

Hi!

Did you believe me when I told you I loved this die and was using it on EVERYTHING???  I have one more post (for now!) to convince the last of the doubters!  This is another simple card that uses the die cuts as an embellishment.


The die comes with little tear drop shaped sections that are great to use as little fillers between the swirls.  Here's a closer look.


After I coloured the flower it was misted with a Champagne Mist Shimmer paint/Isocol mix to give a nice little shimmer.  A few Rhinestones around a Rhinestone Brad completed the flower.

Stamps: Clearly For You
Ink: Basic Black, Wisteria Wonder
DSP/Cardstock: First Edition Specialty DSP, Brushed Silver, Basic Black, Very Vanilla
Other: Big Shot, Swirls Scribbles Sizzlit, Paper Daisy, Rhinestone Brad, Basic Jewels Rhinestones, Word Window Punch, Silver Foil Smooch Spritz, Sponge Dauber, Brayer

Catch you later,

Tina

Wednesday, 14 September 2011

Simply Soft Card

Hi!

Today I have a Thank You card, made using one of the brand new Hostess Sets called Simply Soft.  It's a gorgeous two-step set that has three floral outline images and three more images for easy colouring of the flowers.  It's called two-step because first you stamp the outline and then you stamp the solid image over the top which colours the flowers.  And if you buy the clear mount option like I did, you don't need a stamp positioner to line the stamps up.  How much easier can it be?


I used Blushing Bride and Pear Pizzazz to colour the flower.  The leaves were coloured by hand using my inkpad and a Blender Pen.  Here's a closer look at the flower image.


I also spritzed the panel with my Sahara Sand marker and my Colour Spritzer.  Isn't the flower a lovely soft image?


I also completed the inside of my card using the same stamp as on the front.  I stamped it in Blushing Bride, so it's little hard to see.  Here's a closer look.


The hostess benefits system has changed with the new Idea Book and Catalogue.  Now once your order or Workshop sales reaches $300 you receive $50 Hostess Dollars to spend on anything you'd like from the catalogue.  There are specially priced sets just for Hostesses that you can spend your Hostess Dollars on, or you can buy your choice of items.  I love the new system!

Stamps: Simply Soft, Curly Cute
Ink: Pear Pizzazz, Blushing Bride, Sahara Sand, Basic Black
DSP/Cardstock: Hostess In Colour Patterns Stack (retired), First Edition, Very Vanilla, Blushing Bride
Other: Big Shot, Circle Cutter, Blushing Bride Ribbon, Blender Pen, Sponge Dauber

Catch you later,

Tina