Hi!
It's the first Sunday of the month, which means it's time for a new scrapbooking challenge at Just Add Ink. This month we are challenging you to use a heritage photo in your layout. I selected a photo that my grandfather took in 1926.
This photo has always stuck in my memory, so this challenge provided to perfect opportunity to scrap it. Can you see in the photo - everyone is sitting on the beach in their Sunday best? I also love that the people in the photo are so relaxed, not the usual stiffly posed photo of the era.
I used some more of the gorgeous Joanne Leddy flowers on my layout, they are such a statement but in an understated way!
I kept my layout fairly monochromatic in keeping with the Heritage theme of the challenge. How are you going to interpret this challenge this month? I can't wait to see your layout over at Just Add Ink.
Ink: Wisteria Wonder
DSP/Cardstock: In Colour Patterns DSP, First Edition Specialty DSP, Concord Crush Textured 12x12 Cardstock, Basic Black, Wisteria Wonder, Very Vanilla
Other: Big Shot, Simple Numbers Bigz Dies, Swirls Scribbles Sizzlits Die, Top Note Bigz Die, Fancy Flower Punch, 5-Petal Flower Punch, Boho Blossoms Punch, Vintage Brads, Paper Snips
Bye for now,
Tina
Showing posts with label Stampin' Up Top Note Die. Show all posts
Sunday, 6 May 2012
Saturday, 26 November 2011
Christmas Blog Hop
Hi!
Welcome to our last blog hop of the year. We're doing a Christmas theme this month to give you some inspiration in the final charge into Christmas. Did you know there are only 29 days to go????
The blog before mine was Ros Davidson's, but you can start anywhere and just keep hopping 'til you get back to where you started. I'm sure you're going to see a heap of lovely ideas along the way.
I decided to do a scrapbook layout of the family putting up the Christmas tree. In Adelaide it seems to be the tradition that the tree goes up on Pageant Day (the second Saturday in November). Most families either go into the city to watch the parade and then come home to put up the tree, or they stay at home and watch the parade on TV while putting up the tree. The advantage of putting the tree up this early is that you have plenty of time to scrap the photos before the craziness that is December!
There are some sneak peeks on this layout of products coming out in the upcoming Summer Mini Catalogue. The postage stamp shaped layout was inspired by a new punch. I just used my 1" Circle punch to create the 'perforations' aroun d the edge of the layout.
I kept the postage stamp theme going with a fussy cut postage stamp image from the Letters To Santa DSP. The baubles were also fussy cut from the same DSP pack, and there's another peek - some gorgeous Baker's Twine from the Mini catalogue.
More fussy cut baubles and Baker's Twine to decorate the journalling spot. I decided to 'hang' one of the baubles from the letter 'e' in the title.
A little more Baker's Twine and another bauble to finish off the layout. Can you tell how much I love the twine?
Ink: Early Espresso Stampin' Write Marker
DSP: Letters To Santa DSP, First Edition Specialty DSP, Early Espresso, Riding Hood Red, Whisper White
Other: Big Shot, Timeless Type Junior Alphabet Dies, Top Note Die, 1" Circle Punch, Early Espresso Baker's Twine, Early Espresso Taffeta Ribbon, Paper Snips, Dimensionals
Digital: PS5, Photo Booth Photo Frame
I'd love for you to hop off to Nikki Sadler's blog now to continue the Blog Hop.
Catch you later,
Tina
Blogs in the hop:
Nikki Sadler
http://www.inkyart.com.au/
Sue Madex
http://www.madexcreations.com/
Di Dunk
http://www.stampartbydi.typepad.com/
Judy May
http://www/judymay.typepad.com
Kathryn Mangelsdorf
http://klm55.blogspot.com/
Alisha Watson
http://www.ratherbstampin.typepad.com/
Christine Blain
http://www.christineblain.blogspot.com/
Ros Davidson
http://www.rosdavidson.typepad.com/
Welcome to our last blog hop of the year. We're doing a Christmas theme this month to give you some inspiration in the final charge into Christmas. Did you know there are only 29 days to go????
The blog before mine was Ros Davidson's, but you can start anywhere and just keep hopping 'til you get back to where you started. I'm sure you're going to see a heap of lovely ideas along the way.
I decided to do a scrapbook layout of the family putting up the Christmas tree. In Adelaide it seems to be the tradition that the tree goes up on Pageant Day (the second Saturday in November). Most families either go into the city to watch the parade and then come home to put up the tree, or they stay at home and watch the parade on TV while putting up the tree. The advantage of putting the tree up this early is that you have plenty of time to scrap the photos before the craziness that is December!
There are some sneak peeks on this layout of products coming out in the upcoming Summer Mini Catalogue. The postage stamp shaped layout was inspired by a new punch. I just used my 1" Circle punch to create the 'perforations' aroun d the edge of the layout.
I kept the postage stamp theme going with a fussy cut postage stamp image from the Letters To Santa DSP. The baubles were also fussy cut from the same DSP pack, and there's another peek - some gorgeous Baker's Twine from the Mini catalogue.
More fussy cut baubles and Baker's Twine to decorate the journalling spot. I decided to 'hang' one of the baubles from the letter 'e' in the title.
A little more Baker's Twine and another bauble to finish off the layout. Can you tell how much I love the twine?
Ink: Early Espresso Stampin' Write Marker
DSP: Letters To Santa DSP, First Edition Specialty DSP, Early Espresso, Riding Hood Red, Whisper White
Other: Big Shot, Timeless Type Junior Alphabet Dies, Top Note Die, 1" Circle Punch, Early Espresso Baker's Twine, Early Espresso Taffeta Ribbon, Paper Snips, Dimensionals
Digital: PS5, Photo Booth Photo Frame
I'd love for you to hop off to Nikki Sadler's blog now to continue the Blog Hop.
Catch you later,
Tina
Blogs in the hop:
Nikki Sadler
http://www.inkyart.com.au/
Sue Madex
http://www.madexcreations.com/
Di Dunk
http://www.stampartbydi.typepad.com/
Judy May
http://www/judymay.typepad.com
Kathryn Mangelsdorf
http://klm55.blogspot.com/
Alisha Watson
http://www.ratherbstampin.typepad.com/
Christine Blain
http://www.christineblain.blogspot.com/
Ros Davidson
http://www.rosdavidson.typepad.com/
Tuesday, 30 August 2011
A Wedding Card
Hi!
Rob and I recently attended the wedding of one of my university friends. It was fantastic to catch up with her as she's been living in England pretty much since we graduated. She's a very bright and bubbly person, so I wanted the card I made her to reflect her personality.
Tina
Rob and I recently attended the wedding of one of my university friends. It was fantastic to catch up with her as she's been living in England pretty much since we graduated. She's a very bright and bubbly person, so I wanted the card I made her to reflect her personality.
I used a lot of new products on this card, which will be available for purchase when the new Idea Book and Catalogue goes live on the 1st September. I used the new In Colour Island Indigo, which is the gorgeous deep blue on the card. I also used the new Lace Ribbon Border Punch. I didn't use it as a border though, I cut up the little medallions to use as flowers. Some I kept whole, others I cut up again to use the smaller central flower. I also used some of the offcuts that look like teeny tiny little flowers. Some pearls for the centre and it's done.
Oh, I'd better not forget that I CASED the card from here.
Ink: Island Indigo
Stamp: It's Your Day
Cardstock: Island Indigo, Daffodil Delight, Whisper White
Other: Lace Ribbon Border Punch, Big Shot, Top Note Die, Paper Snips, Basic Jewel Pearls, Daffodil Delight Satin Ribbon
Catch you later,
Tina
Wednesday, 13 July 2011
Cleland Wildlife Park Layout 5
Hi!
As I mentioned yesterday, today's layout shows the kids getting to pat a koala. They were quite hesitant at first, but they all ended up having a pat and they were glad they did. I can't remember the name of the koala, but he (she?) was very patient as the kids took their turns. Even Hudson had a turn. I held my breath as I was half expecting him to grab hold of the fur and pull, but with a bit of help he patted the koala nicely.
The main photo of the family is double matted and raised on some dimensionals to help it stand out from the rest of the photos.
Ink: Chocolate Chip Stampin' Write Marker
DSP/Cardstock: Woodland Walk DSP, Very Vanilla, Garden Green, Cholcolate Chip
Other: Big Shot, Timeless Type Alphabet Die, Top Note Die, Dimensionals, Urban West Rub Ons (retired)
Tomorrow I'll be back with a layout about a Cape Barron Goose. They are quite strange looking creatures!
Catch you later,
Tina
As I mentioned yesterday, today's layout shows the kids getting to pat a koala. They were quite hesitant at first, but they all ended up having a pat and they were glad they did. I can't remember the name of the koala, but he (she?) was very patient as the kids took their turns. Even Hudson had a turn. I held my breath as I was half expecting him to grab hold of the fur and pull, but with a bit of help he patted the koala nicely.
The main photo of the family is double matted and raised on some dimensionals to help it stand out from the rest of the photos.
Ink: Chocolate Chip Stampin' Write Marker
DSP/Cardstock: Woodland Walk DSP, Very Vanilla, Garden Green, Cholcolate Chip
Other: Big Shot, Timeless Type Alphabet Die, Top Note Die, Dimensionals, Urban West Rub Ons (retired)
Tomorrow I'll be back with a layout about a Cape Barron Goose. They are quite strange looking creatures!
Catch you later,
Tina
Saturday, 21 May 2011
One Of A Kind
Hi!
I was searching through some older photos and came across a few cards I haven't blogged yet. This card I made for my sister for her birthday way back in March. Sorry for the not so great photos, I think I was still using my old camera.
The card uses some rub ons for the image and sentiment - no stamping on this card! The rub ons are long retired, but they are so pretty I couldn't leave them sitting on the shelf.
I cut the Top Note shape and then cut on oval out of the middle to create a frame for the main image. A few rhinestones around the bottom of the frame to bling it up a little.
DSP/Cardstock: Love Letter DSP, Basic Black, Riding Hood Red, Very Vanilla
Other: Big Shot, Top Note Die, Rhinestones, Dimensionals, Rub Ons (I can't remember the name!)
Catch you later,
Tina
Thursday, 7 April 2011
JAI #63 - Inspiration Photo
Hi!
This week at Just Add Ink the girls have chosen a bright and cheerful photo to inspire your creativity.
The rest of the colours came from the picture. I added Marina Mist ribbon to represent the sash around the women's waists and the handprint panel is matted on Daffodil Delight cardstock.
I did a quick search of the internet for one of those handprint poems to use as my journalling. Most were a bit too babyish, or were only suitable for one child's handprint. I ended up modifying a poem I found:
This week at Just Add Ink the girls have chosen a bright and cheerful photo to inspire your creativity.
Doesn't it make you just want to get up and dance? The girls at the front look like they are having so much fun!
I looked a bit closer at the photo and noticed that the men dancing behind the girls all have their hands painted green. I decided to use this as the main inspiration behind my project for the challenge. So I painted Alex, Ada and Hudson's hands green and stamped them onto some cardstock.
The rest of the colours came from the picture. I added Marina Mist ribbon to represent the sash around the women's waists and the handprint panel is matted on Daffodil Delight cardstock.
I did a quick search of the internet for one of those handprint poems to use as my journalling. Most were a bit too babyish, or were only suitable for one child's handprint. I ended up modifying a poem I found:
Here's three special handprints
Just so you can say
This is how our fingers looked
When we placed them here today
I used the Circle Circus stamps behind the journalling as they reminded me of the headpieces the ladies are wearing. Wow, I managed to find a lot of inspiration from the photo. I hope you can too - I'd love to see what you come up with for the challenge!
Stamps: Circle Circus
Ink: Daffodil Delight, Marina Mist Marker
DSP/Cardstock: Celebrations DSP, Daffodil Delight, Marina Mist, Whisper White
Other: Big Shot, Top Note Die, Timeless Type Alpha Die, Marina Mist Satin Ribbon, Green Paint
Catch you later,
Tina
Tuesday, 22 March 2011
Layout 22: Vacswim
Hi!
For the past 2 summers Alex and Ada have participated in the Vacswim program. This involves intensive swimming lessons for 7 days over a 9 day period. I plan their lessons so that one is in their lesson while the other has some free time in the pool - it makes supervision much easier! This layout uses some snaps I took on the last day.
Here's Alex's side of the layout. He's pretty fearless in the water and kept sneaking into the deeper water when he thought I wasn't looking.
Here's Ada's side of the layout. She's not quite as fearless as Alex, but SOOOO determined to keep up with him.
This last picture shows how I jazzed up the waterdrop paper. I used my Crystal Effects to 'colour in' a few of the droplets.
These are the Stampin' Up! supplies I used:
Ink: Baja Breeze Marker
Cardstock: Daffodil Delight, Poppy Parade, Whisper White
Other: Big Shot, Top Note Die, Crystal Effects
Catch you later,
Tina
Wednesday, 26 January 2011
Layout 9: So Sweet
Hi!
Today's layout is one of my two eldest children Alex and Ada on their first day of school for Term 4 last year. I love the photo and have had it on my desk for ages waiting to be scrapped but have never found the inspiration to scrap it. Nothing I tried looked right!
In the end I took inspiration from the outdoor setting and tried the photo with the Woodland Walk DSP. I added subtle touches of Marina Mist and Whisper White to the main colour scheme of Garden Green and Crumb Cake. It really helps bring out the blue in the photo.
Ink: Crumb Cake Marker
DSP/Card Stock: Woodland Walk DSP, Crumb Cake, Garden Green
Other: Marina Mist Satin ribbon, Whisper White brads, Marina Mist brad, Big Shot, Timeless Type Alphabet Die, Top Note Die, Paper Snips
Catch you later,
Tina
Today's layout is one of my two eldest children Alex and Ada on their first day of school for Term 4 last year. I love the photo and have had it on my desk for ages waiting to be scrapped but have never found the inspiration to scrap it. Nothing I tried looked right!
In the end I took inspiration from the outdoor setting and tried the photo with the Woodland Walk DSP. I added subtle touches of Marina Mist and Whisper White to the main colour scheme of Garden Green and Crumb Cake. It really helps bring out the blue in the photo.
Ink: Crumb Cake Marker
DSP/Card Stock: Woodland Walk DSP, Crumb Cake, Garden Green
Other: Marina Mist Satin ribbon, Whisper White brads, Marina Mist brad, Big Shot, Timeless Type Alphabet Die, Top Note Die, Paper Snips
Catch you later,
Tina
Saturday, 25 September 2010
A New Catalogue Blog Hop
Hi!
A group of Stampin' Up! demonstrators have decided to do a blog hop to showcase some of the products in the new Idea Book and Catalogue. You can view this catalogue online by clicking on the image of the cover on the right of my page. Hopefully you've arrived here from Christine Blain's blog, but if you've started here just keep hopping til you get back.
Anyway, for my project I decided to do a layout about my son Hudson. In the last week he's fallen asleep in the oddest places. He's just crashed in the middle of playing and I've managed to get a photo each time. It's exhausting being a 3 year old!
So that's my project - I hope it inspires you! There are 9 other demonstrators on this hop, and next is Amy Buchanan. Please take the time to leave a comment on each of our blogs - we'd love to know what you think of our projects. Here are the links in case one is broken along the way.
Ros Davidson
Nikki Sadler
Christine Blain
Tina Gillespie
Amy Buchanan
Erica Boxall
Kathryn Mangelsdorf
Kristine Thompson
Alisha Watson
Judy May
Stamps: Funky Four
Ink: Poppy Parade, Basic Black Stampin' Write Journaller
DSP/Card Stock: Poppy Parade Hostess DSP, Poppy Parade, Crumb Cake
Other: Scallop Edge Punch, Round Tab XL Punch, Paper Snips, Dimensionals, Stamp Positioner, Big Shot, Top Note Die, Timeless Type Alphabet Die, Crystal Effects
Catch you later,
Tina
A group of Stampin' Up! demonstrators have decided to do a blog hop to showcase some of the products in the new Idea Book and Catalogue. You can view this catalogue online by clicking on the image of the cover on the right of my page. Hopefully you've arrived here from Christine Blain's blog, but if you've started here just keep hopping til you get back.
Anyway, for my project I decided to do a layout about my son Hudson. In the last week he's fallen asleep in the oddest places. He's just crashed in the middle of playing and I've managed to get a photo each time. It's exhausting being a 3 year old!
I love the way he sleeps in the top 2 photos - bum in the air and his head resting on his hands.
Here's a close up of the mushrooms I stamped along the bottom of the page. I used the new In Colour Poppy Parade ink and the Funky Four stamp set. It's such a cute set!
Here's a close up of the title. I used the Big Shot and the Timeless Type Alphabet die, except I cut off all the serifs (curly bits) on the alphabet to give it a different look. I saw this idea on Ros Davidson's blog, which is another one of the stops in this hop.
I also covered the letters in Crystal Effects to give the glossy look. Each of the little mushrooms in the title is raised on dimensionals. It's a good way to use up the left over bits around the sheet of dimensionals. I cut them up into tiny pieces small enough to use on the stems of the mushrooms.
Finally, a close up of the journalling box. I used the ledger paper from the new In Colour Hostess DSP pack, cut out with the Top Note die. The journalling reads:
It's happened a few times lately - you've gone quiet and I've wondered "What's Hudson up to?" You've conked out and fallen asleep on the spot - the laundry floor, my bedroom, and even in the chaos of the craft group creche!
So that's my project - I hope it inspires you! There are 9 other demonstrators on this hop, and next is Amy Buchanan. Please take the time to leave a comment on each of our blogs - we'd love to know what you think of our projects. Here are the links in case one is broken along the way.
Ros Davidson
Nikki Sadler
Christine Blain
Tina Gillespie
Amy Buchanan
Erica Boxall
Kathryn Mangelsdorf
Kristine Thompson
Alisha Watson
Judy May
Stamps: Funky Four
Ink: Poppy Parade, Basic Black Stampin' Write Journaller
DSP/Card Stock: Poppy Parade Hostess DSP, Poppy Parade, Crumb Cake
Other: Scallop Edge Punch, Round Tab XL Punch, Paper Snips, Dimensionals, Stamp Positioner, Big Shot, Top Note Die, Timeless Type Alphabet Die, Crystal Effects
Catch you later,
Tina
Saturday, 7 August 2010
Art With Heart Blog Hop: Males In Our Lives
Hi!
Welcome to the Art With Heart August Blog Hop. This month, with Father's Day just around the corner, we have chosen a theme of Males In Our Lives. If you've started the blog hop here, that's fine. It's a circle so just keep on hoppin' round all 9 blogs 'til you get back here. Remember to leave a comment on each blog and then if you're not a SU demonstrator email Nikki Sadler at nikki@inkyart.com.au to be in the running for some fantastic blog candy.
The Art With Heart Team are a fantastic group of Stampin' Up! Demonstrators led by the very talented Claire Daly. You may have just come from the blog of one of those team members: Christine Blain. Christine is also a member of the Helping Hudson team. The Helping Hudson team has a blog set up to raise funds for a KidWalk for my son Hudson. If you'd like to know more, please check out the Helping Hudson blog.
OK, on to my project! I am honoring my eldest son Alex in this blog hop. He is a fantastic big brother and very protective of his younger sister and brother. Hence the title: Brotherly Love.

I took this photo on Ada's last day of Kindy. It was one of those moments that I was lucky to capture, as I wouldn't normally have the camera with me. As we walked out of school after picking up Alex he put his arm around Ada's shoulders and started telling her some of the things she needed to know about starting 'big school'.

I cased this layout from one I saw in Scrapbooking Memories magazine: Kellie Lusted's layout on page 84 of Volume 12 Number 7. For my layout I used the Haiku DSP papers and matching card stock.

There was lots of layering in this layout. It took me 2 evenings to put together. The first was all the cutting, sponging and stamping and the second evening was adhering it all down. I'm really pleased with how it turned out.

So that's it for my project. Next you're off to see how Kristine Thompson has celebrated the men in her life.
The Art With Heart Team run a blog hop on the first Saturday of every month, so be sure to come back next month for the next hop!
Stamps: Circle Circus, Basic Phrases, Short Order Alphabet (on the retiring list!)
Ink: Old Olive, So Saffron, Pumpkin Pie, Soft Suede, More Mustard Marker
DSP/Card Stock: Haiku DSP, More Mustard, Old Olive, Tangerine Tango, So Saffron
Other: Big Shot, Timeless Type Junior Alphabet Die, Top Note Die, Old Olive 1/4" Grosgrain Ribbon, Rhinestone Brads, Paper Snips, Circle punches, Scallop Circle Punch, Stamp Positioner, Sponge Daubers, Dimensionals, Staples
Here are a list of the other blogs in case a link isn't working:
Christine Blain
Kristine Thompson
Nikki Sadler
Dianne Dunk
Alisha Watson
Sue Madex
Kathryn Ruddick
Judy May
Catch you later,
Tina
Welcome to the Art With Heart August Blog Hop. This month, with Father's Day just around the corner, we have chosen a theme of Males In Our Lives. If you've started the blog hop here, that's fine. It's a circle so just keep on hoppin' round all 9 blogs 'til you get back here. Remember to leave a comment on each blog and then if you're not a SU demonstrator email Nikki Sadler at nikki@inkyart.com.au to be in the running for some fantastic blog candy.
The Art With Heart Team are a fantastic group of Stampin' Up! Demonstrators led by the very talented Claire Daly. You may have just come from the blog of one of those team members: Christine Blain. Christine is also a member of the Helping Hudson team. The Helping Hudson team has a blog set up to raise funds for a KidWalk for my son Hudson. If you'd like to know more, please check out the Helping Hudson blog.
OK, on to my project! I am honoring my eldest son Alex in this blog hop. He is a fantastic big brother and very protective of his younger sister and brother. Hence the title: Brotherly Love.
I took this photo on Ada's last day of Kindy. It was one of those moments that I was lucky to capture, as I wouldn't normally have the camera with me. As we walked out of school after picking up Alex he put his arm around Ada's shoulders and started telling her some of the things she needed to know about starting 'big school'.
I cased this layout from one I saw in Scrapbooking Memories magazine: Kellie Lusted's layout on page 84 of Volume 12 Number 7. For my layout I used the Haiku DSP papers and matching card stock.
There was lots of layering in this layout. It took me 2 evenings to put together. The first was all the cutting, sponging and stamping and the second evening was adhering it all down. I'm really pleased with how it turned out.
So that's it for my project. Next you're off to see how Kristine Thompson has celebrated the men in her life.
The Art With Heart Team run a blog hop on the first Saturday of every month, so be sure to come back next month for the next hop!
Stamps: Circle Circus, Basic Phrases, Short Order Alphabet (on the retiring list!)
Ink: Old Olive, So Saffron, Pumpkin Pie, Soft Suede, More Mustard Marker
DSP/Card Stock: Haiku DSP, More Mustard, Old Olive, Tangerine Tango, So Saffron
Other: Big Shot, Timeless Type Junior Alphabet Die, Top Note Die, Old Olive 1/4" Grosgrain Ribbon, Rhinestone Brads, Paper Snips, Circle punches, Scallop Circle Punch, Stamp Positioner, Sponge Daubers, Dimensionals, Staples
Here are a list of the other blogs in case a link isn't working:
Christine Blain
Kristine Thompson
Nikki Sadler
Dianne Dunk
Alisha Watson
Sue Madex
Kathryn Ruddick
Judy May
Catch you later,
Tina
Sunday, 4 July 2010
Best Friends Together
Hi!
I thought I'd use the sketch challenge at Just Add Ink to complete a scrapbook layout. I used a photograph of my daughter Ada and her best friend Zahli that Zahli's mum Lisa took. I think it is a fantastic photo of them and I couldn't wait to scrap it. Here's the layout:

I used two copies of the photo: one at 5x7 inches and one at 6x8 inches. I layered vellum over the smaller photo and inked the edges with Soft Suede. I love the soft, muted effect.

I've left a space for some journalling: a Top Note hidden behind the main photo. I'm not sure where or when the photo was taken so I won't do the journalling until I find out.

I used colours from the Autumn Traditions DSP as my colour inspiration - Elegant Eggplant, Soft Suede and Ruby Red. I would never have thought to put the purple and red together, but I think they look great!
Card Stock: Elegant Eggplant, Ruby Red, Soft Suede, Vellum
Ink: Soft Suede
Other: Small Rhinestone Brads, 1/4" Elegant Eggplant Grosgrain ribbon, 5/8" Soft Suede Polka Dot Grosgrain ribbon, Round Tab Punch, Eyelet Border Punch, Big Shot, Top Note Die, Timeless Type Alphabet Die, Sponge Dauber
Catch you later,
Tina
I thought I'd use the sketch challenge at Just Add Ink to complete a scrapbook layout. I used a photograph of my daughter Ada and her best friend Zahli that Zahli's mum Lisa took. I think it is a fantastic photo of them and I couldn't wait to scrap it. Here's the layout:
I used two copies of the photo: one at 5x7 inches and one at 6x8 inches. I layered vellum over the smaller photo and inked the edges with Soft Suede. I love the soft, muted effect.
I've left a space for some journalling: a Top Note hidden behind the main photo. I'm not sure where or when the photo was taken so I won't do the journalling until I find out.
I used colours from the Autumn Traditions DSP as my colour inspiration - Elegant Eggplant, Soft Suede and Ruby Red. I would never have thought to put the purple and red together, but I think they look great!
Card Stock: Elegant Eggplant, Ruby Red, Soft Suede, Vellum
Ink: Soft Suede
Other: Small Rhinestone Brads, 1/4" Elegant Eggplant Grosgrain ribbon, 5/8" Soft Suede Polka Dot Grosgrain ribbon, Round Tab Punch, Eyelet Border Punch, Big Shot, Top Note Die, Timeless Type Alphabet Die, Sponge Dauber
Catch you later,
Tina
Monday, 21 June 2010
Classic Stars Birthday Card
Hi!
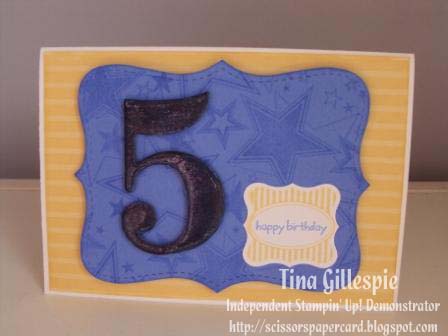
My daughter went to a birthday party recently. Actually, she goes to lots of birthday parties - she's a very social butterfly! This latest one was for a boy who was turning 5. I think this is a difficult age for us poor card makers - too old for baby stuff and way too young for teenage stuff. There's just not a whole lot of options for those in-between years.
That's why I love my Classic Stars Jumbo Wheel. It provides a great background that you could use on a card for any age group. Here's the card I came up with:

This was a quick and easy card to put together. The hardest part was waiting for the Crystal Effects on the number 5 to dry!
Stamps: Classic Stars Jumbo Wheel, Cute and Curly, Happy Moments (retired SAB)
Ink: So Saffron, Ballet Blue
DSP/Card Stock: So Saffron Patterns DSP, Ballet Blue, Whisper White
Other: Crystal Effects, Dimensionals, Curly Label Punch, Big Shot, Top Note Die, Stamp-a-ma-jig, Sponge Dauber, Chipboard Number 5 (non SU).
Catch you later,
Tina
My daughter went to a birthday party recently. Actually, she goes to lots of birthday parties - she's a very social butterfly! This latest one was for a boy who was turning 5. I think this is a difficult age for us poor card makers - too old for baby stuff and way too young for teenage stuff. There's just not a whole lot of options for those in-between years.
That's why I love my Classic Stars Jumbo Wheel. It provides a great background that you could use on a card for any age group. Here's the card I came up with:
This was a quick and easy card to put together. The hardest part was waiting for the Crystal Effects on the number 5 to dry!
Stamps: Classic Stars Jumbo Wheel, Cute and Curly, Happy Moments (retired SAB)
Ink: So Saffron, Ballet Blue
DSP/Card Stock: So Saffron Patterns DSP, Ballet Blue, Whisper White
Other: Crystal Effects, Dimensionals, Curly Label Punch, Big Shot, Top Note Die, Stamp-a-ma-jig, Sponge Dauber, Chipboard Number 5 (non SU).
Catch you later,
Tina
Saturday, 5 June 2010
Art With Heart Celebrations Blog Hop
Hi!
Welcome back to another Art With Heart Blog Hop. The theme for this blog hop is Celebrations. You may have just come from Ros Davidson's blog, but if you've started here that's OK - just keep going until you get back to where you started. There are 11 stops along the way.
The Art With Heart team is led by Claire Daly and it is a very talented team that I feel privileged to be a part of. Claire was recently announced as the Number 1 Demonstrator in Australia, and many other of the Art With Heart team also won awards. It's great to be a part of such a fantastic team.
My projects this month were made with my eldest niece in mind. She turns 21 in June, so I decided to make her a card. She decided to celebrate her birthday with a cocktail party and the invitation had a disco ball on in, so I decided to bling the card to the max!

Just a little bit of glitter!

I cut a Top Note out of Jac paper to adhere the glitter to the background. The glitter in the champagne flutes was adhered using Tombow glue.
I also decided to make a simpler version of the same basic layout.

This time I used double sided tape to adhere the glitter around the edge of the black panel. Easy!

Each layer in both cards was raised on dimensionals.
I also decided to make a gift card holder that matched the cards. More bling!

Here it is opened:

And here's the tag you write on:

I made these cards over a week ago and I'm still finding glitter everywhere! I had lots of fun making them though. Thanks to Robyn for loaning me her stamp to play with - much appreciated!
Stamps: Cheers To You
Ink: Basic Black, Melon Mambo
Card Stock: Basic Black, Melon Mambo, Whisper White
Other: Big Shot, Top Note Die, Timeless Type Junior Alphabet Die, 1/4" Basic Black Grosgrain Ribbon, 1/2" Melon Mambo Polka Dot Grosgrain Ribbon, Dimensionals, Sponge Dauber, Tombow Multi Purpose Adhesive, Sticky Strip, Paper Snips, Round Tab Punch, Jac paper, Glitter
To be in the draw to win the blog candy you must leave a comment on all blogs in the hop before 6am on Tuesday 8th June, then email Nikki Sadler (nikki@inkyart.com.au) to let her know you've commented on all of the blogs. Demonstrators are not eligible for the prize, but we'd still love to know what you think of our projects.
Now you're off to see the fabulous creations of Christine Blain. Happy hopping!
Here's a complete list of participants in case a link isn't working:
Christine Blain
Judy May
Sue Madex
Nikki Sadler
Alisha Watson
Di Dunk
Kathryn Mangelsdorf
Tanja Westwood
Kathryn Ruddick
Ros Davidson
Catch you later,
Tina
Welcome back to another Art With Heart Blog Hop. The theme for this blog hop is Celebrations. You may have just come from Ros Davidson's blog, but if you've started here that's OK - just keep going until you get back to where you started. There are 11 stops along the way.
The Art With Heart team is led by Claire Daly and it is a very talented team that I feel privileged to be a part of. Claire was recently announced as the Number 1 Demonstrator in Australia, and many other of the Art With Heart team also won awards. It's great to be a part of such a fantastic team.
My projects this month were made with my eldest niece in mind. She turns 21 in June, so I decided to make her a card. She decided to celebrate her birthday with a cocktail party and the invitation had a disco ball on in, so I decided to bling the card to the max!
Just a little bit of glitter!
I cut a Top Note out of Jac paper to adhere the glitter to the background. The glitter in the champagne flutes was adhered using Tombow glue.
I also decided to make a simpler version of the same basic layout.
This time I used double sided tape to adhere the glitter around the edge of the black panel. Easy!
Each layer in both cards was raised on dimensionals.
I also decided to make a gift card holder that matched the cards. More bling!
Here it is opened:
And here's the tag you write on:
I made these cards over a week ago and I'm still finding glitter everywhere! I had lots of fun making them though. Thanks to Robyn for loaning me her stamp to play with - much appreciated!
Stamps: Cheers To You
Ink: Basic Black, Melon Mambo
Card Stock: Basic Black, Melon Mambo, Whisper White
Other: Big Shot, Top Note Die, Timeless Type Junior Alphabet Die, 1/4" Basic Black Grosgrain Ribbon, 1/2" Melon Mambo Polka Dot Grosgrain Ribbon, Dimensionals, Sponge Dauber, Tombow Multi Purpose Adhesive, Sticky Strip, Paper Snips, Round Tab Punch, Jac paper, Glitter
To be in the draw to win the blog candy you must leave a comment on all blogs in the hop before 6am on Tuesday 8th June, then email Nikki Sadler (nikki@inkyart.com.au) to let her know you've commented on all of the blogs. Demonstrators are not eligible for the prize, but we'd still love to know what you think of our projects.
Now you're off to see the fabulous creations of Christine Blain. Happy hopping!
Here's a complete list of participants in case a link isn't working:
Christine Blain
Judy May
Sue Madex
Nikki Sadler
Alisha Watson
Di Dunk
Kathryn Mangelsdorf
Tanja Westwood
Kathryn Ruddick
Ros Davidson
Catch you later,
Tina
Wednesday, 12 May 2010
Scrapping Precious Photos
Hi!
A few years ago I was given a copy of a photo of my mum when she was a very little girl. It's been floating around in a box in my photo cupboard ever since. I just wasn't sure what to do with it. I never found a frame that was suitable and I wanted to do it justice. I finally decided I was going to scrap it, but it took another couple of months to get up the courage to do it. I've never scrapped with old photos before and I wanted to get it right.
Last night was the night to take the plunge! I had been playing with some Perfect Plum on a different project and thought it would look good with the black and white photo. I used the following sketch from the Art With Heart team challenge for May:

I know it's meant to be a card, but I thought it would work nicely with the photo I had. Here's my layout:

Isn't it a great picture of my mum? Here's a close up of the photo and journaling:

The journaling reads: "This is one of my favourite photos of my mum. Taken at Christmas 1949, I think it captures great wisdom in such a young, innocent face. Beautiful!"
Stamps: Baroque Motifs
Ink: Chocolate Chip, Pale Plum Marker
Card Stock: Close To Cocoa 12x12, Very Vanilla, Pale Plum
Other: Big Shot, Top Note Die, Timeless Type Alphabet Die, 1/4" Very Vanilla Grosgrain Ribbon, Sponge Dauber, Paper Snips
Close to Cocoa and Pale Plum are retiring at the end of August. If you need to stock up on card stock, markers, ink pads and reinkers, do it sooner rather than later. The US is already running out of some colours and it won't be long before Australia does too!
Catch you later,
Tina
A few years ago I was given a copy of a photo of my mum when she was a very little girl. It's been floating around in a box in my photo cupboard ever since. I just wasn't sure what to do with it. I never found a frame that was suitable and I wanted to do it justice. I finally decided I was going to scrap it, but it took another couple of months to get up the courage to do it. I've never scrapped with old photos before and I wanted to get it right.
Last night was the night to take the plunge! I had been playing with some Perfect Plum on a different project and thought it would look good with the black and white photo. I used the following sketch from the Art With Heart team challenge for May:

I know it's meant to be a card, but I thought it would work nicely with the photo I had. Here's my layout:
Isn't it a great picture of my mum? Here's a close up of the photo and journaling:
The journaling reads: "This is one of my favourite photos of my mum. Taken at Christmas 1949, I think it captures great wisdom in such a young, innocent face. Beautiful!"
Stamps: Baroque Motifs
Ink: Chocolate Chip, Pale Plum Marker
Card Stock: Close To Cocoa 12x12, Very Vanilla, Pale Plum
Other: Big Shot, Top Note Die, Timeless Type Alphabet Die, 1/4" Very Vanilla Grosgrain Ribbon, Sponge Dauber, Paper Snips
Close to Cocoa and Pale Plum are retiring at the end of August. If you need to stock up on card stock, markers, ink pads and reinkers, do it sooner rather than later. The US is already running out of some colours and it won't be long before Australia does too!
Catch you later,
Tina
Friday, 7 May 2010
A Pregnant Lady
Hi!
No, the pregnant lady is not me - there'd be a very serious conversation in my house if it was me! Here is my pregnant lady:

We learned how to make this piece of punch art in another online class at Swap Sisters. It was lots of fun and the card would be perfect for a baby shower.
Last Friday at Swap Sisters we also learned how to make our own rub ons. The sentiment on the card was my attempt at making a rub on. I can see lots of potential with this skill, but I think I'm going to need a bit more practice!
If you think you'd like to join this online community, please let me know and I'll arrange for an invitation. You don't need to be a Stampin' Up Demonstrator, you just need to love the products.
DSP/Card Stock: Sweet Always DSP, Melon Mambo, Whisper White, Blush Blossom, Chocolate Chip, Regal Rose, Acetate
Other: LOTS of punches, Big Shot, Top Note Die, Dimensionals, Crop-A-dile, Crimper, Paper Ships, Printer
I hope all the mums out there have a fabulous Mother's Day on Sunday.
Catch you later,
Tina
No, the pregnant lady is not me - there'd be a very serious conversation in my house if it was me! Here is my pregnant lady:
We learned how to make this piece of punch art in another online class at Swap Sisters. It was lots of fun and the card would be perfect for a baby shower.
Last Friday at Swap Sisters we also learned how to make our own rub ons. The sentiment on the card was my attempt at making a rub on. I can see lots of potential with this skill, but I think I'm going to need a bit more practice!
If you think you'd like to join this online community, please let me know and I'll arrange for an invitation. You don't need to be a Stampin' Up Demonstrator, you just need to love the products.
DSP/Card Stock: Sweet Always DSP, Melon Mambo, Whisper White, Blush Blossom, Chocolate Chip, Regal Rose, Acetate
Other: LOTS of punches, Big Shot, Top Note Die, Dimensionals, Crop-A-dile, Crimper, Paper Ships, Printer
I hope all the mums out there have a fabulous Mother's Day on Sunday.
Catch you later,
Tina
Thursday, 6 May 2010
All A Flutter
Hi!
As some of you may know, we've been having issues with our gas supply this week. As a result we had no hot water for 3 days. Hot water's kinda crucial when you have children! Thankfully my neighbour and very dear friend allowed us to go to her house to use her bathroom. The kids thought it was great fun, as they got to use their torches to go next door. It was a real adventure for them, but a real pain for the grown ups!
I decided to make my friend a card to go with a box of chocolates as a thank you for her kindness, which was very much appreciated. I don't know what we would have done without her! Here's the card:

I was able to have a play with some of my new things as I was making this card: Polka Dot Background stamp, Perfect Polka Dots Embossing Folder and Melon Mambo ink. I'm so glad Melon Mambo is going to be one of the core colours come September. I think it gets a bit overlooked by the very popular Rich Razzleberry, but it is a fabulous colour and well worth adding to your colour collection.
Stamps: All A Flutter (Autumn Winter Mini), Polka Dot Back Ground Stamp
Ink: Melon Mambo
Card Stock: Melon Mambo, Whisper White, Watercolour Paper
Other: Aqua Painter, Whisper White Satin Ribbon, Big Shot, Top Note Die, Perfect Polka Dots Embossing Folder, Chit Chats Rub On (retired from Summer Mini), Dimensionals
As some of you may know, we've been having issues with our gas supply this week. As a result we had no hot water for 3 days. Hot water's kinda crucial when you have children! Thankfully my neighbour and very dear friend allowed us to go to her house to use her bathroom. The kids thought it was great fun, as they got to use their torches to go next door. It was a real adventure for them, but a real pain for the grown ups!
I decided to make my friend a card to go with a box of chocolates as a thank you for her kindness, which was very much appreciated. I don't know what we would have done without her! Here's the card:
I was able to have a play with some of my new things as I was making this card: Polka Dot Background stamp, Perfect Polka Dots Embossing Folder and Melon Mambo ink. I'm so glad Melon Mambo is going to be one of the core colours come September. I think it gets a bit overlooked by the very popular Rich Razzleberry, but it is a fabulous colour and well worth adding to your colour collection.
Stamps: All A Flutter (Autumn Winter Mini), Polka Dot Back Ground Stamp
Ink: Melon Mambo
Card Stock: Melon Mambo, Whisper White, Watercolour Paper
Other: Aqua Painter, Whisper White Satin Ribbon, Big Shot, Top Note Die, Perfect Polka Dots Embossing Folder, Chit Chats Rub On (retired from Summer Mini), Dimensionals
Friday, 30 April 2010
Art With Heart Women In Our Lives Blog Hop
Hi!
Welcome back to another Art With Heart Blog Hop. The theme for this blog hop is Women In Our Lives. You may have just come from Judy May's blog, but if you've started here that's OK - just keep going until you get back to where you started. There are 14 stops along the way.
The Art With Heart team is led by Claire Daly and it is a very talented team that I feel privileged to be a part of. Talk about Inspirational Women - they're all an inspiration to me!
Today I chose the women in my family as the women in my life who inspire me. My mum and my 3 sisters are all incredible women who have achieved so much. I decided to do a layout inspired by them. The photo is from Christmas 2006. Unfortunately it's the most recent photo I have of us all together. The layout is based on Sketch 35 from the blog Got Sketch.

Here's a close up of the title. I googled scrapbooking titles and came up with 'We Will Shine'. I thought it was a perfect accompaniment to the journalling I had in mind.

Next is a close up of the flowers. I first stamped the stem stamp along the edge of the Old Olive card stock. I stamped it one way, turned the stamp 180 degrees end stamped it again so it looked more like a vine along the edge of the DSP. Each of the flowers was stamped, fussy cut and adhered to the page, some with Dimensionals.

Finally a close up of the journalling block. I achieved this shape by cutting a Top Note Die and then carefully placing it back on the die, but at right angles to the first cut. I cut 2 of these shapes - One in Garden Wall DSP and One in Rich Razzleberry. I cut along the perforations of the DSP shape so I could matt it on the Rich Razzleberry. I love the shape it gives, and it was better for this page as I didn't have enough journalling to fill a whole Top Note.

Stamps: Cottage Garden
Ink: Old Olive, Rich Razzleberry, Orchid Opulence Stampin' Write Marker
DSP/Card Stock: Cottage Wall DSP, Rich Razzleberry, Old Olive, Orchid Opulence, Whisper White
Other:Big Shot, Stampin' Up Top Note Die, Stampin' Up Timeless Type Junior Alphabet Die, Paper Snips, Dimensionals, Stamp-A-Ma-Jig
So that's it for me! You're now off to Kathryn Manglesdorf's blog. If you're not a Stampin' Up Demonstrator you could win some blog candy. All you need to do is leave a comment on every blog before 6 am Monday 3rd May and then email Nikki Saddler (nikki@inkyart.com.au) to let her know you've commented on each blog. Good Luck!
Here's a list of the other blog participants in case a link is broken:
Kathryn Manglesdorf
Alisha Watson
Nicole Rouillon
Kathryn Lowe
Ros Davidson
Nikki Sadler
Tanja Westwood
Kristine Thompson
Sue Madex
Gayatri Murali
Christine Blaine
Di Dunk
Judy May
I hope to see you for the next Blog Hop - we have them on the last day of every month.
Catch you later,
Tina
Welcome back to another Art With Heart Blog Hop. The theme for this blog hop is Women In Our Lives. You may have just come from Judy May's blog, but if you've started here that's OK - just keep going until you get back to where you started. There are 14 stops along the way.
The Art With Heart team is led by Claire Daly and it is a very talented team that I feel privileged to be a part of. Talk about Inspirational Women - they're all an inspiration to me!
Today I chose the women in my family as the women in my life who inspire me. My mum and my 3 sisters are all incredible women who have achieved so much. I decided to do a layout inspired by them. The photo is from Christmas 2006. Unfortunately it's the most recent photo I have of us all together. The layout is based on Sketch 35 from the blog Got Sketch.
Here's a close up of the title. I googled scrapbooking titles and came up with 'We Will Shine'. I thought it was a perfect accompaniment to the journalling I had in mind.
Next is a close up of the flowers. I first stamped the stem stamp along the edge of the Old Olive card stock. I stamped it one way, turned the stamp 180 degrees end stamped it again so it looked more like a vine along the edge of the DSP. Each of the flowers was stamped, fussy cut and adhered to the page, some with Dimensionals.
Finally a close up of the journalling block. I achieved this shape by cutting a Top Note Die and then carefully placing it back on the die, but at right angles to the first cut. I cut 2 of these shapes - One in Garden Wall DSP and One in Rich Razzleberry. I cut along the perforations of the DSP shape so I could matt it on the Rich Razzleberry. I love the shape it gives, and it was better for this page as I didn't have enough journalling to fill a whole Top Note.
Stamps: Cottage Garden
Ink: Old Olive, Rich Razzleberry, Orchid Opulence Stampin' Write Marker
DSP/Card Stock: Cottage Wall DSP, Rich Razzleberry, Old Olive, Orchid Opulence, Whisper White
Other:Big Shot, Stampin' Up Top Note Die, Stampin' Up Timeless Type Junior Alphabet Die, Paper Snips, Dimensionals, Stamp-A-Ma-Jig
So that's it for me! You're now off to Kathryn Manglesdorf's blog. If you're not a Stampin' Up Demonstrator you could win some blog candy. All you need to do is leave a comment on every blog before 6 am Monday 3rd May and then email Nikki Saddler (nikki@inkyart.com.au) to let her know you've commented on each blog. Good Luck!
Here's a list of the other blog participants in case a link is broken:
Kathryn Manglesdorf
Alisha Watson
Nicole Rouillon
Kathryn Lowe
Ros Davidson
Nikki Sadler
Tanja Westwood
Kristine Thompson
Sue Madex
Gayatri Murali
Christine Blaine
Di Dunk
Judy May
I hope to see you for the next Blog Hop - we have them on the last day of every month.
Catch you later,
Tina
Thursday, 22 April 2010
Two Step Bird at a picnic
Hi!
I'm still on a bit of a roll with the Bella Rose goodies I won. Last night I thought I'd have a go at the latest challenge at Card Patterns. Here is the latest sketch:

I also wanted to make a Top Note Box. I've seen them around a bit and now that I have the Top Note Die, I was all set! I downloaded the tutorial over at SplitCoast Stampers.
Here is the box I came up with:

When I showed my husband the finished product he said it looked like the bird was sitting on a picnic blanket, hence the title of this post.

This little box will be donated to my daughter's kindy for their Mother's Day fundraiser. I think it would make a perfect gift for any mother.
DSP/Card Stock: Bella Rose DSP, Kiwi Kiss, Chocolate Chip, Pink Pirouette, Riding Hood Red
Ink: Regal Rose, Old Olive
Other: Big Shot, Top Note Die, Circle Cutter, Square Punch, Horizontal Slot Punch, Bird and Branch Die Cuts, Sponge Dauber, 5/8" Striped Riding Hood Red Grosgrain Ribbon, Dimensionals
Catch you later,
Tina
I'm still on a bit of a roll with the Bella Rose goodies I won. Last night I thought I'd have a go at the latest challenge at Card Patterns. Here is the latest sketch:

I also wanted to make a Top Note Box. I've seen them around a bit and now that I have the Top Note Die, I was all set! I downloaded the tutorial over at SplitCoast Stampers.
Here is the box I came up with:
When I showed my husband the finished product he said it looked like the bird was sitting on a picnic blanket, hence the title of this post.
This little box will be donated to my daughter's kindy for their Mother's Day fundraiser. I think it would make a perfect gift for any mother.
DSP/Card Stock: Bella Rose DSP, Kiwi Kiss, Chocolate Chip, Pink Pirouette, Riding Hood Red
Ink: Regal Rose, Old Olive
Other: Big Shot, Top Note Die, Circle Cutter, Square Punch, Horizontal Slot Punch, Bird and Branch Die Cuts, Sponge Dauber, 5/8" Striped Riding Hood Red Grosgrain Ribbon, Dimensionals
Catch you later,
Tina
Subscribe to:
Posts (Atom)


