Pages

Showing posts with label Itty Bitty Christmas. Show all posts

Thursday, 12 November 2020

JAI #531: Just Add Inspiration

 Hi!


Welcome back for the new Just Add Ink Challenge. This week Lou has found a super cute Inspiration photo. Aren't the pompom trees adorable?


It took a bit of thinking to work out what I was going to do this week, and then I saw a video by Alisa Tilsner where she played with Stampin' Blends and Isopropyl Alcohol to create cool backgrounds.

scissorspapercard, Stampin' Up!, Just Add Ink, Itty Bitty Christmas, Forever Gold SP, Stampin' Blends, Subtle 3DEF, Alcohol Ink Blended Background, Christmas

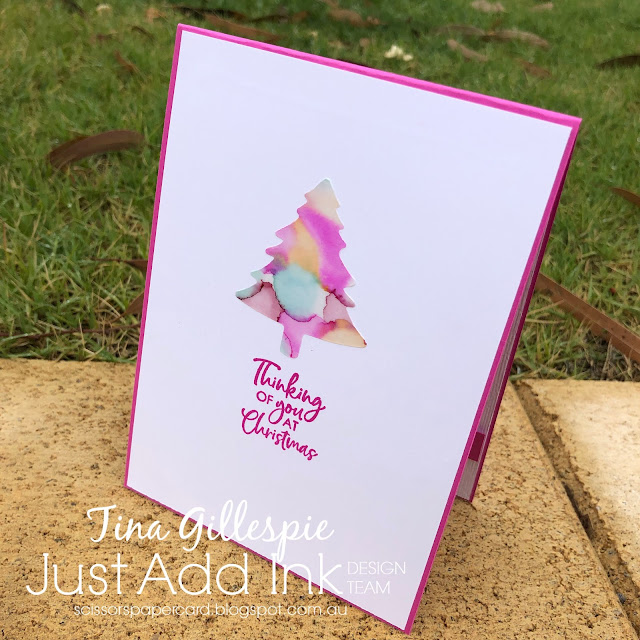
I chose to use the following Dark Stampin' Blends: Blackberry Bliss, Pumpkin Pie, Bermuda Bay and Magenta Madness. To get the background, I simply scribbled a small circle of colour onto Vellum Cardstock using the Blend, and then dripped a drop of the alcohol onto it. You need the good stuff from Bunnings, not the chemist's rubbing alcohol. Alisa played with hers more to get a more blended look, but I wanted the dots like the pompoms in the Inspiration Photo. It's such a cool effect!

scissorspapercard, Stampin' Up!, Just Add Ink, Itty Bitty Christmas, Forever Gold SP, Stampin' Blends, Subtle 3DEF, Alcohol Ink Blended Background, Christmas

The vellum was wrapped around a piece of Whisper White card, which I've embossed with the Subtle 3DEF. I then added a Forever Gold Laser Cut element over the top. I think it's meant to be a fern leaf, but I think it works nicely as a Christmas tree! I finished the front with a white heat-embossed sentiment from Itty Bitty Christmas.

scissorspapercard, Stampin' Up!, Just Add Ink, Itty Bitty Christmas, Forever Gold SP, Stampin' Blends, Subtle 3DEF, Alcohol Ink Blended Background, Christmas

While I was playing with the larger piece of vellum, I also made a smaller piece, so that I could use it on the inside. You can see that I've blended the colours more, rather than let them form circles. I just punched the vellum with my Pine Tree Punch and ran the tree through my Xyron sticker maker so that I could adhere it to the cardstock.

I definitely think I'll be trying this technique again! In the meantime, I'll be heading off to the Just Add Ink blog, where the rest of this week's Design team cards are linked. You can also link up your card for our challenge. What inspires you from the photo?

Bye for now,

Tina

Wednesday, 28 October 2020

Colour Creations: Just Jade

 Hi!


Welcome back to this week's Colour Creations Showcase. This week we are highlighting one of the newest In Colours - Just Jade. It's what I'd call a dusky green, and is a shade that I really like. Despite that, I haven't used it much, yet. After this week's showcase, I may find myself reaching for it a little more!

scissorspapercard, Stampin' Up!, Colour Creations, Stitched Triangles Dies, Peace & Joy Bundle, Stitched Stars Dies, Subtle 3DEF, Dainty Diamonds 3DEF, Itty Bitty Christmas

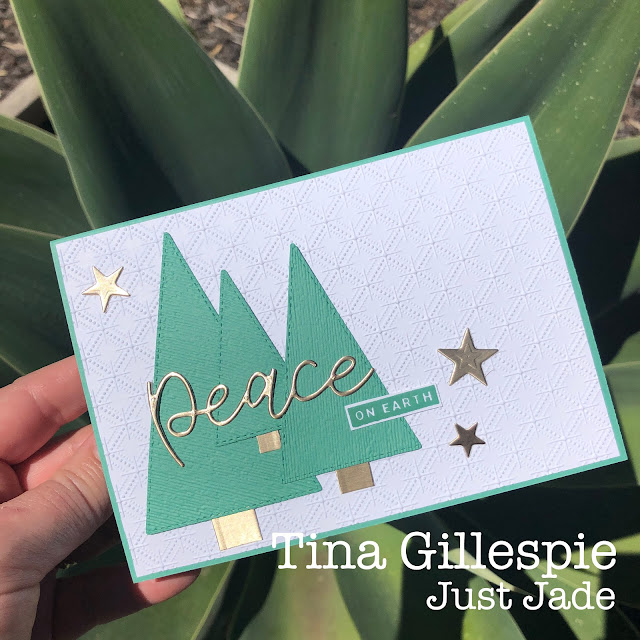
I started by using my Stitched Triangles dies to cut a heap of isosceles triangles from Just Jade cardstock. I then threw them into my Subtle 3DEF and ran it though my Big Shot. I didn't want the embossing to go in the same direction on each triangle, although it seems that in trying to be random, two have ended up the same! Oh well.

scissorspapercard, Stampin' Up!, Colour Creations, Stitched Triangles Dies, Peace & Joy Bundle, Stitched Stars Dies, Subtle 3DEF, Dainty Diamonds 3DEF, Itty Bitty Christmas

I cut some tree trunks from Brushed Metallic foil, and also the word 'peace' from my Joy Dies. The stars are from the swirly die in the Stitched Stars set. All this was layered over the top of a Whisper White layer, embossed with the Dainty Diamonds 3DEF. I like how the pattern could be stars twinkling in the background.

scissorspapercard, Stampin' Up!, Colour Creations, Stitched Triangles Dies, Peace & Joy Bundle, Stitched Stars Dies, Subtle 3DEF, Dainty Diamonds 3DEF, Itty Bitty Christmas

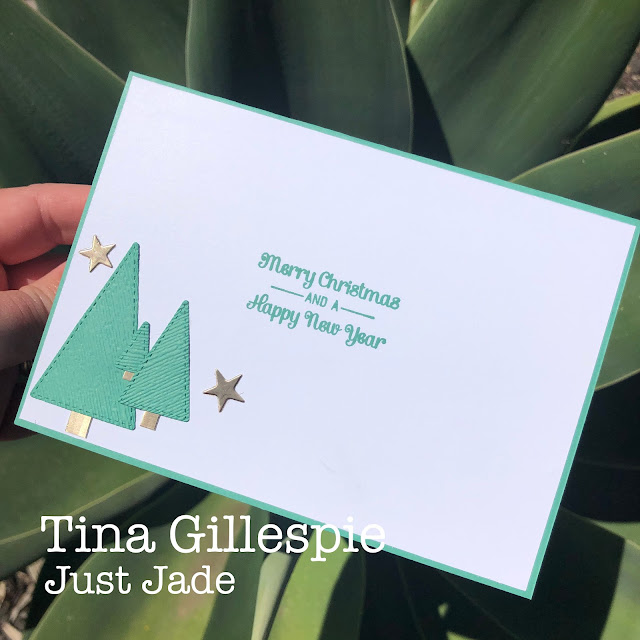
I repeated the trees on the inside, just on a much smaller scale, and the finished off with a sentiment from Itty Bitty Christmas.

As is usual for our Colour Creations Showcase, the list of all participants is over on the lovely Catherine's blog. Please do pop on over to see what everyone has made.

Bye for now,

Tina

Sunday, 25 October 2020

CTC #291: CASE A Mini Catalogue Bundle Card

 Hi!


Thank you for joining me for the new CASEing The Catty Sunday Challenge Blog Hop. This week we are asking you to CASE a project from pages 71-75 of the August-December Mini Catalogue, which just happen to be the pages that show all of the available bundles in the catalogue.


That gives you a whopping 30 different projects to choose from! I was a bit tempted to go back and have another go at the Have A Hoot card, which I CASEd a couple of weeks ago. In the end, I opted to try something new, and chose the Snowflake Wishes card on page 73.


I don't have this bundle (which I think is even better for imaginative CASEing!), but I loved the way that the front of the card was split, with the banner dividing the two sections. The designer also used Gold Foil on the card.

scissorspapercard, Stampin' Up!, CASEing The Catty, Peace & Joy, Itty Bitty Christmas, Joy Dies, Heartwarming Hugs DSP, Red Foil

My Heartwarming Hugs DSP has been feeing a little unloved lately, so I pulled it out and selected two of the more subtle patterns. The Real Red went at the bottom, as it was the heavier of the two patterns. I added a thin strip of Red Foil to separate the two DSPs.

scissorspapercard, Stampin' Up!, CASEing The Catty, Peace & Joy, Itty Bitty Christmas, Joy Dies, Heartwarming Hugs DSP, Red Foil

Instead of a banner for my sentiment, I opted to use all three layers of the 'bright' Joy Dies. I started with Pear Pizzazz, then Whisper White, and finally some more Red Foil (yay for adhesive sheets!). They were popped up over the join in the DSPs, and then some holly leaves from Peace & Joy were arranged around them. I had some left over foil with adhesive on the back, so I punched some small circles from the foil and used them for the holly berries.

scissorspapercard, Stampin' Up!, CASEing The Catty, Peace & Joy, Itty Bitty Christmas, Joy Dies, Heartwarming Hugs DSP, Red Foil

I like the look of the holly, so I repeated it on the inside, to accompany the sentiment from Itty Bitty Christmas. I quite like this card, I may have to try it with some other DSP packs. I think it would look great with the Brightly Gleaming DSP, too.

To enter our challenge - and we'd really love to see what you make - just join our Facebook group and add your picture to the group. You don't need a blog or any fancy camera or software, just snap a photos with your phone and post it in the group. 


Before you dash off to get creating, please do finish the Blog Hop. Next up is the lovely Peta, and her wondercat, Marvi. We all love seeing his adventures each week!

Bye for now,

Tina

Sunday, 11 October 2020

CTC #289: CASE a Halloween Project

 Hi!


Welcome back for the new CASEing The Catty Sunday Challenge Blog Hop. This week we are asking you to CASE a Halloween Project from either of the catalogues.


After a quick flick through both catalogues, I settled on this card from the August-December Mini Catalogue. I really liked the simplicity, and I'm a real sucker for a flicked ink background!


If you're like me, and don't do Halloween, you can still join in - you just need to be inspired by a card. It could be the colours, or a technique, or the layout, it does not have to be the theme. I changed the theme to make a Christmas card.

scissorspapercard, Stampin' Up!, CASEing The Catty, Coming Home, Itty Bitty Christmas, Home Together Dies, Trimming The Town DSP, Balmy Blue Glimmer Paper, Stampin' Blends

My card ended up not looking like the owl card at all! There are still elements of it, though. The flicked background became a Glimmer Paper sky. The moon turned into a house, and the sentiment banner became a sentiment strip. And if I really want to stretch it, there are trees on both cards, LOL.

scissorspapercard, Stampin' Up!, CASEing The Catty, Coming Home, Itty Bitty Christmas, Home Together Dies, Trimming The Town DSP, Balmy Blue Glimmer Paper, Stampin' Blends

Each of the elements were stamped using the Coming Home stamp set, coloured with Blends and then cropped using the Home Together Dies. I finished the front of the card with a sentiment cropped from the Trimming The Town DSP.

scissorspapercard, Stampin' Up!, CASEing The Catty, Coming Home, Itty Bitty Christmas, Home Together Dies, Trimming The Town DSP, Balmy Blue Glimmer Paper, Stampin' Blends

The inside was completed with left overs from the front of the card - an extra little strip of Glimmer Paper trimmed from the front and a few extra trees that I'd coloured but not used. The sentiment is from Itty Bitty Christmas. 

Our challenge is run though our Facebook group, which means that you don't need a blog to enter. Just make your card and upload a picture in the group. Easy! Which Halloween project will you choose to CASE - and how will you choose to CASE it? All the big questions this week!


Next up is the wonderful Siobhan, I wonder which direction she has gone with her Halloween CASEing? Only one way to find out - hop on over to her blog!

Bye for now,

Tina

Sunday, 4 October 2020

CTC #288: CASE A Kit Project

 Hi!


Thanks for joining me for the new CASEing The Catty Sunday Challenge Blog Hop. I have two confessions for you tonight: first, I nearly missed the Hop. It's a long weekend here in Adelaide, so in my head the Hop was tomorrow because it's the last day of the weekend. Oops - luckily I remembered in time! I'll let you know my second confession later in my post.


This week we are challenging you to choose a Kit Card or Project from either catalogue to CASE. Unusually for me, I started my search for inspiration at the beginning of the Annual Catalogue. I soon came across the Gorgeous Posies Kit. I don't own it, but it's one I've admired. I absolutely love the Gold Foil outlines on some of the base cards.


It made me think of the (sadly) retired Magnolia Notecards, which have a Silver Foil outline. I'm much more of a silver person anyway!

scissorspapercard, Stampin' Up!, CASEing The Catty, Poinsettia Petals Bundle, Plush Poinsettia SP, Itty Bitty Christmas, Magnolia Notecards, Stampin' Blends, Christmas Card

I started by trimming a piece of Plush Poinsettia SP to fit within the Silver Foil outline and adhering it with Glue Dots. The Poinsettia Petals die cuts were then layered over the top. I love the texture that is added to the petals and leaves as you crop the shapes.

scissorspapercard, Stampin' Up!, CASEing The Catty, Poinsettia Petals Bundle, Plush Poinsettia SP, Itty Bitty Christmas, Magnolia Notecards, Stampin' Blends, Christmas Card

A couple of sprigs cut from Silver Foil were added to really highlight the Silver Foil on the card base. The flag end of the sentiment was cut using the Banners Pick A Punch.

scissorspapercard, Stampin' Up!, CASEing The Catty, Poinsettia Petals Bundle, Plush Poinsettia SP, Itty Bitty Christmas, Magnolia Notecards, Stampin' Blends, Christmas Card

I stamped the complete poinsettia from the Poinsettia Petals stamp set, and then masked it so I could add some leaves in behind. A sentiment from Itty Bitty Christmas finished off the card, or so I thought...

So here is confession number two: I accidentally made two half cards, rather than one whole card. Another oops! The two notecards had stuck together, and it wasn't until after I'd glued my inside to what I thought was the card I'd just decorated the front of, that I realised. 

scissorspapercard, Stampin' Up!, CASEing The Catty, Poinsettia Petals Bundle, Plush Poinsettia SP, Itty Bitty Christmas, Magnolia Notecards, Stampin' Blends, Christmas Card

So now I have two half done cards that I will have to finish at a later date, as due to confession #1, I had no time to finish off both today before the blog hop. Oh dear!

I hope you have a better run than me when you make your card for this week's challenge. Once it's done, just post a photograph in our Facebook group. Don't forget to tell us which Kit you CASEd.


Before you go, please do continue on with our Blog Hop. Next up is the very clever Julia, who has been very inventive with her CASE!

Bye for now,

Tina

Sunday, 27 September 2020

CTC #286: CASE A Leaf Or Tree Project

 Hi!


Thanks for joining me once again for the new CASEing The Catty Sunday Challenge Blog Hop. This week we are challenging you to find a Leaf Or Tree Project from the August-December Mini Catalogue and CASE it.


For these kinds of challenges, I always start at the back of the catalogue and flick forwards. I kinda assume that most people start at the front, and I don't want the back of the catalogue to feel unloved! I got to page 49 before I found a suitable candidate for CASEing.


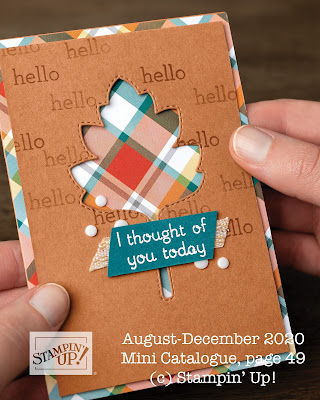
Part of the reason that it took quite a few pages was that I don't really have a lot of leaf or tree stamps or dies, so I had to find something that would translate to the products I do have. In this instance I liked the DSP that both framed the main panel and peeked through the leaf opening. I also liked the stitched detail around the leaf, so when it came time to reach for my supplies, I pulled out my Stitched Stars Dies.

scissorspapercard, Stampin' Up!, CASEing The Catty, Brightly Gleaming SDSP, Peace & Joy Bundle, Stitched Stars Dies, Stitched Rectangles Dies, Itty Bitty Christmas, Brushed Foil, Christmas Card

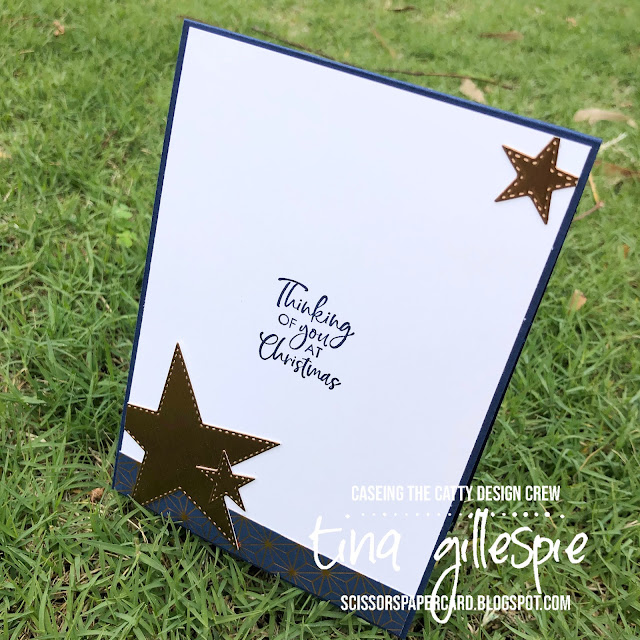
I die cut three star windows, because that suited my layout better. The Brushed Copper Foil, layered over some Night Of Navy and Copper DSP from the Brightly Gleaming SDSP pack, is so lush for a Christmas card.

scissorspapercard, Stampin' Up!, CASEing The Catty, Brightly Gleaming SDSP, Peace & Joy Bundle, Stitched Stars Dies, Stitched Rectangles Dies, Itty Bitty Christmas, Brushed Foil, Christmas Card

The hardest part of this card was getting the 'on Earth' part of the sentiment. I didn't want to add another colour to the mix as it would have been really glaring. Embossing with Copper powder on Night Of Navy cardstock was a fizzer, as was the retired Delicata inks. I ended up using Bright Copper Shimmer Paint. The paint pooled into the letters, which I was trying not to do, but in the end I actually preferred how it looked. Gotta love those happy accidents!

scissorspapercard, Stampin' Up!, CASEing The Catty, Brightly Gleaming SDSP, Peace & Joy Bundle, Stitched Stars Dies, Stitched Rectangles Dies, Itty Bitty Christmas, Brushed Foil, Christmas Card

I had a tiny strip of DSP left from the front, and the three stars cut from the main panel. I may as well use them on the inside, alongside a sentiment from Itty Bitty Christmas.

Our challenge is hosted in our Facebook group. It's super easy to participate - just join the group and post your photo. Easy!


Next up on our Blog Hop is the lovely Julia, who has made a stunning Christmas card for the challenge.


Bye for now,

Tina

Thursday, 24 September 2020

JAI #524: Just Add Colour

 Hi!


Hooray for Friday - and even better, this Friday marks the start of school holidays here in South Australia. I'm very much looking forward to lazy mornings/days with the kids!

This week for the new Just Add Ink challenge, Jo had given us a fabulous colour combination to work with.


I like the two different shades of pink with the mint green. I decided to do a sponged background with the pinks, and go from there with my card.

scissorspapercard, Stampin' Up!, Just Add Ink, Warm & Toasty, Itty Bitty Christmas, Home Together Dies,

I used blending brushes to add the colour to a piece of Whisper White card, starting with the Rococo Rose. I then added Merry Merlot around the edge and finished by flicking some Frost White Shimmer Paint over the top.

scissorspapercard, Stampin' Up!, Just Add Ink, Warm & Toasty, Itty Bitty Christmas, Home Together Dies,

The tree/hill die is from the Home Together Dies. I coloured the trees using my Dark Mint Macaron and Bronze Stampin' Blends (just a little colour cheat there!). Finally the sentiment and polar bear from Warm & Toasty finished off the card.

scissorspapercard, Stampin' Up!, Just Add Ink, Warm & Toasty, Itty Bitty Christmas, Home Together Dies,

I couldn't resist using the baby polar bear on the inside. I used the blending brushes again to add a little colour to the corner of the card and layered the bear over the top. This certainly isn't my usual style Christmas card, but I love how it turned out.

The rest of this week's Design Team cards can be found over on the Just Add Ink blog, were you can also link up your entry. Don't have these exact colours? That's ok - just use the closest match that you have.

Bye for now,

Tina

Monday, 21 September 2020

Heart Of Christmas: September

 Hi!


Welcome to September's Heart Of Christmas Creative Showcase. Each month, bloggers from the Art With Heart team bring you some gorgeous Christmas inspiration. The card I have for you tonight is based entirely around a left over piece from the letter board card that I blogged yesterday.

scissorspapercard, Stampin' Up!, Heart Of Christmas, Playful Alphabet Dies, Brightly Gleaming SDSP, Itty Bitty Christmas, Brushed Foil, Stitched Rectangle Dies

I used the letters on he previous card, so I had the negative left to use for tonight's card. Thankfully I'd had the foresight to cut the piece with a Stitched Rectangle Die before cutting the letters from it. I also added a piece of Foam Adhesive to the back. All I had to do when I popped out the letters was to make sure that I didn't lose all of the little pieces from within the letters.

scissorspapercard, Stampin' Up!, Heart Of Christmas, Playful Alphabet Dies, Brightly Gleaming SDSP, Itty Bitty Christmas, Brushed Foil, Stitched Rectangle Dies

I layered it up over some Brushed Copper Foil from the Mini Catalogue and some Brightly Gleaming SDSP on a Night Of Navy card base.

scissorspapercard, Stampin' Up!, Playful Alphabet Dies, Technique

Here's a little trick for keeping the dies lined up: use your grid paper to line the dies up in a straight line (cutting side down) and then use a fully adhesive sticky note to pick them up. It must be a fully adhesive sticky note, as it has adhesive covering most of the back. You can then flip them over and use the sticky note to hold the dies to the cardstock while you run it through your die cutting machine. This trick is especially useful if you're making multiples, as the dies will stay lined up perfectly.

scissorspapercard, Stampin' Up!, Heart Of Christmas, Playful Alphabet Dies, Brightly Gleaming SDSP, Itty Bitty Christmas, Brushed Foil, Stitched Rectangle Dies

Once again, I used an offcut from the Brightly Gleaming SDSP on the front of my card to decorate my inside. A sentiment from Itty Bitty Christmas finished off the card.

Each month, the Heart Of Christmas is hosted by my lovely friend, Judy May. Please pop on over to her blog, where you will find the rest of the links for tonight's Creative Showcase.

Bye for now,

Tina