Pages

Friday 30 March 2012

Festive Friday #12

Hi!


It's Festive Friday time again!  Once again we are making Easter Cards for your inspiration.


I decided to try my hand at an easel card using an egg shaped cut out.  Here's a closer look at the base of the card.


I wanted a pretty card, and I was really pleased with how it turned out.


I hope I can inspire you to play along at Festive Friday Challenges this week.

Stamps: Well Scripted (retired)
Ink: Wisteria Wonder
Cardstock: Wisteria Wonder, Lucky Limeade, Blushing Bride, Whisper White
Other: Itty Bitty Punch, Bird Builder Punch, Wisteria Wonder Ruffled Ribbon, Basic Jewels Pearls, Egg Shaped Cutter (non SU)

Bye for now,

Tina

Wednesday 28 March 2012

Stylish Star Birthday

Hi!

One of the smaller stamps you may have missed at the back of the Summer Mini Catalogue is Stylish Star.  It's such a cute little stamp and may not be available after the end of the month, so act quickly if you want one!


What a quick and easy card to make when you need to whip one up in a hurry!  Here's the inside.  I'm not sure whet happened with my watermark brush in this photo, and I didn't notice it 'til just now.  The card has long been given away so I can't rephotograph.  Sorry!


I obviously made this card before I'd seen Mary Fish's tutorial on how to patch up stamped images that don't quite stamp properly!

Stamps: Stylish Star, Happiest Birthday Wishes (hostess)
Ink: Real Red, Pacific Point
Cardstock: Real Red, Pacific Point, Whisper White
Other: Mini Brads, Corner Rounder Punch, Dimensionals

Bye for now,

Tina

Monday 26 March 2012

First Edition Sale-A-Bration Card

Hi!

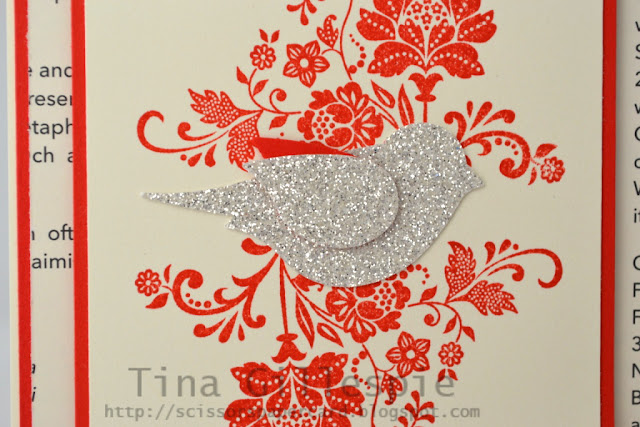
Today I have a card for you that I made using the Sale-A-Bration stamp set Fresh Vintage, combined with some of the gorgeous First Edition Speciality DSP and touches of the fabulous Silver Glimmer Paper.


For some reason I have made a lot of Sale-A-Bration cards using Poppy Parade!  I think it's a colour that looks gorgeous with the Fresh Vintage Stamp Set.  Here's a closer look at the main panel.


Here's the inside of the card.  I left it blank so that I could stamp a sentiment when I knew what I was going to use the card for.


Stamps: Fresh Vintage (SAB)
Ink: Poppy Parade
DSP/Cardstock: First Edition SDSP, Poppy Parade, Very Vanilla, Silver Glitter Paper
Other: Bird Builder Punch, Poppy Parade Double Stitched Poly Twill Ribbon, Dimensionals

Bye for now,

Tina

Friday 23 March 2012

JAI #110: Just Add A Sketch

Hi!

Yay, it's Friday, which means it's time for another Just Add Ink challenge.  This week it's a sketch to inspire your creativity.  Just as I was about to make my card for this sketch I had an order arrive from Stampin' Up! that included The Open Sea stamp set.  I could not wait another moment to get it inky!  But first, here's the sketch.


I decided to make a square card using the sketch for inspiration.


I used every stamp in the set on this card - isn't it great when you love every single stamp in a set?  I can see that this stamp set will become a favourite of mine!


I can never leave the inside plain, so a bit more stamping to finish it off.


I hope you can play along at Just Add Ink this week.  The sketch is fabulous and sure to inspire you to create!

Stamps: The Open Sea, Well Scripted (retired)
Ink: Night Of Navy, Sahara Sand
Cardstock: Night of Navy, Riding Hood Red, Sahara Sand
Other: 1" Square Punch, 1 1/4" Square Punch, Linen Thread, Dimensionals

Bye for now,

Tina

Wednesday 21 March 2012

Just Believe

Hi!

In my previous post I showed you a Christmas card I'd made as a sample for a workshop.  When I finished the workshop I had one kit left over and I just couldn't be bothered putting it away so I decided to make a card with it.  I didn't want to make the same card, so I had a bit of a play with the bits and pieces.  This is what I ended up with.


I kept the base the same, but instead of using the postage stamp punch I just stamped straight onto the DSP with the gorgeous stamp from Just Believe.  I also used different ribbon and the Decorative Label punch to frame my greeting.


I had some Concord Crush cardstock left over, so I ran some through the Big Shot in my Beautiful Wings Embosslit.

Stamps: Just Believe, Curly Cute
Ink: Concord Chrush
DSP/Cardstock: In Colour Patterns DSP, Concord Crush, Whisper White
Other: Big Shot, Beautiful Wings Embosslit, Elegant Eggplant Scalloped Dots Ribbon, Decorative Label Punch, Basic Jewel Rhinestones, Paper Snips

Bye for now,

Tina

Monday 19 March 2012

Postage Stamp Punch Christmas Card

Hi!
I was going through my 'To Blog' folder and came across this card that I hadn't blogged yet.  I made this as a sample card for a workshop way back in December!

It's a lovely, simple Christmas card that would be very easy to reproduce.  The Postage Stamp punch is in the current Summer Mini Catalogue, which ends at he end of the month.  It may not be offered for sale ever again, so make sure you get your hands on one soon if you've been thinking about buying one.  I'd hate for you to miss out!

I love the non-traditional colours in this card - they are so soft and pretty.
Stamps: Snow Swirled
Ink: Baja Breeze, Concord Crush
DSP/Cardstock: In Colour Patterns DSP, Concord Crush, Whisper White
Other: Baja Breeze Seam Binding Ribbon, Postage Stamp Punch, 1" Square Punch, Basic Jewels Rhinestones, Dimensionals
Bye for now,

Tina

Sunday 18 March 2012

Au Revoir!

Bonjour!

I just thought I'd pop in to let you know that Rob and I are off to Paris for the next 12 days.


I can't wait to share some photos with you when we get back.  In the meantime I have scheduled a few posts a week while I'm gone.  Hopefully Blogger will play nicely and they will all appear when they are meant to, if not I'll worry about it when I get home! I'm sure I'll be too busy having the trip of a lifetime with my wonderful husband.

Au revoir,

Tina

Friday 16 March 2012

Festive Friday #10

Hi!


It's Friday, which means it's time for another Festive Friday Challenge.  I had a lot of fun making this one, as it's a super cute little Easter card.


You can find this cute little stamp in the current Summer Mini Catalogue.  He was so much fun to colour!  Here's a closer look at the bunny.


I kept the flag motif going on the inside using some scraps left over from the front of the card.


Stamps: Hoppy Easter, Delicate Doilies
Ink: Ummm, I can't remember!  There's Marina Mist and Perfect Plum, the rest slip my mind!
DSP/Cardstock: Nursery Nest DSP, Marina Mist, Perfect Plum, Whisper White
Other: Perfect Plum Taffeta Ribbon, Oval Cutter (non SU), Blender Pen, Dimensionals

I hoe you can find time to play along at Festive Friday Challenges this week.  If there are more than 5 entries Nicole is offering a prize to the winner!

Bye for now,

Tina

Wednesday 14 March 2012

A 21st Birthday Card

Hi!

One of my nieces turned 21 late last year.  I haven't shown you the card I made for her yet!


What girl doesn't like a bit of bling, so I teamed the retired stamp set Cheers To You with some of the Silver Glitter paper.


I used some Crystal Effects on the cocktail glasses to make it look like there was a cocktail in the glass.


I used some more of the Hostess DSP Cheerful Treat on the inside.

Stamps: Cheers To You (retired), Happiest Birthday Wishes (hostess)
Ink: Melon Mambo
DSP/Cardstock: Cheerful Treat (hostess), Silver Glitter Paper, Melon Mambo, Basic Black, Whisper White
Other: Crystal Effects, Dimensionals, Organza Ribbon

Bye for now,

Tina

Monday 12 March 2012

February Customer Thank You Cards

Hi!

A quick post today of the little gift cards I made to thank my wonderful customers who ordered from me in the month.


I used some of the gorgeous Sale-A-Bration DSP, Everyday Enchantment.  I simply punched a heart, drew the little stitching lines around it with my white gel pen and the popped it up on some Dimensionals over the top of the base card which had been stamped using a stamp from the Fresh Vintage Sale-A-Bration stamp set.


You can see in the photo above how it's popped up with Dimensionals.


I used the punchie from the front to decotate the inside.  I also used some faux stitching on the punchie.

Stamps: Fresh Vintage (SAB), Trendy Trees
Ink: Lucky Limeade, White Signo Gel Pen
DSP/Cardstock: Everyday Enchantment DSP, Very Vanilla, Lucky Limeade
Other: Full Heart Punch, Modern Label Punch, Word Window Punch, Dimensionals

Bye for now,

Tina

Friday 9 March 2012

JAI 108: Just Add A Colour Combination

Hi!

I love the colour challenge weeks at Just Add Ink, and this week I'm in luck, because it's a fantastic combination.

I had so much fun playing with this colour combination.  I decided I wanted to make a masculine card as I don't have many of those in my stash.  I also decided to pull out some old favourite stamp sets that hadn't seen much ink lately.


Even though there are quite a few layers on the card, I love the Clean and Simple feel of the card.  I was itching to add some ribbon or something else to pretty it up a bit, but that's not really 'right' on a male card now is it?


I kept the inside fairly clean and simple too.

I hope you can find time to play along this week at Just Add Ink.

Stamps: Lovely As A Tree, Fifth Avenue Floral, Happiest Birthday Wishes (hostess)
Ink: Early Espresso, Island Indigo
DSP/Cardstock: Pool Party In Colour Patterns DSP, Island Indigo, Early Espresso, Whisper White
Other: Dimensionals

Bye for now,

Tina

Wednesday 7 March 2012

A 3D Project

Hi!

When I applied to become a member of the JAI Design Team I decided to apply for both the card making team and the scrapping team.  Part of the application process for the card making team was to design a 3D, off the page item.  I decided to alter a shadow box photo frame I bought from Ikea.  I"d originally bought it to do something for my daughter's room, but it took on a life of it's own and ended up very differently to what I'd planned.


I love how it turned out, and I think it would look great in a little boy's room.  Now I just need someone to have a baby boy so I can give it to them!

I also made a card to match the frame.


Like the frame, I fussy cut one of the balloons from the DSP and popped it up on Dimensionals.


I used the hostess set Ain't Love Grand for the inside.  Here's the two projects together.


Overall, I was very pleased with how they turned out, even if they were nothing like what I had originally planned!

Stamps: Ain't Love Grand (hostess), Happiest Birthday Wishes (hostess)
Ink: Tempting Turquoise, Real Red
DSP/Cardstock: Big Top Birthday DSP, Tempting Turquoise, Real Red, Whisper White
Other: Big Shot, Simple Letters Alpha Dies, Paper Snips, Dimensionals, Cherry Cobbler Baker's Twine, Scalloped Ribbon Border Punch, Blender Pen

Bye for now,

Tina

Sunday 4 March 2012

JAI Scrapbooking Challenge #3: Just Add Altered Art

Hi!
Welcome back to the latest Just Add Ink Scrapbook Challenge.  The challenge requires you to Just Add Altered Art.  I must admit I had to go looking for the definition of altered art, and I found that it means turning an ordinary, everyday object into a work of art.  I decided to turn a bunch of Stampin' Up!'s now retired mini lunch sacks into a mini smash album.


For those of you who aren't sure what a smash album is, it's simply a book that you smash things into.  In this case Rob and I are going to Paris, so I intend to smash things like tickets, maps, postcards, postage stamps, etc into the album.  I will also journal in the album so it will be a travel journal.


I trimmed the bottom of the sacks to make little pockets, for which I made a pull-out section to write on or smash something onto.  The main part of each sack also has a pull-out insert for the same purpose. 

This smash album was a real labour of love, and I can't wait to fill it with beautiful memories of our trip to the city of love!  I'll post some more photos when I get back and it's full.

I used a lot of different materials on this album, but the main ones are the mini lunch sacks, Beau Chateau DSP and Creative Elements Stamp Set.

I hope you can play along this month with us at Just Add Ink.

Bye for now,

Tina

Friday 2 March 2012

Festive Friday #8

Hi!


Here we are - up to the eighth Festive Friday Challenge.  Wow!  Today I have a very Clean and Simple card for you. It was inspired by this card.


This was an easy card to make.  I just used Post-It notes to mask off the section I didn't want to stamp and sponge in, and then away I went!  Once again the inside was done to complement the outside.


Stamps: Tree Trimmings, Snow Swirled, En Francais, Season Of Joy
Ink: Cherry Cobbler, Sahara Sand
Cardstock: Cherry Cobbler, Very Vanilla
Other: Basic Jewel Rhinestones, Corner Rounder Punch, Sponge Dauber, Post-It Notes

Don't forget to pop on over to Festive Friday Challenges to see what the rest of the Design Team have in store for you.

Bye for now,

Tina