Pages

Showing posts with label Snow Front. Show all posts

Thursday, 10 October 2024

JAI 723: Just Choose Two

 Hi!


Welcome to the new Just Add Ink Challenge. This week it's a Choose Two challenge, suggested to us by Kim.


I purchased a new stamp set last week from Scrappy Boy Stamps, called Summer Fling. I just had to use it, but was a little stumped on how to include two of either circles, trees or ink blending with the images. I had intended to ink blend behind the circle die cut on my card, but got distracted and glued it down before I blended. Oops! Trees it was!


Can you guess the fandom that the people are from? The sentiment might be a bit of a giveaway if they don't! It's one of my all-time favourite movies. I coloured them with my Copic markers and then popped them up over the circle, die cut from my Everyday Details Dies. The sentiment was also cropped using a rectangular die from the same set.


As I mentioned earlier, I had forgotten to ink blend, so I had to add trees. I remembered that the man lives in a cabin on the edge of the woods, so I used my Snow Front (cabin) and Waterfront (trees) stamp sets to add those details to the card. Easy!

The inside of the card might give you one final clue to the fandom, if you haven't already worked it out. Hehe, I couldn't resist adding the watermelon!

That's all from me, but please jump on over to the Just Add Ink blog so that you can see what the rest of the Design Team have made. You can also add your card to our Linky when you're ready to enter the challenge. Which two will you choose?

Bye for now,

Tina

Thursday, 4 February 2021

JAI #540: Just Add Colour

 Hi!


Woo Hoo! It's Friday again, which means that it's not only the weekend, it's also time for the new Just Add Ink Challenge!


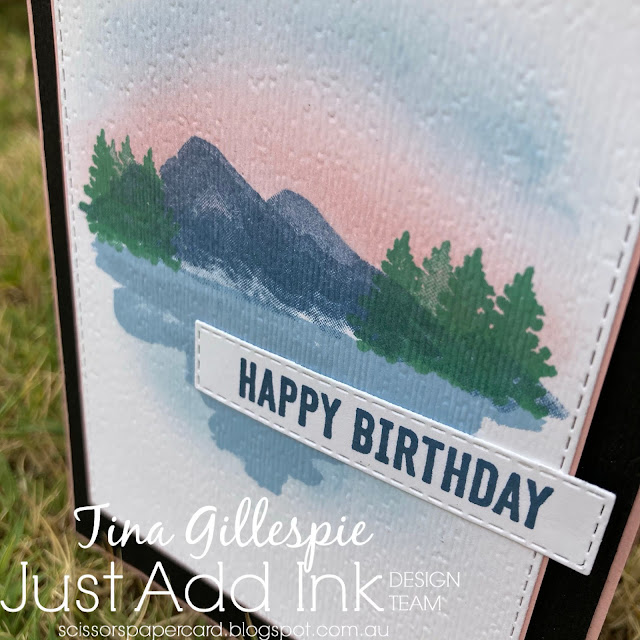
How good is this colour combo that Rochelle has put together for us to use? The blue/green tones with a pop of pink is stunning! I decided to use the colour combo to create a scene - the pink with the blues reminded me of an evening sky.

scissorspapercard, Stampin' Up!, Just Add Ink, Waterfront, Snow Front, Itty Bitty Birthdays, Subtle 3DEF, Stitched Rectangles Dies

I started by stamping the mountains from Waterfront in stamped-off Misty Moonlight. There are some grey tones in the deep blue, and stamping off helps to bring them out. I then stamped the lake in Seaside Spray and the trees, which are from Snow Front, in Just Jade. I then used a Blending Brush to add some Blushing Bride ink to the sky, just above the mountains, with a little bit of Seaside Spray above that. I was very pleased with how it turned out.

scissorspapercard, Stampin' Up!, Just Add Ink, Waterfront, Snow Front, Itty Bitty Birthdays, Subtle 3DEF, Stitched Rectangles Dies

I finished the front by running the panel though my Big Shot with the Subtle 3DEF. I love the way it makes the cardstock look like canvas, and a bit more like a watercolour painting.

scissorspapercard, Stampin' Up!, Just Add Ink, Waterfront, Snow Front, Itty Bitty Birthdays, Subtle 3DEF, Stitched Rectangles Dies

I repeated elements of the scene again on the inside of the card. It's so easy to do when you already have the stamps out and inky!

That's all from me for this week, you can find the rest of the Design Team's cards over on the Just Add Ink Blog. You will also find the Linky, so that you can join in the fun. What will you create with this gorgeous colour combo?

Bye for now,

Tina

Wednesday, 3 June 2020

AWH Colour Creations: Balmy Blue

Hi!


You may remember that in 2018-19 I participated in the Art With Heart Colour Creations Blog Shares. Well, it's back again! This time it's the Colour Creations Showcase, but otherwise, it's the same. Each week on a Wednesday evening, we will all post cards using one of the Stampin' Up! colours. I used the last round as an opportunity to try out new techniques and styles, and I will try to do that again.

Week one is Balmy Blue!

scissorspapercard, Stampin' Up!, Art With Heart, Colour Creations Showcase, Snow Front, Blossoms In Bloom, Stitched Rectangles Dies

Very recently I purchased the Snow Front stamp set, as it was carrying over to the new Annual Catalogue. I've had a lot of fun with Waterfront, and hopefully I will with Snow Front too. Let's talk about the card base, though. On the top section I stamped the new Blossoms In Bloom stamp set. I just wanted it to look like random stamping, rather than the gorgeous flowers it is, which is why I stamped the spotty stamp around the edge. It's meant to be the flower centre.

The bottom half of the card base is simply narrow strips of Balmy Blue cardstock glued to a larger piece of Balmy Blue cardstock. I like the subtle texture this gives to the card - a bit like a wall with wood panelling on the bottom half. I don't know what it's called, but I do like the look, especially on cards!

EDIT: Kathryn tells me it's a dado rail, and she'd be right!

scissorspapercard, Stampin' Up!, Art With Heart, Colour Creations Showcase, Snow Front, Blossoms In Bloom, Stitched Rectangles Dies

To help the main panel stand out from the background, I matted it twice, once with Balmy Blue and then again with the new Misty Moonlight. It looks quite dark here, but it's more of a mid blue. I created the scene with Snow Front and then used a blending brush to add a little ink to the sky. It's a very wintery card!

scissorspapercard, Stampin' Up!, Art With Heart, Colour Creations Showcase, Snow Front, Blossoms In Bloom, Stitched Rectangles Dies

I repeated the scene on the inside, including the ink blending. The sentiments on the card are from Blossoms In Bloom.

I hope I didn't make you feel too cold looking at my Balmy Blue card!

Time now to pop on over to Catherine's blog, where you'll find the rest of this week's Colour Creations Showcase links. I think there are over 16, so plenty of inspiration to be had for Balmy Blue.

Bye for now,

Tina

Thursday, 28 May 2020

JAI #507: Just Add A Sketch

Hi!


It's been a bit of a cold and wet week in Adelaide this week, so perfect weather for crafting! I had a play day on Wednesday, where I watched both Mamma Mia movies and crafted the day away. It's been a long time since I've been able to do that, so it was heavenly! One of the cards I made was for the new Just Add Ink challenge. This week Jackie has designed a fun, funky sketch for us to use.


I love the quirk of the angled line at the bottom. While it would be easy to just go straight across the card, the diagonal adds a touch of fun to a card.

scissorspapercard, Stampin' Up!, Kindred Stamps, Sweet Stamp Shop, Just Add Ink, Waterfront, Snow Front, Legendary, Legendary Word Die, Stampin' Blends, Subtle 3DEF, Stitched Shapes Dies, Gold Foil

Speaking of fun, I took the opportunity to play with a Stamp set that I recently purchased from Kindred Stamps, called Legendary. The gamers out there may think that this character looks familiar. I'm not very 'up' with him, but my kids and hubby know exactly who he looks like! I created a forrest background for him, as it suits his outfit and pointy ears. I used a mix of Waterfront and Snow Front to create the scene. Did you notice the cloud? I stamped it with some First White Shimmer Paint to give the wispy look of a cloud.

scissorspapercard, Stampin' Up!, Kindred Stamps, Sweet Stamp Shop, Just Add Ink, Waterfront, Snow Front, Legendary, Legendary Word Die, Stampin' Blends, Subtle 3DEF, Stitched Shapes Dies, Gold Foil

The character himself was coloured sing my Stampin' Blends. I used both my Ivory and Bronze Blends to colour his skin - Ivory for the bulk of the area, and then the Bronze to add shadows around his hairline or the edge of his clothing. It's a great trick when the Ivory on its own is too flat. The legendary die is from Sweet Stamp Shop and it just called Legendary Word. It's a match made in heaven with this stamp set!

scissorspapercard, Stampin' Up!, Kindred Stamps, Sweet Stamp Shop, Just Add Ink, Waterfront, Snow Front, Legendary, Legendary Word Die, Stampin' Blends, Subtle 3DEF, Stitched Shapes Dies, Gold Foil

I recreated much of the same scene, including the wispy cloud, on the inside of my card. The female character has made her home here. I had assumed that she was the main character, and should be on the front of the card, but Rob tells me that the male character is the main character, even though the game is named for her. Go figure!

That's all from me this week. Did you like my card with Jackie's fun sketch? You can see what the rest of the Design Team made with it over on the Just Add Ink blog, where you can also link up your card to enter our challenge. Can't wait to see what you make of the sketch!

Bye for now,

Tina