Pages

Showing posts with label Snow Swirled. Show all posts

Friday, 21 June 2013

JAI #170: Just Add Leaves

Hi!

Time for another Just Add Ink challenge!


This week Christine has challenged us to add leaves to our projects. I had a bit of a brain fart and panicked about not having any leaf stamps, quite forgetting about French Foliage and Lovely As A Tree sitting on my shelf! Ooops!  I ended up using the leaf punchies from my Bird Builder Punch on my card.
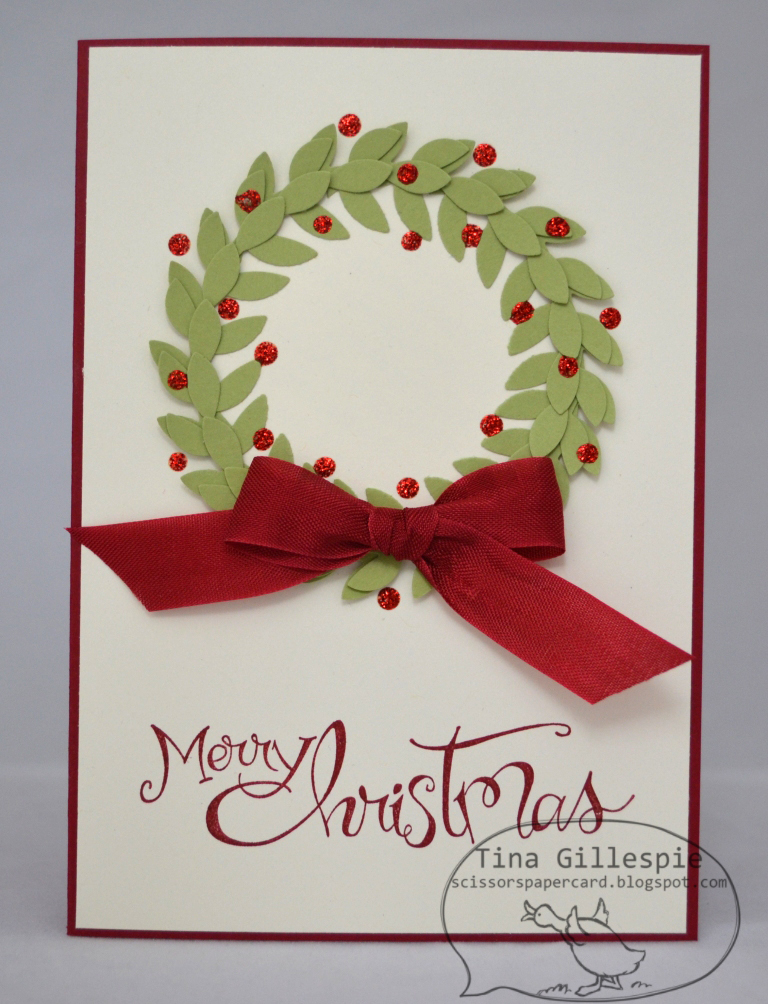

In the end I was quite pleased with my forgetfulness as I really like this card!  To get the perfect circle I punched a circle from Very Vanilla with my 2 1/2 Circle punch and then adhered the leaves around the edge.


It looked a little plain so I used my Cherry Cobbler Dazzling Details to add some berryish looking highlights to the wreath.  I loved the final effect,


I had a few leaves left over so I used them on the inside of the card.

Stamps: Snow Swirled, Sassy Salutations
Ink: Cherry Cobbler
Cardstock: Very Vanilla, Cherry Cobbler, Old Olive
Other: Bird Builder Punch, 2 1/2" Circle Punch, Cherry Cobbler Seam Binding Ribbon, Cherry Cobbler Dazzling Details

So what leaves do you have hiding in your stash that you could use on a project?  See you over at Just Add Ink.

Bye for now,

Tina

Monday, 10 December 2012

Faux Silk Christmas Card

Hi!

My monthly stampin' ladies were keen to try another technique for their technique book this month.  I have a bit of a look around and finally settled on the Faux Silk Technique.


I love the luxurious look it gives to the front of the card, despite it being a quick, easy and cheap technique to try.  Who doesn't have tissue paper floating around their house somewhere?  A quick tip though - with the new inkpads you need to wait a little bit before scrunching up the tissue paper as the ink takes a little longer to dry.


I used Gumball Green, Cherry Cobbler and Very Vanilla on my card. The stamps used were Ornament Keepsakes, Sweet Essentials and Snow Swirled.

Bye for now,

Tina

Friday, 7 December 2012

Festive Friday #48

Hi!

Here we are again at the end of another week and ready for a new Festive Friday Challenge!


This week Nicole has challenged us to use punch art on a Christmas card.  I did a bit of googling and finally decided I would make some punch art bells for the front of my card.


I thought they were really cute, and my kids knew what they were straight away, so they 'passed the test'. I've used some of the gorgeous Festival of Prints Designer Series Paper Stack on the front of my card too.  The bells are punched from More Mustard cardstock and sponged with the same ink.


I used a small scrap of the same DSP on the inside, as well as the Dotted Scallop Ribbon Border Punch.

I hope you can play along this week!

Bye for now,

Tina

Friday, 23 November 2012

Festive Friday #46

Hi!

Yay! It's Friday again!  This week it's my week for Festive Friday Challenges.


This week Nicole has given us a sketch to play with. It's a fantastic sketch that has plenty of scope for interpretation.


I certainly took a few liberties with the interpretation!


As you can see, I flipped it on it's side and swapped the waves for scallops - my new Delicate Designs Embossing Folder and coordinating Large Scallop Edgelit had just arrived and I wanted to play with them! I coloured parts of the raised design with my Silver Stampin' Dazzle Marker.


If you look closely you can see that the Whisper White panel is stamped with the small snowflake from Snow Swirled. I stamped it with my Illuminate Glimmer Watermark Stampin' Pad. I mustn't've cleaned my stamp properly last time I used it because the images stamped a little pink (I think I last used Cherry Cobbler with the stamp) and now my inkpad it stained a little.  Oh well! The effect looks great on this card in real life though!


I also stamped the snowflake on the inside at the top and bottom - it's so hard to photograph nicely!

I hope you can play along this week at Festive Friday!

Also, please come back tomorrow (Saturday) for a blog hop showcasing products from the current Holiday Catalogue.

Bye for now,

Tina

Friday, 9 November 2012

Festive Friday #44

Hi!

After a bit of an absence from my Design Team duties I'm back with a Festive Friday card.


This week Nicole has chosen a gorgeous candy cane and peppermint picture to inspire us.

I have been suffering from a serious lack of mojo over the past month.  I've had a lot going on and not much headspace for creating.  Some advice for these kinds of situations is to find a card you love and CASE it.  In this case I decided to CASE myself, so I went right back to the very first Festive Friday card I made. It was a Valentine's card and you can see it card here.


I used the large snowflake stamp from Snow Swirled  and my Real Red Inkpad to recreate the red and white striped look of the peppermint lollies in the inspiration photo.  The merry stamp is from For My Family.  Here's a closer look at the panel.


The scallop punchies are the new smaller Scallop Circle punch from the Holiday Catalogue. I also used some Rhinestones for a bit of bling.  Don't forget the score lines created using my Simply Scored Scoring Tool.


Nice, simple stamping on the inside to compliment the simplicity of the outside.

I hope you can play along with us this week!

Bye for now,

Tina

Friday, 5 October 2012

Festive Friday #39

Hi!

It's a clash of the Design Teams today!  I'm filling in for a fellow Design Team member at Festive Friday today.  If you're looking for my Just Add Ink card, scroll down to the next post.

 
This week Nicole has given us an inspiration photo to create with.  It's a funny one!
 
 
lol, I actually googled "Stampin' Up Santa bum punch art" for ideas.  I didn't find any Santa bum punch art creations, but I did find a few Easter Bunny bum ideas which I adapted for Santa.  Here's my card.


Does it look like Santa is trying to climb through the card?  I hope so!  Here's a closer look at Santa's bum.


Pretty easy punch art so far, just a 1 3/4" Circle punchie and two of the now retired Small Oval punchies.  Oh, and a teased out cotton ball as the trim on his jacket.  I adhered the cotton using some of our Multipurpose Adhesive Sheets. The hole he's crawling through was punched one layer at a time using the 2 1/2" Circle Punch.


Well, I just had to put Santa's head on the inside - it'd look a bit funny if I just had his bum!  To create his head I've used the Ornament punch (beard), Bird Builder (mustache), Owl Builder (eyes, nose and mouth), retired Small Oval (face), Extra Large Oval (hat and trim on hat), 1/2" Circle (hat pom pom).  For his hands I used the retired small oval and the retired Slot punch.  I used my white gel pen to add the twinkle in his eyes.  Santa always needs that twinkle!  Here's a closer look at Santa.


I had a lot of fun making this card.  I hope you have time to play along with us at Festive Friday Challenges using this fun inspiration image.

Stamps: Snow Swirled
Ink: Cherry Cobbler, Island Indigo, Signo White Gel Pen
DSP/Cardstock: Festival Of Prints DSP Stack, Cherry Cobbler, Crumb Cake, Basic Black, Whisper White, Blushing Bride (retired), Bashful Blue
Other: Lots of punches (I've listed them all in the post!), Mulitpurpose Adhesive Sheets, Cotton Ball (non SU)

Bye for now,

Tina

Friday, 28 September 2012

Festive Friday #38

Hi!


Time for some Friday Christmassy inspiration from the new Festive Friday Challenge.  This week Nicole has designed a sketch for us to play with.


I loved this sketch - it allows a lot of room for playing and could be interpreted in soooo many ways.  Here's how I chose to use the sketch.


I used the new In Colour Midnight Muse as the base of my card, with Brushed Silver as the matt.  I quite like this rich new blue to play with.


The centre panel was embossed and then I used some Frost White Shimmer Paint on a sponge dauber to dab lightly over the panel.  Most of the paint settles on the raised sections of the cardstock, but little bits also land on the lower sections.  I like the 'dusted' look this gives.


Stamps: Snow Swirled, For My Family
Ink: Midnight Muse
Cardstock: Midnight Muse, Brushed Silver, Whisper White
Other: Big Shot, Petals A Plenty Embossing Folder, Word Window Punch, Modern Label Punch, Frost White Shimmer Paint, Sponge Dauber, Basic Jewels Rhinestones, Dimensionals

I hope you can play along with the new Festive Friday challenge.

Bye for now,

Tina

Monday, 17 September 2012

Guest Designers: Rob and Ada Gillespie

Hi!

A little something different today!  A few weeks ago Ada was invited to the birthday party of a classmate who she told me was mad on Star Wars.  She therefore wanted to make him a Star Wars card.  Hmmm.... So I handballed the job to my Star Wars mad husband, Rob!  Rob and Ada put their heads together and this is the card they came up with.


Not bad!  Even I recognise the Death Star out in space.  Here's a closer look.


I spy a snowflake stamp from Snow Swirled, and also one of the border stamps from Bordering On Romance.  Who knew they could be used to help create a futuristic space ship? lol


I think they had run out of ideas before they got to the inside!  Oh well, from all accounts the birthday boy loved the card.

Bye for now,

Tina

Friday, 14 September 2012

Festive Friday #36

Hi!

It's that time of the week again - a new Festive Friday challenge!


This week Nicole has found this gorgeous picture of a table all set out for a Christmas meal to inspire us.  Must be an Aussie table, as it looks like prawns on the plates!


I took my inspiration from the candles this week.  I had also just received my new Stampin' Up! order with the Festival of Prints DSP stack, so I had to use some of the paper on the card!


Isn't it gorgeous paper?  I made the flames of the candles using the wing section of the Bird Builder Punch.  They were punched in So Saffron and sponged with More Mustard ink to give a more flame-like effect.  The middle candle was popped up on Dimensionals.


I had an extra candle made, so it went on the inside to jazz that up a little!

 
The Dotted Scallop Ribbon Border Punch also adds a touch of interest to the inside of the card.
 
So will you find time to play along?  I hope so!
 
Stamps: Snow Swirled
Ink: Cherry Cobbler, More Mustard
DSP/Cardstock: Festival of Prints DSP stack, Cherry Cobbler, So Saffron, Whisper White, Silver Glimmer Paper
Other: Bird Builder Punch, Word Window Punch, Modern Label Punch, Dotted Scallop Ribbon Border Punch, Basic Jewel Rhinestones, Cherry Cobbler Seam Binding Ribbon, Antique Brad, Sponge Daubers, Chit Chat Rub Ons (retired)
 
Bye for now,
 
Tina

Friday, 31 August 2012

Festive Friday #34

Hi!

Friday again, which means it's time for....


This week Nicole has put together a colour combination to use on the cards.

 
Now when I first saw this combo my first thought was "Nicole, what were you thinking???"  I put off making the card for ages, but when I could no longer avoid it and sat down to craft I realised just how GORGEOUS this combination is.  I love it!
 
 
I used my Simply Scored to create the background of the card.  I then dragged an inkpad over the top to highlight the score lines, and dotted on the joins with my white gel pen.  I wanted a luxurious, quilted look for the background.


Isn't the sentiment lovely?  It's a sneak peek from the new Holiday Catalogue that I received at the Melbourne Heartfelt Event.  I used my markers on the stamp to give the multicoloured look.


I decorated the inside in the same manner as the outside.

I hope you can play along with this gorgeous colour combination!

Stamps: Snow Swirled, Heart Of Christmas (upcoming), Tree Trimmings (retiring)
Ink: Not Quite Navy, More Mustard, Cherry Cobbler
Cardstock: Not Quite Navy, More Mustard, Cherry Cobbler, Whisper White
Other: Big Shot, Apothecary Accents Framelits, Simply Scored Score Board, Cherry Cobbler Seam Binding, White Baker's Twine,  More Mustard Designer Button, Dimensionals, White Signo Gel Pen

Bye for now,

Tina

Friday, 3 August 2012

Festive Friday #30

Hi!


Who's ready for another round of Festive Friday goodness?  Me!  This week Nicole has designed a cute sketch to use on our cards.  It's a very versatile sketch, with lots of room for playing.


I changed the sketch from rectangle to square for my card, which is a cute little 4 1/4" size.


Love, love, love Dasher for Christmas cards.  He's been a bit neglected lately, so it was way past time for him to see some ink.


More of the gorgeous Letters To Santa DSP on the inside.  I'm not worried about not much room for writing in my card, as I usually send out a newsletter with my cards.

Stamps: Snow Swirled, Dasher, Season Of Joy
Ink: Early Espresso, Marina Mist
DSP/Cardstock: Letters To Santa DSP, Early Espresso, Whisper White
Other: Word Window Punch, Modern Label Punch, Early Espresso Baker's Twine, Basic Jewels Rhinestones, Dimensionals

Bye for now,

Tina

Friday, 20 July 2012

Festive Friday # 28

Hi!


Festive Friday time again!  This week Nicole has given us this gorgeous picture to use as inspiration for our cards.


Lol, if you look really closely you can see the photographer in the shiny bauble!  Am I the only one who notices things like that? Anyway, here's the card I made that was inspired by the picture.


I am really loving the Letters for Santa DSP for my Christmas cards.  I think it's one of those DSP's that grows on you over time.  I cut the large bauble from the DSP and used a scrap for the panel down the side.  I also used some red Glimmer Paper down the side to represent the string of beads in the photo.  I carried this over to the inside of the card too.


What a gorgeous inspiration picture we have to work with this week.  I hope it inspires you to get out your Christmas supplies and get stampin'! See you over at Festive Friday.

Stamps: Snow Swirled, Baroque Motifs
Ink: Old Olive
DSP/Cardstock: Letters To Santa DSP, Red Glimmer Paper, Early Espresso, Old Olive, Whisper White
Other: 1" Circle Punch, 1/8" Early Espresso Taffeta Ribbon, Mini Glue Dots, Sponge Dauber, Paper Snips

Bye for now,

Tina