Pages

Showing posts with label Celebrate You Thinlits (SAB). Show all posts

Thursday, 2 February 2023

JAI 638: Just Choose Two

 Hi!


Welcome back to my blog for the new Just Add Ink challenge. I love Fridays and the new challenge! This week Di has challenged us to a Choose Two project.

The choices are Candles, Cake or Celebration. As soon as I saw this challenge, I knew the exact stamp I wanted to use - the 'CEL-E-BRATE' stamp I used for my background. It's from a retired Kindred Stamps set, called Time Traveller.

scissorspapercard, Just Add Ink, Kindred Stamps, Time Traveler, It's About Time, Ink Road Stamps, Belated, Celebrate You Dies, Pop Culture Card

I stamped it down my card using my Stamparatus and the step-stamping technique. The celebrate die cut is from a retired Stampin' Up! die set, called Celebrate You. I was so excited about the 'celebrate' elements of my card, I nearly forgot to choose the second. A few candles, from Ink Road Stamp's Belated stamp set, fit the bill!

scissorspapercard, Just Add Ink, Kindred Stamps, Time Traveler, It's About Time, Ink Road Stamps, Belated, Celebrate You Dies, Pop Culture Card

My robot (hopefully you can hear him saying celebrate in his particular voice!), is from another Kindred Stamps set, called It's About Time. I struggled with which colours to use on him, but finally settled on red and grey.

scissorspapercard, Just Add Ink, Kindred Stamps, Time Traveler, It's About Time, Ink Road Stamps, Belated, Celebrate You Dies, Pop Culture Card

I decided to go with another villain from the series on the inside, despite this image not looking very villainous! She goes well with the sentiment, and both are from the Time Traveler set. I'm sure the someone who loves this fandom will love the card!

That's all from me for this week's challenge, but your job is just beginning! Jump on over to the Just Add Ink blog, where you'll find lots more inspiration from the Design Team. Then you can choose your two elements, and get stamping! Link your card over on the JAI blog when you're done. 

Bye for now,

Tina

Thursday, 2 September 2021

JAI 570: Just Add Colour

 Hi!


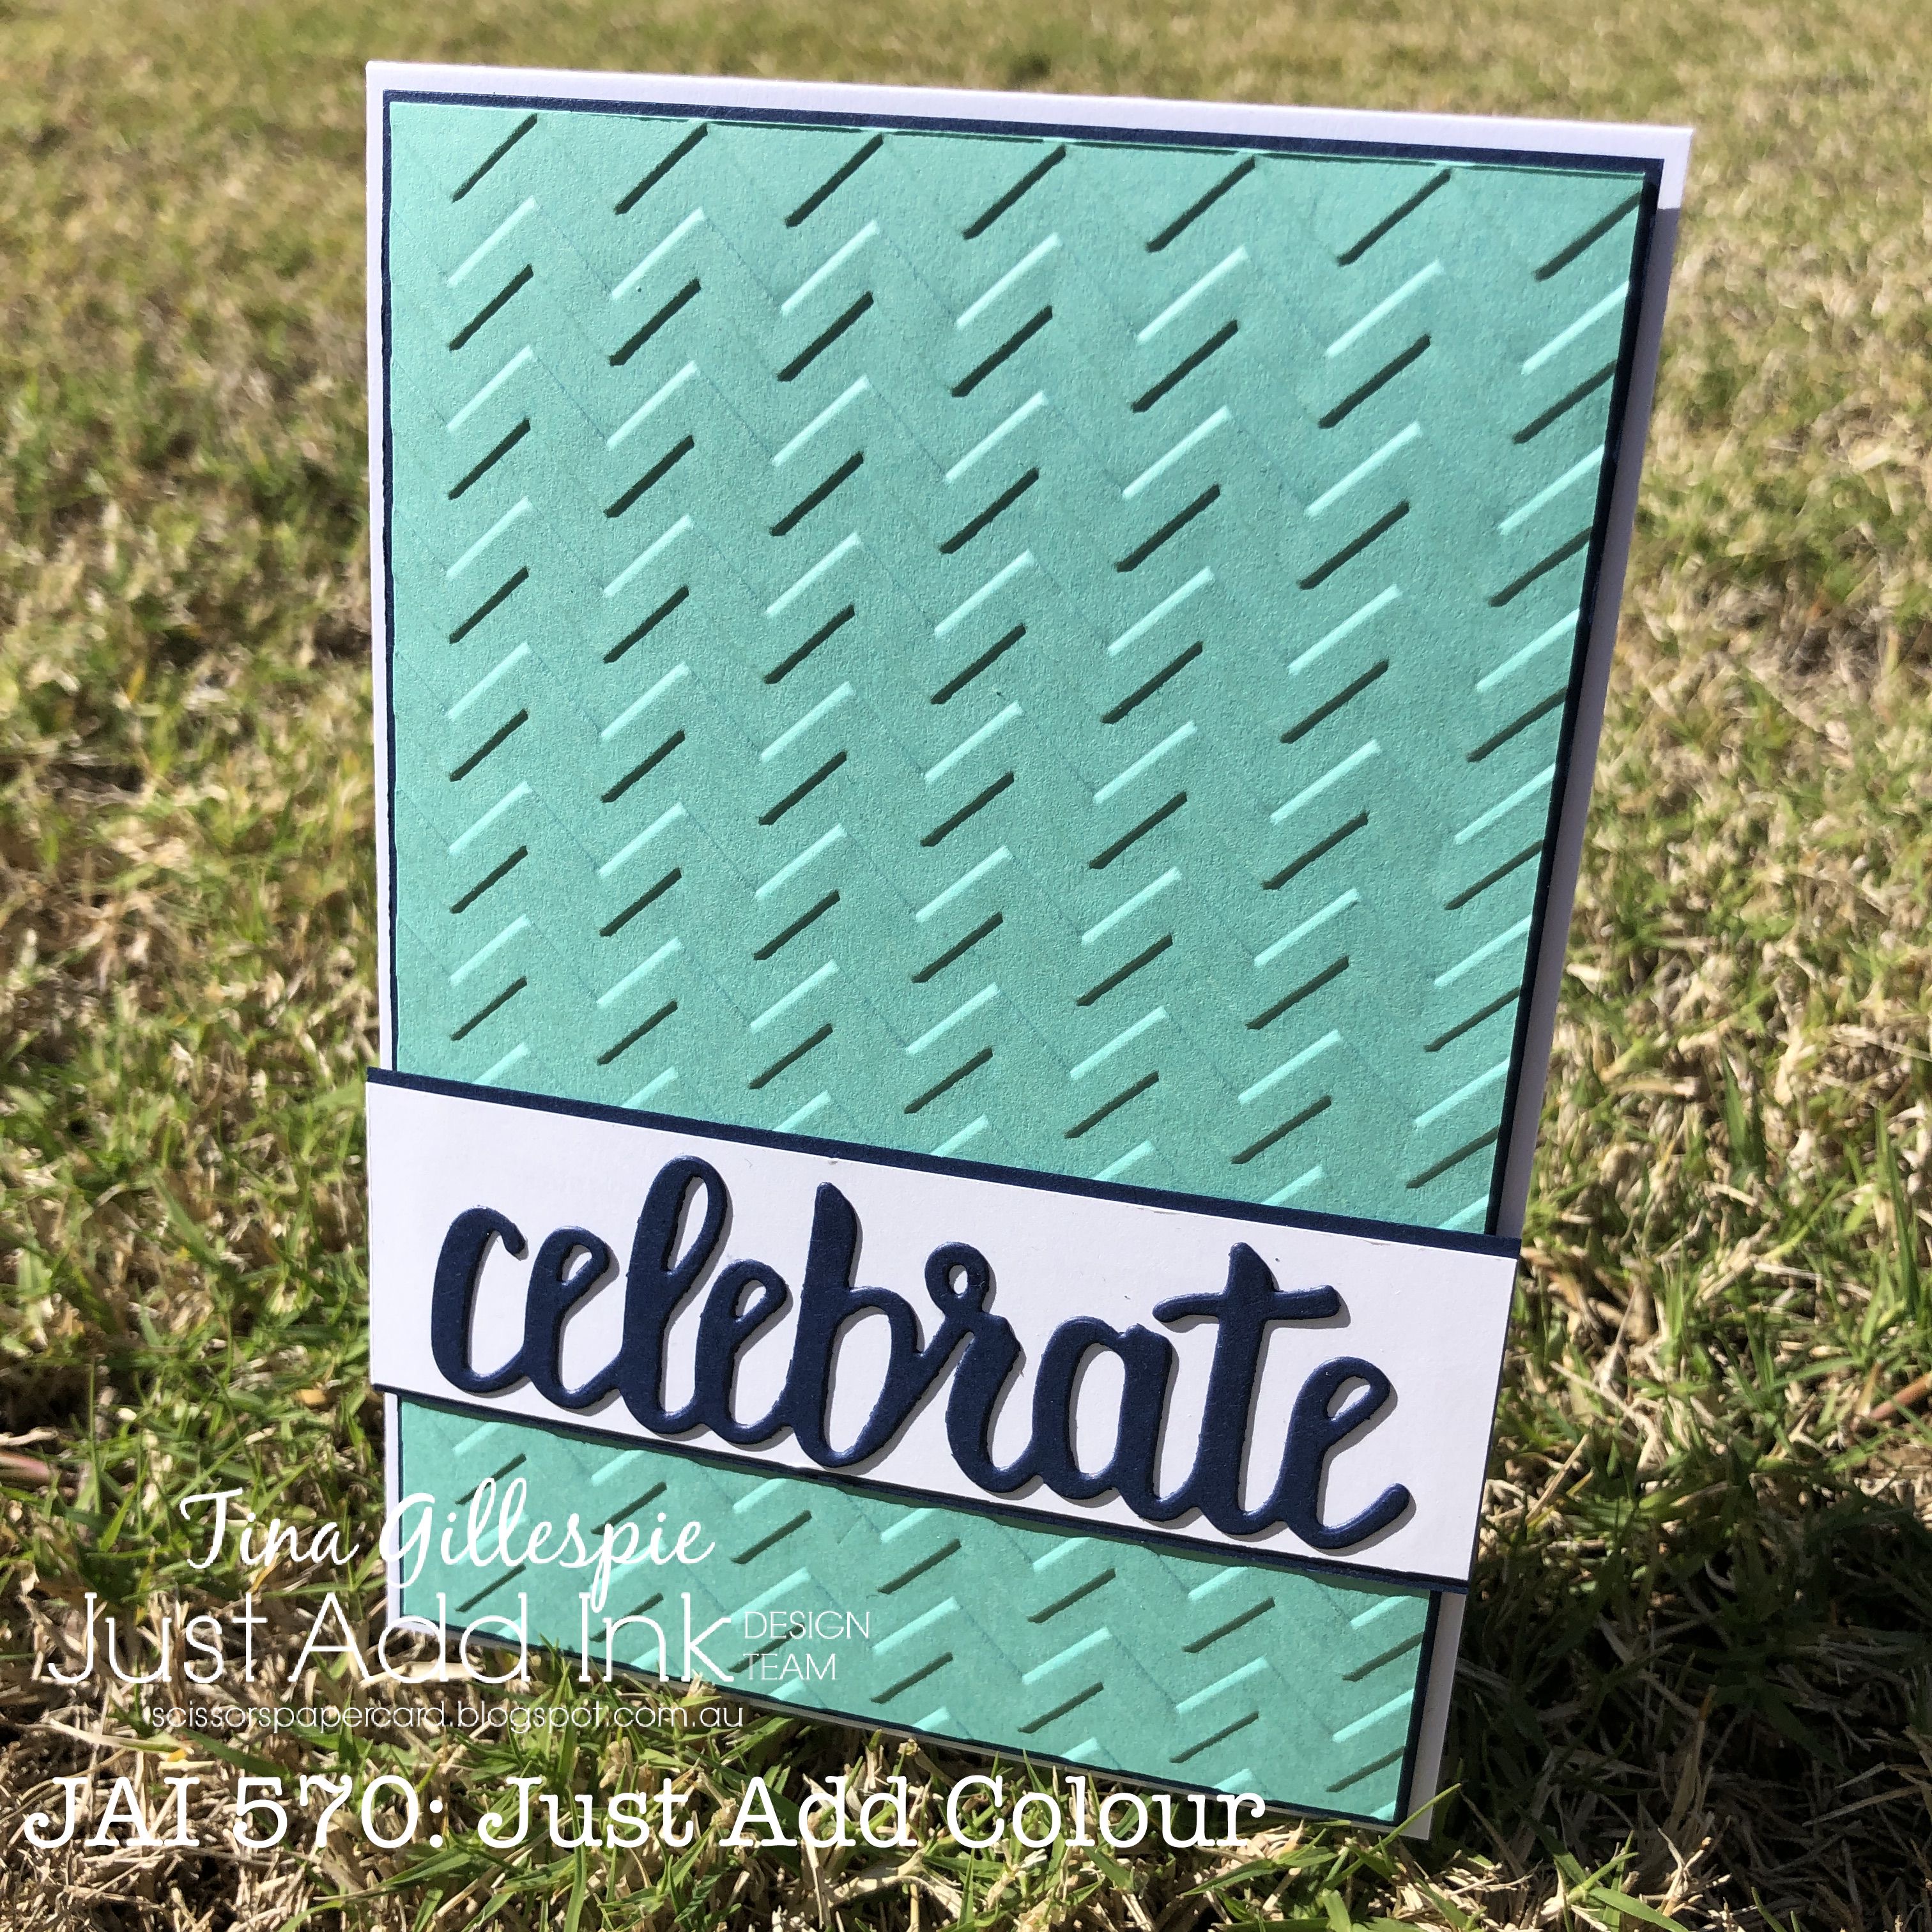
Hooray for another Friday! I'm soooo ready for the weekend - how about you? I'm hoping to get a little quilting done, perhaps some card making too. I hope you've got something fun planned, too. If not, why not try the new Just Add Ink challenge?


Isn't this colour combo fabulous? I love the two different blues, and the addition of white keeps it fresh. I'm not sure why, but I pulled out a couple of long-retired products to play with on my card.

scissorspapercard, Stampin' Up!, Just Add Ink, A Good Man, Celebrate You Thinilts, Chevron Embossing Folder, Masculine Card

The first of which is the Chevron Embossing Folder. It's such a fun background! However, the folder was designed before SU started releasing square folders, so to get a portrait orientation card I had to emboss two pieces of card - the join is under the sentiment panel.

scissorspapercard, Stampin' Up!, Just Add Ink, A Good Man, Celebrate You Thinilts, Chevron Embossing Folder, Masculine Card

Speaking of the sentiment, it's my other retired product. It's from the Celebrate You Thinlits set, which I think started off as a Sale-A-Bration item, but was included in the following year's Annual Catalogue. I'm a sucker for word dies, so they stayed in my collection after they retired.

scissorspapercard, Stampin' Up!, Just Add Ink, A Good Man, Celebrate You Thinilts, Chevron Embossing Folder, Masculine Card

I really wasn't sure what to put on the inside of the card, so I ended up making it a masculine card by stamping the image and sentiment from A Good Man. I feel like the front could be either masculine or feminine, but the inside is definitely masculine. What do you think?

That's all from me for tonight - I'm off to enjoy my weekend! The Royal Adelaide Show should have been on this week, but it was cancelled due to COVID. My kids still get an extra long weekend off from school, so it will be nice to have four days at home with them.

Please jump on over to the Just Add Ink Blog to see the cards that the rest of the Design Team have created. You can also add your card to the link gallery. I can't wait to see what you do with these colours.

Bye for now,

Tina

Sunday, 16 February 2020

CTC #263 Week 1: CASE The Kerchief Colours

Hi!


Hello, and welcome once again to the CASEing The Catty Sunday Challenge Blog Hop. I'm the first stop on this week's blog hop, so you may have come here from our Facebook group, or you may have come from Judy's blog. Either way, just keep hopping until you get back to where you started!


This fortnight we are CASEing the colours of the Kerchief Card Kit. There are a heap of colours (Balmy Blue, Coastal Cabana, Early Espresso, Gold, Mossy Meadow, Night of Navy, Petal Pink, Pear Pizzazz, Poppy Parade, White), so there are lots and lots of options. I recently received the card kit, and so I pulled it out to inspire some creativity. I naturally lean towards blues, so this week's cards focus on that side of the palette. I thought it would be pretty to punch some butterflies from the floral part of the card, and that naturally led to making a paid of Floating Frame cards.

scissorspapercard, Stampin' Up!, CASEing The Catty, Label Me Bold, Itty Bitty Birthdays, Peaceful Moments, Kerchief Card Kit SAB, Floating Frame Technique

Have you tried your hand at Floating Frame cards yet? They were all the rage about a year ago, and I haven't made one for a while. I punched as many butterflies as I could from the front of the pre-stamped card. I was so right about the butterflies looking pretty in the floral print!

scissorspapercard, Stampin' Up!, CASEing The Catty, Label Me Bold, Itty Bitty Birthdays, Peaceful Moments, Kerchief Card Kit SAB, Floating Frame Technique

This first card features most of the butterflies. The Press 'n' Seal pulled off a bit of the top layer as I peeled it away, but I decide to just go with the distressed look to some of the butterflies. I cut a Stitched Circle and layered it under a Subtle embossed layer for my sentiment. The gaps in the front were filled with gold sequins.

scissorspapercard, Stampin' Up!, CASEing The Catty, Label Me Bold, Itty Bitty Birthdays, Peaceful Moments, Kerchief Card Kit SAB, Floating Frame Technique

A couple of spare butterflies were used to finish off the inside.

scissorspapercard, Stampin' Up!, CASEing The Catty, Label Me Bold, Itty Bitty Birthdays, Peaceful Moments, Kerchief Card Kit SAB, Floating Frame Technique

The second card uses the butterflies cut from the centre of the first card. A larger gold Stitched Circle layers underneath, and the background is embossed sing the Subtle 3D Embossing Folder. A Sentiment from Label Me Bold finished off the front of the card.

scissorspapercard, Stampin' Up!, CASEing The Catty, Label Me Bold, Itty Bitty Birthdays, Peaceful Moments, Kerchief Card Kit SAB, Floating Frame Technique

I had run out of Kerchief butterflies, so I used a gold one to complete the inside, LOL!

You have two weeks to get your card made and entered into our challenge. It's super easy - just photograph your card and post it to our Facebook group. Done!


Now it's time for you to hop on over to Michelle's blog. Au revoir 😉


Bye for now,

Tina

Sunday, 26 May 2019

CTC #230: Favourite Big Shot Project

Hi!


Gosh, these Sunday's seem to be rolling around quickly! That's good, though, as that means it's time for the CASEing The Catty Sunday Challenge Blog Hop. This week we are CASEing our Favourite Retiring Big Shot Project. Whether you came from Julia's blog, or are starting here, just keep hopping until you get back to where you started.


Once again, I have far too many favourites to pick just one, so I decided to go with a die set that I thought hadn't seen enough love from me - the Window Box Frameilts. They are a fun set that is designed to make a sweet octagonal box, but I mostly got the set so that I could make a pop up card with it. Sadly, I didn't ever make one, so this was my chance to do so.

scissorspapercard, Stampin' Up!, CASEing The Catty, Broadway Bound SDSP, Window Box Thinlits, Celebrate You Thinlits, Stitched Nested Labels Dies, Itty Bitty Birthdays, Pop Up Card

I have a friend trying 50 next month, so I decided that this would be an extra special card for him. I know his party colours are black and red, so the Broadway Bound SDSP was the perfect choice! I followed this tutorial to make the card base. It was very easy to follow, but she doesn't tell you which flaps to chop off, so do look at the pictures closely!

scissorspapercard, Stampin' Up!, CASEing The Catty, Broadway Bound SDSP, Window Box Thinlits, Celebrate You Thinlits, Stitched Nested Labels Dies, Itty Bitty Birthdays, Pop Up Card

The word 'celebrate' is held up with two thin strips of Window Sheet. I cut two of the words and sandwiched the ends of the acetate between them. I then adhered the bottom the strips to the flap in the middle of the card.

I decided to add 50 balloons to the card - that's a lot of fussy cutting! I adhered some flat, but a lot of them were adhered using Dimensionals to give added dimension. Some even had two layers of Dimensionals to pop them out even further!

scissorspapercard, Stampin' Up!, CASEing The Catty, Broadway Bound SDSP, Window Box Thinlits, Celebrate You Thinlits, Stitched Nested Labels Dies, Itty Bitty Birthdays, Pop Up Card

Here's a look at the back of the card - the only place to write a message! The writing panel also adds some strength to the back to keep it standing straight.

scissorspapercard, Stampin' Up!, CASEing The Catty, Broadway Bound SDSP, Window Box Thinlits, Celebrate You Thinlits, Stitched Nested Labels Dies, Itty Bitty Birthdays, Pop Up Card

The beauty of this card is that it folds flat to allow it to be mailed. Well, flatish after all the Dimensionals I used! This card will be given in person, though, so I didn't mind that it got a bit bulky.

That's it for me! Will you join or challenge this week? What's your favourite retiring Big Shot item? Is it a die set, or maybe an embossing folder? Your can enter our challenge over in our Facebook group.


Before you do, don't forget to finish the blog hop. There's lots of lovely projects to see, including Michelle's Medallion card, which is up next!


Bye for now,

Tina

Tuesday, 19 February 2019

Petals In The Springtime

Hi!


Tuesday night means it's time for the Art With Heart Colour Creations Blog Share. I've lost count of the number we are up to, but we are well past half way, and I'm impressed that I've managed to join in every week so far. Hopefully I haven't jinxed myself by saying that!

scissorspapercard, Stampin' Up!, Art With Heart, Colour Creations, Thoughtful Banners, Beautiful Bouquet, Subtle DTIEF, Springtime Impressions Thinlits, Celebrate You Thinlits

It's Petal Pink this week, which isn't a colour I particularly like. It's a little on the coral/peach side of the pinks and I prefer a pinker pink, if you know what I mean! It is a useful pink though, great for Caucasian skin tones, among other things. Anyway, on to the card! I used the partial die cutting technique to create the band across the middle of the Springtime Impressions Thinlit for the sentiment. I love how it creates one seamless piece for the front of the card.

scissorspapercard, Stampin' Up!, Art With Heart, Colour Creations, Thoughtful Banners, Beautiful Bouquet, Subtle DTIEF, Springtime Impressions Thinlits, Celebrate You Thinlits

To get the band, I lightly drew two lines across the Whisper White cardstock to mark where I wanted the band. I then ran my sandwich through the Big Shot, with one end of the top plate lined up with one of the lines. The older style plates with the straight edges work best for this technique. I then repeated for the other line. I then used my trimmer and snips to cut along the two lines, but just to remove the excess cardstock, I didn't cut through the die cut design. Does that make sense? If not, google it - Jennifer McGuire has a great video tutorial.

scissorspapercard, Stampin' Up!, Art With Heart, Colour Creations, Thoughtful Banners, Beautiful Bouquet, Subtle DTIEF, Springtime Impressions Thinlits, Celebrate You Thinlits

I finished the inside with a few of the coordinating flowers from the die set, adding a sequin to each centre to add a bit of glitz.  This card will go to Ada's dance teacher, who is getting married in April. She likes her glitz!

Time to pop on over to Catherine's blog, where you can find the links to the rest of this week's Colour Creations cards.

Bye for now,

Tina

Sunday, 17 February 2019

CTC# 215: Sale-A-Bration

Hi!


Welcome to the Sunday evening CASEing The Catty Blog Hop. The blog before mine was the lovely Monique's. Did you start there, here or somewhere else? Doesn't matter - just keep hopping until you get back to where you started.


Tonight we are CASEing the Sale-A-Bration catalogues - that's right, there are two catalogues now! Did you know that the second release products are now available to customers? They are gorgeous! Mine did not arrive in time for tonight's card, so I have CASEd a colour combo from the new SAB brochure.


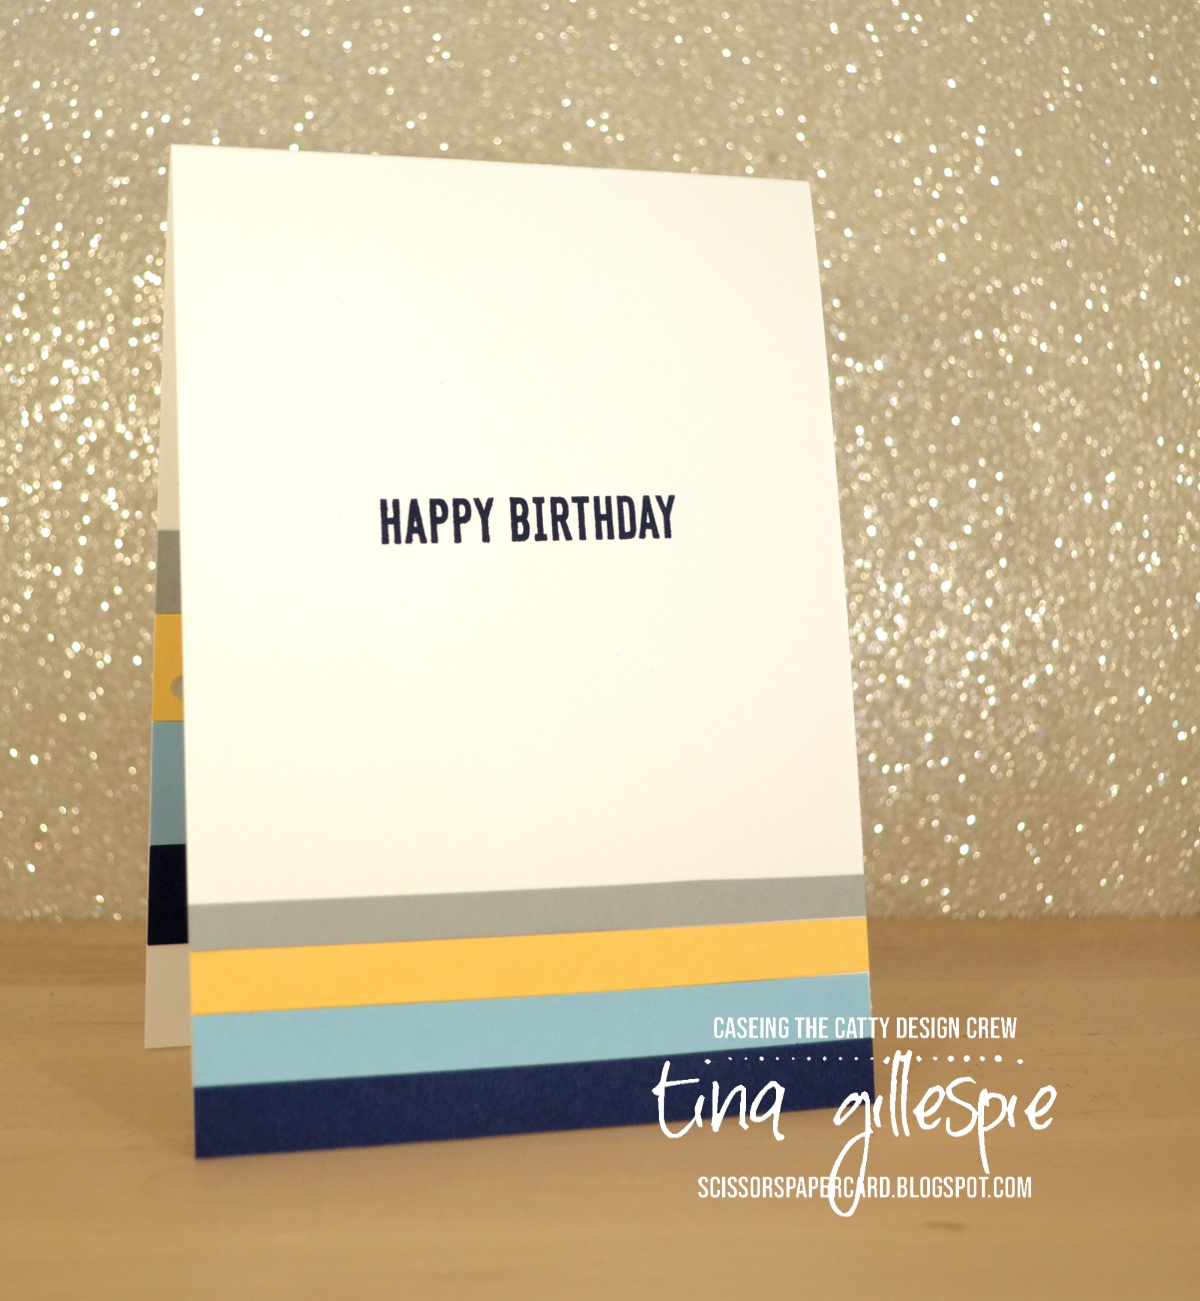
The colours in this card really caught my eye - it's a masculine combo that is still quite light and fresh. I saw Balmy Blue, Night Of Navy, Smoky Slate, So Saffron, Whisper White and Silver Foil.

scissorspapercard, Stampin' Up!, CASEing The Catty, Celebrate You Thinlits, Itty Bitty Birthdays, Male Card

To make my card I simply took strips of the four main colours and trimmed them to the same width as the card base. I used scraps of card, so none of them are the same height as any of the others. I like the random look - do you?

scissorspapercard, Stampin' Up!, CASEing The Catty, Celebrate You Thinlits, Itty Bitty Birthdays, Male Card

I used some Silver Foil card for the sentiment. It adds a fun touch to the card, I think. The rest of the sentiment was from the new Itty Bitty Birthday stamp set. I simply trimmed the two words I wanted after I'd stamped the whole sentiment.

scissorspapercard, Stampin' Up!, CASEing The Catty, Celebrate You Thinlits, Itty Bitty Birthdays, Male Card

For the inside I used the same cardstock to create the stripes, they are just half the height of the ones I used on the front. Do you decorate the insides of your cards? To me they don't look finished until I do!

That's it for me tonight, you can join in the fun over at the Facebook group. No need for anything fancy, just join the group and start uploading your cards for each challenge.


For now, though, you're off to the lovely Shannon's blog, where she's got some wonderful SAB inspiration for you.


Bye for now,

Tina

Thursday, 13 December 2018

JAI # 348: Just Add Colour

Hi!

Welcome to Friday!


This week Nikki has set the new Just Add Ink challenge. Check out the colours she's chosen:


Hmmm, what will you add to Lovely Lipstick and Granny Apple Green? I chose Pacific Point to keep the colours (sort of) primary.

scissorspapercard, Stampin' Up!, Just Add Ink, Thoughtful Banners, Celebrate You Thinlits, Confetti Punch

I've had such a full on week that I had about half an hour to make my card, photograph it and edit it ready to go on my blog. I *had* to make something quick and simple, but I wanted a big impact. I think I achieved it! I stared by die cutting the 'amazing' from Lovely Lipstick cardstock, gluing it down and then stamping 'you are' in Pacific Point.

scissorspapercard, Stampin' Up!, Just Add Ink, Thoughtful Banners, Celebrate You Thinlits, Confetti Punch

I'd originally cut some stars with a retired star punch that came in a trio with a heart and a flower. Remember that one? It was too big though, so after a quick scrounge in my retired products basket I found the Sprinkles Confetti punch and used the star from that. Much better! You may not see in the photo, but I added some Wink Of Stella to the word and stars for a tiny touch of glimmer.

scissorspapercard, Stampin' Up!, Just Add Ink, Thoughtful Banners, Celebrate You Thinlits, Confetti Punch

I finished off the inside with a couple of Wink Of Stella'd stars after I'd stamped the thank you. It's from the Thoughtful Banners set, as was the 'you are' on the front.

So, which colour will you choose to pair with our two colour this week? I'll be very interested to see! You can add your blog to the list over at Just Add Ink, where you can also see what colours the Design Team chose to use.

Bye for now,

Tina

Thursday, 6 December 2018

JAI #437:Just Add I

Hi!

Welcome to the end of the week, the start of the weekend (yay!) and a new challenge!


This week at Just Add Ink it's one of my alphabet challenges. The letter up for duty this week is the letter I, which *really* got the Design Team thinking!


After a bit of thought, I decided I'd go with the Inlaid Die Cuts technique. Once you get your head around it, it's not tricky, just a bit time consuming. Here's my card, and then I'll explain!

scissorspapercard, Stampin' Up!, Just Add Ink, Wood Textures DSP, Best Route DSP, Celebrate You Thinlits, Bottles and Bubbles Framelits, Itty Bitty Birthdays

It's called inlaid, because even with all of those die cuts (I think there were 8!), the card front is completely flat - nothing sticking out at all.

scissorspapercard, Stampin' Up!, Just Add Ink, Wood Textures DSP, Best Route DSP, Celebrate You Thinlits, Bottles and Bubbles Framelits, Itty Bitty Birthdays

After cutting the card base in Wood Textures DSP, I then die cut it using the largest Layering Circle. I then cut the same. circle from Best Route DSP and inlaid the circle into the base, holding it in place with washi tape on the back. Next was the two straws (you work from the back of the design to the front), then the brown bottle, red label, green bottle, orange label, and finally the white 'celebrate'. Each time you replace the piece you cut from the design with a fresh piece that is held in place at the back with washi. The hardest part was the sentiment, as there are a whole lot of little bits that have to be stuck back down - all the little bits in the loops of each letter. I was a little frightened to do the celebrate in case I stuffed up all the work before it, but thankfully it worked!

scissorspapercard, Stampin' Up!, Just Add Ink, Wood Textures DSP, Best Route DSP, Celebrate You Thinlits, Bottles and Bubbles Framelits, Itty Bitty Birthdays

I used the same technique on the inside to make the bottle. This time I just cut a bottle from DSP. On the front I cut them from Whisper White and brayered on the colour. The label on the inside bottle is the one I cut from the green bottle on the front. As it was one of the last layers it was one of the only useable pieces left!

You can see what the rest of the super imaginative Design Team have created over at the Just Add Ink blog. Pleas join in the fun - link up your "I" cards over there too.

Bye for now,

Tina

Tuesday, 23 October 2018

A Balloon Celebration For Granny

Hi!

Are you enjoying seeing the different colours each week in the Colour Creations Blog Share? I am!


This week we are looking at Granny Apple Green, one of the new greens in our colour range. It's a lovely, bright green that is true to the Granny Apple Green name. It's a softer bright green, if that makes sense to you!

scissorspapercard, Stampin' Up!, Art With Heart, Colour Creations, Balloon Celebration, Celebrate You Thinlits, Shimmer Paint

I had a lot of fun with the colour this week, seeing how many shades I could get from the colour. I've seen this style of card with the ombre balloons around the Internet a bit and I've been wanting to try it. This seemed like the perfect time. I started with the colour full strength at the top, and slowly worked my way down the cardstock each time I stamped it, so that it got lighter as it got closer to the bottom. Here's a hint if you want to try this: if you stamp a balloon half way off the cardstock, don't stamp the second generation balloon completely on the cardstock - you'll end up with a balloon that is part ark and part light. Not a good look! To get around it, I either stamped off on scrap paper or made sure that when I stamped second or third generation I stamped less of the balloon, so that the darker areas were always off the cardstock.

scissorspapercard, Stampin' Up!, Art With Heart, Colour Creations, Balloon Celebration, Celebrate You Thinlits, Shimmer Paint

To give the card a bit more zing to go with the Silver Foil edges, I also stamped some balloons over the top using Frost White Shimmer Paint on my stamp. I've darkened the photo a little so that you can see it better. The 'celebrate' die cut was cut from vellum, and I hid chopped up Mini Dimensionals behind the sequins. I didn't want to go to all that effort with the balloons and then hide them behind a big sentiment!

scissorspapercard, Stampin' Up!, Art With Heart, Colour Creations, Balloon Celebration, Celebrate You Thinlits, Shimmer Paint

Some more balloon-y fun on the inside. Once I got going on the balloons, I really couldn't stop!

As always, you can find the rest of this week's cards over at Catherine's blog. I can't wait to see what fun everyone has had with Granny Apple Green!

Bye for now,

Tina