Pages

Sunday 29 November 2020

CTC #296: Step Up a Mini Catalogue Project

 Hi!


Thank you for jointing me for the new CASEing The Catty Sunday Challenge Blog Hop. This week Bec has challenged us to take a project from the August-December Mini Catalogue and step it up.


So what does 'step it up' mean? Pretty much just to make it a bit more fancy or complicated - or a lot more if you're like me and just can't help yourself!


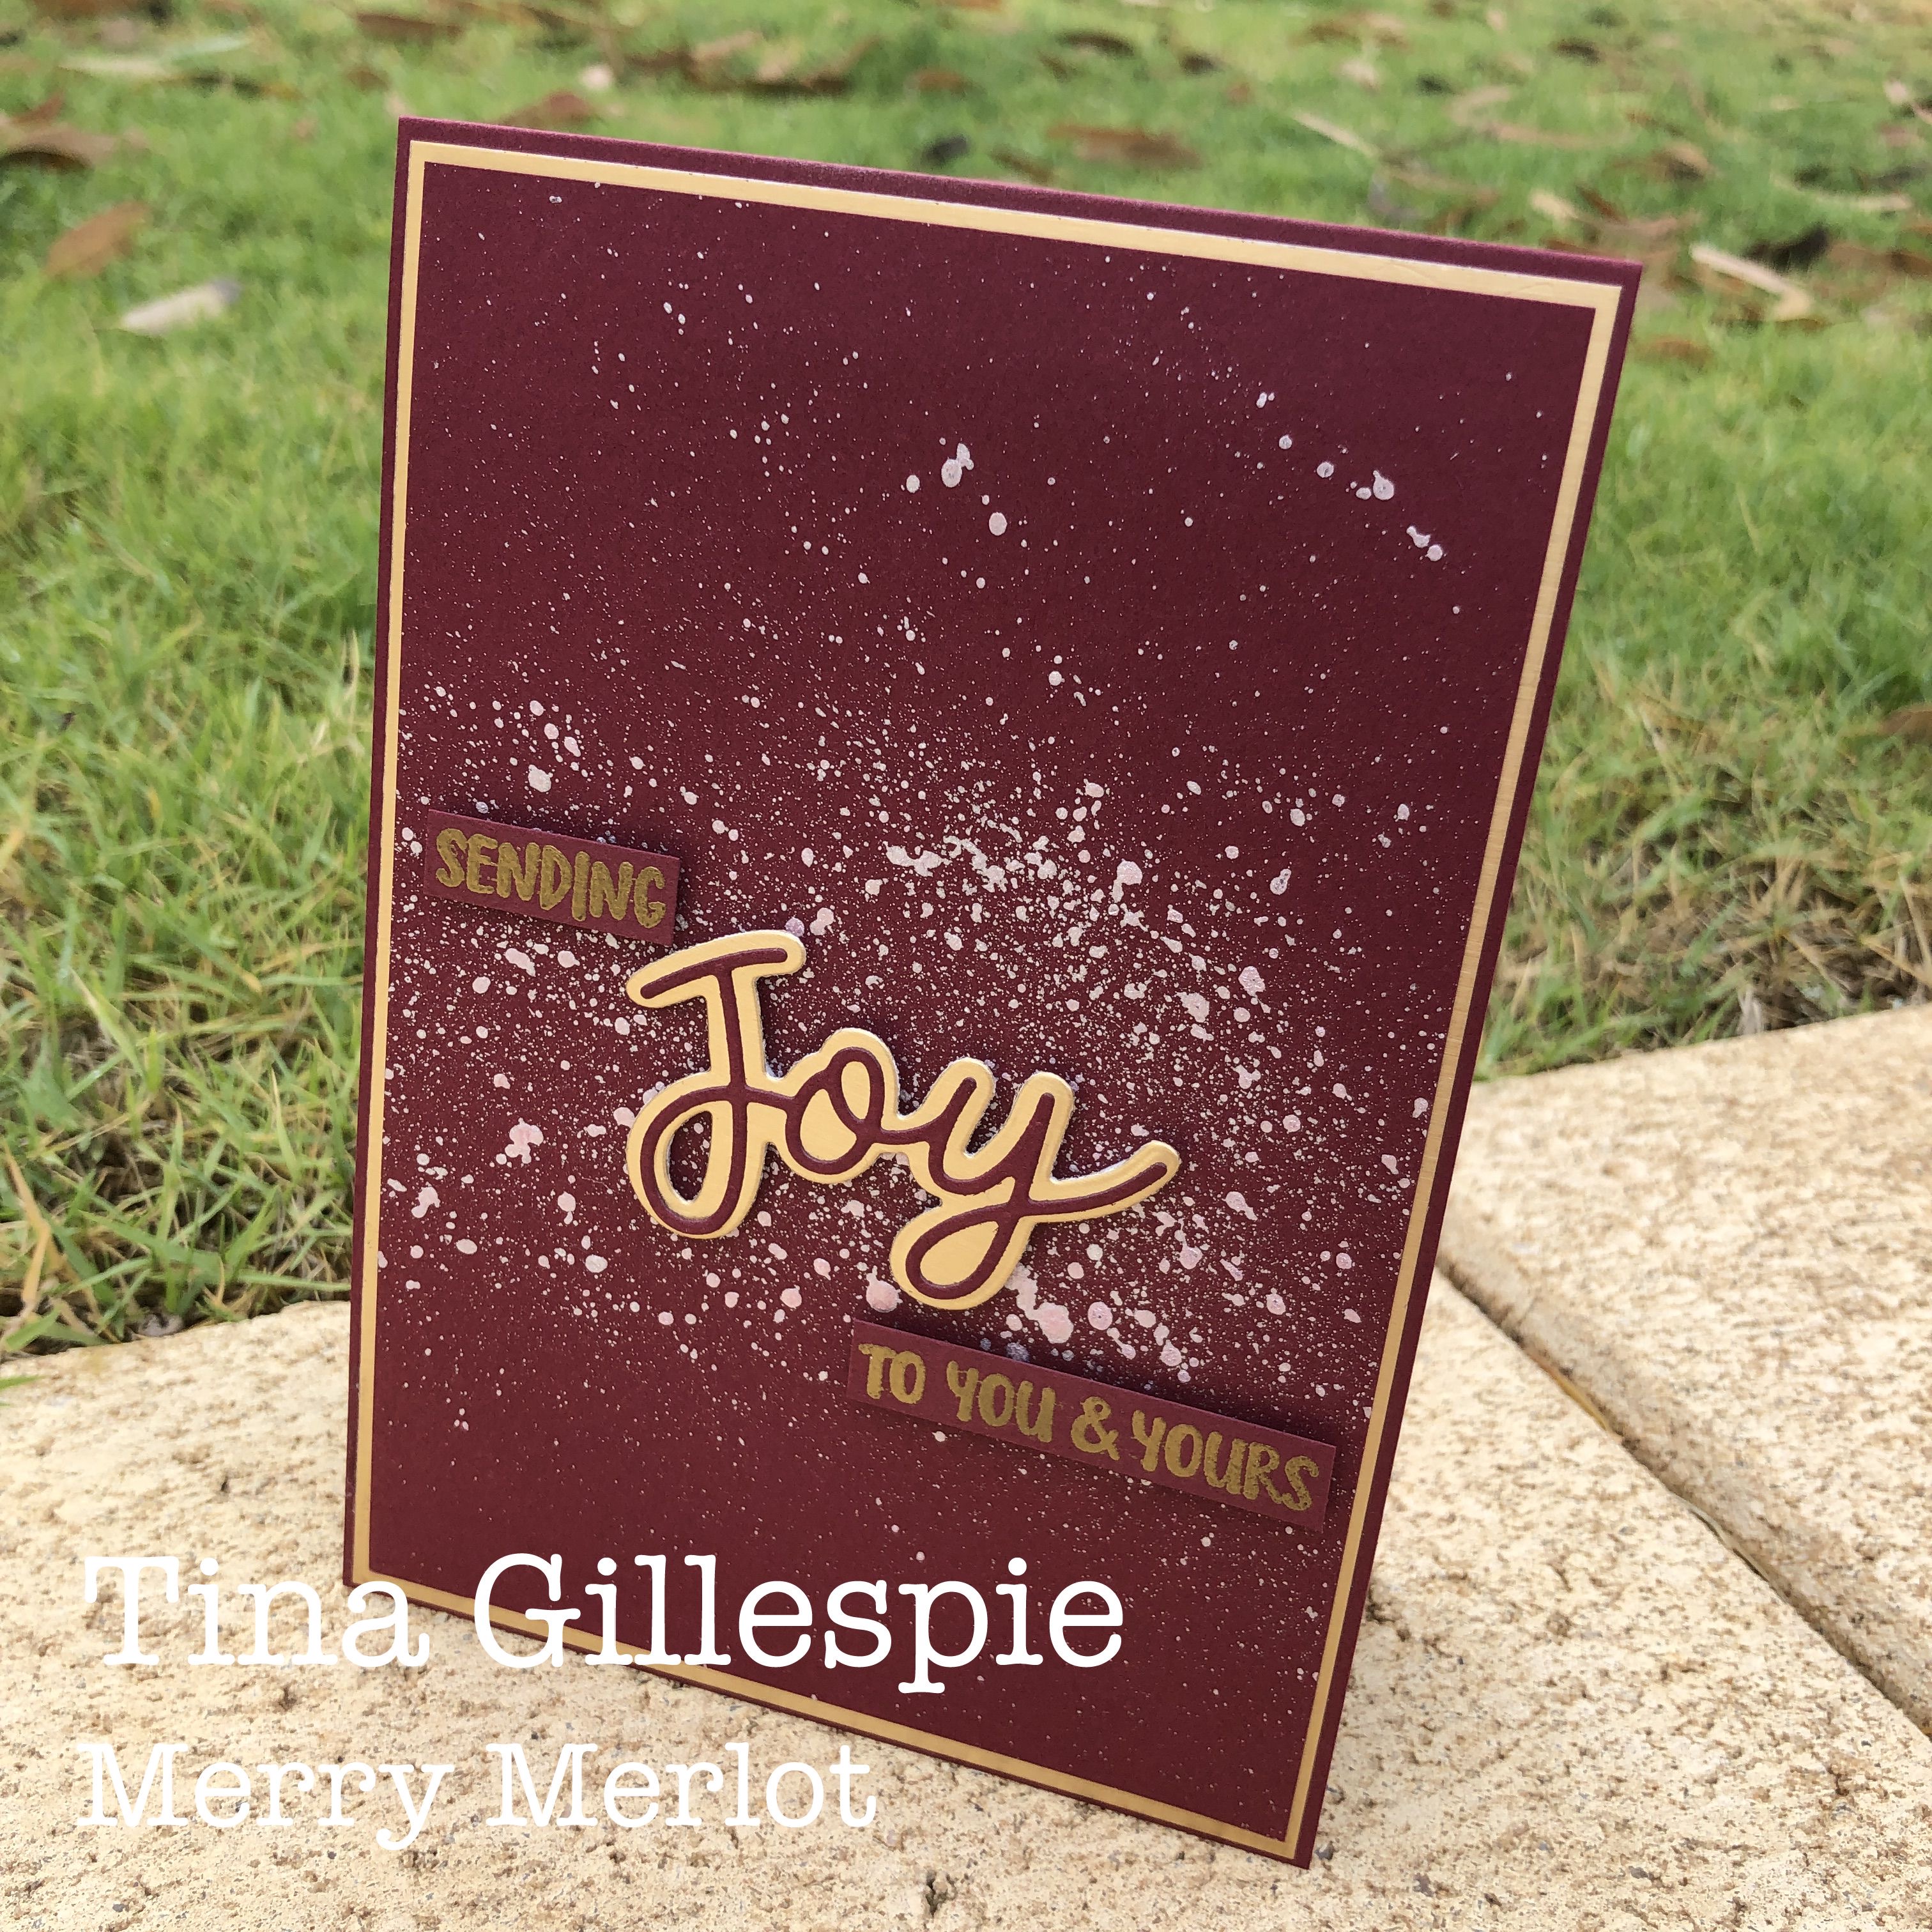
I had a hankering to use the Warm & Toasty stamp set, so I decided to CASE one of the samples that used the stamps. I kept my layout pretty much the same, and just tweaked a few things.

scissorspapercard, Stampin' Up!, CASEing The Catty, Warm & Toasty, Joy To The World, Winter Snow EF, Subtle 3DEF, Layering Ovals Dies, Stitched Rectangles Dies, Faux Mother-Of-Pearl Technique

One of the easiest ways to step it up is to add layers. In my case, I added a Silver Foil layer to the card base, and a Purple Posy layer under the focal Silver Foil Oval. I made the sentiment panel a little fancied by using a Stitched Rectangle die to crop it.

scissorspapercard, Stampin' Up!, CASEing The Catty, Warm & Toasty, Joy To The World, Winter Snow EF, Subtle 3DEF, Layering Ovals Dies, Stitched Rectangles Dies, Faux Mother-Of-Pearl Technique

My favourite part of the card, though, is the background. The sample used alternating strips of DSP, but I went a lot fancier. I started by embossing a piece of Whisper White cardstock with the Winter Snow embossing folder. I then used the Faux Mother-Of-Pearl technique over the top. To do this I used scrunched up plastic wrap to apply Frost White Shimmer paint to the card in a pouncing motion. Once dry I used my blending brushes to add some Balmy Blue, Blushing Bride and Purple Posy ink over the top. It's so shimmery and pretty - but very hard to photograph!

scissorspapercard, Stampin' Up!, CASEing The Catty, Warm & Toasty, Joy To The World, Winter Snow EF, Subtle 3DEF, Layering Ovals Dies, Stitched Rectangles Dies, Faux Mother-Of-Pearl Technique

I had a left over strip of the piece to use on the inside. The sentiment here is from the Joy To The World Paper Pumpkin kit. Have you got your's yet? It's such a lovely kit!

To join in our challenge, all you need to do is add a photo of your card to our Facebook group. You don't need a blog or any fancy photography equipment, just join the group and away you go!


Before you get creating though, please do finish our Blog Hop. Next up is the lovely Sandra with her gorgeous floral cards. You won't want to miss them!


Bye for now,

Tina

Wednesday 25 November 2020

Colour Creations: Merry Merlot

 Hi!


welcome once gain to this week's Colour Creations Creative Showcase. It's time for Merry Merlot, which has more than one meaning after my busy week!! It's not a colour I use a lot, but I do like the rich red, which is part of the Neutrals colour family.

scissorspapercard, Stampin' Up!, Colour Creations, Joy To The World, Joy Dies, Shimmer Paint, Christmas Card

I've paired it with the Brushed Metallics from the Mini Catalogue, specifically the Gold sheet. It's such a rich colour combo. I also used some Frost White Shimmer Paint. I splattered it over the front of the card, focussing on the middle section and tapering off towards the top and bottom. I love the look! 

scissorspapercard, Stampin' Up!, Colour Creations, Joy To The World, Joy Dies, Shimmer Paint, Christmas Card

The Joy Dies combined perfectly with the Joy To The World stamp set over the top of the splatters. I heat embossed the sentiment in Gold to match the Brushed Gold Foil.

scissorspapercard, Stampin' Up!, Colour Creations, Joy To The World, Joy Dies, Shimmer Paint, Christmas Card

The inside was kept super simple, with just the larger sentiment from Joy To The World stamped in Merry Merlot.

That's all from me tonight, please pop on over to Catherine's Blog, where you'll find the rest of this week's Merry Merlot cards. I'm off to enjoy a sip on the lounge!

Bye for now,

Tina

Sunday 22 November 2020

CTC #295: CASE The Inside AC Cover

 Hi!


Thanks for joining me on a hot and thundery Sunday evening for the new CASEing The Catty Sunday Challenge Blog Hop. Was it hot and thundery where you were? It certainly was here in Adelaide!


This week for our challenge, we are CASEing these In Colour cards from the inside cover and page 1 of the Annual Catalogue. 


I quite liked the split in this card, with the sentiment stamped in the gap, so that's what I took from the sample card to make mine.

scissorspapercard, Stampin' Up!, CASEing The Catty, Seaside Notions, Whale Of A Time DSP

I've only recently purchased the Whale Of A Time DSP, so this was a good excuse to play with it again.I chose the seahorse paper, as it was a pretty, all-over pattern like the floral on the original card. However, I decided to split my paper horizontally rather than on the diagonal. I adhered the DSP to some pieces of Thick Whisper White, leaving a small border as there was a similar border on the original.

scissorspapercard, Stampin' Up!, CASEing The Catty, Seaside Notions, Whale Of A Time DSP

The sentiment from Seaside Notions was heat embossed in White on the card base. I felt that the card was too plain, so I also heat embossed a seahorse from the same stamp set on Watercolour Paper and coloured it with Just Jade ink.

scissorspapercard, Stampin' Up!, CASEing The Catty, Seaside Notions, Whale Of A Time DSP

I used the left over piece of DSP on the inside of the card. I normally wouldn't use such a big piece, but I didn't want to lose the Seahorses by cutting it in half. I will just have to write my message a little smaller!

We'd love to see which of the five cards inspires you to CASE it. Will you CASE the whole card, or just elements of it? When you've made your card, please post it in our Facebook group. We'd all love to see it.


For now though, please do continue on with the Blog Hop. Next up is my lovely friend, Rachel. Her lovely projects are what convinced me that I had to have the Whale Of A Time DSP!

Bye for now,

Tina

Thursday 19 November 2020

JAI #532: Just Add A Sketch

 Hi!


Hello, and welcome back to the new Just Add Ink Challenge. This week we have a cool sketch, designed by Patrice.
My oldest son graduated High School recently. Due to a new COVID 'circuit breaker' lockdown in Adelaide, his formal was cancelled. We did a little celebration for him at home, which included strawberry cake and red and gold star shaped balloons. Can you tell what his favourite colour is? LOL! I decided that I would make him a card to mark this huge occasion in his life.

scissorspapercard, Stampin' Up!, Just Add Ink, Well Said, Stitched Stars Dies, Stitched Rectangles Dies, Dainty Diamonds 3DEF, Foil Cardstock

I stuck with the red and gold stars theme, using my Stitched Stars Dies and Red and Gold Foil to cut the starry flourish and large star for the front. The word 'congratulations' is from Well Said, and is cropped using my Stitched Rectangles Dies.

scissorspapercard, Stampin' Up!, Just Add Ink, Well Said, Stitched Stars Dies, Stitched Rectangles Dies, Dainty Diamonds 3DEF, Foil Cardstock

You can see that I've also used my Dainty Diamonds EF on the background. I thought that it worked well with the stars without being too girly.

scissorspapercard, Stampin' Up!, Just Add Ink, Well Said, Stitched Stars Dies, Stitched Rectangles Dies, Dainty Diamonds 3DEF, Foil Cardstock

I cut a few smaller Red Foil Stitched Stars for the inside, and complimented them with the Gold Foil stars that popped out of the flourish on the front.

You can join in the fun over on the Just Add Ink Blog. Once you've checked out the rest of the DesignTeam cards, you can add your card to our linky. I can't wait to see what you do with this sketch!

Bye for now,

Tina

Wednesday 18 November 2020

Colour Creations: Melon Mambo

 Hi!


Thanks for joining me on another Tuesday evening for the new Colour Creations Showcase. This week we are all using Melon Mambo in our creations. Many years ago, the release of Melon Mambo as an additional In Colour was the start of the process of bringing the South Pacific market into line with the North American market. Although it's not a colour that I use a lot, it has that special little place in my SU journey.

scissorspapercard, Stampin' Up!, Colour Creations, Timeless Tulips, Stitched Shapes Dies, Painted Labels Dies, Stamparatus

I paired it with a stamp set that I don't use a lot either - Timeless Tulips. I was inspired by some cards by Michelle Taylor recently. She's the queen of In The Round stamping, or wreath stamping, where you use your Stamparatus to stamp in a circular design. My base layer has the largest tulip flower stamped either time in a circle. I layered a piece of Vellum, cropped with the swirly Painted Labels Die, over the top. I also teased out a length of the Forever Greenery Gold Thread and layered it over the Vellum.

scissorspapercard, Stampin' Up!, Colour Creations, Timeless Tulips, Stitched Shapes Dies, Painted Labels Dies, Stamparatus

Finally, I used my Stamparatus again to stamp the smallest tulip bud in the round. I fussy cut around the edge and them popped it up over the other layers. The smallest circle Stitched Shapes Die was the perfect space for the sentiment.

scissorspapercard, Stampin' Up!, Colour Creations, Timeless Tulips, Stitched Shapes Dies, Painted Labels Dies, Stamparatus

I layered the same two tulips on the inside, this time on the straight instead of in the round. I didn't usually pop up elements on the inside, but I felt that the row of smaller tulips needed it.

As always, it's time to pop on over to Catherine's blog, where she's hosting all of the rest of this week's Melon Mambo links. I can't wait to see what everyone does with this bold colour!

Bye for now,

Tina

Monday 16 November 2020

Heart Of Christmas: November

 Hi!


Welcome to November's Heart Of Christmas Creative Showcase! It's a monthly showcase devoted to Christmas. I don't know about you, but at around this time of year I start worrying that I don't have enough Christmas cards. I usually send close to 100, so I need a lot! In order to make a lot of cards in a hurry, I revisited the Double Wonder Card Template that was popular about six months ago. For those who have forgotten, it's a cutting template and instructions to create 11 cards using two 6x12 inch pieces of DSP. Shannon West and Julie Davison prepared the template and instructions.

scissorspapercard, Stampin' Up!, Heart Of Christmas, Joy To The World, Paper Pumpkin, Christmas Gleaming, Heartwarming Hugs DSP, Stampin' Blends, Double Wonder Template Cards

The card above is Card 1. The template allows you to create four of these cards. You can see that I have used the Heartwarming Hugs DSP for my cards. I think it was the perfect choice, as the small patterns work nicely together. To add a little more interest, I added some holly from the Christmas Gleaming stamp set. I coloured them with my Granny Apple Green and Real Red Blends.

scissorspapercard, Stampin' Up!, Heart Of Christmas, Joy To The World, Paper Pumpkin, Christmas Gleaming, Heartwarming Hugs DSP, Stampin' Blends, Double Wonder Template Cards

The next cards are Card 2, and you also create four of them using the template. The instructions say to score and fold back a flap on the front of the card, which I didn't do. Instead I matted the two strips on Whisper White and adhered it straight to the front.

scissorspapercard, Stampin' Up!, Heart Of Christmas, Joy To The World, Paper Pumpkin, Christmas Gleaming, Heartwarming Hugs DSP, Stampin' Blends, Double Wonder Template Cards

Next up is Card 3, of which you make two. To get the contrasting strip in the middle, I've simply used the reverse side of the two papers. I don't like those sides as much, but it looks nicer with the contrasting piece. 

scissorspapercard, Stampin' Up!, Heart Of Christmas, Joy To The World, Paper Pumpkin, Christmas Gleaming, Heartwarming Hugs DSP, Stampin' Blends, Double Wonder Template Cards

Lastly, is Card 4. The template only makes one of this card, using the final pieces from the template - nothing gets wasted!

scissorspapercard, Stampin' Up!, Heart Of Christmas, Joy To The World, Paper Pumpkin, Christmas Gleaming, Heartwarming Hugs DSP, Stampin' Blends, Double Wonder Template Cards

The template does not allow for DSP on the insides of the card, but I just couldn't help adding some! In keeping with the 'quick and easy' premise of the template, I kept all of my insides the same, apart from the orientation - a 3/4 inch strip of DSP and the same sentiment stamped in all.

scissorspapercard, Stampin' Up!, Heart Of Christmas, Joy To The World, Paper Pumpkin, Christmas Gleaming, Heartwarming Hugs DSP, Stampin' Blends, Double Wonder Template Cards

The stamp set that I've used for the front and inside is from the new Paper Pumpkin kit, Joy To The World. It's a set I really love, and I'm sure it will find it's way into my permanent collection!

scissorspapercard, Stampin' Up!, Heart Of Christmas, Joy To The World, Paper Pumpkin, Christmas Gleaming, Heartwarming Hugs DSP, Stampin' Blends, Double Wonder Template Cards

Here are all of the cards in a bunch. These cards took me a whole day to make, but a lot of that was colouring the holly. Once I got cutting and gluing, the rest of the process went very quickly. If you need a heap of cards in a hurry, I definitely recommend the Double Wonder Template!

That's all from me for tonight, please do head on over to Judy's Blog, where you'll find the rest of the links for November's Heart Of Christmas Creative Showcase. You won't be disappointed!

Bye for now,

Tina

Sunday 15 November 2020

CTC #294: CASE The Colours

 Hi!


Welcome back to the new CASEing The Catty Sunday Challenge Blog Hop. This week we have chosen a page in the Annual Catalogue, and we are CASEing the colour scheme of the cards on that page.


These cards are a great example of how to 'step up' a card design - start with a simple idea and add layers, elements and products to make it more detailed.

scissorspapercard, Stampin' Up!, CASEing The Catty, Beautiful Friendship, Story Label Punch

I haven't stamped with my Beautiful Friendship stamp set in a while, so I pulled it off my shelf for this challenge. It's a pretty set, and I thought that it would work well with the colour scheme of Blushing Bride, Petal Pink, Mint Macaron, Soft Sea Foam and Gray Granite.

scissorspapercard, Stampin' Up!, CASEing The Catty, Beautiful Friendship, Story Label Punch

I also haven't used my Story Label punch in a long time, so it was also dusted off for this card. A few rhinestones and a length of Sliver Metallic Edge ribbon, and the front was done!

scissorspapercard, Stampin' Up!, CASEing The Catty, Beautiful Friendship, Story Label Punch

I kept my stamping on the inside to one corner, so that I have plenty of room in which to write a birthday message when I give this card away.

As always, our challenge is run through our Facebook group, so you don't need a blog or a fancy camera or editing tools to join in. Just make the card, take a snap and add it to the group. Easy!


Before you race off to make your card, please do finish the Blog Hop. Next up is my fellow South Australian,  the wonderful Michelle Stradz. She's made a super sweet pair of cards.

Bye for now,

Tina

Thursday 12 November 2020

JAI #531: Just Add Inspiration

 Hi!


Welcome back for the new Just Add Ink Challenge. This week Lou has found a super cute Inspiration photo. Aren't the pompom trees adorable?


It took a bit of thinking to work out what I was going to do this week, and then I saw a video by Alisa Tilsner where she played with Stampin' Blends and Isopropyl Alcohol to create cool backgrounds.

scissorspapercard, Stampin' Up!, Just Add Ink, Itty Bitty Christmas, Forever Gold SP, Stampin' Blends, Subtle 3DEF, Alcohol Ink Blended Background, Christmas

I chose to use the following Dark Stampin' Blends: Blackberry Bliss, Pumpkin Pie, Bermuda Bay and Magenta Madness. To get the background, I simply scribbled a small circle of colour onto Vellum Cardstock using the Blend, and then dripped a drop of the alcohol onto it. You need the good stuff from Bunnings, not the chemist's rubbing alcohol. Alisa played with hers more to get a more blended look, but I wanted the dots like the pompoms in the Inspiration Photo. It's such a cool effect!

scissorspapercard, Stampin' Up!, Just Add Ink, Itty Bitty Christmas, Forever Gold SP, Stampin' Blends, Subtle 3DEF, Alcohol Ink Blended Background, Christmas

The vellum was wrapped around a piece of Whisper White card, which I've embossed with the Subtle 3DEF. I then added a Forever Gold Laser Cut element over the top. I think it's meant to be a fern leaf, but I think it works nicely as a Christmas tree! I finished the front with a white heat-embossed sentiment from Itty Bitty Christmas.

scissorspapercard, Stampin' Up!, Just Add Ink, Itty Bitty Christmas, Forever Gold SP, Stampin' Blends, Subtle 3DEF, Alcohol Ink Blended Background, Christmas

While I was playing with the larger piece of vellum, I also made a smaller piece, so that I could use it on the inside. You can see that I've blended the colours more, rather than let them form circles. I just punched the vellum with my Pine Tree Punch and ran the tree through my Xyron sticker maker so that I could adhere it to the cardstock.

I definitely think I'll be trying this technique again! In the meantime, I'll be heading off to the Just Add Ink blog, where the rest of this week's Design team cards are linked. You can also link up your card for our challenge. What inspires you from the photo?

Bye for now,

Tina

AWH Creative Showcase: 5 Supplies

 Hi!


Thanks for joining me for the November Art With Heart Creative Showcase. This month we have been challenged to make a project using only 5 supplies. We decided that things like adhesives, snips, clear blocks, trimmers, etc did not count in our limit, but other things like DSP, ink, stamp sets, etc do count!

I decided to use the opportunity to crack open one of the DSP packs that I purchased in the recent DSP sale - Whale Of A Time DSP. I was really attracted to the scenes in the DSP, so that's the direction I went on my card. I actually came in 'under budget' on my supply list - I only used 4! They were the Whale Of A Time DSP, Thick Whisper White cardstock, Seaside Notions and my Pacific Point ink pad.

scissorspapercard, Stampin' Up!, Creative Showcase, Whale Of A Time DSP, Seaside Notions

I started by trimming the DSP to size and adhering it to a Thick WW card base. I trimmed an inch off either side of the DSP, as I wanted the beam of light at the top of the paper to stay in the middle of the card. Normally, I'd use a darker card base that coordinated with the DSP, but that would have been an extra item on my 5 supplies list. By making the DSP edge to edge, it doesn't matter what colour the base is!

scissorspapercard, Stampin' Up!, Creative Showcase, Whale Of A Time DSP, Seaside Notions

The fish were roughly cut from another sheet of the DSP and glued to some scraps of Thick WW, before being fussy cut and popped up on the front. I had planned to stamp the sentiments on WW, but they would have been a bit too glaring white. Instead, I stamped them on the water section of one of the pieces cropped from the sides of the DSP I used on the front. This way, they match perfectly! So that they matched the fish with the darker blue border, I glued the fussy cut sentiments to the dark blue part of the DSP that the fish came from. It's the sheet with the fish swimming around the edge. I then fussy cut them again to give the blue border.

Before I move on - did you catch the pun in the sentiment? Birthday 'fishes' to you! LOL!

scissorspapercard, Stampin' Up!, Creative Showcase, Whale Of A Time DSP, Seaside Notions

I had one last strip of DSP that I trimmed from the piece I used on the front of the card. I cut it in half and adhered one piece on either side of the inside, with a piece of Thick WW adhered over the top. It's a cool way to use a scrap, don't you think? I couldn't resist adding another little fishie!

It was a bit harder than I thought, making a card with limited supplies! I tend to make things up as I go along, but limited supplies requires a little more planning and thought. It was certainly fun to try though. I hope you're keen to see what the rest of the ladies participating in the Creative Showcase tonight have made. Pop on over to Rachel's blog, where you'll find the rest of this month's links.

Bye for now,

Tina