Hi!
Thanks for popping back to check out what the Just Add Ink team are doing for our new challenge. This week Lou has challenged us to add an Easel to our creations.
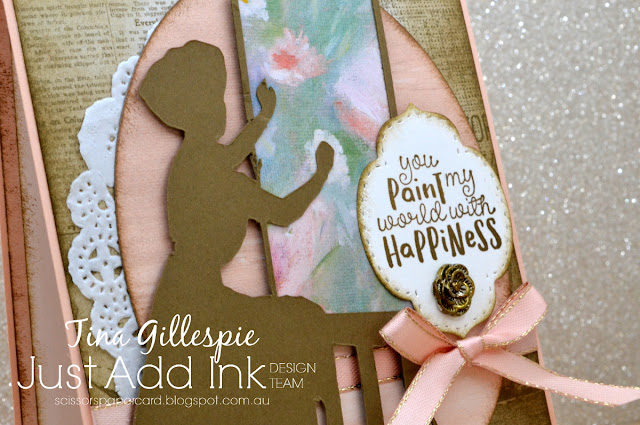
There are *lots* of different types of Easel Cards out there, but I decided to do something a little different and actually use an easel image on my card. I don't have any stamps or dies, so I googled free easel clip art, and when I found one I liked I cut the shape on my Scan 'n' Cut.
I really loved this vintage woman. Check out the hairstyle! I'm sure it was very fashionable over 100 years ago. This image set the tone for the card - I went for vintage colours and papers. The newsprint behind the image is from the Come Sail Away DSP pack. I tried to cut a piece that wasn't obviously sailing related, and then inked the edges to age it further.
Perennial Essence DSP was the perfect choice for the artwork, don't you think? I used another piece from the pack to cut the oval background. This sentiment from It Starts With Art was also perfect for the card. The metal flower underneath is from the retired Share What You Love Embellishment kit. I aged the silver flower by colouring over it with my Bronze Stamping' Blend.
I'm not entirely sure what I'll use this card for - I guess it could be anything, depending on what I write on the inside!
I hope you have a lot of fun thinking of easel ideas for our challenge at Just Add Ink. I can't wait to see what you make!
Bye for now,
Tina
Thursday, 30 January 2020
Sunday, 26 January 2020
CTC #261 Week 2: Sale-A-Bration
Hi!
Australia Day or not, it's time for our weekly CASEing the Catty Sunday Challenge Blog Hop. As it's Week 2 of the challenge, we are still CASEing anything from the Sale-A-Bration catalogue. Flicking through, this Lily card with the die cut ombre background caught my eye. I love blue, so I think it was natural that I was drawn to it.
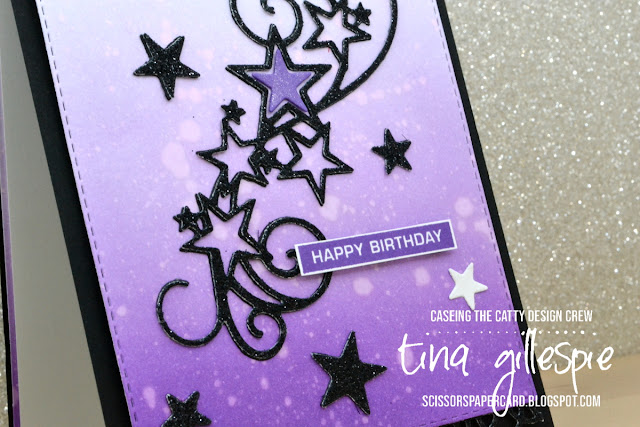
If you've been following my blog for a while, you know that I love a good sponge brayered ombre background, so that's how I chose to CASE this card. It was tempting to use the blues, but I decided in the end to use purples - Purple Posy, Highland Heather and Gorgeous Grape.
It's interesting how this process shows up some of the undertones in the colours. For example, Purple Posy has a grey undertone, and you can see this at the top of the card where the purple fades out. Once I'd rolled on the three colours, I flicked some water over the top. Such a fun, cool effect!
I die cut the starry swirl from Black Glimmer paper and adhered it to the ombre background. I forgot to peel off the coating on the back of the paper, so popping out all of the little bits was a pain, but I think it was worth it! I used the stars, plus a few extra in Whisper White and Gorgeous Grape that I had floating around on my desk, to finish off the front. The sentiment comes from Label Me Bold, a stamp set I am really loving.
It's soooo hard to see, because it's very thin border, but I used the offcuts from the ombre background as a border for the Whisper White panel on the inside. When I rolled the front panel, I did a full card front sized piece for this very reason. It's a great time saver!
I'm all done, so I'm off to kick back for the rest of the Australia Day long weekend. I think I might do some sewing tomorrow. I have a quilt on the go that needs a little more work. It's for Alex's 17th birthday in April, so in theory I have plenty of time, but we all know how time can run away on us! Check out our Facebook Group for lots of inspiration, and upload your card for our Sale-A-Bration challenge.
To continue the hop, next up is the fabulous Siobhan.
Happy Australia Day! I hope you've had a lovely day doing fun things. I was up early to play in my concert band at an Australia Day breakfast, and then played later in the afternoon at a Citizenship Ceremony. I could do without the speeches, but it's always fun seeing the range of new citizens welcomed to our city.
Australia Day or not, it's time for our weekly CASEing the Catty Sunday Challenge Blog Hop. As it's Week 2 of the challenge, we are still CASEing anything from the Sale-A-Bration catalogue. Flicking through, this Lily card with the die cut ombre background caught my eye. I love blue, so I think it was natural that I was drawn to it.
If you've been following my blog for a while, you know that I love a good sponge brayered ombre background, so that's how I chose to CASE this card. It was tempting to use the blues, but I decided in the end to use purples - Purple Posy, Highland Heather and Gorgeous Grape.
It's interesting how this process shows up some of the undertones in the colours. For example, Purple Posy has a grey undertone, and you can see this at the top of the card where the purple fades out. Once I'd rolled on the three colours, I flicked some water over the top. Such a fun, cool effect!
I die cut the starry swirl from Black Glimmer paper and adhered it to the ombre background. I forgot to peel off the coating on the back of the paper, so popping out all of the little bits was a pain, but I think it was worth it! I used the stars, plus a few extra in Whisper White and Gorgeous Grape that I had floating around on my desk, to finish off the front. The sentiment comes from Label Me Bold, a stamp set I am really loving.
It's soooo hard to see, because it's very thin border, but I used the offcuts from the ombre background as a border for the Whisper White panel on the inside. When I rolled the front panel, I did a full card front sized piece for this very reason. It's a great time saver!
I'm all done, so I'm off to kick back for the rest of the Australia Day long weekend. I think I might do some sewing tomorrow. I have a quilt on the go that needs a little more work. It's for Alex's 17th birthday in April, so in theory I have plenty of time, but we all know how time can run away on us! Check out our Facebook Group for lots of inspiration, and upload your card for our Sale-A-Bration challenge.
To continue the hop, next up is the fabulous Siobhan.
Bye for now,
Tina
Thursday, 23 January 2020
JAI #489: Just Add Colour
Hi!
Its time for the new week of Just Add Ink. Yay! This week we have a little bit of a different Colour Challenge for you. Rachael has given us these five colours, and we are to choose any three.
Hmm, which ones appeal to you? Confession: I struggled for the longest time with these. I just couldn't find a combo of three that I liked! Then I picked up 'The Gang's All Meer' and inspiration struck. I went with the bottom line: Blueberry Bushel, Daffodil Delight and Call Me Clover.
I started by stamping the cacti and the lizard (iguana?) in my new Saddle Brown Stazon on Watercolour paper. I then used my selected colours (and a little touch of Sahara Sand) to watercolour my scene. I diluted the Blueberry a lot so that it worked better as a sky colour. The sun is stamped from Waterfront, as I really suck at getting a round shape freehand.
I stamped the Clover card base with the cactus and lizard in coordinating ink. The sentiment panel was finished with a mini paper clip and some white thread from the retired Share What You Love Embellishment kit. Why do I hoard these kits, only to use them once it's retired?
I finished off the inside with another cactus. I tried to add in the lizard too, but I just couldn't make him work. Next time!
Time now to pop on over to the Just Add Ink blog, where you can find the rest of this week's Design Team cards. You can also link your card up for the challenge. Which three of our colours appeal to you?
Bye for now,
Tina
AWH January Blog Hop: Sale-A-Bration
Hi!
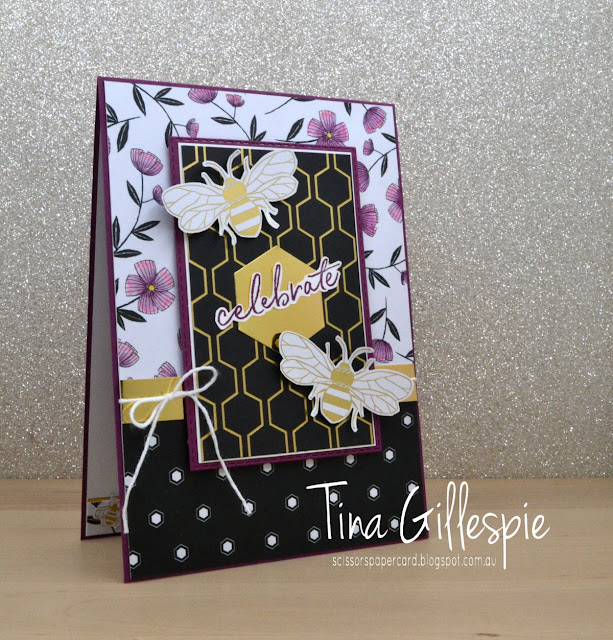
As much as I'm not into bees, I couldn't resist adding a couple of the gold foil bees to the front of my card. They were very easy to fussy cut from the DSP. I popped them up (using Black Dimensionals - yay!) over a piece of black and gold DSP. It's meant to be a honeycomb look, but I'm already trying to work out if I can get it to look like a circuit board on a future card. LOL.
The SDSP features black, gold and white, but I wanted to add some colour. After experimenting with Blends and Stampin' Write Markers, I ended up using my Watercolour Pencils. The bottom third of each flower/petal was coloured with Rich Razzleberry, and the top third with Flirty Flamingo. I then used my Wink Of Stella (what else!?!) to blend the colours into the middle third. The pop of colour is quite nice, I think!
I used a Sale-A-Bration stamp set, Happy Birthday To You, for the sentiments on my card. I also used a left over strip of my coloured flower DSP to finish the inside of the card. There wasn't a flower at the left of the strip, which looked a little boring, so I fussy cut a tiny gold bee and glued him over the leaves.
That's all from me tonight, so now you're off to visit my lovely friend, Rachel Palmieri to see what wonderful creation she's made using her SAB goodies. I can't wait!
Bye for now,
Tina
Welcome to the first Art With Heart Blog Hop for 2020. This month we are featuring cards using the amazing products you can earn for free during our Sale-A-Bration promotion. Until the 31st of March, for every $90 you spend on Stampin’ Up! products, you will earn free products from our Sale-A-Bration brochure. Just ask me if you'd like to know more!
I recently earned the gorgeous Golden Honey Specialty DSP, and so that's what I'm using on tonight's card. I'm not big on bees, but there are enough non-bee papers to make it worth getting for me. The DSP is specialty paper because one side of each sheet contains gold foil elements.
As much as I'm not into bees, I couldn't resist adding a couple of the gold foil bees to the front of my card. They were very easy to fussy cut from the DSP. I popped them up (using Black Dimensionals - yay!) over a piece of black and gold DSP. It's meant to be a honeycomb look, but I'm already trying to work out if I can get it to look like a circuit board on a future card. LOL.
The SDSP features black, gold and white, but I wanted to add some colour. After experimenting with Blends and Stampin' Write Markers, I ended up using my Watercolour Pencils. The bottom third of each flower/petal was coloured with Rich Razzleberry, and the top third with Flirty Flamingo. I then used my Wink Of Stella (what else!?!) to blend the colours into the middle third. The pop of colour is quite nice, I think!
I used a Sale-A-Bration stamp set, Happy Birthday To You, for the sentiments on my card. I also used a left over strip of my coloured flower DSP to finish the inside of the card. There wasn't a flower at the left of the strip, which looked a little boring, so I fussy cut a tiny gold bee and glued him over the leaves.
That's all from me tonight, so now you're off to visit my lovely friend, Rachel Palmieri to see what wonderful creation she's made using her SAB goodies. I can't wait!
If you have a broken link or have come to this blog hop midway, you can view all the participants below:
Bye for now,
Tina
Sunday, 19 January 2020
CTC #261 Week 1: Sale-A-Bration
Hi!
Wow, this week went fast! It's Sunday, which means it's time for the new CASEing The Catty Sunday Challenge Blog Hop. After two weeks of CASEing the new JJ Mini Catalogue, we are now CASEing the SAB Catalogue. Did you arrive here from Rachel's blog? Wasn't her card pretty?
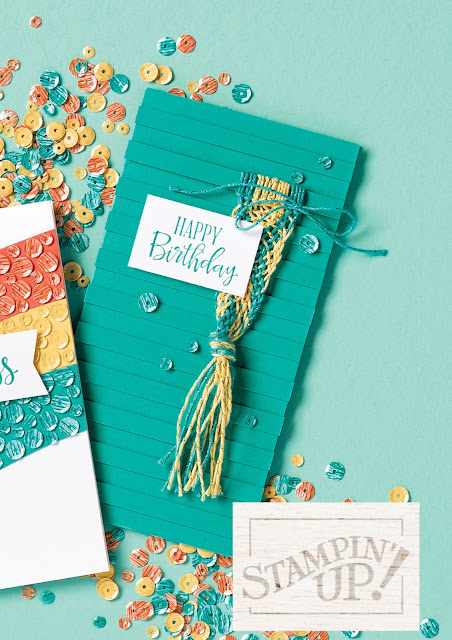
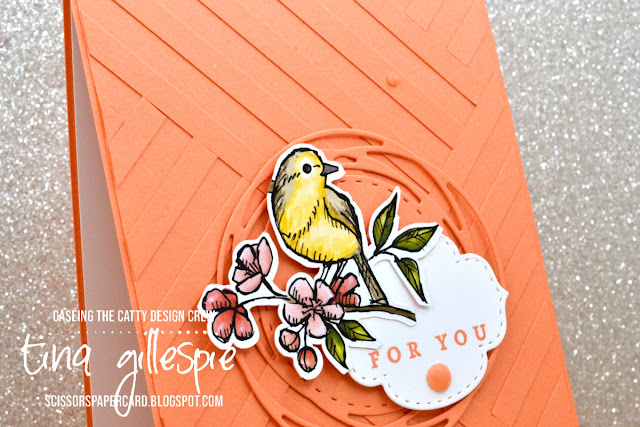
It's a smaller catalogue, but there's still a tonne of inspiration to be found. My eye was caught by this card on page 7. I loved how they've used strips of Bermuda Bay cardstock over a Bermuda Bay base to create an interesting background for the card.
I don't know what I was thinking, but I decided to step it up even more! I used Grapefruit Grove, a colour that I haven't used much of lately. It's retiring in July, so I thought I better use it a bit more before it goes!
I started by cutting a heap of 1cm x 15cm strips of Grapefruit Grove. I then used a 1cm x 1cm piece in the exact centre to help me line up the first four strips, laid out around the square. I then used one piece as a spacer to lay out the rest of the strips. I did five strips in one direction before changing. I was so pleased with how it turned out!
After all that effort, I didn't want to hide too much under other layers, so I kept the rest of the front very simple. I like that the die cut from the Painted Labels dies looks a lot like a nest under the bird, which was fussy cut from the Bird Ballad DSP. The sentiment label was from the new Stitched So Sweetly dies. A few Grapefruit Grove Faceted Gems finished the front.
I also kept the inside very simple, just a sentiment from the SAB set, Happy Birthday To You, and a small flower, fussy cut from the DSP.
Our new schedule of challenges means that you now have two weeks in which to get your challenge card made and posted to the group. This is Week 1 of the new challenge, so you have plenty of time. Just head to our Facebook group and upload your photo there. Don't forget to let us know which card you've CASEd.
Time for me to go for this week, but you're now off to see what my lovely friend, Judy, has created.
Bye for now,
Tina
Thursday, 16 January 2020
JAI #488: Celebrating 10 Years!
Hi!
Welcome back to a new year of Just Add Ink challenges! This year is our 10th Birthday year, and so in our annual first challenge of the year Blog Hop, the theme is Celebrate! I have been a part of the team for nearly 8 years - February 4th marks my 8th Anniversary. I started on the Scrapbooking Team, but played along with the main Design Team when I could, and then just the Design Team when we stopped the scrapping challenges. It's such a fun Design Team, the years have flown by!
My family and I spent New Year's Eve at a friends house. It was a lovely evening of just food and chatting - a BBQ and gathering around the table while the kids played pool and swam. Perfect! I wanted to make the hosts a card to say thanks for having us celebrate the new year with them.
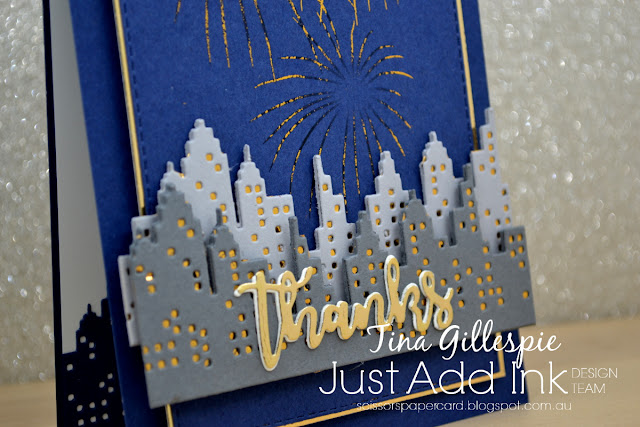
This card was take two on my attempts to use hot foiling techniques on a card. I found an image of some fireworks online and printed it onto Night Of Navy cardstock using my laser printer. I then sat a layer of gold foil over the top and ran it through my laminator in a paper sleeve. It worked a bit better than last time, but still not perfect. I'll just have to keep trying!
The buildings are a Mama Elephant die called Cityscape. I cut three each of Basic Grey and Smoky Slate. I used the left over foil from the fireworks to back the windows on one of each colour die cut, and then stacked them with the other two die cuts. They were then popped up on Dimensionals. The 'Thanks' is a Uniquely Creative die that I cut from Gold Foil card.
I used the same die to finish the inside. The sentiment comes from an Ink Road Stamps set called Pitch, Please.
Now for some good news: we want to celebrate with you! We are doing this by giving away some gifts. The Top Pick and Honourable Mentions will each receive a gift, but so will some of our other entrants! To qualify for one of the random gifts you must live in either Australia or New Zealand, enter the challenge (duh!), but you must also comment on all 14 blogs in the Blog Hop. Too easy!
That's it from me, now you're off to see what the fabulous Denita has created. Don't forget to comment to be in the running for a gift!
Bye for now,
Tina
Here's a list of blogs in case a link is broken or missing:
Denita
Kim
Jan
Rachael
Di
Narelle
Patrice
Chantell
Nikki
Joanne
Jackie
Kelly
Lou
Sunday, 12 January 2020
CTC #260 Week 2: January July Mini Catalogue
Hi!
Welcome back to Week Two of the first CASEing The Catty Sunday Challenge for 2020! As I mentioned last week, we have switched to running each challenge over two weeks, with a new blog hop each Sunday as usual. That means you get twice the inspiration for each challenge! Speaking of inspiring, the blog before mine was the fabulous Rebecca's, and you can find the link to the next blog at the end of my post.
This week continues with CASEing any project from the January-June Mini Catalogue. There's so much to choose from! Last week I CASEd a card fairly closely, so this week I went looking for a technique to CASE. I didn't have to go far!
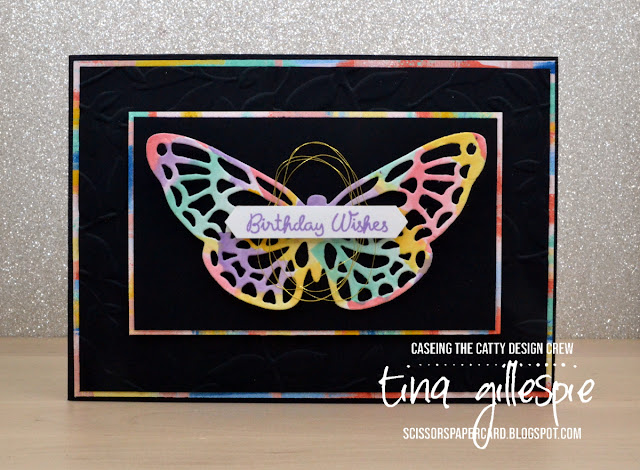
This beauty is on page 3, and uses a watercolour wash on the die cut background. It's such a fun technique, so I was very keen to give it a try!
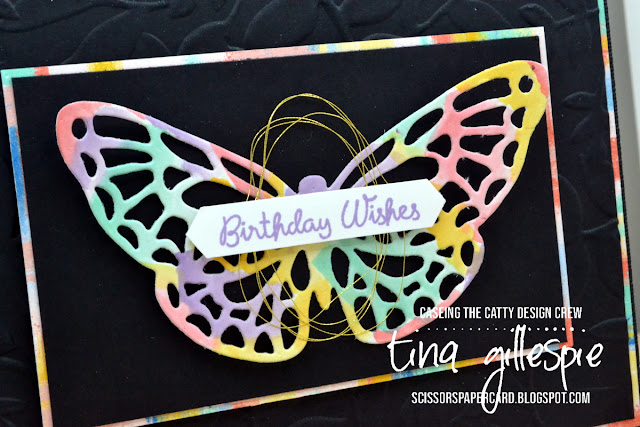
I don't have the Heart To Heart bundle, so instead I used my Springtime Impressions Dies. I started by washing Highland Heather, Coastal Cabana, Mango Melody and Flirty Flamingo over a piece of Watercolour Paper. Once it dried, I cropped it using the butterfly die.
The rest of the card is just layers of Basic Black cardstock and Follow Your Art DSP. I love how the DSP mimics the look of the butterfly, without all the effort! You might also be able to see that I embossed the largest black layer with the Layered Leaves 3D Embossing Folder.
I used a couple of DSP offcuts to add to the side of the writing panel on the inside. Just a slither - any more takes away from the watercolour wash look from the butterfly.
Have you made your card and posted it to our Facebook group in the last week? If not, you still have another week - get to it! LOL!
For now though, it's time to hop on over to the wonderful Siobhan's blog. Give a little 'rawr!' as you go!
Bye for now,
Tina
Sunday, 5 January 2020
CTC #260 Week 1: January July Mini Catalogue
Hi!
Welcome to the first CASEing the Catty Blog Hop for 2020! I can't believe we are writing 2020 already! The blog before mine is the fabulous Angela's, but we are all linked in a circle, so just keep going until you get back to where you started.
This week we are CASEing projects from the new January-June Mini Catalogue. This year we are trying something new - each challenge will run for two weeks, not one. We will still have a blog hop each week, so there will be double the inspiration for each challenge. Yay!
I liked the layout and die cut elements on this card from page 19. I chose to use the new Under My Umbrella stamp set though. It's a cute line art set, perfect for colouring.
How sweet are the boots and umbrella? I coloured the images with my Stamping' Blends, in Seaside Spray, Rococo Rose, Purple Posy, Daffodil Delight, Crumb Cake and Call Me Clover. I had a lot of fun practicing to get a rounded look on the boots and umbrella. Do you think I succeeded?
The background was created with a die from the Poppy Moments Dies. I like that it cuts windows in the shape of a bunch of poppies in the card. I backed it with some Seaside Spray DSP from the In Colour pack. The label and tag dies are from the Painted Labels and Ornate Frames Dies. A few sequins finished off the front.
The inside sentiment is from the new Peaceful Moments stamp set, with another spray of flowers from Under My Umbrella. They are such cute flowers!
As I said earlier, you now have two weeks to enter our challenges. You do this by taking a photo of your completed card an uploading to our Facebook group, telling us which challenge you are entering.
That's all from me for now, next up is the lovely Judy.
Bye for now,
Tina
Subscribe to:
Posts (Atom)


