Pages

Showing posts with label Bloomin' Marvelous. Show all posts

Friday, 12 April 2013

JAI #161: Just Add Colour!

Hi!

 
Yay! Time for another Just Add Ink challenge! This week Mae has pulled a gorgeous colour combination directly from the Colour Coach. Midnight Muse, More Mustard and Rich Razzleberry are not colours I'd think of putting together, but I think you'll agree that they make a fabulous combination!
 
 
Sale-A-Bration was in full swing when I made this card, so apologies for using a now-retired stamp set!
 

I really love the colours - they are so rich and vibrant and work so beautifully together.


So? What do you think you'll do with the colours? Can't wait to see!

Stamps: Sweet Essentials, Sassy Salutations, Bloomin' Marvelous (retired SAB)
Ink: Midnight Muse, Rich Razzleberry, More Mustard
DSP/Cardstock: Floral District DSP, Midnight Muse, Rich Razzleberry, Whisper White
Other: Big Shot, Paper Doily Sizzlit, Midnight Muse Stitched Satin Ribbon

Bye for now,

Tina

Wednesday, 10 April 2013

A Party Card

Hi!

I have been posting some photos of cards all made using the same design. You can see the previous card here. Today I have one more in the series.

 
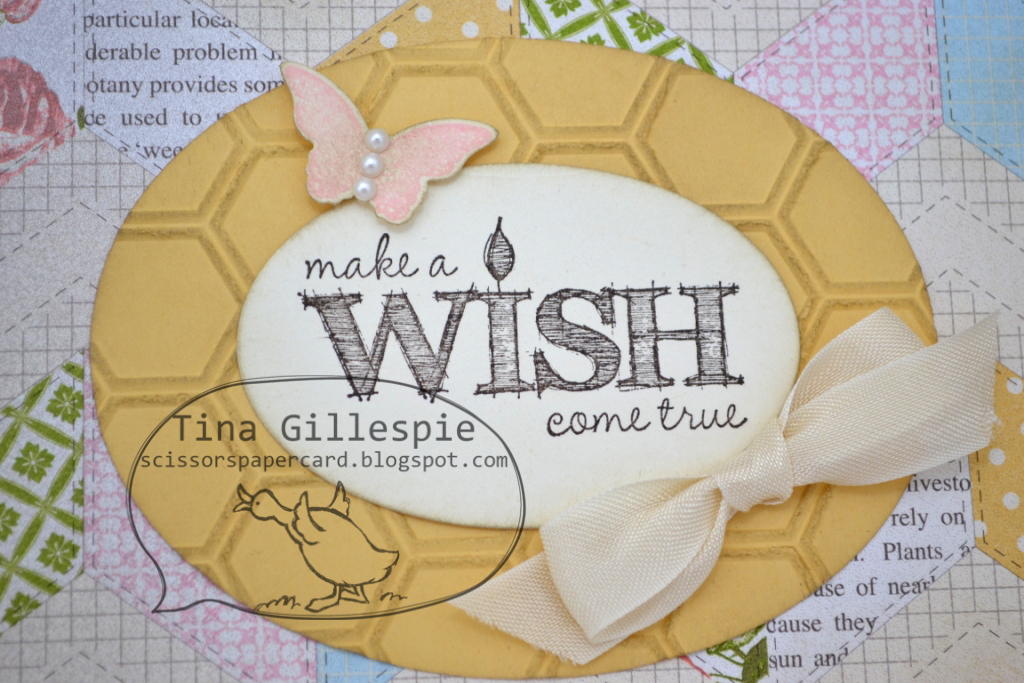
This card was made for a party I did for a lovely group of ladies recently. I made a few more changes, such as changing the DSP. It's still the Tea For Two DSP, just a different paper in the pack. I also left off the stitching - I wasn't going to lug my sewing machine to the party! I did keep the style of ribbon from the last version, I just switched the ribbon to suit my cardstock better.
 

Speaking of cardstock, the matting layer is now made from the Primrose Petals Coredinations cardstock, embossed with the Lacy Brocade Embossing folder and then sanded to give the lovely texture and design a lift.


We kept the inside simple by stamping some butterflies.

Stamps: Make a Wish, Bloomin' Marvelous (retired SAB)
Ink: Primrose Petals, Lucky Limeade
DSP/Cardstock: Tea For Two DSP, Primrose Petals Coredinations, Early Espresso, Very Vanilla
Other: Big Shot, Ovals Collection Framelits, Lacy Brocade Embossing Folder, Bitty Butterfly Punch, Primrose Petals Stitched Satin Ribbon, Basic Jewels Jumbo Pearls, Dimensionals, Sanding Blocks

I still have one more card in my series, so come back soon!

Bye for now,

Tina

Monday, 8 April 2013

Tea For Two Birthday Card

Hi!

Last week I posted some photos of a card I had made for a swap. You can see that card here. Today I have a second card I made using the same design. I made it for my niece's birthday.

 
As you can see I made a few small changes. I added a strip of the Very Vanilla Seam Binding Ribbon across the card and an extra layer of Calypso Coral cardstock.


I also skipped the distressing on the Honeycomb panel using Crumb Cake ink.


Here's the inside of the card. Fairly simple, but it really adds something to the card.

Stamps: Make A Wish, Sassy Salutations, Bloomin' Marvelous (retired SAB)
Ink: Early Espresso, Pretty In Pink, Calypso Coral
DSP/Cardstock: Tea For Two DSP, Early Espresso, Calypso Coral, So Saffron, Very Vanilla
Other: Big Shot, Ovals Collection Framelits, Honeycomb Embossing Folder, Bitty Butterfly Punch, Very Vanilla Seam Binding Ribbon, Calypso Coral Baker's Twine, Basic Jewels Pearls, Dimensionals.

I still have two more versions of this card, so stay tuned for more!

Bye for now,

Tina

Wednesday, 3 April 2013

A Swap Card

Hi!

I recently participated in a card swap.  To do a swap you need a group of people to participate, let's just say 10 people, but it could be any number really. So those 10 people each make 10 identical cards and then send them to the person hosting the swap. The host then sorts the cards and sends them back out to the rest of the group so each person ends up with 10 different cards.  It's lots of fun and the anticipation of getting the cards back is exciting!


Most of the products on my card are from the current Seasonal Catalogue. I really love the Tea For Two DSP. So perfect for pretty, feminine cards.


I used the Honeycomb Embossing Folder and then distressed it a little using Crumb Cake ink and a sponge.

I really loved this design and ended up using it on a few cards I made recently.  I will blog them soon.

Stamps: Make A Wish, Bloomin' Marvelous (retired SAB)
Ink: Early Espresso, Crumb Cake, Pretty In Pink
DSP/Cardstock: Tea For Two DSP, So Saffron, Early Espresso, Very Vanilla
Other: Big Shot, Ovals Collection Framelits, Honeycomb Embossing Folder,, Bitty Butterfly Punch, Very Vanilla Seam Binding Ribbon, Basic Jewels Pearls, Dimensionals, Stampin' Sponge, Sewing Machine and Thread.

Bye for now,

Tina

Friday, 8 March 2013

JAI #156: Just Add A Colour Combination

Hi!

It's challenge time at Just Add Ink again!

 
This week Christine has challenged us to make a card using the following colour combination.  Isn't it gorgeous?

I loved the richness of the Early Espresso and Raspberry Ripple as a contrast to the softer Bashful Blue. The card I made was for my niece who turned 18.


It had been a while since I'd had a play with any of the newer In Colours so it was fun to get one out again.


Isn't the Raspberry Ripple Satin Ribbon lovely?


Some stamping and pearls finish off the inside.

Stamps: Bloomin' Marvelous (SAB), Memorable Moments
Ink: Raspberry Ripple, Bashful Blue
Cardstock: Early Espresso, Raspberry Ripple, Whisper White
Other: Big Shot, Finishing Touches Edgelit, Lots Of Tags Sizzlit, Extra Large Oval Punch, Large Oval Punch, Basic Jewel Pearls, Raspberry Ripple Stitched Satin Ribbon, Dimensionals

I hope you can play along at Just Add Ink this week.

Bye for now,

Tina

Wednesday, 13 February 2013

Bloomin' Marvelous Take Two

Hi!

A couple of weeks ago I showed you a card I'd made as a Sale-A-Bration sneak peek.  You can see the card here. I decided to use the card as a class card, with a couple of small changes.


I dropped one of the layers, but I added some sparkle to the butterflies.  You can see this in the next photo.  Ignore my boo-boo, I was going to edit it out (love Photoshop!) but obviously forgot. My class ladies suggested I cover it with some bling, which I will do before I send it!


A bit hard to see in the photo, but we covered the butterflies in a layer of Dazzling Details. It's a lovely, easy and inexpensive way to add a little something to your card. 

But are you a silly duffer like me? I didn't realise until I made this card that there are 3 different Dazzling Details currently available! There's the Dazzling Details and Cherry Cobbler Dazzling Details from the Annual Catalogue, and there's also Silver Sparkles Dazzling Details in the Seasonal Catalogue (carried over from the Holiday Catalogue). I thought the two silvery ones were the same but they aren't the same at all! The Silver Sparkles, as the name suggests, is much more silvery than the regular, more opaque Dazzling Details. Guess what will be in my next order?


Stamps: Bloomin' Marvelous
Ink: Island Indigo, Summer Starfruit, Sahara Sand
Cardstock: Sahara Sand, Whisper White
Other: Dazzling Details

Bye for now,

Tina

Monday, 11 February 2013

A Bloomin' Marvelous CASE

Hi!

I recently saw this card on Selene Kempton's blog and thought it would be a perfect card for my stamping ladies.


I made a few minor changes, a knot in the ribbon instead of a bow, one less layer, no bling on the butterflies to name a few.


I didn't stamp a sentiment on the inside as I'm not sure what I'll use this card for yet.

Stamps: Bloomin' Marvelous
Ink: Rich Razzleberry, Island Indigo
DSP/Cardstock: Sycamore Street DSP, Tangerine Tango, Rich Razzleberry, Whisper White
Other: Sycamore Street Ribbon, Bitty Butterfly Punch, Dimensionals

Bye for now,

Tina

Monday, 4 February 2013

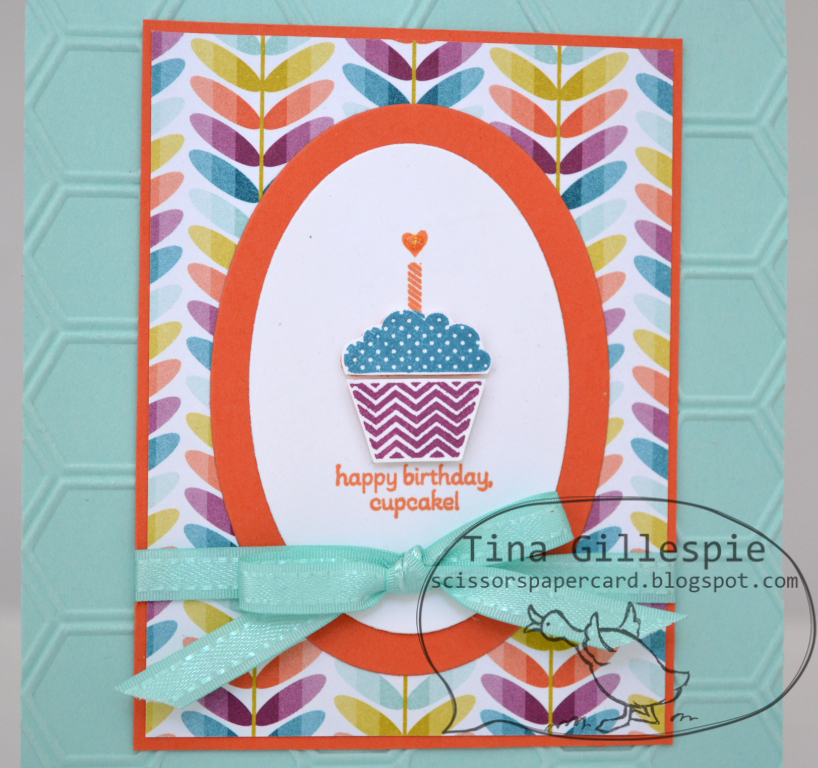
Happy Birthday, Cupcake!

Hi!

I am really loving this year's Sale-A-Bration offerings.  There's such a HUGE range of freebies to choose from.  Today I have a card for you made using the very cute Patterned Occasions stamp set.


There's also some new products from the new Seasonal Catalogue on this card. The Honeycomb Embossing Folder is just gorgeous, and could work quite well on both a masculine or feminine card.  Have you seen some of the beautiful patchwork cards using the folder?


You can also see on the card I used the new Ovals Collection Framelits to cut the main panel and it's matt. If you look closely you can also see some Dazzling Details on the candle flame.


I also used the Sycamore Street DSP and the coordinating Sycamore Street Ribbon in Pool Party on the card.

Have you earned any SAB freebies yet?

Bye for now,

Tina

Wednesday, 30 January 2013

Some More SAB Calendar Gifts

Hi!

I'm back, as promised, with the other three calendars I made as gifts for my family.


To make construction of the five calendars a bit quicker and easier I did it in a bit of a production line.  First I chose and cut the DSP I wanted to use from the Sycamore Street DSP pack. I then chose the cardstock colours to coordinate.  I stuck to three colours to simplify the process a little - Island Indigo, Pool Party and Rich Razzleberry.


Once I'd cut all the pieces, including the Scallop Square Bigz Clear die cut on the Big Shot, I started assembling each calendar.


Finally came the embellishing - the punches, stamping and bling.  Best part? They all fold down flat for convenient mailing!

Bye for now,

Tina

Monday, 28 January 2013

Some SAB Calendar Gifts

Hi!

Every second Christmas I travel home to see my family for the holidays.  I love going to catch up with my mum and sisters and their families.  When I returned this year I decided to make each of them a small gift to thank them for their hospitality.  I had some calendars left over from my calendar class last year, so I decided to make them an easel calendar each.


I used the gorgeous Sale-A-Bration exclusive Sycamore Street DSP. It's lovely and bright - perfect for cheerful projects.


The colours I chose to use - Rich Razzleberry and Pool Party - are from the DSP colour palette.


I also used the SAB stamp set Bloomin' Marvelous for the sentiment and the rest of the stamping on the Decorative Label punchie.


I used the same colours on the second calendar, I just switched the DSP to a different pattern. Easy peasy!

I'll be back soon with more of the calendars I made.

Bye for now,

Tina

Friday, 25 January 2013

Just Add Ink #150: Sketch Challenge

Hi!


It's Friday again, and nice to get back into the routine of a Design Team post on a Friday. This week at Just Add Ink Mae has given us a fantastic sketch to play with.


Isn't it a great sketch? You can interpret it any way you'd like.  I substituted the flag ends for the wavy lines.  What will you do?


I decided to use one of the larger frames from the Peekaboo Frames Bigz L die to create the focal panel of my card. The sentiment is from the Sweet Essentials Stamp set.


I used the smaller scallop punch from the Holiday Catalogue to create the scrunched flower on the front of the card. They are really easy to make - just punch about 5-8 scallop circles, pop a brad through the middle and then scrunch them up one layer at a time.  You then just open it out again to achieve your desired look.


Here's what's under the flap. The sentiment is from Perfect Punches and the flower is from one of the new Sale-A-Bration sets, Bloomin' Marvelous.


I deliberately left the inside blank (except for the flags of course!) as I don't know what I'll use this card for yet.  I'll stamp it when I know!

I hope to see you over on the Just Add Ink blog.

Bye for now,

Tina

Monday, 21 January 2013

A Bloomin' Marvelous Sneak Peek

Hi!

The biggest promotion of the Stampin' Up! year starts tomorrow.  Sale-A-Bration is nearly here! As usual Stampin' Up! Demonstrators have the opportunity to get their hands on some of the SAB products before the promotion starts and have fun creating some projects.  One of the first things I ordered was the SAB stamp set Bloomin' Marvelous which has 4 images and 4 sentiments.  Here's a birthday card I made with the set.

 
The card started off as a CASE of one by Mary Fish. I ended up changing it quite a bit though. The colours I used were Island Indigo, Sahara Sand and Summer Starfruit.
 
 
I stamped the envelope to match. I'm going to try hard to stamp the envelopes this year - one of my New Year's Stampin' Resolutions!
 
 
Here's the inside of the card. I used the Memorable Moments stamp set for the inside sentiment.
 
Can't wait to play some more with this set!
 
Bye for now,
 
Tina