Hi!
I was asked to make a card on commission for a female 30th Birthday. The brief I has was girly. The first thing that popped into my head was this layout I'd done for a Just Add Ink Scrapbooking Challenge earlier in the year. It was a girly layout that I'd loved making and so I was keen to see how it would translate to a card.
I think it worked pretty well! I knew the card was going to be hand delivered so I was able to use some bulkier embellishments that I didn't have to worry about getting squished in the mail.
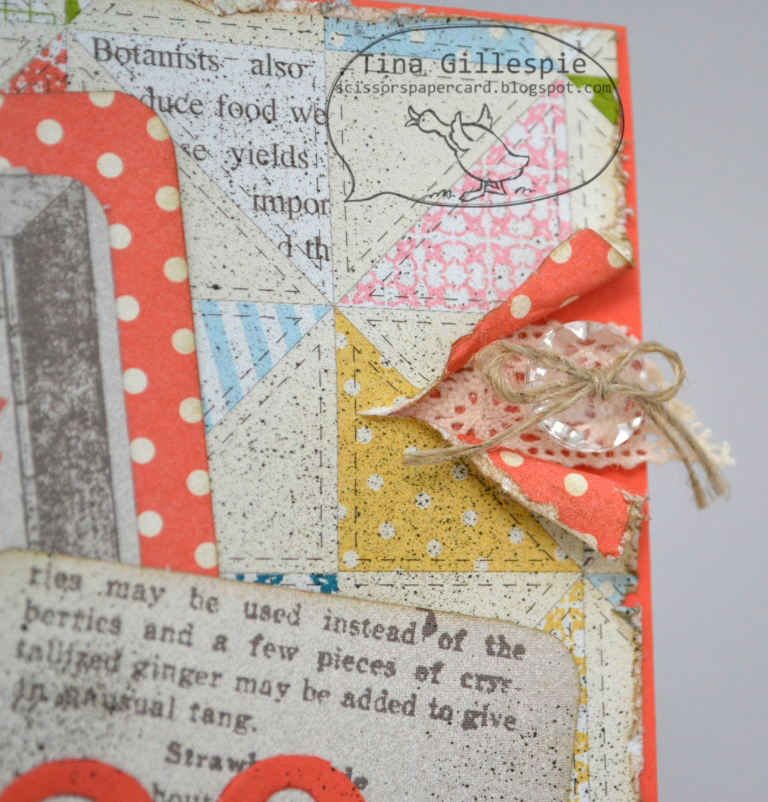
I loved the little torn section with the button and lace on my layout, so of course I had to carry it over to the card.
I wanted the inside to be as pretty as the outside, but with plenty of space for writing a message.
Of course I had to dress up the envelope too. I had a tiny scrap of the lace trim that I tucked in between the two ovals on the front.
On the back of the envelope I just covered the flap with some coordinating DSP.
Stamps: Sweet Essentials
Ink: Crumb Cake, Early Espresso
DSP/Cardstock: Tea For Two DSP, Calypso Coral, Very Vanilla
Other: Big Shot, Ovals Collection Framelits, Timeless Type Alphabet Dies (retired), Paper Doilies, Corner Rounder Punch, Linen Thread, Victoria Crochet Trim, Vintage Faceted Buttons, Colour Spritzer, Sponge Dauber, Butterfly Trinket (non SU)
Bye for now,
Tina
Showing posts with label Tea For Two DSP. Show all posts
Wednesday, 12 June 2013
Sunday, 2 June 2013
JAI Scrap #18: Just Add Milestones.
Hi!
I have been busy scrapping again, just in time for the new Just Add Ink Scrapping Challenge.
This month Ruthy has challenged us to scrap a milestone. A milestone can be defined as an important event in your life. I have chosen my Grandma turning 100 as the milestone I scrapped. She's pretty amazing - these pictures were taken over a year ago and she is now 101!
I chose to scrap a double page as I had too many photos for just one page. The three square photos were taken at her party. Sadly she was unable to attend her own party as she was unwell. The photos on the right side of the layout are the following day when we were able to talk to her through the window of the nursing home. We all sang Happy Birthday and blew her kisses.
This photo was taken a week later. We were able to travel back to see her when she was well and able to have visitors. She's such a remarkable woman and someone I really admire.
You can see that in the top corner I stamped the large flourish from Flowering Flourishes using the Illuminate Inkpad. I stamped the same image in each of the corners for a subtle little lift.
This is one of my favourite bits of the layout. At her party I was asked to make a speech with only about 10 minutes notice. My sisters helped me come up with some points to make and I scribbled them on a scrap of paper. The scroll is that scrap of paper.
Stamps: Flowering Flourishes
Ink: Illuminate, Lucky Limeade, So Saffron, Pretty In Pink
DSP/Cardstock: Tea For Two DSP, So Saffron, Early Espresso, Lucky Limeade
Other: Big Shot, Typeset Alpha Dies, Tasteful Trims Die, Little Leaves Sizzlit, Petals A Plenty Embossing Folder, Soda Pop Tops, Paper Doilies, Early Espresso Baker's Twine, Crystal Effects, Vanilla Flower Trim
I hope you can find time to play along with us this month at Just Add Ink.
Bye for now,
Tina
Monday, 29 April 2013
A Baby Card
Hi!
A couple of weeks ago I posted a little series of cards all based on the same design. You can see the previous post here. Today I have the last of the cards for you. This card was a commissioned card, made to be given to a couple to congratulate them on the news that they were to become great grandparents.
You can see the changes I made to this one - I used one of the Apothecary Accents Framelits instead of an oval. The main panel is matted by cutting two more labels and cutting them in pieces to be able to extend the shape outwards. A fantastic trick when your Framelits aren't nesting like the ovals.
I rolled the Baby Tees wheel in the background and then stamped the sentiment over the top. I stamped it off once first to reduce the intensity of the colour, which is Island Indigo.
Love, love, love the All In The Family stamp set for making cards like these easy to personalise a little more.
Stamps: Sassy Salutations, All In The Family, Baby Tees Jumbo Wheel
Ink: So Saffron, Island Indigo
DSP/Cardstock: Tea For Two DSP, So Saffron, Very Vanilla
Other: Big Shot, Apothecary Accents Framelits, Primrose Petals Stitched Satin Ribbon, Paper Snips, Dimensionals
Bye for now,
Tina
Wednesday, 10 April 2013
A Party Card
Hi!
I have been posting some photos of cards all made using the same design. You can see the previous card here. Today I have one more in the series.
Speaking of cardstock, the matting layer is now made from the Primrose Petals Coredinations cardstock, embossed with the Lacy Brocade Embossing folder and then sanded to give the lovely texture and design a lift.
We kept the inside simple by stamping some butterflies.
Stamps: Make a Wish, Bloomin' Marvelous (retired SAB)
Ink: Primrose Petals, Lucky Limeade
DSP/Cardstock: Tea For Two DSP, Primrose Petals Coredinations, Early Espresso, Very Vanilla
Other: Big Shot, Ovals Collection Framelits, Lacy Brocade Embossing Folder, Bitty Butterfly Punch, Primrose Petals Stitched Satin Ribbon, Basic Jewels Jumbo Pearls, Dimensionals, Sanding Blocks
I still have one more card in my series, so come back soon!
Bye for now,
Tina
I have been posting some photos of cards all made using the same design. You can see the previous card here. Today I have one more in the series.
This card was made for a party I did for a lovely group of ladies recently. I made a few more changes, such as changing the DSP. It's still the Tea For Two DSP, just a different paper in the pack. I also left off the stitching - I wasn't going to lug my sewing machine to the party! I did keep the style of ribbon from the last version, I just switched the ribbon to suit my cardstock better.
Speaking of cardstock, the matting layer is now made from the Primrose Petals Coredinations cardstock, embossed with the Lacy Brocade Embossing folder and then sanded to give the lovely texture and design a lift.
Stamps: Make a Wish, Bloomin' Marvelous (retired SAB)
Ink: Primrose Petals, Lucky Limeade
DSP/Cardstock: Tea For Two DSP, Primrose Petals Coredinations, Early Espresso, Very Vanilla
Other: Big Shot, Ovals Collection Framelits, Lacy Brocade Embossing Folder, Bitty Butterfly Punch, Primrose Petals Stitched Satin Ribbon, Basic Jewels Jumbo Pearls, Dimensionals, Sanding Blocks
I still have one more card in my series, so come back soon!
Bye for now,
Tina
Monday, 8 April 2013
Tea For Two Birthday Card
Hi!
Last week I posted some photos of a card I had made for a swap. You can see that card here. Today I have a second card I made using the same design. I made it for my niece's birthday.

I also skipped the distressing on the Honeycomb panel using Crumb Cake ink.
Here's the inside of the card. Fairly simple, but it really adds something to the card.
Stamps: Make A Wish, Sassy Salutations, Bloomin' Marvelous (retired SAB)
Ink: Early Espresso, Pretty In Pink, Calypso Coral
DSP/Cardstock: Tea For Two DSP, Early Espresso, Calypso Coral, So Saffron, Very Vanilla
Other: Big Shot, Ovals Collection Framelits, Honeycomb Embossing Folder, Bitty Butterfly Punch, Very Vanilla Seam Binding Ribbon, Calypso Coral Baker's Twine, Basic Jewels Pearls, Dimensionals.
I still have two more versions of this card, so stay tuned for more!
Bye for now,
Tina
Last week I posted some photos of a card I had made for a swap. You can see that card here. Today I have a second card I made using the same design. I made it for my niece's birthday.
As you can see I made a few small changes. I added a strip of the Very Vanilla Seam Binding Ribbon across the card and an extra layer of Calypso Coral cardstock.
I also skipped the distressing on the Honeycomb panel using Crumb Cake ink.
Here's the inside of the card. Fairly simple, but it really adds something to the card.
Stamps: Make A Wish, Sassy Salutations, Bloomin' Marvelous (retired SAB)
Ink: Early Espresso, Pretty In Pink, Calypso Coral
DSP/Cardstock: Tea For Two DSP, Early Espresso, Calypso Coral, So Saffron, Very Vanilla
Other: Big Shot, Ovals Collection Framelits, Honeycomb Embossing Folder, Bitty Butterfly Punch, Very Vanilla Seam Binding Ribbon, Calypso Coral Baker's Twine, Basic Jewels Pearls, Dimensionals.
I still have two more versions of this card, so stay tuned for more!
Bye for now,
Tina
Wednesday, 3 April 2013
A Swap Card
Hi!
I recently participated in a card swap. To do a swap you need a group of people to participate, let's just say 10 people, but it could be any number really. So those 10 people each make 10 identical cards and then send them to the person hosting the swap. The host then sorts the cards and sends them back out to the rest of the group so each person ends up with 10 different cards. It's lots of fun and the anticipation of getting the cards back is exciting!
Most of the products on my card are from the current Seasonal Catalogue. I really love the Tea For Two DSP. So perfect for pretty, feminine cards.
I used the Honeycomb Embossing Folder and then distressed it a little using Crumb Cake ink and a sponge.
I really loved this design and ended up using it on a few cards I made recently. I will blog them soon.
Stamps: Make A Wish, Bloomin' Marvelous (retired SAB)
Ink: Early Espresso, Crumb Cake, Pretty In Pink
DSP/Cardstock: Tea For Two DSP, So Saffron, Early Espresso, Very Vanilla
Other: Big Shot, Ovals Collection Framelits, Honeycomb Embossing Folder,, Bitty Butterfly Punch, Very Vanilla Seam Binding Ribbon, Basic Jewels Pearls, Dimensionals, Stampin' Sponge, Sewing Machine and Thread.
Bye for now,
Tina
Friday, 22 March 2013
JAI #158: Just Add A Sketch
Hi!
Apologies for the lack of posts lately - I have been madly preparing for my stall at a school fair on Saturday.
This week over at Just Add Ink the lovely Mae has designed a sketch challenge for your inspiration. Mae and I had a lovely day chatting and crafting recently as she passed through Adelaide on her big holiday. I started the card for this challenge while she was here. Bur first, the sketch!
Isn't it great? I decided to go vintage and make a birthday card using some of the pretties I have been hoarding rather than using!
I really, really love the new flower trim! I also used some bits and pieces from the Artisan Embellishment Kit. To make the scalloped lace go further I cut it in half down the middle and used the seam binding ribbon to hide the cut.
I struggled with a sentiment on the front. I tried a bigger sentiment but it just didn't work. In the end the cute little tag punchies worked beautifully.
A little more stamping to finish off the inside.
I hope you can play along this week with us at Just Add Ink. And if you're in the south of Adelaide tomorrow afternoon between 3 and 7pm and can come to the Emmaus Catholic School Earth Fair come and find me at my Stampin' Up! stall.
Bye for now,
Tina
Friday, 15 March 2013
JAI #157: Just Add Green
Hi!
Do you celebrate St Patrick's Day? I don't so much, but it's a great excuse to drink a Midori and Lemonade or two as a nod to my Irish Ancestors. Well, that's my story and I'm sticking to it!
This week Mae has challenged us to go green in honour of St Patrick's Day. Now, you don't need to make a St Patrick's Day card, but your card does need to be predominantly green. There are lots of greens in the Stampin' Up! palette, and I chose to go with Lucky Limeade.
I used some DSP from the Tea For Two pack. It's fast becoming my favourite DSP. The only St Patrick's Day sentiment stamp I had was from Itty Bitty Sentiments, so I created a little banner for it.
I used the heart section of the Owl Builder Punch to create the four leaf clover on the flag - pretty easy peasy.
I'm sure the Irish need very little encouragement to celebrate, but I had no other sentiment suitable for the inside!
Stamps: Itty Bitty Sentiments, Topsy Turvy Celebrations
Ink: Lucky Limeade
DSP/Cardstock: Tea For Two DSP, Lucky Limeade, Very Vanilla
Other: Lucky Limeade Ruffled Ribbon, Pennant Builder Punch, Owl Builder Punch, Toothpick
I hope to see you over at Just Add Ink this week.
Bye for now,
Tina
Friday, 8 February 2013
JAI #152: Just Add Hearts
Hi!
Aren't the weeks flying by?
And because they are it means that Valentine's Day is sneaking up on us too! Kim has given us this week's challenge, which is to Just Add Hearts to your project.
I actually made this card for my niece and her new husband rather than as a Valentine's card. They got married last weekend in a beautiful ceremony.
The card features some products from the new Seasonal Catalogue. Firstly the absolutely gorgeous Tea For Two DSP. Both the background paper and the fussy cut flowers were from this pack. It's very retro vintage, cup of tea with your Nana inspired paper. Lovely! Second is the Artisan Embellishments Kit, from which came the Love Ticket and the Scalloped Lace. So very pretty!
And here's my heart - did you think I'd forgotten to add one to the card? I'm quite proud of this little heart as I crocheted it myself from some ultra soft bamboo fibre. You can just see one of the small Vintage Faceted Designer Buttons underneath the bow. So very sweet, a lovely finishing touch for the front of the card.
So sweet that I added a second crochet heart to the inside of the card too!
I hope you can play along this week at Just Add Ink.
Bye for now,
Tina
Sunday, 3 February 2013
JAI Scrapbooking #14: Just Add Lace and Ephemera
Hi!
How did the first week of back to school go? Did you find it hard getting back in to the early rising routine? I sure did! I am enjoying the quiet days at home where I get to have a little play after the day's chores are done.
So on to this month's Just Add Ink Scrapbooking Challenge! This month Kim had the idea to Just Add Lace, and I had the idea to Just Add Ephemera. We've combined them into the one challenge. Now when I suggested Ephemera to the team it was because it's a pretty sounding word and I knew that it had something to do with scrapping. I didn't really know what it was though! So I looked it up and discovered it's something you add to a layout that most people would probably throw away! Things like old buttons, keys, hatpins, tickets, nails, watch faces, chain,... you get the idea.
When I was thinking about my layout I decided to do a vintage style layout as to me it suited the challenge of lace and ephemera. The new Tea For Two DSP was the perfect choice for the basis of my layout. I used my new Stampin' Distress Tool to rough the edges of the paper before sponging it to really complete the vintage, aged look. I also used my Colour Spritzer to add some age to the paper.
This lace and button are from the Artisan Embellishment Kit. It's a lovely delicate lace, and perfect for a little feature inside the torn and rolled edge. I used Linen Thread throughout my layout in combination with the buttons and lace.
This time I layered a Vintage Faceted Button with the larger metallic button from the Artisan Kit. I adhered them to a Tea Lace Paper Doily. The doily was a little too white for my layout and so to soften the colour I dragged a sponge with Crumb Cake ink over the top to alter the colour. I was very pleased with the effect.
This rose trinket was a gift from my JAI Secret Santa, and I thought it was a lovely addition to the layout. There are roses featured throughout the DSP, so it fit nicely. I tied it to the knot in the Artisan Kit Lace Ribbon using some more Linen Thread.
Finally, another Vintage Faceted Button tied with Linen Thread to finish off the layout.
I hope you have been inspired to play along with us this month at Just Add Ink Scrapbooking Challenges, I'd love to see how you interpret the theme!
Bye for now,
Tina
Subscribe to:
Posts (Atom)