Pages

Showing posts with label Rectangle Stitched Dies. Show all posts

Thursday, 12 February 2026

JAI 779: Just Add A Sketch

 Hi!


Welcome back to the newest Just Add Ink challenge. This time around it's a sketch challenge, designed by Jan.


My first thought was of a polaroid photograph! What fun would that be to incorporate into a card? Ultimately, though, I went in a very different direction.


I decided to use my Stitched Shapes Dies to create some dimension in my card. I started by stamping the flowers from Pretty Perennials and the leaves from Beautiful Friendship in Strawberry Sluch, Powder Pink, Garden Green and Mint Macaron. I do love the watercolour look of the images!


I then cropped the image with the largest square die. I glued the die cut piece to my card base and then popped up the rest using Dimensionals. I love the idea of the main part of the image being inset rather than popped up. A sentiment and a scattering of sequins finished off the front of the card.

I used similar stamping on the inside of the card. I really loved revisiting these older stamp sets!

What do you see in the sketch? You can see what the rest of the Design Team created over on the Just Add Ink blog. You can also add your card to our challenge gallery when you are ready. I can't wait to see what you make!

Bye for now,

Tina

Wednesday, 1 December 2021

Colour Creations: Merry Merlot

 Hi!


Hello, and thanks for joining the Colour Creations Blog Hop once again. This week is our third-last hop for the year, before we pick up again in January. We are featuring Merry Merlot this week, a rich burgundy colour. It's not one I use a lot, probably because my high school uniforms were burgundy. Do you have a bias against your school colours? I've heard that it's quite common!

scissorspapercard, Stampin' Up!, Colour Creations, Forever Fern, Blossoms In Bloom, Stitched Rectangles Dies

I googled a little bit for inspiration, and found a Forever Fern card by Debra Burgin, of Heartfelt Inkspiration. I liked how she's stamped the one image all over her background, so that's where I started. I found the colour a bit too strong, so I decided to tone it down with a layer of vellum. Both layers were die cut with the largest Stitched Rectangles Die and adhered to my card front.

scissorspapercard, Stampin' Up!, Colour Creations, Forever Fern, Blossoms In Bloom, Stitched Rectangles Dies

I played with the Stitched Rectangles again to create the frame for my card. To keep them in place, I glued both to a slightly smaller piece of Whisper White cardstock. This also helps to prevent the popped-up panel from sagging, so double win!

scissorspapercard, Stampin' Up!, Colour Creations, Forever Fern, Blossoms In Bloom, Stitched Rectangles Dies

I've used the off-cut from the front of the card to frame my writing panel on the inside. It's good to repurpose a piece that would usually get thrown away.

In hind sight, this card probably would have worked better as a Sympathy card, but I think it's still fine as a birthday card. What do you think? 

That's all from me for tonight, but please do continue your way around our blog hop. The next cab off the rank is my lovely friend, Rachel Palmieri. She's certain to have a ripper of a card for your viewing delight!

If you run into trouble with missing or broken links, please jump on over to Catherine Proctor's blog. She's the super-organised and super-wonderful host of the Colour Creations Hops.

Bye for now,

Tina

Thursday, 24 June 2021

JAI 560: Just Add Colour

 Hi!


Brrr! Is it cold where you are? We had a severe weather warning here today for wind and rain - the perfect day to be rugged up inside crafting for the new Just Add Ink challenge! This week Jo has put together a gorgeous colour combo for us to play with.


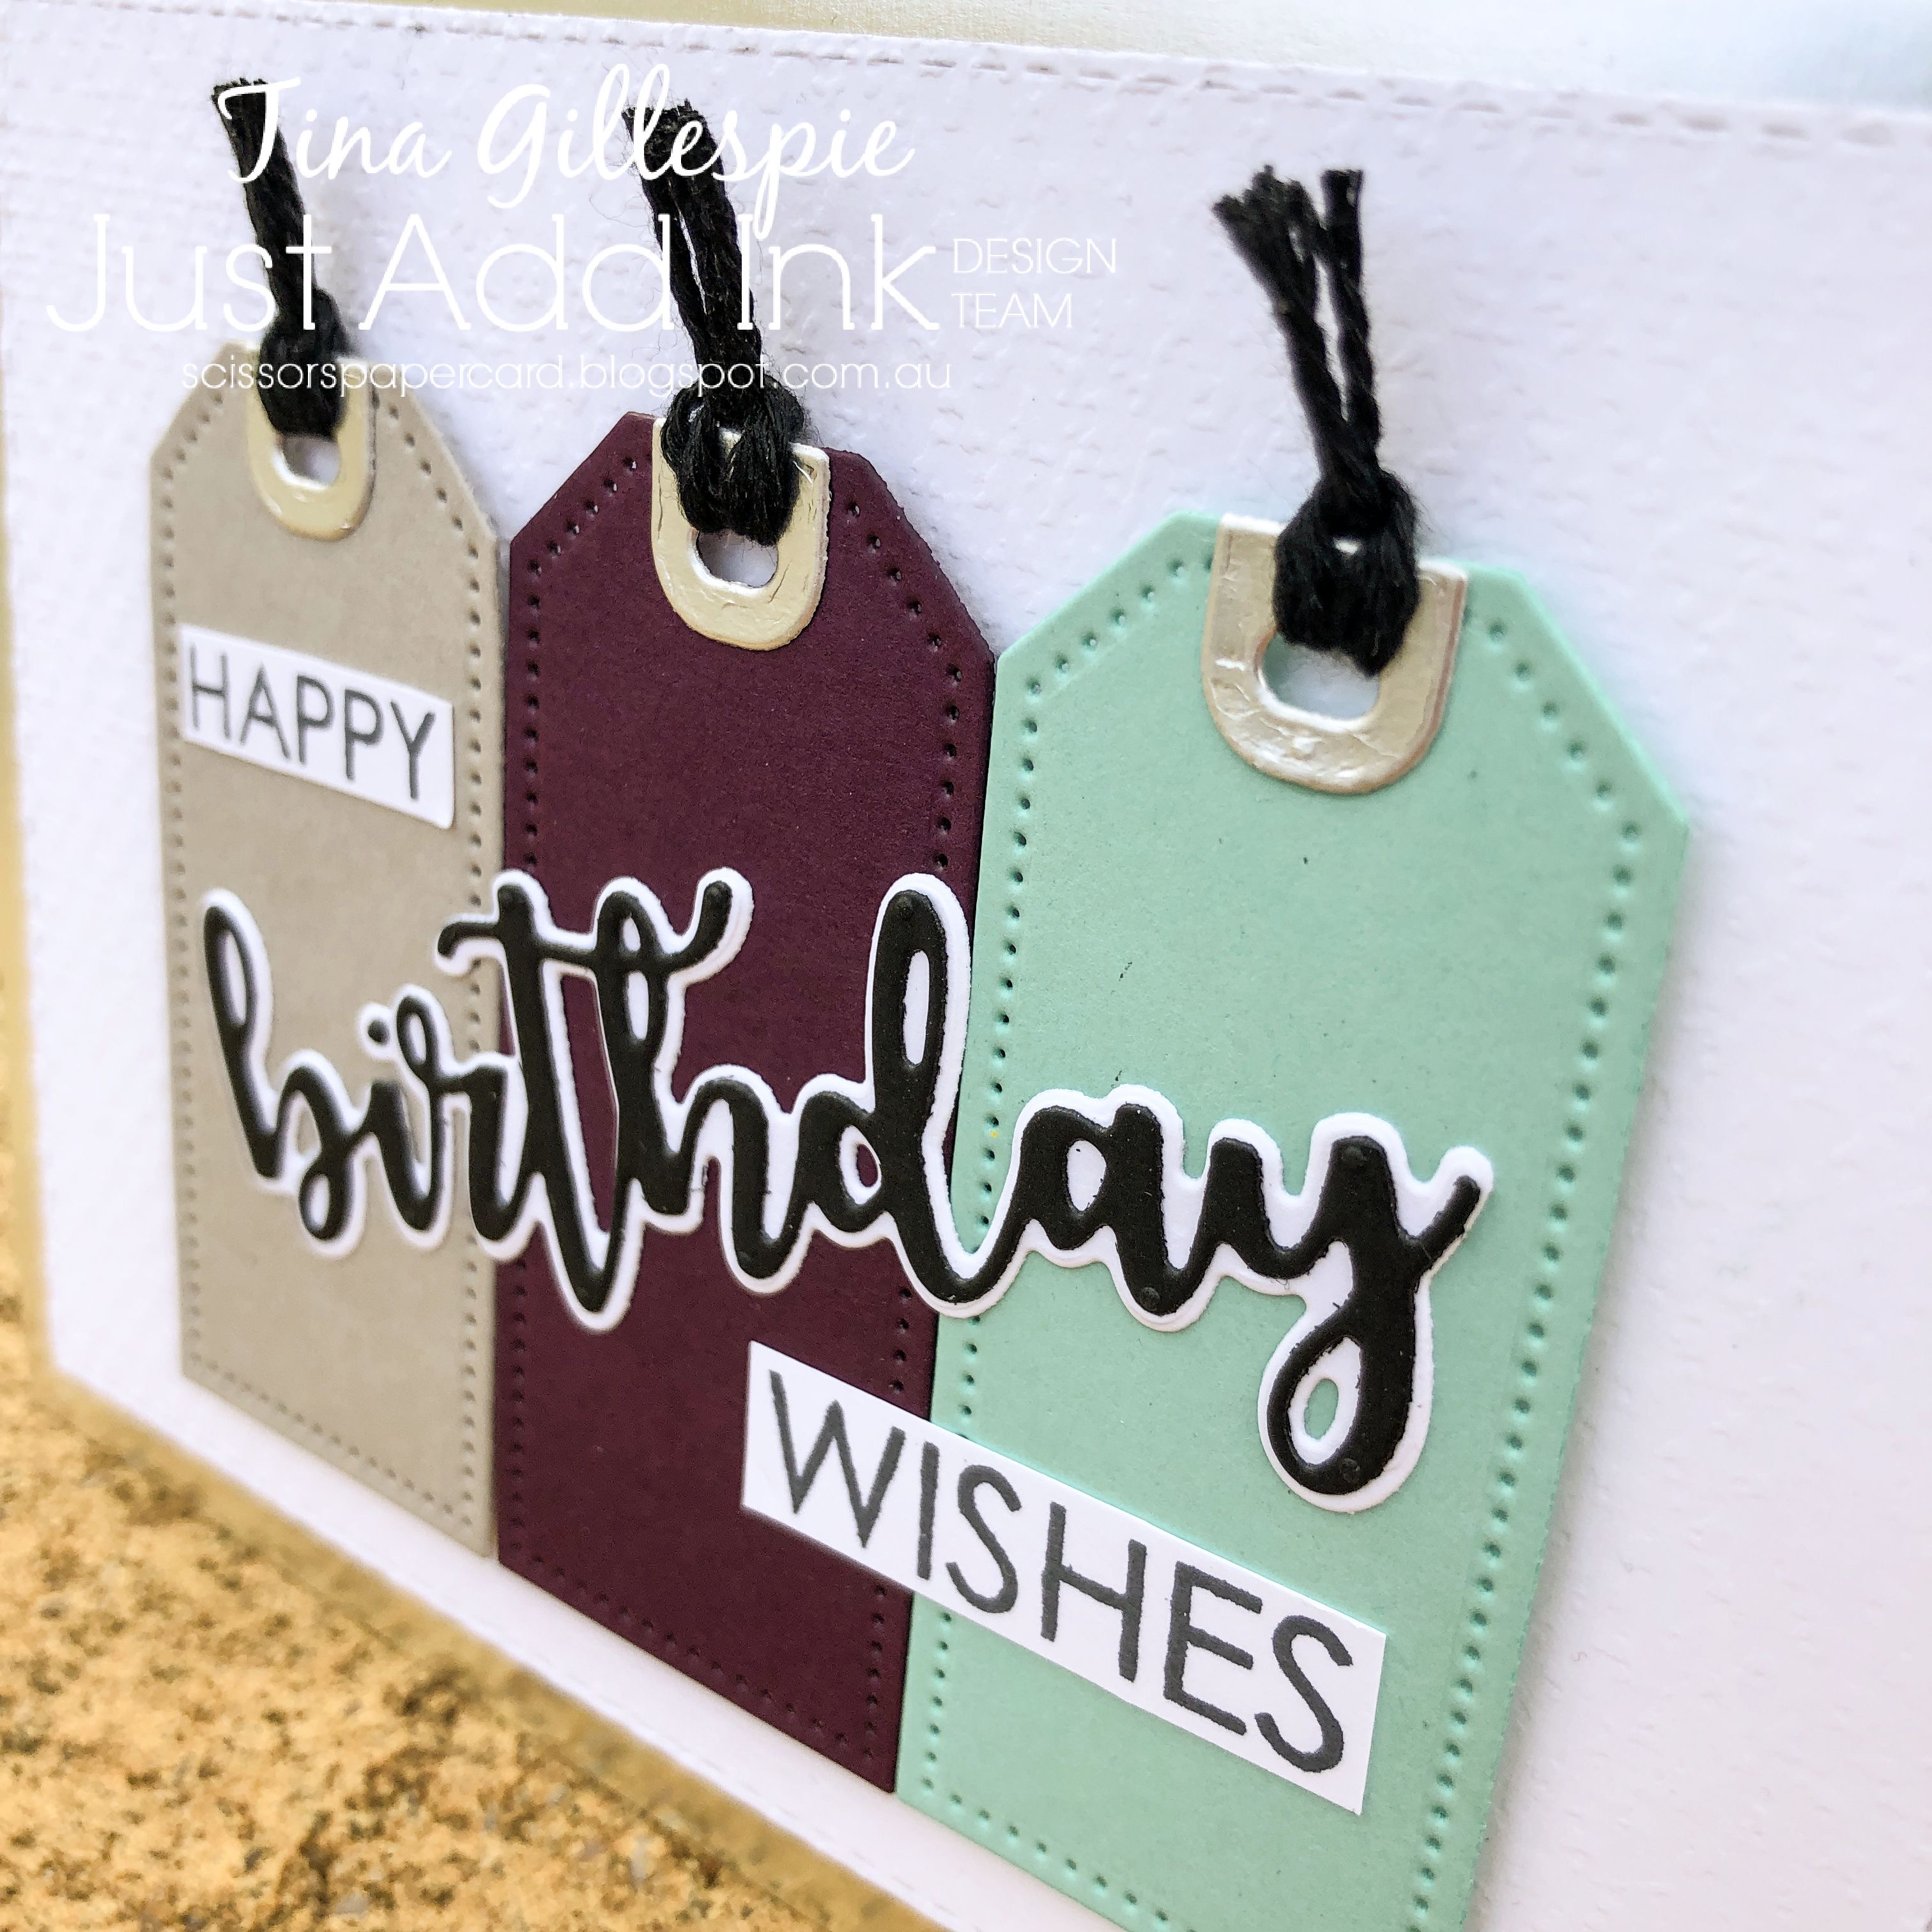
The day I made my card I just received the new Tailor Made Tags Dies from Stampin' Up!. I couldn't resist playing with them straight away.

scissorspapercard, Stampin' Up!, Uniquely Creative, Just Add Ink, Sweet Sentiments Builder, Tailor Made Tags Dies, Stitched Rectangles Dies, Tasteful Textile 3DEF

I started by cropping my cardstock using the second smallest tag die. I also cropped the little do-dad at the top from Silver Foil, to match the Silver Foil card base. I can't think of what that bit is called - a reinforcer, maybe? Some black BAker's Twine was threaded through the holes and trimmed off.

scissorspapercard, Stampin' Up!, Uniquely Creative, Just Add Ink, Sweet Sentiments Builder, Tailor Made Tags Dies, Stitched Rectangles Dies, Tasteful Textile 3DEF

It's tricky to see, but the Whisper White Stitched Rectangle layer is also embossed using the Tasteful Textile 3D Embossing Folder. It's a new purchase, too, and I quite like it - it dulls the pain of losing Subtle just a little. LOL! The sentiment is a mix of dies and stamps from Uniquely Creative, called Sweet Sentiments.
 
scissorspapercard, Stampin' Up!, Uniquely Creative, Just Add Ink, Sweet Sentiments Builder, Tailor Made Tags Dies, Stitched Rectangles Dies, Tasteful Textile 3DEF

I used the same stamps on the inside of my card. I wasn't sure how to incorporate the tags into the inside, so I didn't even try!

That's all from me for now, but please do pop on over to the Just Add Ink blog, where you can find the rest of this week's Design team cards. You can also add you card to our link for this challenge. What will you do with the colours?

Bye for now,

Tina

Thursday, 17 June 2021

JAI 559: Just Choose Two

 Hi!


Thanks for joining me once again for the new Just Add Ink challenge. This week, Di has challenged us to Choose Two to add to our cards, the choices being Stitching, Stripes or Paper Strips.


I'm a sucker for a stitched die, so the stitching part of the decision was a no-brainer. Hmm, then to pick stripes or paper strips?

scissorspapercard, Stampin' Up!, Kindred Stamps, Sweet Stamp Shop, Just Add Ink, TV Time Die, Spoiler Alert, Pleased As Punch DSP, Galactic Adventures The Third, The One With The Friend

The stripes were an obvious choice after choosing to use this retro TV die from Kindred Stamps as a feature. Does the paper remind you a bit of the old test patterns? Or are you too young to remember those, back when TV stations didn't air programs 24 hours a day.

scissorspapercard, Stampin' Up!, Kindred Stamps, Sweet Stamp Shop, Just Add Ink, TV Time Die, Spoiler Alert, Pleased As Punch DSP, Galactic Adventures The Third, The One With The Friend

I cropped the TV from Silver Foil paper, with the accent pieces in Basic Black. The DSP is from last year's Sale-A-Bration, called Pleased As Punch. The 'spoiler alert' sentiment is from a Sweet Stamp Shop set. The company no longer exists, so I can't find out the name of the stamp set, unfortunately.

scissorspapercard, Stampin' Up!, Kindred Stamps, Sweet Stamp Shop, Just Add Ink, TV Time Die, Spoiler Alert, Pleased As Punch DSP, Galactic Adventures The Third, The One With The Friend

The inside sentiment is from two different Kindred Stamps sets, called The One With The Friend and Galactic Adventures The Third. This card is going to someone who watches a lot of TV/Movies and will get a laugh from the getting old bit. That's one of the things I love about making cards- the ability to make the perfect card for a loved one.

That's all from me for now, but please do pop on over to the Just Add Ink blog, where you'll find the rest of this week's Design Team cards. You'll also find our linky, where you can enter your card in our challenge. Which two will you choose?

Bye for now,

Tina

Thursday, 10 June 2021

JAI 558: Just Add A Sketch

 Hi!


I feel like I say this every week, but hooray for Friday! It's been another super-busy week and I am looking forward to the long weekend. My two youngest kids have pupil-free days (of course not on the same day!), so it's an extra long weekend for them.


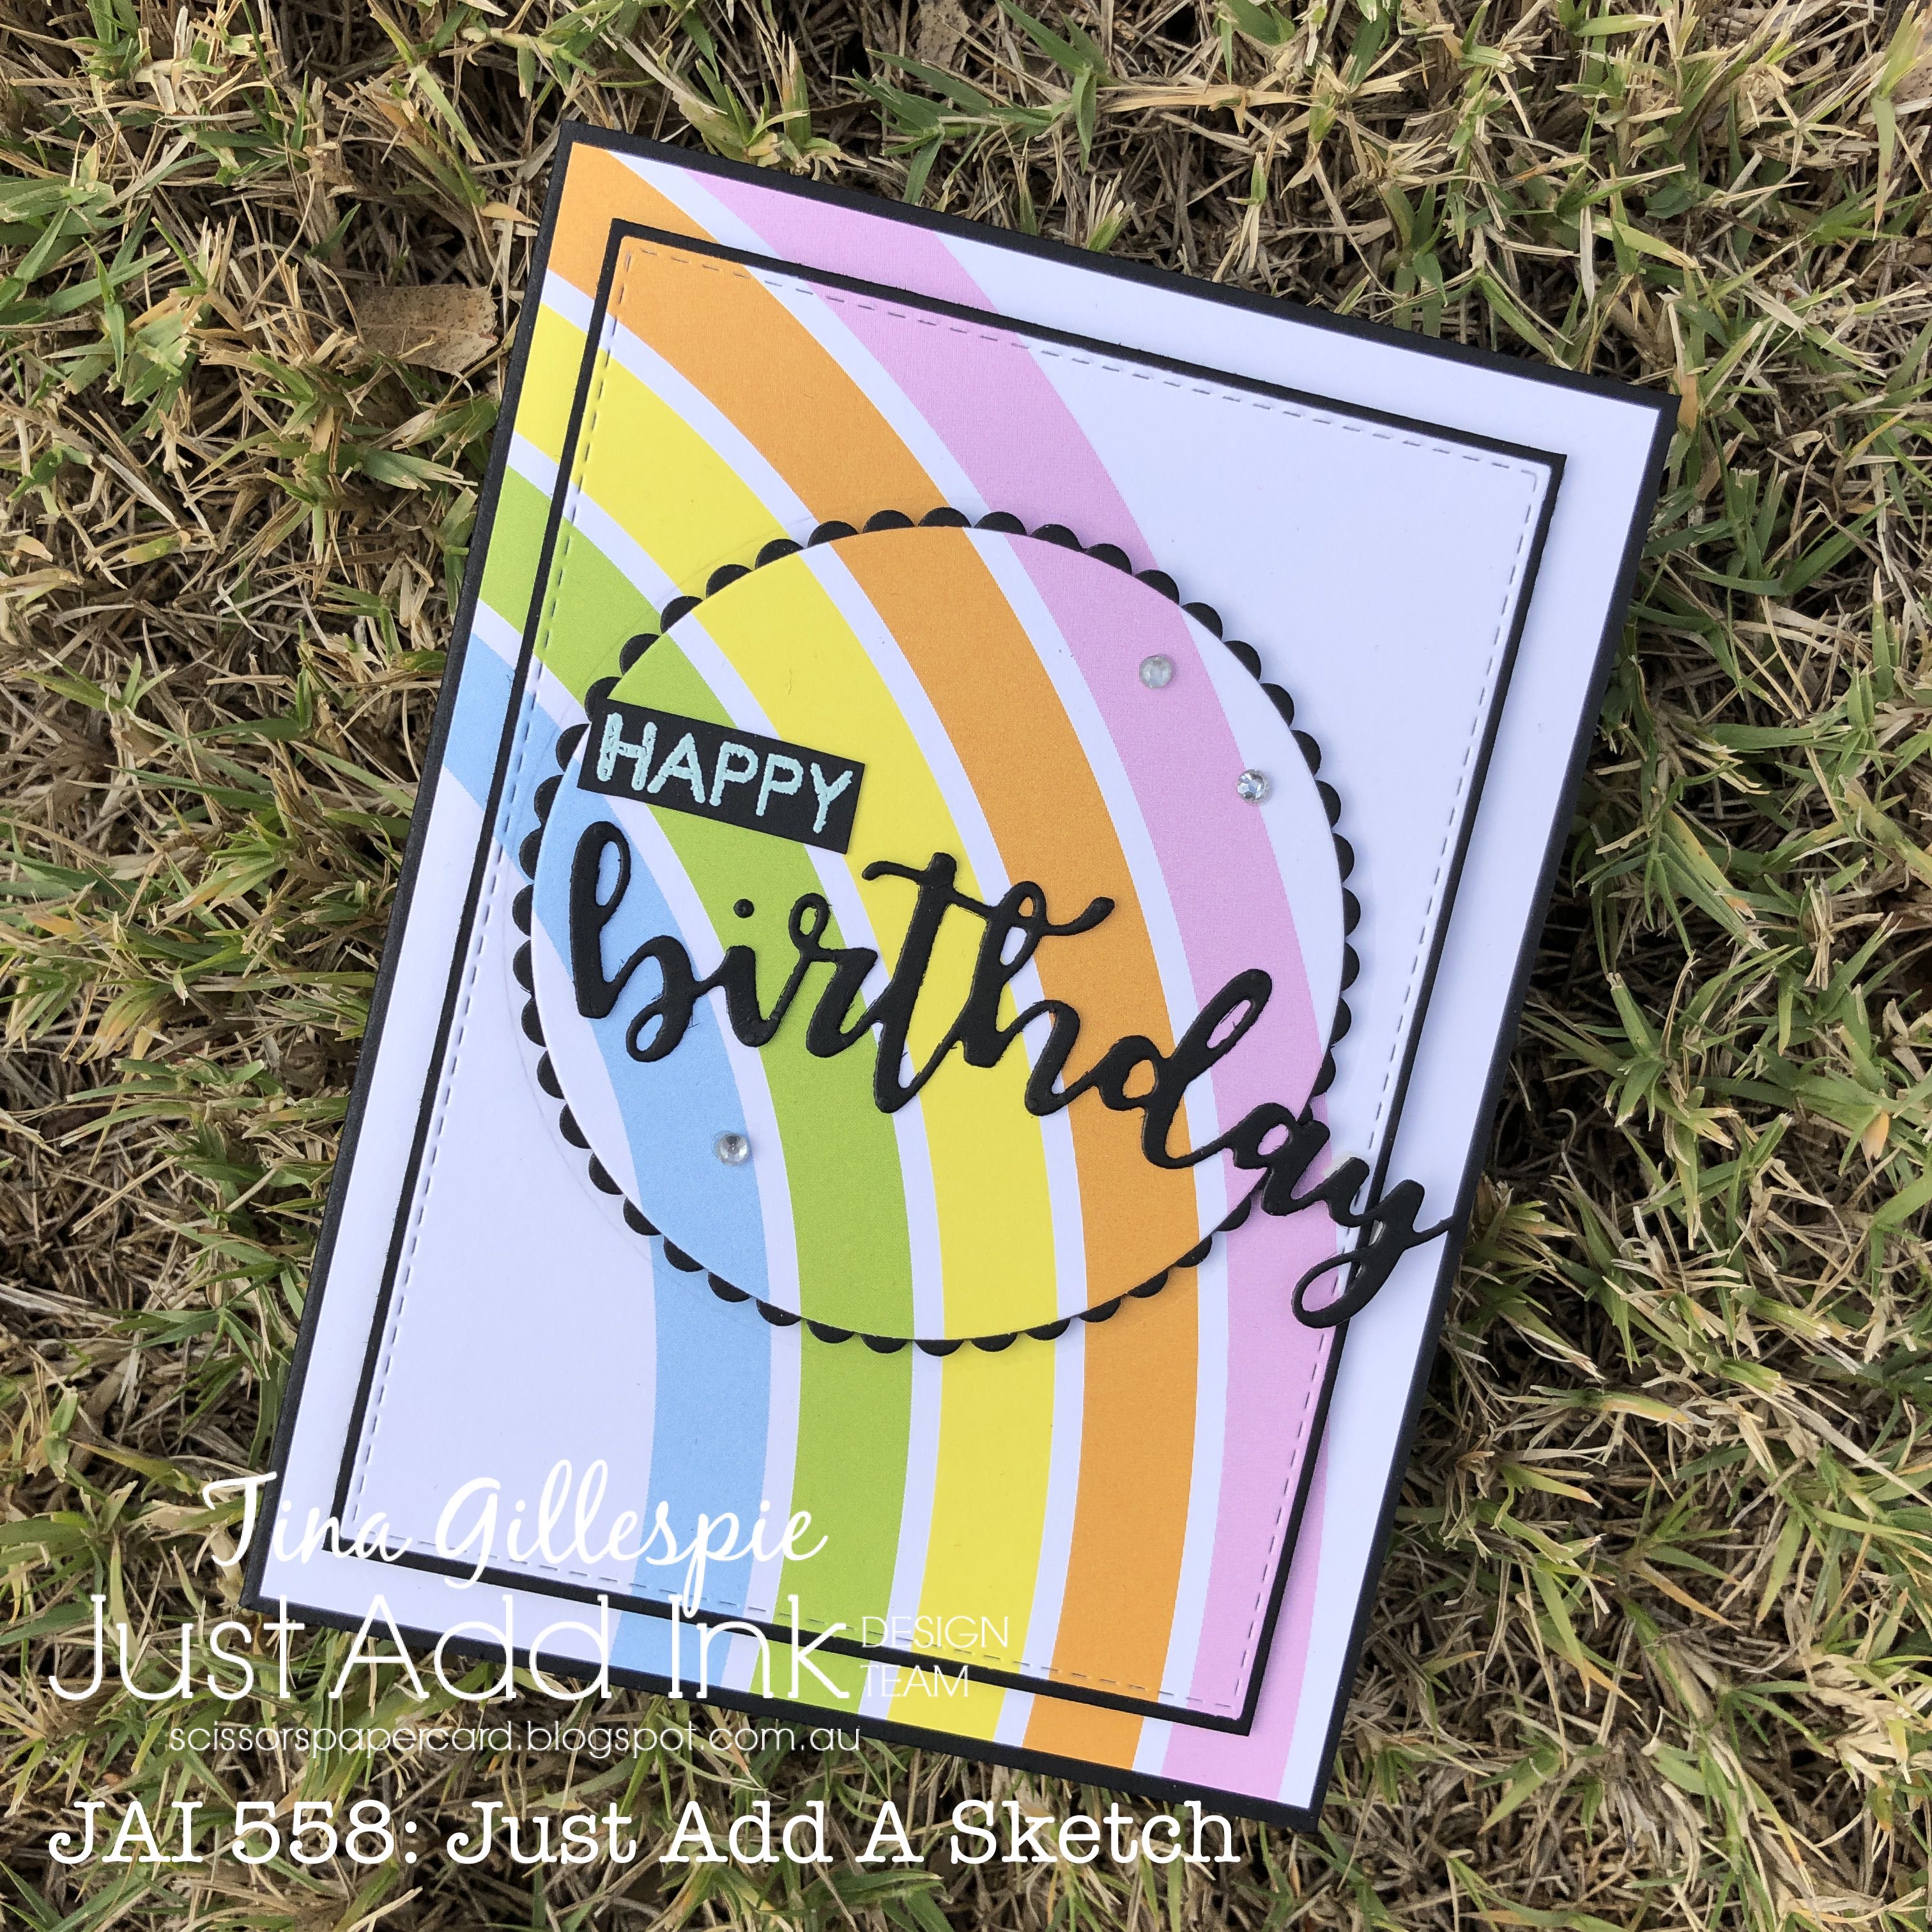
How awesome is this sketch that Kim designed for our challenge this week? All those delicious layers! I decided to have a lot of fun with the layers, by making my background DSP carry across all of the layers on the card.

scissorspapercard, Just Add Ink, Stampin' Up!, Uniquely Creative, WaffleFlower, Sweet Sentiments Builder, Sweet Sentiments Dies, JJ's Rainbows DSP, Layering Circles Dies, Stitched Rectangles Dies

The DSP is from WaffleFlower, and is called JJ's Rainbows. It's so happy and cheerful! I held my breath and carefully cropped the paper using a Stitched Rectangles Die and a Layering Circles Die. I had to be so careful to cut the rectangle straight - I was so nervous! Each layer is matted in Basic Black and popped up using Dimensionals, aligning the stripes with the layer below.

scissorspapercard, Just Add Ink, Stampin' Up!, Uniquely Creative, WaffleFlower, Sweet Sentiments Builder, Sweet Sentiments Dies, JJ's Rainbows DSP, Layering Circles Dies, Stitched Rectangles Dies

The sentiment is from Uniquely Creative, using their coordinating Sweet Sentiments stamps and dies. I found some old Pool Party embossing powder in my stash, and was pleasantly surprised when it still worked. I had planned to use white, but thought I'd give this a go when I found it while reaching for my white powder.

scissorspapercard, Just Add Ink, Stampin' Up!, Uniquely Creative, WaffleFlower, Sweet Sentiments Builder, Sweet Sentiments Dies, JJ's Rainbows DSP, Layering Circles Dies, Stitched Rectangles Dies

The inside uses more of the Sweet Sentiments stamps. It's a 'builder' set, so you can mix and match the stamps to create your own sentiment. I thought the 'magical' bit suited the rainbow on the front. They are a little magical, after all!

That's all from me for now, it's rather cold here, so I'm off to snuggle up somewhere with a good book and a cuppa! Please do pop on over to the Just Add Ink blog, where you'll find the rest of this week's Design team cards. You can also link up your card for our challenge. I can't wait to see what you make!

Bye for now,

Tina

Sunday, 6 June 2021

CTC 321: Mini Project, Masculine Twist

 Hi!


Thanks for joining me for the new CASEing The Catty Sunday Challenge Blog Hop. It's a fun challenge this week. Actually, all our challenges are fun (I think!) but this one was extra fun for me.


We are tasking you to find a project in the Mini Catalogue and give it a masculine twist. I like to really challenge myself, so I decided to look for a very feminine card to twist.


Smoochy, lipstick lips are super feminine, right?

scissorspapercard, Stampin' Up!, CASEing The Catty, Handsomely Suited Bundle, Sweet Strawberry, Birch, In Good Taste DSP, Stampin' Blends

My first thought was to replace the lips with a bow tie, and the rest of the card was built around that! The bow tie, from Handsomely Suited, was coloured with my Night Of Navy Blends and then cropped with the matching Suit & Tie Dies. My sentiment is from Sweet Strawberry, and I've just noticed that it has a mix of fonts, just like the catalogue card I am CASEing.

scissorspapercard, Stampin' Up!, CASEing The Catty, Handsomely Suited Bundle, Sweet Strawberry, Birch, In Good Taste DSP, Stampin' Blends

The DSP is from the In Good Taste pack, which carried over from the previous Annual Catalogue. I layered it on a discarded piece of Whisper White that had beens tamped with the Birch stamp and cropped with a Stitched Rectangles Die. I had made it for a different card and didn't end up using it, but it worked perfectly on this card. I tied a reef knot in my twine, instead of the bow on the original card.

scissorspapercard, Stampin' Up!, CASEing The Catty, Handsomely Suited Bundle, Sweet Strawberry, Birch, In Good Taste DSP, Stampin' Blends

My DSP offcut from the front of the card and a tie were the perfect additions to the inside of the card.

That's all from me for tonight, but your job is just beginning! We'd love to see how you turn a non-masculine card into a masculine card. All you need to do is make the card and post a photo in our Facebook group.


Don't race off too quickly, though! You will want to finish our blog hop first! Please pop on over to Peta's blog, where she has a stunner of a card made using a popular stamp set for masculine cards.

Bye for now,

Tina

Wednesday, 2 June 2021

Colour Creations: 2021-22 In Colours

 Hi!


Hooray!! Time for a new year of Colour Creations! To get our timeline back in whack, we are starting with all five of the new In Colours. Have you seen them yet? Picked a favourite? Hmm, I'm still deciding! Because of that, I bucked my own system of the past year of Colour Creations and made a card that used all five colours.

scissorspapercard, Stampin' Up!, Colour Creations, Biggest Wish, Ornate Layers Dies, Stitched Rectangles Dies, Stampin' Blends

I started by creating my colourful panel. I used the stitched rectangle die from the Ornate Layers Dies to crop the Whisper White, Soft Succulent, Pale Papaya, Polished Pink and Fresh Freesia cardstock. I adhered these to a piece of copy paper so that I could crop the whole lot with a Stitched Rectangle Die. Copy paper ensures that it's not too thick for the die or Big Shot to cope with.

scissorspapercard, Stampin' Up!, Colour Creations, Biggest Wish, Ornate Layers Dies, Stitched Rectangles Dies, Stampin' Blends

The stamping was done to match the colours on the main panel. Have you discovered the Biggest Wish stamp set yet? It's such an awesome set! I coloured a few Rhinestones with my Dark Evening Evergreen Blend and then popped the whole lot onto an Evening Evergreen card base that I'd stamped with the little crosses from Biggest Wish. I was so enamoured with the words in the set that I hadn't even noticed the crosses until I saw them used on other card!

scissorspapercard, Stampin' Up!, Colour Creations, Biggest Wish, Ornate Layers Dies, Stitched Rectangles Dies, Stampin' Blends

For my inside, I simply used the offcuts from the front of the card! I cropped another Stitched Rectangle to sit inside the border piece. Too easy!

That's all from me for tonight. You've probably noticed by now that we've switched back to a traditional Blog Hop format for this year's Colour Creations. Next in the round is my lovely friend, Christine. You won't want to miss her gorgeous card, nor anyone else's! Just keep cruising around the blogs until you get back to where you started. If you find a broken link, you can click on the links below to get back to where you were.


Bye for now,

Tina

Kate Morgan

Sharon Davern

Vicki Boucher

Caroline Manwaring

Tina Gillespie <<you are here

Christine Blain

Rachel Woollard

Theresa Gerrard

Rachel Palmeri

Michelle Taylor

Diane Furniss

Andrea Sargent

Ros Davidson

Cathy Proctor

Sunday, 30 May 2021

CTC 320: All Occasions Section

 Hi!


Wow, how has Sunday evening rolled around again so quickly? It's been a super busy week for me, so no wonder it flew by! My favourite way to end the week is with the CASEing The Catty Sunday Challenge Blog Hop, so let's get started!


This week we are asking you to CASE the All Occasions section of the new Annual Catalogue. There's 49 pages, so plenty of inspiring projects to choose from. This cutie caught my eye.


I don't have any baby stamps, as most people in my life are beyond that for now. I did, however, love the Stitched Rectangles that sit behind each of the three images, so this formed the basis of my card.

scissorspapercard, Stampin' Up!, CASEing The Catty, Bloom Where You're Planted DSP, A Good Man, Stitched Rectangles Dies

I received the Bloom Where You're Planted DSP last week, and thought that the plant images would be the perfect substitute for the babies. To suit the design, this meant having three vertical rectangles to frame the plants.

scissorspapercard, Stampin' Up!, CASEing The Catty, Bloom Where You're Planted DSP, A Good Man, Stitched Rectangles Dies

I wanted the background DSP to be very neutral, so I chose this Grey Granite piece. My uncle owns a cane furniture business, and he used to give the fabric scraps from the seating cushions to my Nana. She'd make all kinds of things with them, and this paper reminds me of the fabric, and her. She was always busy making something!

scissorspapercard, Stampin' Up!, CASEing The Catty, Bloom Where You're Planted DSP, A Good Man, Stitched Rectangles Dies

On the inside I used one of the plant images that was on the side of the DSP sheet, so partially cut off. This is perfectly OK to use, just adhere it over the side of your card so the cropped bit looks intentional!

That's all from me for tonight, but please come and join in with our challenge. Just make a suitable card and upload it to our Facebook group. It really is that easy!


For now, though, please do continue on with our Blog Hop. Next up is my lovely friend, Rachel. She's had a lot of fun playing with a stamp set that may very soon make the jump from my 'maybe' list to my 'must-have' list. I've loved seeing her recent creations using it, and I'm sure you will too.

Bye for now,

Tina

Wednesday, 3 March 2021

Colour Creations: Pumpkin Pie

 Hi!


Welcome back to the new Colour Creations Creative Showcase. Fittingly, for our first colour of Autumn, it's Pumpkin Pie being featured this week. It's a lovely orange, and a very classic addition to any Autumnal colour scheme.

scissorspapercard, Stampin' Up!, Colour Creations, Playful Alphabet Dies, Pretty Perennials, Pinewood Planks 3DEF, Stampin' Blends, Joy To The World

My card was built around the 'happy' part of the sentiment. I've seen this technique, where you fussy cut around die cut letters, around a lot recently and I wanted to give it a go. It was certainly fun to try!

scissorspapercard, Stampin' Up!, Colour Creations, Playful Alphabet Dies, Pretty Perennials, Pinewood Planks 3DEF, Stampin' Blends, Joy To The World

I also wanted to play with my Stampin' Blends to create the background. I used the Dark Pumpkin Pie Blend to scribble on a piece of Vellum and then I spritzed it thoroughly with the heavy duty isopropyl alcohol. This allowed me to move the ink around on the vellum for a short period of time before it dried. I used a piece of acetate to help move it. It was a lot of fun.

scissorspapercard, Stampin' Up!, Colour Creations, Playful Alphabet Dies, Pretty Perennials, Pinewood Planks 3DEF, Stampin' Blends, Joy To The World

Of course, I made my vellum piece a bit larger than I needed it to be for the front so that I could have an offcuts to use on the inside. I work smarter, not harder, as my good friend Rachel taught me!

Please pop on over to Cathy's blog for the rest of this week's Pumpkin Pie cards.

Bye for now,

Tina