Pages

Showing posts with label Merry Christmas Thinlits. Show all posts

Thursday, 28 November 2019

AWH Blog Hop: Boxes and Gift Bags

Hi!


The Art With Heart Team are back with another inspirational Blog Hop. This month we are featuring Gift Bags and Boxes, just in time for the Christmas gift giving season. The bags and boxes featured are all made using current Stampin’ Up! products and any of our wonderful team members are happy to help you with the supplies you will need to reproduce these beautiful projects.

It took me a while to work out what I was going to do for this Hop - for the longest time I had 'Boxes and Gift Tags' in my head, not Gift Bags. Oops! Back to the drawing board!

scissorspapercard, Stampin' Up!, Art With Heart, Gift Box, Merry Christmas To All Bundle, Night Before Christmas DSP, Scalloped Note Cards, Pine Tree Punch

I ended up making this cute little gift box from one of the Old Olive Scalloped Notecards. Have you noticed them in the Annual Catalogue? I hadn't, until recently. For the very low price of $14.00, you receive 20 cards and 20 envelopes, 5 each of Balmy Blue, Old Olive, Light Pink and Terracotta Tile. I like making something unexpected from our products, and this fit the bill nicely!

scissorspapercard, Stampin' Up!, Art With Heart, Gift Box, Merry Christmas To All Bundle, Night Before Christmas DSP, Scalloped Note Cards, Pine Tree Punch

I love how the scalloped edge of the Note Card gives a cute little finish to the opening of the box. It really feels like cheating to use these to make a box!

scissorspapercard, Stampin' Up!, Art With Heart, Gift Box, Merry Christmas To All Bundle, Night Before Christmas DSP, Scalloped Note Cards, Pine Tree Punch

I used some Night Before Christmas DSP on the top of the box. I couldn't resist adding some Wink Of Stella to the Pine Tree shape, although it's hard to photograph. I love that this paper makes the tree look decorated without any extra effort on my behalf!

Here's some instructions on how I made the box:

scissorspapercard, Stampin' Up!, Art With Heart, Gift Box, Merry Christmas To All Bundle, Night Before Christmas DSP, Scalloped Note Cards, Pine Tree Punch

I cropped 1 1/2cm from the straight edge of the card. I then scored at 1cm all the way around the edges, as well as another score line 1cm from the pre-scored line in the card, on the side of the scalloped edge. Did that make sense? The extra line is basically under the l and e of Gillespie in my watermark. I then snipped the corners as shown, and folded and glued the straight edged side of the card to form a box. To close it, the side flaps fold into the box, and the scalloped edge stays outside of the box. You might be able to see that I trimmed a tiny bit off the side flaps to make them easier to fold into the box.

scissorspapercard, Stampin' Up!, Art With Heart, Gift Box, Merry Christmas To All Bundle, Night Before Christmas DSP, Scalloped Note Cards, Pine Tree Punch

You can see that the box is very thin, but it would be perfect for a gift card or voucher, or maybe even cash. The box could be made to be deeper, but you would lose width and length.

That's all from me for this month's Blog Hop, now it's time to jump on over to Kate Morgan's blog to continue the hop.


If you have a broken link or have come to this blog hop midway, you can view all the participants below:


Bye for now,

Tina

Wednesday, 13 November 2019

AWH HOC Week 13

Hi!


I can't believe how quickly Wednesday has rolled around again! I'm very time poor this week, but I still wanted to play along with the Art With Heart team's Heart Of Christmas Blog Share. My card was quick to throw together, using all sorts of bit and pieces I found on my craft desk!

scissorspapercard, Stampin' Up!, Art With Heart, Heart Of Christmas, Merry Christmas To All Bundle, Night Before Christmas DSP, Christmas

I started with the Stitched Rectangles, which were left over from this Elfie card I made recently. I cut some Night Before Christmas DSP to fit inside each rectangle, and then popped the shapes up on Dimensionals.

scissorspapercard, Stampin' Up!, Art With Heart, Heart Of Christmas, Merry Christmas To All Bundle, Night Before Christmas DSP, Christmas

The 'Merry' was cropped from Red Foil, but in hindsight I probably should have forgone the foil and cut it from something darker. It doesn't stand out as much as I'd like, but it's glued down now!

scissorspapercard, Stampin' Up!, Art With Heart, Heart Of Christmas, Merry Christmas To All Bundle, Night Before Christmas DSP, Christmas

I had a strip of the biscuit DSP left over from a different card, so I put it to use on the inside of the card. Done!

This week the blog share is hosted by my wonderful friend, Judy May. I'm very much looking forward to seeing her, and my other demo friends, in Sydney this weekend for Stampin' Up!'s OnStage event. Keep an eye out early next week for all the news!

Bye for now,

Tina

Wednesday, 6 November 2019

AWH HOC Week 12

Hi!


Welcome to another week of the Art With Heart team's Heart Of Christmas Blog Shares, as we inch ever closer to Christmas. My kids started writing their Christmas Wish Lists yesterday - I don't know if they are starting early or late! Probably late by most kid's standards. LOL!

scissorspapercard, Stampin' Up!, Art With Heart, Heart Of Christmas, Christmas, Swirly Frames, Merry Christmas To All Bundle, Pine Tree Punch, Night Before Christmas DSP

For tonight's card I decided to use a non-Christmas set to create my background. Have you noticed Swirly Frames in the Annual Catalogue? It's got a heap of fun circles, squares, rectangles and lines in a hand drawn style. Great for framing other images, or just stamping randomly for a background, as I have done. I used Old Olive and Cherry Cobbler inks, both full strength and stamped off.

scissorspapercard, Stampin' Up!, Art With Heart, Heart Of Christmas, Christmas, Swirly Frames, Merry Christmas To All Bundle, Pine Tree Punch, Night Before Christmas DSP

Once again I reached for my trusty Pine Tree punch for a focal point for my card. I think I lined up the stars in the Night Before Christmas DSP quite well in the punched shape! The star on the top of the tree is simply one of the Copper Star Elements from the Holiday Catalogue, coloured with my Dark Cherry Cobbler Blend.

scissorspapercard, Stampin' Up!, Art With Heart, Heart Of Christmas, Christmas, Swirly Frames, Merry Christmas To All Bundle, Pine Tree Punch, Night Before Christmas DSP

I punched a second tree for the inside, with some Real Red Glimmer Paper for the star - the copper stars are a little too bulky for the inside of a card.

Time for you to head on over to Claire's Blog, where you can find the rest of this week's heart Of Christmas links. I think we only have four more weeks to go after this one!

Bye for now,

Tina

Sunday, 1 September 2019

CTC #244: Holiday Catalogue Cover

Hi!


Hello! It's time once again for the CASEing The Catty Sunday Challenge Blog Hop. You may have come from Monique's blog, or you may be starting here. Either way, just keep touring the blogs until you get back to where you started.


This week we are CASEing projects from the front of the Holiday Catalogue. My eye was particularly taken by the wreath card in the Toile Tidings grouping of cards, so that's what I CASEd.

scissorspapercard, Stampin' Up!, CASEing The Catty, Bloom And Grow, Merry Christmas To All Bundle, In Colour DSP, Stampin' Blends, Christmas

I don't actually have any of the products in that suite, so I had to search my stamp collection for something that would work in place of the wreath. Bloom and Grow fit the bill! I changed the circle to an oval to better suit the flowers, so I switched the orientation of the card too. The flowers were stamped and then I added a few extra of the smaller spray stamps at each end to fill the gaps. I coloured the little circle buds yellow to look a bit like wattle. I wanted to add a little Australian feel to the card.

scissorspapercard, Stampin' Up!, CASEing The Catty, Bloom And Grow, Merry Christmas To All Bundle, In Colour DSP, Stampin' Blends, Christmas

The Merry die cut was cut four times and stacked. The top is cut in Red Foil and the bottom three layers in Call Me Clover to match the card base. It's a cool effect that looks so much more effective in real life.

scissorspapercard, Stampin' Up!, CASEing The Catty, Bloom And Grow, Merry Christmas To All Bundle, In Colour DSP, Stampin' Blends, Christmas

I stamped the flowers again on the inside. I'd curved the stamp a little for the front of the card to go around the oval, but I straightened it for the inside.

Don't forget to check out our Facebook group, where you can enter your card in this week's challenge. Which card catches your eye from the front cover?


That's it for me, so now you're off to see what the lovely Peta has created. I wonder what hijinks Marvi has been up to this week?


Bye for now,

Tina

Tuesday, 30 July 2019

Blueberry Peacock

Hi!

Do you ever buy a craft product just for one part of a pack? Maybe it's a set of dies that you purchased for one die, or a stamp set? This time, for me, it was one pattern in the Noble Peacock SDSP. I really loved the Blueberry Bushel paper in the pack, and bought it just for that! Although, I think once I get into Christmas card making, the Pretty Peacock sheets will be just as appealing!

scissorspapercard, Stampin' Up!, Noble Peacock SDSP, Merry Christmas Dies, Stitched Nested Labels Dies, Well Said

I made this card as a class sample to show off the gorgeous foil DSP. I paired it with plain Black Foil, with some Black Glittered Organdy Ribbon for a touch of glitz. After I'd glued it all down I looked at it and wished I'd embossed the plain black foil with the Subtle Embossing Folder. My class ladies all went for this option, and it looked fabulous.

scissorspapercard, Stampin' Up!, Noble Peacock SDSP, Merry Christmas Dies, Stitched Nested Labels Dies, Well Said

I cut the 'Happy' from Black Foil using the Merry Christmas Dies. I love that the 'Happy' works equally well on a birthday card as it does on a Christmas card. I layered it over some vellum that I'd cropped using a Stitched Nested Labels Die. The Classic Label Punch was the perfect choice for the 'Birthday' part of the sentiment, as it mirrors the Labels Die shape.

scissorspapercard, Stampin' Up!, Noble Peacock SDSP, Merry Christmas Dies, Stitched Nested Labels Dies, Well Said

A little strip of the DSP finishes off the inside. I like occasionally doing a vertical strip rather than horizontal, just for something different. In this case it ties the inside layout with the front layout, so I think it was a good decision.

Bye for now,

Tina

Tuesday, 2 July 2019

A Pocket Full Of Posy

Hi!


Sob! We are finally at the last week of the Colour Creations Blog Share posts. It's been a fun year using each of the colours in Stampin' Up!'s range. I set myself the challenge to participate every week, and I met that challenge! Even when I was overseas I was able to play along, thanks to Catherine allowing me to give her links ahead of time and hoping they would work.

For our final week we are featuring Purple Posy, which is a soft purple that fits well with Highland Heather and Gorgeous Grape. I wanted to go out with a bang, so I have made a super special card for you today.

scissorspapercard, Stampin' Up!, Art With Heart, Colour Creations, Daisy Lane Bundle, Well Said, Itty Bitty Birthdays, Daisy Punch, Subtle TIEF, Layered Die Cut See Through Card

I had the chance to watch a few crafting videos last week, and one was Jennifer McGuire's Layered Die Cut See-Through Cards. I was immediately keen to give the technique a try, and this was a great opportunity. LOL, it's a great way to use more of that Press'n'Seal that we all got in New Zealand too!

scissorspapercard, Stampin' Up!, Art With Heart, Colour Creations, Daisy Lane Bundle, Well Said, Itty Bitty Birthdays, Daisy Punch, Subtle TIEF, Layered Die Cut See Through Card

You basically die cut (or punch in my case) a heap of shapes and layer them so that they overlap quite a bit. Press'n'Seal holds it all in place while you trim it to size and then glue matching shapes on the back to keep it all in one piece. You can watch Jennifer's video to see how she completes the cards. I love the lacy look to the card, and how it's quite strong even though it looks delicate.

scissorspapercard, Stampin' Up!, Art With Heart, Colour Creations, Daisy Lane Bundle, Well Said, Itty Bitty Birthdays, Daisy Punch, Subtle TIEF, Layered Die Cut See Through Card

The inside of the card perfectly mirrors the front of the card, so that you can't see the Purple Posy circle or daisy from the front of the card. This card took several hours to complete, but it was well worth the time. I can't wait to try it again!

For the final time, please head on over to Catherine's blog to see the rest of this week's Purple Posy cards. Keep an eye out though, soon we will be starting the Heart Of Christmas, so there will be weekly Christmas inspiration for you all.

Bye for now,

Tina

Thursday, 14 March 2019

JAI #448: Just Add J

Hi!


It's time for a new Just Add Ink challenge. This week it's one of my alphabet challenges, with the letter J coming up for our inspiration. Hmmm, what can you do with the letter J? A stamp set, technique, colour?


I decided to go for a fancy fold and make a Joy Fold card. It's been a while since I've made one, I'm not sure why because they are so easy and have a huge impact. For some reason my mind went to Christmas (joyeux noel - another J!), so that's what I did for my card.

scissorspapercard, Stampin' Up!, Just Add Ink, Merry Christmas To All Bundle, Painted Seasons Bundle, Rectangle Stitched Framelits, Joy Fold Card, Fancy Fold

Once again I used the gorgeous Painted Seasons stamps and DSP for my card. I was a little worried that the green patterned paper would be too busy and dominate, but by the time I had adhered the second 'card' I realised that you can't actually see much of the DSP.

scissorspapercard, Stampin' Up!, Just Add Ink, Merry Christmas To All Bundle, Painted Seasons Bundle, Rectangle Stitched Framelits, Joy Fold Card, Fancy Fold

To make a Joy Fold card you take a tent fold card and chop off half of the front. Lay it on the side, decorate with DSP and then cut a smaller card and adhere it on the inside of the base with the fold facing the other way. Decorate this and you're done! I added the circle with the pinecone on the front so that the smaller card tucks under and keeps it shut.

scissorspapercard, Stampin' Up!, Just Add Ink, Merry Christmas To All Bundle, Painted Seasons Bundle, Rectangle Stitched Framelits, Joy Fold Card, Fancy Fold

So there you have it, a Joyous Noel Joy Fold card. What will you make? Join in the fun over at the Just Add Ink blog, where you can see what the rest of the Design team have created with J, and also link up your own J card.

Bye for now,

Tina

Thursday, 25 October 2018

JAI #432: Just Choose Two

Hi!

Hooray for Friday and the new Just Add Ink challenge.


This week Patrice has challenged us to Choose Two to add to our cards this week.


Which two will you choose of Buttons, Bows or Bling? I chose Bows and Bling.

scissorspapercard, Stampin' Up!, Just Add Ink, Star Of Light, Merry Christmas To All, Starlight Thinlits, Merry Christmas Thinlits

I'm not sure if this card is a bit too footy jumper looking or not. What do you think? I think it's the stripe down the middle. I stamped over it with the starry swirl in Balmy Blue in to match the cardstock. The same stamp was also stamped in Night Of Navy on the larger layer.

scissorspapercard, Stampin' Up!, Just Add Ink, Star Of Light, Merry Christmas To All, Starlight Thinlits, Merry Christmas Thinlits

My bling is these cute little stars that I found in my stash - I think they were a free gift with a purchase. I glued them over where the larger stars are in the swirl. A bit fiddly, but my Take Your Pick tool made the job much easier.

scissorspapercard, Stampin' Up!, Just Add Ink, Star Of Light, Merry Christmas To All, Starlight Thinlits, Merry Christmas Thinlits

I repeated the swirls and stars on the inside. If you're going to bling something up, you may as well go big!

You can see the rest of the Design Team cards over at the Just Add Ink blog, where you can also link up your card. Which two will you choose?

Bye for now,

Tina

Wednesday, 10 October 2018

Saved!

Hi!


Welcome to the new Heart Of Christmas Blog Share. I think we are up to about week 9 now, and so far I've managed to make a card each week. It's so nice to be well on my way to having my Christmas cards finished for 2018.

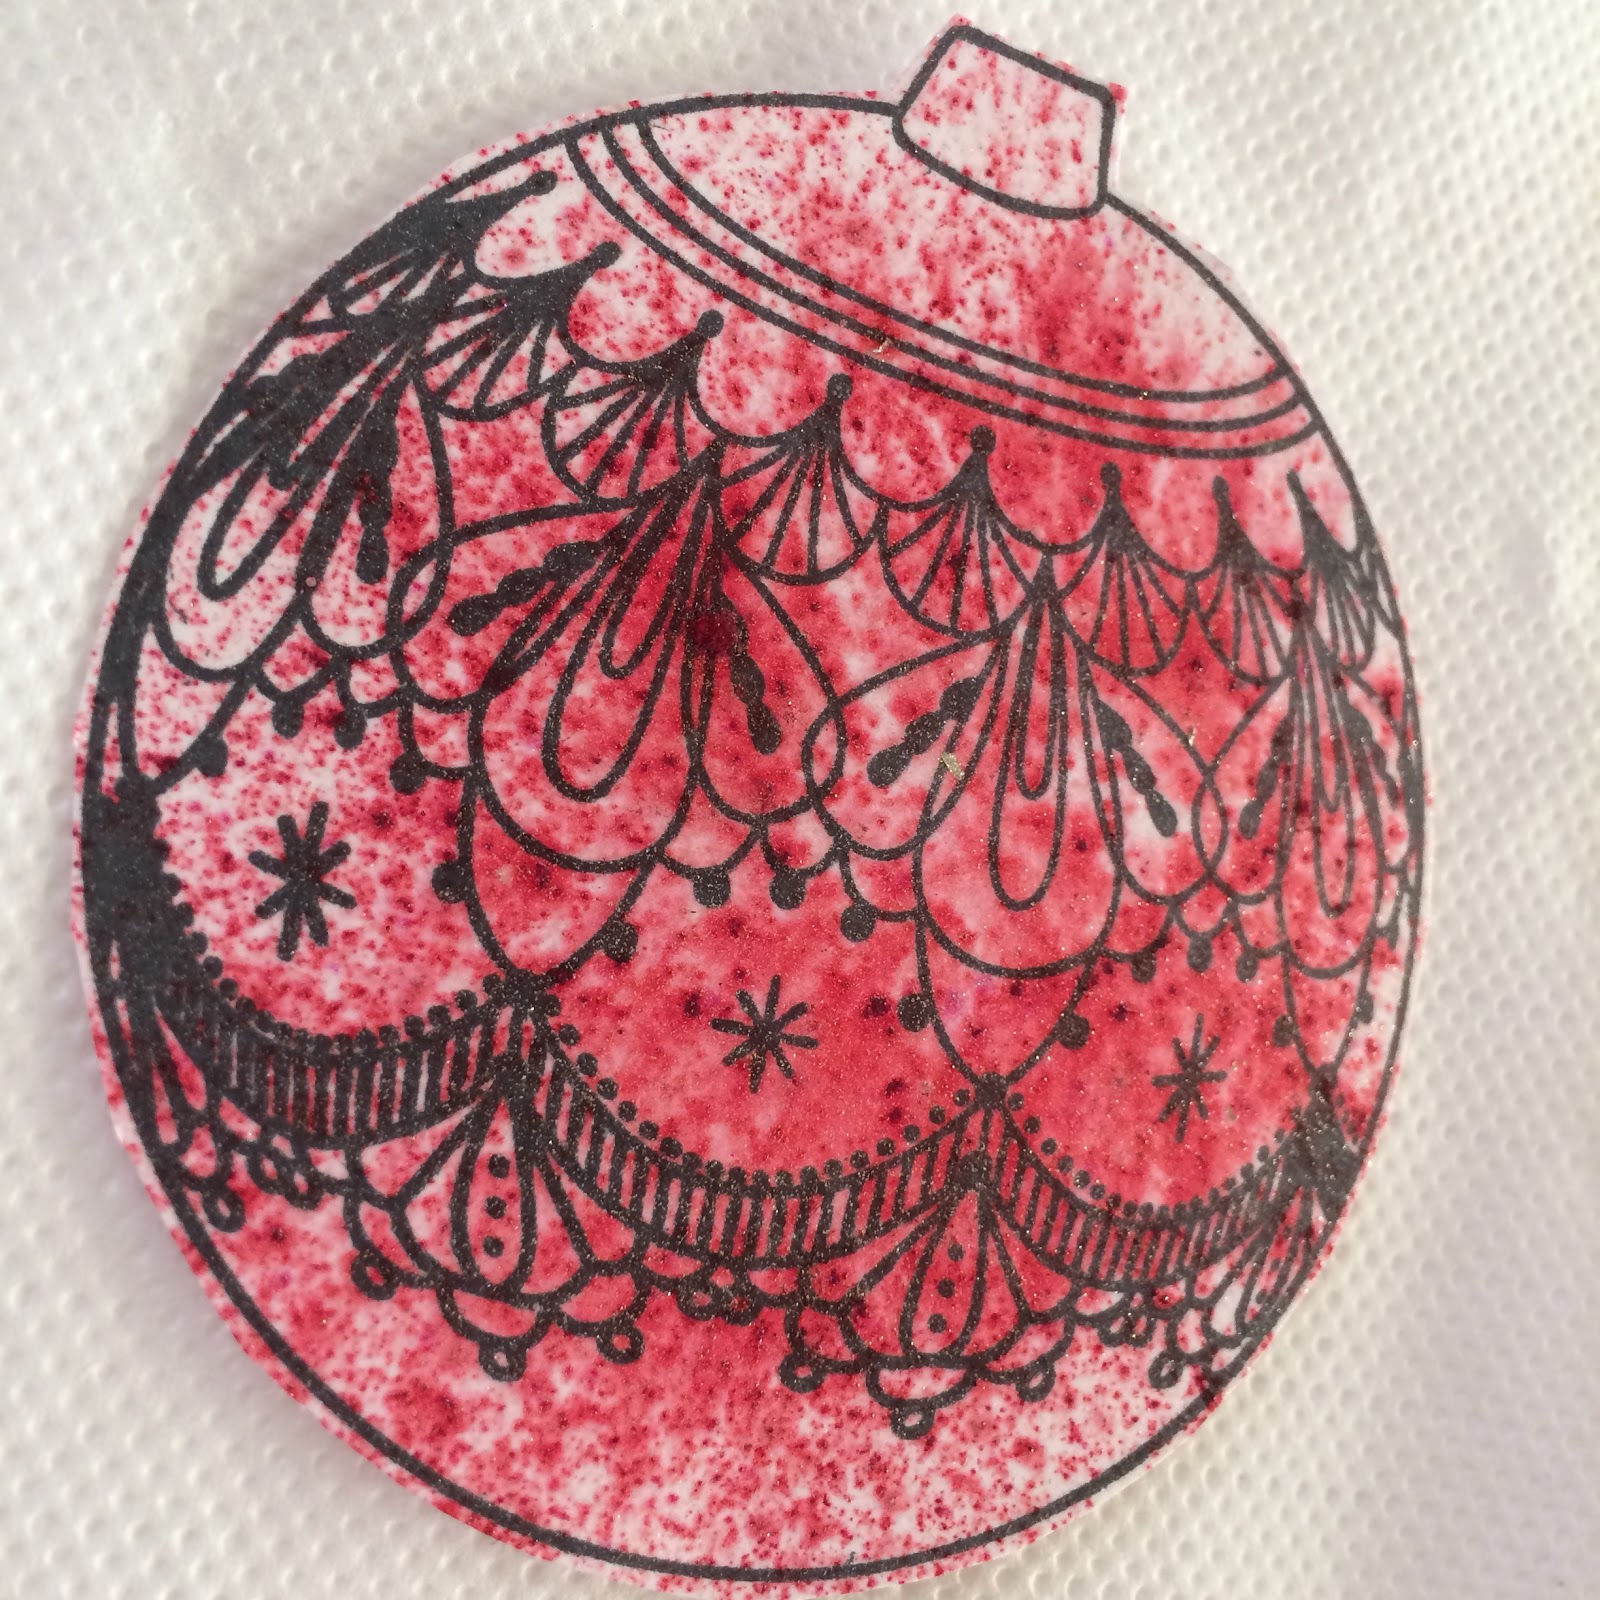
Today's card came about after a little experiment didn't go as well as I'd hoped.  I was wanting to see if I could used Isocol to activate Brushos powder over the top of an image stamped in Momento ink. Momento is designed to with with Blends, so water would have made the ink run. As it turns out, it does work, just differently than it would with water.


I chose the Brilliant Red Brushos because I was making a Christmas card, and red is Christmassy - right? Unfortunately, as one of my Facebook followers said, she was getting a serial killer vibe after I asked if it looked too much like blood splatter. LOL! Despite this, I was determined to make it work on a card, so after a bit of a think, this is what I made. The layout was a CASE of this card by my friend, Judy May.

scissorspapercard, Stampin' Up!, Art With Heart, Heart Of Christmas, Beautiful Baubles, Star Of Light, Merry Christmas To All, Broadway Bound SDSP, Brushos, Glitter Window

Red ornament, minus the serial killer blood splatters! Yay! I recently hosted an ATC swap with a Glitter Window technique theme, so it seemed a brilliant solution to my problem. Basically, you cut a hole in your card, run some clear packing tape across the back so that the sticky side is up, and then dump glitter over the top. Our Dazzling Diamonds is perfect for this, because you can still see through it. Finally, you adhere a stamped image behind the window so that you can see it through the window.

scissorspapercard, Stampin' Up!, Art With Heart, Heart Of Christmas, Beautiful Baubles, Star Of Light, Merry Christmas To All, Broadway Bound SDSP, Brushos, Glitter Window

A little bit of detail is lost when you do this technique, so to make the bauble look more like a bauble I took an old black marker (in case I ruined it) and coloured bits of the design to make them a lot bolder. I was pretty pleased with the overall effect. What do you think? Did I redeem the bauble?

scissorspapercard, Stampin' Up!, Art With Heart, Heart Of Christmas, Beautiful Baubles, Star Of Light, Merry Christmas To All, Broadway Bound SDSP, Brushos, Glitter Window

The bauble had done my head in by this point, so a super simple inside was definitely in order!

You can see the rest of this week's cards over at Claire's blog. I love seeing what everyone makes each week.

Bye for now,

Tina

Wednesday, 3 October 2018

Getting Merry With Merlot And Champagne

Hi!


Welcome to a new week of Art With Heart's Heart Of Christmas Blog Share. Are you being inspired every week to start your Christmas cards? Have you started yet? I hope so on both counts!

 This week I have a very Big Shot heavy card - not much stamping at all!

scissorspapercard, Stampin' Up!, Art With Heart, Heart Of Christmas, Detailed Deer Thinlits, Merry Christmas Thinlits, Subtle DTIEF, Merry Christmas To All

I started with a Detailed Deer die cut from a piece of Merry Merlot cardstock. I wanted to use the negative on the front of my card and decided to back it with some foil card. I'd hoped to use Copper, but realised I don't actually own any! Oops! My next choice was Champagne. For a bit of added texture, I ran the Champagne Foil cardstock through the Big Shot with the Subtle DTIEF. How gorgeous does that look?

scissorspapercard, Stampin' Up!, Art With Heart, Heart Of Christmas, Detailed Deer Thinlits, Merry Christmas Thinlits, Subtle DTIEF, Merry Christmas To All


I just want to run my fingers over it! It's amazing how such a simple thing can add so much to a card.

scissorspapercard, Stampin' Up!, Art With Heart, Heart Of Christmas, Detailed Deer Thinlits, Merry Christmas Thinlits, Subtle DTIEF, Merry Christmas To All

I used the die cut deer to finish off the inside, along with another small strip of the Subtle embossed Champagne Foil.

This week the Blog Share is being hosted from the wonderful Ros's blog. Go and check it out - you're sure to find something amazing.

Bye for now,

Tina

Wednesday, 5 September 2018

A Juggling Act in Santa's Workshop

Hi!


Welcome back to a new week of Heart Of Christmas. I am loving the new Santa's Workshop SDSP from the Holiday Catalogue, so I'm playing with it again for today's card. I love that so many of the images can be fussy cut to go on a card. If you're not a colourer it can be a great option instead of the stamp set.

scissorspapercard, Stampin' Up!, Art With Heart, Heart Of Christmas, Merry Christmas To All, Santa's Workshop SDSP, Dashing Along DSP, Merry Christmas Thinlits, Stitched Shapes Framelits

How cute is the juggling snowman?  I roughly trimmed around him so that I could drop him with one of my Stitched Shapes Circles Thinlits - yay for not having to fussy cut! Unfortunately the first time I roughly cut him too close and I couldn't fully cut the circle. I've popped him aside to use on another card where I can hide the chopped off part of the circle!

scissorspapercard, Stampin' Up!, Art With Heart, Heart Of Christmas, Merry Christmas To All, Santa's Workshop SDSP, Dashing Along DSP, Merry Christmas Thinlits, Stitched Shapes Framelits

I used paper from two different packs to go on the front and inside of the card. Did you notice that the front of the card wasn't a full card? I trimmed a strip off the front so that the gorgeous candy striped flocked paper from Santa's Workshop could be seen from both the inside and outside. The green star paper is from the Dashing Along pack, which is a promotional item for September only.

scissorspapercard, Stampin' Up!, Art With Heart, Heart Of Christmas, Merry Christmas To All, Santa's Workshop SDSP, Dashing Along DSP, Merry Christmas Thinlits, Stitched Shapes Framelits

Here's the inside. I thought the snowman might be a little tuckered out after all that juggling, so I popped a fussy cut sleeping snowman on the inside. When the card is closed you can't see him because he's tucked behind the juggling snowman.

As always, you can see the rest of this week's Heart Of Christmas cards over at Claire's blog. Are you finding inspiration each week - I certainly am!

Bye for now,

Tina