Pages

Showing posts with label 100 Layouts. Show all posts

Monday, 8 December 2014

Memory Keeping With PLxSU: December

Hi!

On the first Monday of each month I participate in a challenge hosted over at the Memory Keeping With PLxSU Facebook group.  The Design Team are based in countries all around the world and we are all SU Demonstrators and Project Life fans.  This month we are challenging ourselves (and you of course!) to complete a page or pages around a December theme.  It's important to note that this doesn't necessarily mean a December Daily page - it can be absolutely anything to do with December.

Having said that, my pages today are from my December Daily album.  This is the third year I have started a December Daily album.  My first year I didn't complete the album until the following September.  Last year I finished the album in January.  Not too bad!  This year keeping up will be so much easier with the Hello December PLxSU Collection.


Now, you might notice that I have actually started my December Daily with a November entry. That's because in Adelaide the Christmas season officially begins with the Annual Christmas Pageant.  This year Rob took the big kids into the city and they watched from his office window.


Another November entry, simply because we attended our first Christmas party for the season in November.  The party had a Super Hero theme, and Rob and Hudson didn't need much encouragement to dress in their Superman t-shirts!


December 1st is the day we put up our Christmas tree.  It fell on a Monday this year, and it felt really strange doing it on a weekday.  From my perspective it was great though, as I could assemble the tree without any 'helpers' or whining kids!  I did briefly regret allowing the big kids to decorate the tree by themselves as they made a huge mess and left it for me to clean up!
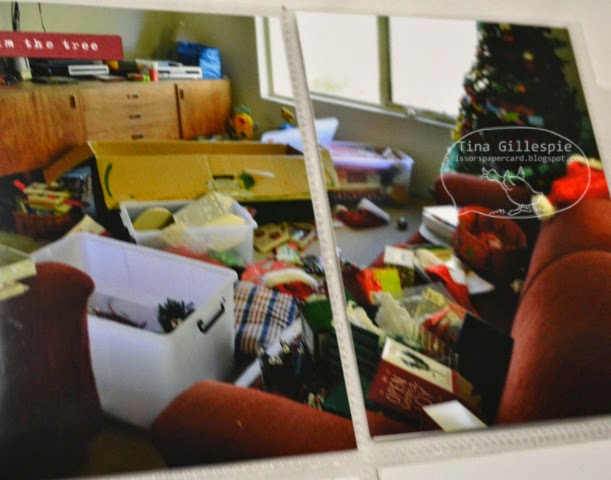

Here's a little trick for pocket pages: don't be afraid to cut photos to fit them across multiple pockets.  It makes planning your pages a little easier.  If you are cutting a photo of people though, place the photo on a flat surface and lay the pocket page over the top.  This way you can see if you are going to cut through someone's head BEFORE you start chopping up the photo.


My husband was on call and got called out on Monday, so we decided to wait for him to be home on Tuesday to finish decorating the tree.  All the kids have name baubles and they take turns putting Santa on top of the tree each year.  The tree is so tall that Rob needs to lift them up so that they can reach!  It worked out well that we did the tree over 2 days, as I didn't have anything else 'planned' for my DD that day.


It's not Christmassy at all, but it was the 'story' for the day - the surgery I had on my head. A DD doesn't necessarily need to be all about Christmas, you just pick a story for the day and tell it!


Sometimes, no matter how much you try, you just can't make a back to back page work.  In this case I had one landscape photo and one portrait photo.  Thankfully in each pack of Photo Pocket Pages you get one page that is a single 6x8 inch pocket.  I just cut a piece of Cherry Cobbler cardstock to size and adhered the photo, date card, journalling and embellishments to the cardstock and slid it into the page.  Easy!


I really like the addition of the Cherry Cobbler Glimmer Paper to the date cards.  I saw this somewhere, but I can't remember where.  I quite liked it, so I've decided to use it through my album.  It helps the cork numbers you get in the Hello December Accessory Pack to stand out.

So, that's it from me for now.  I have a few more pages to show you, but I will do it in batches through the month.  You can see what the rest of the MKWPLxSU Design Team have come up with by clicking on the links to their blogs listed below.

Claire Daly, Australia – http://www.clairedaly.typepad.com
Delys Cram, New Zealand - http://delysc.wordpress.com/
Constanze Wirtz, Germany - http://conibaer.blogspot.com.au/
Janet Morrow Wakeland,  USA - http://remarkablycreated.com/
Kim Holterman,  Netherlands  - http://kims-scrapbooking.nl/

Kimberly VanDiepen - http://stampinbythesea.com/

Bye for now,

Tina

Monday, 17 November 2014

Layout 83: Hollywood Horrors

Hi!

Another layout for you, and it's another 'spooky' one.  I've done a few lately!


This photo was taken at the Royal Adelaide Show just before Rob and the kids went through the Hollywood Horrors ride. I had to laugh at how frightened Ada looks, even though she insisted she wanted to go on the ride.


I scored around the outside of the layout and then wrote most of my journalling along the score line.  If you'd like to know how I did it you'll need to sign up for my newsletter.  There's a sign up box over to the right on my sidebar.

Bye for now,

Tina

Friday, 14 November 2014

JAI #240: Just Add Texture!

Hi!

On the JAI Design Team we get our challenge lists a bit in advance, which is often quite useful.  The new challenge is to Just Add Texture on your projects, and I was glad I had a bit of thinking time for this one!  Not because I was stuck for ideas, but more because I needed time to choose which option I was going to use to add texture to my project.


In the end I decided to go with a bit of 'bandage' from Rob's Halloween costume on my layout.  Rob has been planning this costume for years, but every year he leaves it to the last minute and runs out of time.  This year he got organised and was able to pull the mummy look together.  He wanted to use real bandages, but after finding out the cost he decided to make fake bandages with cheesecloth died in tea.


I pinched a short section and adhered it to my layout using a Stampin' Glue Stick.  I made sure I frayed the edges a little more before adhering for a bit of added texture.  I think it looks great!

So how will you add texture to your project?  There are a heap of options - why don't you check out the rest of the Design Team's work over at Just Add Ink to get some inspiration?  Don't forget that we also have a Design Team call on at the moment.  It's a fabulous, close team that is lots of fun to work with, so why don't you check out the requirements and apply?

Bye for now,

Tina
Saturday, 8 November 2014

Layout 82: Halloween 2014

Hi!

I've had a little burst of scrapping lately, mostly back to the more traditional 12x12 instead of Project Life.  It's been a while since I've done any 12x12 and I'm really enjoying it.


Rob took the kids Trick or Treating last week.  They really enjoy the dressing up part of it.  Ada plans her outfit for weeks, while Alex just throws something together at the last minute!  Lucky he and Rob had built a 'Steve' head (from Minecraft) for a birthday party earlier in the year, so it wasn't too difficult for him to put together his outfit.


The house is from the Set Holiday Homes.  You can purchase it as a Photopolymer set out of the current Holiday Catalogue, or you can do as I did and purchase the MDS download.  I opted for the download as I wanted the flexibility of being able to resize the images.  In this case I printed the house at approximately 3 1/2 inches by 4 1/2 inches, printed it and then coloured it with my Blendabilities.


I did a lot of soft collage stamping in the background of my layout.  I deliberately used softer colours so that I didn't take too much focus away from the photos and the house.  A bit different from more traditional Halloween colours, but I love the effect.  I used Soft Sky, Crumb Cake and Daffodil Delight and Pumpkin Pie.

Bye for now,

Tina

Wednesday, 5 November 2014

Layout 80: Sweet Moments

Hi!

I've been a bit slack in keeping up with my scrapping lately, and my self-challenge to scrap 100 layouts this year.  I am getting close to my target, but the end of the year is rapidly approaching!  Today's layout came about as I had a left over photo from a recent mini album project that I didn't want to waste.


I started with a base of the Typeset Specialty DSP and then used the Dots Decorative Mask, my Lost Lagoon inkpad and marker and a sponge dauber to create a background.  I tilted the mask a bit so that the dots weren't too evenly lined up and then I randomly daubed a few, traced a few with the marker, and on some dots I did both.  I wanted a fairly rough look to the background.  I then stamped over the top with some of the stamps from Kinda Eclectic.


In a couple of places I punched the side of the SDSP with my trusty Spiral Border Punch.  I'm so pleased that this punch has made a come back - it was one of my old favourites that I could never bear to part with.


I wanted to do a little journalling, but I couldn't work out where to place it, so I ended up going with the old hidden journalling trick by creating a tag to pop in behind the photo.  Easy!

Bye for now,

Tina

Sunday, 12 October 2014

Layouts 77 and 78

Hi!

Today I am cheating on my 100 layouts a little and including a mini album as 2 layouts.  To be fair though, there was a HEAP of work in the mini album so I think it balances out.  The album has very little Stampin' Up product in it.  I actually did it at a class at my LSS, Seriously Scrapbooking, taught by the gorgeous Natalie May.  Her blog is called Happy Daks if you want to check her out.


I added a couple of extra pages to the album as I had more photos than pages.  The beautiful photos were taken by Mel Minnie Photography at the Botanical Gardens in March.

Bye for now,

Tina

Friday, 3 October 2014

JAI #234: Just Add Baby!

Hi!

This week we have a special challenge theme at Just Add Ink because one of the Design Team girls is due to have a baby any day now. Most of the Design Team have gone with baby cards, but as I made one for last week's challenge I decided to do something different.


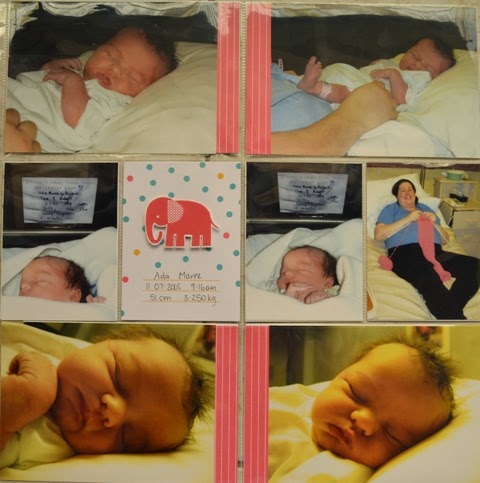
This is the first page in my daughter's Project Life Album.  Wasn't she a chubba bubba!


I love the simplicity of Project Life.  In this case I decided to jazz it up a little by adding the stamped elephant to the journalling card.


For some strange reason when we printed these photos way back in 2007 they were printed at 4 inches by 5 3/4 inches (or thereabouts).  To make up the shortfall in the pocket I just cut one of the 4x3 inch cards into 4 strips so I could add one to each of the photos.


Here's the second page in the album too, when she was introduced to big brother Alex and then had her first bath.  Rob gave all three kids their first baths, which was a great bonding experience. In the journalling I commented on how fluffy her hair was - she was born with really long, thick dark hair.

It's a fabulous theme this week, so I hope you can join in the fun at Just Add Ink.

Bye for now,

Tina

Sunday, 28 September 2014

Layouts 73 and 74

Hi!

Today I have for you the first two pages in my 2014 album.  Project Life is making it so much easier to create albums like this.  I am trying to do a double page a month.  I started doing this several years ago but I stopped for a few years.  I fully intend to go back and do the missing years - I just need to get organised with my photos!


January is usually a quiet month for us.  The long school holidays are a chance to rest and get ready for the school year ahead.


We did have a few outings though.  There was a hands on Lego display at the State Library that the kids loved.  The bottom right photo is the Lego version of the Chinese Embassy in Canberra that Ada and Rob built together.


We also spent a bit of time at the beach. The kids love going to the beach but I'm not a big fan - too much sand for me!  Still, I love going there to look for sea glass and I'm getting quite a collection.


February was quite busy too, with birthday parties, gardening and a trip to Mildura.


The kids were invited to a superhero dress up party.  Alex went as Steve from Minecraft and Ada went as Cat Woman.  It was a lot of fun!


We had missed out on seeing my family over Christmas/New Years so we all decided to have a weekend in Mildura, as it's about half way between where we all live.  It was a fantastic weekend, even if we scared the local club when all 14 of us turned up for dinner without booking first.  Luckily they were able to shuffle things around and fit us in.

Bye for now,

Tina

Saturday, 20 September 2014

Layouts 71 and 72

Hi!

Here we have it, the final two layouts in my Paris trip album.


This page was a bit of a mish-mash of bits and pieces that I collected along the way that didn't belong anywhere else.  The jigsaw of the Mona Lisa that we purchased at the Louvre that had an extra piece, the dollar to Euro conversion chart I made before we left home, some travel passes and some Euro coins left over from the trip.


This final page was, as you can see, a map of the city of Paris.  Most of the places we visited are marked on there, and I also added an arrow to show where our hotel was.  You can see it under the right side of my watermark.

Thanks for coming along with me as I relived my trip, I hope you enjoyed it as much as I did!

Bye for now,

Tina

Sunday, 14 September 2014

Layouts 69 and 70

Hi!

Just squeaking in for my weekend scrapbooking post!  Very close to the end of my Paris layouts now.


I had researched before we left and found out that there was a Titanic Exhibition on in Singapore while we were there.  I'd missed it when it was on in Australia, so I was determined to go to this one.  When we arrived we were given a passenger card each that was based on a real passenger on Titanic.  At the end we got to find out the fate of our passenger.


Sadly, Rob's passenger didn't survive, being a 'lower class' male.  I got a First Class female passenger, so I was pretty sure I was going to survive.


It was an amazing exhibition that included real artifacts recovered from the ship and the wreck site.  There were lots of recreated rooms, including the magnificent staircase, where we had a very dodgy tourist photo taken!


I didn't take any photos of our arrival home to Adelaide.  I remember that at the airport Hudson ignored both Rob and I, like he was upset we'd left him for nearly 2 weeks.  It didn't take long for him to warm to us again though!  I loved the pictures that Alex and Ada had drawn for us, especially as they had "missed our faces".  Funny!

Bye for now,

Tina

Saturday, 6 September 2014

Layouts 67 and 68

Hi!

I'm nearing the end of my Paris trip layouts - only 2 more weeks to go after this week!  I hope you're not sick of them yet.

As exhausted as we were when we flew into Singapore on our way home, we decided that we wanted to get out and see a bit of the city while we were there.  It was really tempting to stay at the airport and try to sleep a little more,  but I didn't want to regret not going into the city, so off we went!


After discussions with the lady on the help desk we decided to splurge on taxis rather than to attempt the public transport system on the amount of sleep we'd had!  In the end it wasn't much of a splurge, as the taxis were quite cheap.  Our destination was the Marina Sands Resort and the Art Science Museum as there was a Titanic Exhibition there that we were both keen to see. We wandered around the Resort for a little while and saw the amazing Casino, which looks like it has a boat on top of 3 pillars!  We also saw people getting a fish pedicure (yuck!) and some costumes from Wicked!, which was showing there.  Sadly, we didn't have enough time to catch the show.


The Museum is an incredible building that is in the shape of a lotus flower.  So pretty!  There are several ponds surrounding the building that are full of lotus plants.  There weren't many flowers in bloom, but the ones that were blooming were beautiful.


Bye for now,

Tina