Pages

Showing posts with label Decorative Dots TIEF. Show all posts

Thursday, 14 March 2024

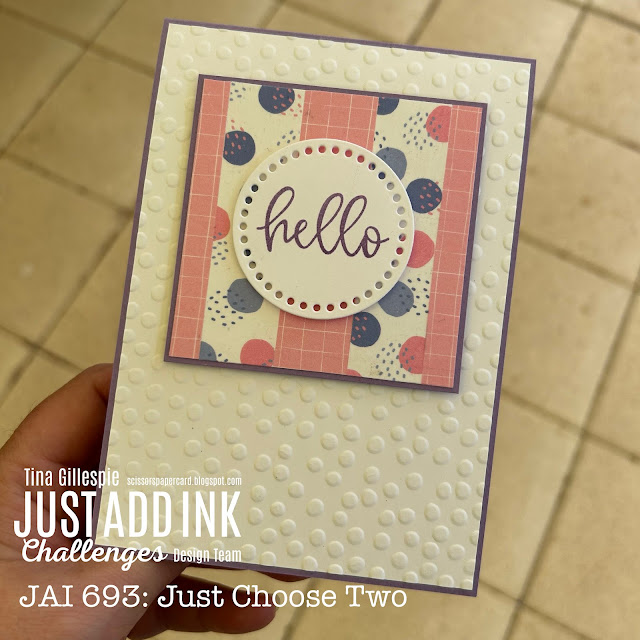
JAI 693: Just Choose Two

 Hi!


Thanks for joining me for the new Just Add Ink challenge. This week it's a Choose Two challenge, suggested to us by Di Barnes. She'd like us to choose two of either circles, squares or sayings to add to our cards.


Hmm, what to do? I spotted (ha, pun unintended!) some new washi tape on my desk, and the choices were made for me!

scissorspapercard, Just Add Ink, Stampin' Up! Biggest Wish, Everyday Details Dies, Decorative Dots TIEF, Daiso Washi Tape

I purchased this washi in a pack from Daiso last week, mostly to use for masking purposes, but when I saw the wide tapes with circles on one and squares on the other, it was fated! I started by applying the washi to a square of Whisper White cardstock, which I then matted with Highland Heather cardstock. The retired Decorative Dots embossing folder was the perfect choice for the background of the card.

scissorspapercard, Just Add Ink, Stampin' Up! Biggest Wish, Everyday Details Dies, Decorative Dots TIEF, Daiso Washi Tape

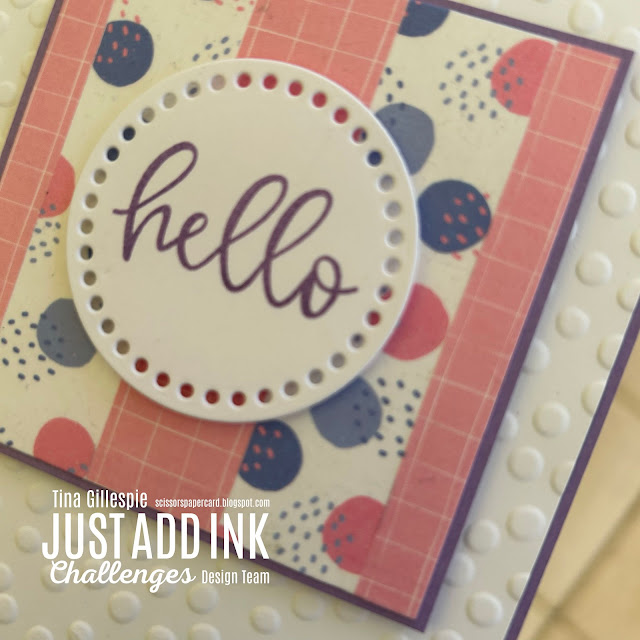
I was all set to use my Stylish Shapes dies to crop the circle for the sentiment, when I remembered that the Everyday Details dies featured circles within a circle - the perfect choice for this challenge!

scissorspapercard, Just Add Ink, Stampin' Up! Biggest Wish, Everyday Details Dies, Decorative Dots TIEF, Daiso Washi Tape

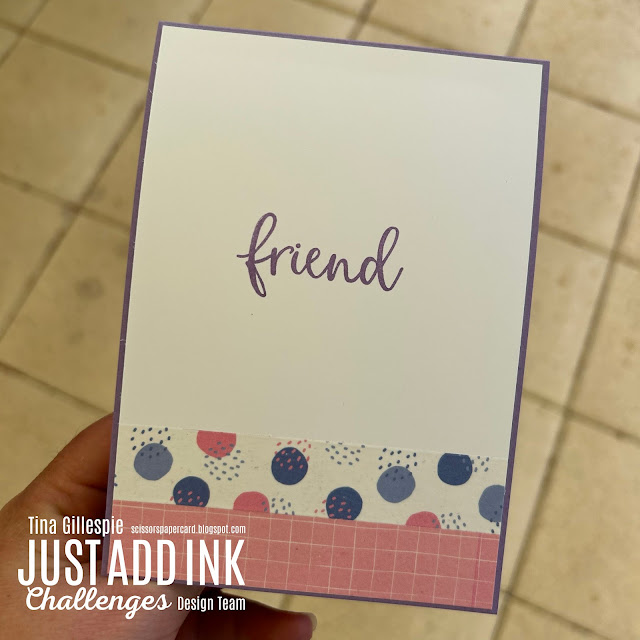
I used a couple more strips of the washi to decorate the inside of the card, and a stamped sentiment from Biggest Wish, and the card was done!

We'd love to see which two you choose to use on your card. You can pop on over to the Just Add Ink blog, where you'll see what the rest of the Design Team chose to use. You can add your card to our linky when you're ready.

Bye for now,

Tina

Sunday, 10 April 2022

CTC 364: CASE An Easter Project

 Hi!


Thanks for joining me for the new CASEing The Catty Sunday Challenge Blog Hop. This week we are asking you to CASE an Easter project from either of the two current catalogues.


I don't usually send Easter cards, so I went looking for a project that could easily be made into a birthday card. I found this gem on page 77 of the Jan-June Mini.


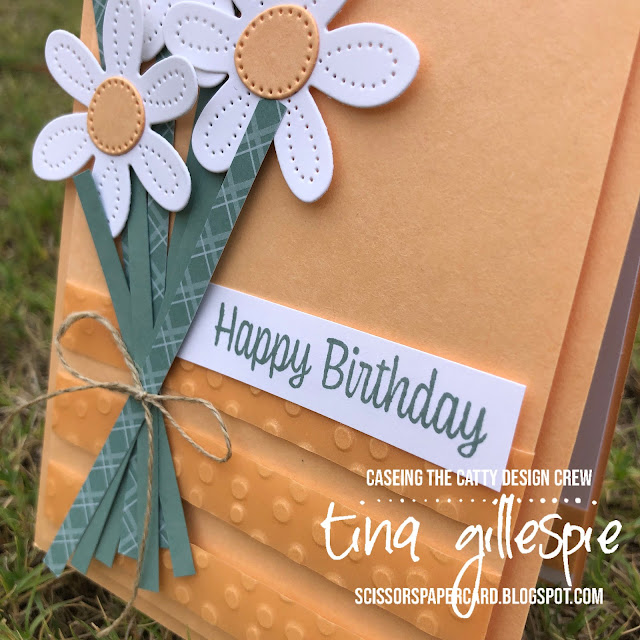
I loved the three horizontal stripes on the background of the card, and the cluster of strips that makes up the bunch of stems. 

scissorspapercard, Stampin' Up!, CASEing The Catty, Sweet As A Peach, Pierced Blooms Dies, Decorative Dots EF

I don't own the Daffodil Daydream bundle, so I substituted for the soon-to-retire Pierced Blooms Dies. I just trimmed some strips of Soft Succulent cardstock and DSP to use for the stems.

scissorspapercard, Stampin' Up!, CASEing The Catty, Sweet As A Peach, Pierced Blooms Dies, Decorative Dots EF

I also used some Pale Papaya Shimmer Vellum instead of the stamped stripes. I embossed it with the long-retired Decorative Dots EF. I am a bit lacking in embossing folders lately, so this was my best option.

scissorspapercard, Stampin' Up!, CASEing The Catty, Sweet As A Peach, Pierced Blooms Dies, Decorative Dots EF

I used some offcuts to complete the inside of the card. The sentiments on the card are from the Sweet As A Peach stamp set

We'd love for you to play along with us for our challenge. Just make a suitable card and add a photo to our Facebook group. It's that easy!


For now though, please continue your way around our Blog Hop. The next stop is the lovely Julia Quinn, with an absolutely gorgeous card.


Bye for now,

Tina

Thursday, 21 September 2017

AWH Blog Hop: Fancy Folds

Hi!


Welcome to another Art with Heart Team blog hop where we are focusing on fancy folds. You will find loads of creative inspiration tonight, showcasing different folding techniques and projects. Don't be afraid of trying some Fancy Fold cards; they may look intimidating, but in fact, they are not that difficult to create.


scissorspapercard, Stampin' Up!, Art With Heart, Wood Textures, Number Of Years, Milestone Moments, Tabs For Everything, Bunch Of Blossoms

I was recently asked to make a birthday card for a woman turning 50, but it had to be big enough for around 30 people to sign. My first thought was to make a super-sized card, but I thought about how annoying that would be to store, so I decided to make something that was the size of a regular card, and add some extra pages for the guests to write on.

scissorspapercard, Stampin' Up!, Art With Heart, Wood Textures, Number Of Years, Milestone Moments, Tabs For Everything, Bunch Of Blossoms

I'm not sure of the name of the fold, but you pretty much take a sheet of cardstock that is double the height of the finished card and 3-4 times the width. In this case I used a sheet of 12x12 cardstock in Elegant Eggplant. I should mention at this point that my brief included using purple and no flowers - the recipient is a really outdoorsy kind of person who enjoys camping, etc.

scissorspapercard, Stampin' Up!, Art With Heart, Wood Textures, Number Of Years, Milestone Moments, Tabs For Everything, Bunch Of Blossoms

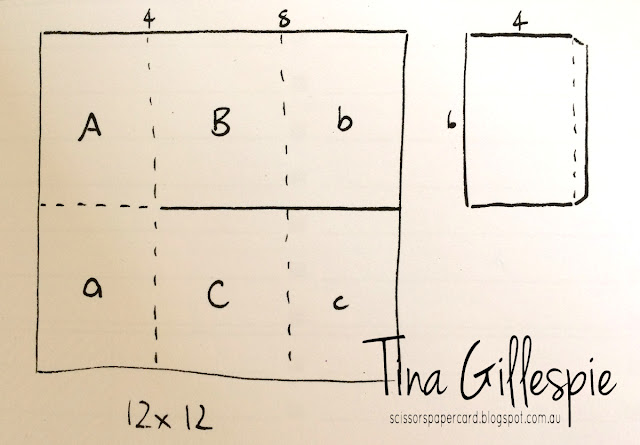
I scored the 12x12 at 4 and 8 inches, and then turned it 90 degrees and cut at 6 inches from the edge and stopping at the second score line from the edge. I also cut two extra pieces of cardstock that were 6x4, with an additional flap on one 6 inch side. Here's a diagram that shows what I did. Dashed lines are scored, solid are cutting lines, and all measurements are in inches.

scissorspapercard, Stampin' Up!, Art With Heart, Wood Textures, Number Of Years, Milestone Moments, Tabs For Everything, Bunch Of Blossoms

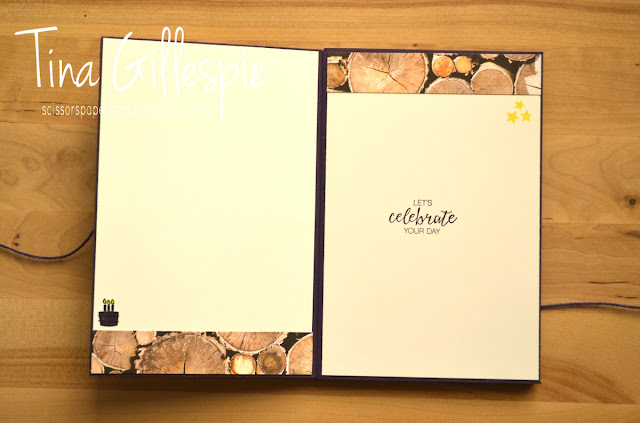
I adhered the to extra flaps to the edges of b and c. I then adhered A to a, B to b and C to c using Tear And Tape Adhesive. This creates a little book with 8 pages. You could leave the top of each page open, so that you could have extra tags in the pockets too.

I decorated the front and back cover with Wood Textures DSP and used another piece of cardstock to act as a spine, hiding all of the folds. I added a length of twine to the cover before adding the spine, so that the card can be tied shut.

scissorspapercard, Stampin' Up!, Art With Heart, Wood Textures, Number Of Years, Milestone Moments, Tabs For Everything, Bunch Of Blossoms

Each of the pages was decorated with a little more of the DSP, and I also added a few stamps from the Tabs For Everything set to give it a bit more colour. I heard that the card was a hit, so I was very pleased!

Well, that's it for me, so now you're hopping off to visit Kate Morgan's blog. She always has something fabulous that is bound to inspire.
If you find a broken link or have come to this blog hop from a different entry point, you can view the participants below:


Bye for now,

Tina

Thursday, 6 July 2017

JAI #367: Just Add Colour

Hi!


This week at Just Add Ink Patrice has set the challenge for us, and it's a colour challenge. Lots of lovely neutrals with a fabulous pop of lemon lime.


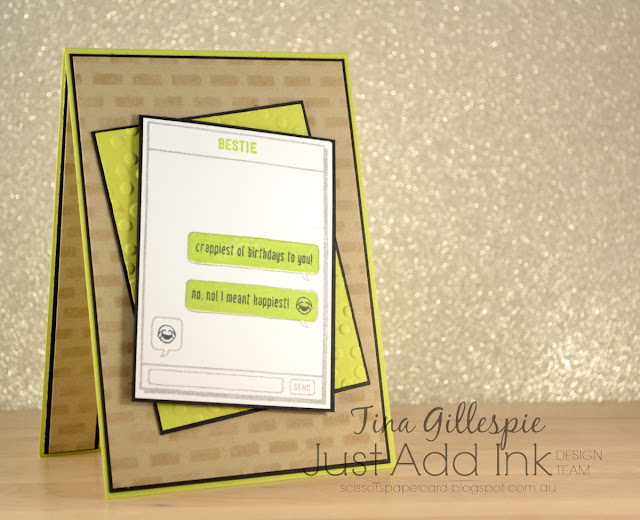
This one was a tricky combo I think! It's good to get the old brain matter working a bit harder sometimes though. I needed to make a card for Ada to give to a friend who was turning 13, so I decided to crack open my new Text Ya Later stamp set, which I think is perfect for teen cards.


I love the text stamps in this set. I knew the birthday girl would get a real giggle out of the 'crappiest of birthdays to you' stamp.


I also love that the set includes some of the commonly used emojis. I've only recently started using them in my texts, and they are a lot of fun.


What will you do with these colours? If you get your thinking cap on, I'm sure you'll have as fun a time with them as I did! Check out the Just Add Ink blog to see what the rest of the Design Team created.

Bye for now,

Tina

Monday, 28 March 2016

Flowering Fields In Honey

Hi!

It's nearly the end of Sale-A-Bration for another year. What's been your favourite SAB choice? Flowering Fields has been popular among my customers this year.I think it's the gorgeous Australian Wildflowers. Today's card features this stamp set, and was the most liked of my card class cards this month.


I chose Hello Honey as the main colour from the card after a comment from one of my class ladies that she liked the colour. After that, the wattle flower was the logical choice to use for the main panel.


We stamped the image with Basic Black and them coloured it with Hello Honey and Old Olive Stampin' Write Markers.


I deliberately left the card without a sentiment so that it can be used for a wide range of occasions.

I hope you've had a fabulous Easter weekend. I've had a lovely few days with family, so today is going to be about me - some crafting time is just what I need!

Bye for now,

Tina
Wednesday, 17 February 2016

A Nice Cuppa CASE

Hi!

Today's card is a CASE of this card by Patsy Waggoner.


I loved Patsy's card, but as this was for a class, I also wanted to showcase the coordinating Have A Cuppa DSP Stack. Hence, I changed all the colours to suit the DSP, but kept most of the layout elements the same as Patsy's card.


Here's I've use Bermuda Bay, Wisteria Wonder and Melon Mambo on Whisper White. The sentiment is from Sky Is The Limit, which retired from the SAB line up on Monday.


I finished my card off with another teacup on the inside.  I like the way the DSP heart ties it in with the front of the card, plus it's just a bit cute.

Bye for now,

Tina

Monday, 18 January 2016

A Nice Cuppa

Hi!

I was able to get a bit of unexpected crafting time in yesterday while hubby made dinner, and today's card is the result.  I wanted to have a play with the new Have a Cuppa suite of products.  I'm a big tea drinker, so this suite really appealed to me.


I don't make a lot of single layer cards - probably because they nearly always seem unfinished to me. I do like this card though. It took a lot of playing around to get it to look right, but I'm fairly satisfied with the final product. The colours (Melon Mambo, Wisteria Wonder and Bermuda Bay) were taken from the coordinating Have A Cuppa DSP. You can see a bit of it peeking out from under the teapot.


The teapot was originally just the pot and lid, but it looked a little plain.  I die cut some scallop trim and adhered it to the pot using my Fine-Tip Glue Pen.  It still wasn't quite enough, so I grabbed my Clear Wink Of Stella Glitter Brush and added highlights to the scallops and lid.  Much better!


Isn't that curl of steam so cute? Love it!

Bye for now,

Tina

Monday, 5 October 2015

Embellished Ornaments in Crumb Cake

Hi!

Are you loving the products in the new Holiday Catalogue? I'm especially loving the Embellished Ornaments stamp set and coordinating Delicate Ornaments Thinlits.  Today's card is a CASE of a gorgeous card I saw online that used the bundle.  You can see the original card here.


I made a few changes to Amy's card - Crumb Cake instead of Tip Top Taupe, Baker's Twine instead of ribbon and a different embossing folder.  I also used a stamped panel behind the ornament rather than vellum.


I quite like the look of the stamped panel as it ties in nicely with the design on the stamped ornament. I think my Crumb Cake inkpad needs reinking though!


It's funny how Amy and I ended up with similar insides.  I didn't actually see her inside until I went searching for her blog post to link. I'd only seen the front of her card online and taken a screen capture on my phone. Great minds think alike!

Bye for now,

Tina

Wednesday, 7 January 2015

Some Embossed Kissing

Hi!

I'll bet you're thinking 'huh?' over the post title right? My stamping ladies did the same thing when I introduced them to the technique a couple of months ago.


In this card it is the focal tree that is Embossed Kissed. It's a pretty simple technique really. You just ink up a solid stamp in one colour and a fairly closed design embossing folder in another colour and then smooch the two together.


The ink on the embossing folder transfers to the stamp so then you can stamp on cardstock and get a really cool effect.  The only downside is that you need to clean both the stamp and the embossing folder each time you stamp - so not a great technique for mass produced cards!


Why don't you give Embossed Kissing a go? It's a lot of fun trying out different stamp/embossing folder combinations.  I used Festival of Trees, Decorative Dots, Garden Green and Cherry Cobbler.

Bye for now,

Tina

Monday, 8 September 2014

Dotty Angles With Sequins

Hi!

Today's card uses a new stamp set that we were shown at Convention, way back in May.  The name of the stamp set "Dotty Angles" stuck in my head, because Brian Pilling, who demonstrated the set, commented that he thought they stamp set was called "Dotty Angels" and couldn't work out why because there was nothing angelic about it!


I used the Dotty stamp in the set for this card.  I really love the confetti look of the dots.  They were stamped three times in Pistachio Pudding, Crisp Cantaloupe and So Saffron.


I added some Crisp Cantaloupe and Pistachio Pudding round sequins to the front for a little bling interest to the card.


As you know, I like to do the insides of my cards and match them to the fronts.  More dots, this time down the side to leave plenty of room for writing a message to the recipient.

Bye for now,

Tina

Friday, 6 June 2014

JAI #217: Just Add Cupakes, Cake or Dessert

Hi!

This week at Just Add Ink we have a theme challenge for you.  We want you to add cupcakes, cake or dessert to your creation.  It's a fun idea and a great idea for a challenge.  Having said that I had a slight panic when I read the theme for the week as I didn't think I had any stamps that fit the theme.  Then I remembered a set I had recently purchased that had a cupcake image.


I also decided to use some of my left over Hip Hip Hooray Kit pieces on the card.  You might also spot a Sale-A-Bration favourite on the card.  I was very excited to see that Stampin' Up have included the Decorative Dots Embossing Folder in the upcoming catalogue.  I really love it and I'm glad to have it for at least another year.


The stamp set was never available here, much to my disappointment.  I really love the whole "Keep Calm" idea and was lucky enough to get my hands on the stamp set.


I thought the cupcake image was really cute, so I just had to include a whole row of them on the inside of the card too.

The design team have come up with a heap of creative ways to interpret the challenge theme this week.  What will you do? See you over at Just Add Ink.

Bye for now,

Tina

Monday, 31 March 2014

Zoo Babies Farewell Sale-A-Bration

Hi!

Today I have one final card using Sale-A-Bration products.  Well, two cards actually!


This was the sample card I'd made for a series of workshops I was running last month.  It uses the Decorative Dots Embossing Folder and some of the Twine from the Sweet Sorbet Accessories Pack.


Love that cute little monkey swinging off the hello!  On the way to my first workshop where we were going to be making this card I realised that the Very Vanilla panel was 2 inches (5.1cm) wide - the perfect size for the Scallop Tag Topper Punch.  Yay!  I gave the ladies the option to play with the punch instead of following my design.  They has lots of fun.


I had a leftover kit after I'd finished all my workshops for the month so I decided to make my own alternative using the tag punch.  Exact same materials, just trimmed a little!


I punched the Very Vanilla cardstock with the punch, adhered it to the Island Indigo piece and then hand trimmed around the top.  I also hand cut the hole so that my ribbon could go through both layers.  I added a piece of Very Vanilla ribbon and used the twine to tie around it.


Just to finish off - the two cards side by side.

Don't forget that today is the final day to place an order to take advantage of the Sale-A-Bration promotion.  Each $90 spent frome our catalogues gets you a freebie from the Sale-A-Bration catalogue. Bonus!

Bye for now,

Tina