Pages

Showing posts with label Embossing Paste. Show all posts

Thursday, 23 July 2020

JAI #515: Just Add Mixed Media

Hi!


It's once again time for the new Just Add Ink Challenge. This week Jan has challenged us to add Mixed Media to our cards.


'What is Mixed Media?', I hear you say. It's pretty much the addition of mediums, other than inks, to your card. Things that add texture and dimension, like paint, embossing paste, fabric, are all examples. I had lots of great ideas for this week's challenge, but unfortunately life got in the way and I had to concede that I would not get my card finished in time.

scissorspapercard, Stampin' Up!, Kindred Stamps, Just Add Ink, National Sewing Machine Day, Mixed Media Cards

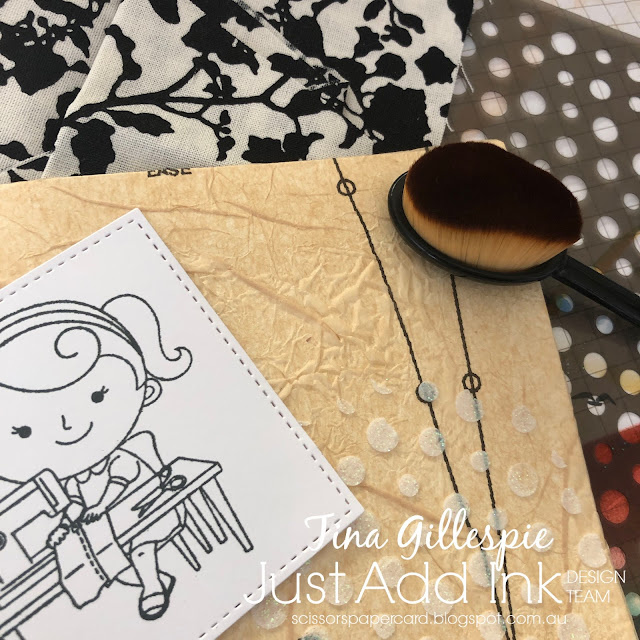
I had started it, though! My plan was to make a sewing themed card, and so I used an old pattern over some Very Vanilla cardstock for the base of my card. I used Shimmery Embossing paste over the top. Some left over fabric from making masks this week would have found it's way onto the card, and this cute image from Kindred Stamps would have tied it all together. I'd changed my mind on the image though, I was going to stamp it onto Crumb Cake and colour it to give a sepia-like effect. I'm hoping I can get the card made over the weekend, so you may get to see it yet!

In the meantime, please do head on over to the Just Add Ink blog, where you can see the gorgeous cards that the DesignTeam have created for our challenging Mixed Media challenge!

Bye for now,

Tina

Sunday, 23 February 2020

CTC #263 Week 2: CASE The Kerchief Colours

Hi!


Thanks for joining us on Week 2 of our CASE of the Kerchief Card Kit Colours blog hop. You may be arriving here from Rebecca's blog, or you may be starting here. Just keep going until you get back to where you started. Have you checked out the kit? It's got the sweetest floral design printed on the card bases!


Last week I made a card that used the Coastal Cabana card, and my natural inclination for this week was to use the Poppy Parade card. However, I had a lovely day stamping with Kathryn Mangelsdorf and Rachel Palmieri recently, and I was able to stamp some images from Kathryn's Above The Clouds stamp set. I thought it would be a great way to get lots of the colours onto one card!

scissorspapercard, Stampin' Up!, CASEing The Catty, Above The Clouds, Label Me Bold, Seaside Notions, Shimmery Embossing Paste, Pattern Party Masks, Stampin' Blends, Copics, Subtle 3D EF

I started with a Balmy Blue base that I used my Shimmery Embossing Paste and the cloud mask to create a sky. To make the clouds look fluffy, I slapped the flat side of my fat palette knife over the smooth paste. I learned this technique when making lemon meringue pie, as it makes lovely peaks in the meringue. Don't you love it when skills from one area translate to other areas of your life? LOL!

scissorspapercard, Stampin' Up!, CASEing The Catty, Above The Clouds, Label Me Bold, Seaside Notions, Shimmery Embossing Paste, Pattern Party Masks, Stampin' Blends, Copics, Subtle 3D EF

The hot air balloons were coloured using Poppy Parade, Night Of Navy, Balmy Blue, Pear Pizzazz, Soft Suede and Mossy Meadow. I was colouring them while watching a movie with my daughter, who was home sick from school. She told me that the top balloon looked like a strawberry, so I had to add the bunting to make it less strawberry-like!

scissorspapercard, Stampin' Up!, CASEing The Catty, Above The Clouds, Label Me Bold, Seaside Notions, Shimmery Embossing Paste, Pattern Party Masks, Stampin' Blends, Copics, Subtle 3D EF

I used my cloud mask with some Balmy Blue ink to create the scattering of clouds across the bottom. Although, now that I think about it, I probably should have put them at the top of the card. Oh well, maybe I'll just pretend that the balloon is floating above the clouds!

That's all from me for tonight. Our challenge is run through our Facebook group. You can see all of the Crew cards posted during the week, and you can also post your card to enter our challenge. You don't need a blog or fancy equipment, just snap a photo and add it with a description. Easy!


Before you go, please do continue on with the hop. Next up is my wonderful friend, Judy, who always has something spectacular to see!


Bye for now,

Tina

Thursday, 26 September 2019

AWH September Blog Hop: DSP

Hi!


Tonight the Art With Heart team are sharing amazing projects featuring Stampin’ Up! Designer Series Paper, most of which is in the current promotions where you can buy 3 packs of Designer Series Paper and receive a pack for free! You can select many of the DSP packs from the Annual Catalogue  but only until the 30th of September.

I took advantage of this awesome sale to purchase four packs that I didn't yet own, one of which being the gorgeous Woven Threads DSP. The patterns look like worn rugs that are hundreds of years old. Lots of gorgeous, muted colours and beautiful texture to the paper. I chose a piece of Pretty Peacock DSP that has a fabulous medallion design that's in a lighter shade of the same colour.

scissorspapercard, Stampin' Up!, Art With Heart, Blog Hop, Seaside Notions, Woven Threads DSP, Shimmery Embossing Paste, Party Pattern Masks

I had a plan to add some Shimmery Embossing Paste over the top of the DSP, but otherwise no idea beyond that! To colour the embossing paste, I tapped my Pretty Peacock ink pad over the top of the Pattern Party mask and then scooped out some of the paste. As I spread it over the mask and onto the DSP, it picked up the colour on the mask. I love how this gives uneven colour to the paste - it's lighter through the middle where I first applied the paste, but darker towards the edges, as I'd picked up more ink as I spread the paste.

scissorspapercard, Stampin' Up!, Art With Heart, Blog Hop, Seaside Notions, Woven Threads DSP, Shimmery Embossing Paste, Party Pattern Masks

I decided that the gorgeous blue/green made me think of the ocean, and so I reached for my Seaside Notions stamp set. Each image was stamped on Shimmery White cardstock and then I took an Aquapainter and ran it lightly over each image. It pulls a little colour in from the ink and is a really quick and easy way of adding some subtle colour.

scissorspapercard, Stampin' Up!, Art With Heart, Blog Hop, Seaside Notions, Woven Threads DSP, Shimmery Embossing Paste, Party Pattern Masks

When I'm stamping things like the shells and coral for the front, I always stamp a couple of extras. This means when I get to the inside I don't have to start stamping all over again, I can just go straight for fussy cutting and gluing. It saves so much time, especially if you're like me and like to clean and put away your stamps as soon as you can.

That's it for me this evening. Now it's time for you to hop on over to the lovely Rachel's blog. I wonder which DSP she's chosen to use?


If you find a broken link or have come to this blog hop from a different entry point, you can view the participants below:

Bye for now,

Tina

Sunday, 4 August 2019

CTC #240: Everyday Occasions

Hi!


Welcome to this week's CASEing The Catty Sunday Challenge Blog Hop. The blog before mine belongs to my lovely friend, Judy. She creates the most stunning cards every week! This week we are CASEing cards from the Everyday Occasions section of the catalogue. It's a ginormous section, so there is plenty of inspiration for everyone.


I didn't have to flick far through the section before I found the card I wanted to CASE. Actually, it was three cards, and you can see them on page 12, which just happens to be the first page of the section.


The cards I chose were the three at the top of this photo. I really loved how the Embossing Paste was applied to the card both on top of the DSP and the card base itself.

scissorspapercard, Stampin' Up!, CASEing The Catty, Sweetly Swirled, See A Silhouette DSP, Pattern Party Decorative Masks, Shimmery White Embossing Paste

I started by adhering the See A Silhouette DSP to the front of my Seaside Spray card base. I then used my cloud mask and some Shimmery White Embossing Paste to add the moulds to the front. I love how it sort of , but not really, looks like a window, but the clouds are on the inside!

scissorspapercard, Stampin' Up!, CASEing The Catty, Sweetly Swirled, See A Silhouette DSP, Pattern Party Decorative Masks, Shimmery White Embossing Paste

The sentiment is from a new to me stamp set, called Sweetly Swirled. The hand written font is pretty awesome, don't you think? It was a little tricky getting the Gold Thread to sit under the banner - I had to make sure that most of it hung over the top, not the bottom. A scattering of sequins finished off the front.

scissorspapercard, Stampin' Up!, CASEing The Catty, Sweetly Swirled, See A Silhouette DSP, Pattern Party Decorative Masks, Shimmery White Embossing Paste

I was a bit stuck on how to finish off the inside for the longest time. As you can see, I ended up sponging a few clouds in Seaside Spray around the sentiment.

You have a huge 59 pages to scan this week for inspiration for our challenge. What fun! Which card will you choose to CASE? Don't forget to add your card to our Facebook group.


In the meantime though, don't forget to finish the hop! Next up is the lovely Monique's blog.


Bye for now,

Tina

Thursday, 25 October 2018

AWH October Blog Hop: Pink

Hi!

Tonight the Art With Heart team are sharing creative projects featuring the colour pink. We hope our Blog Hop inspires you to get creative with the various shades of pink that Stampin’ Up! offer in our collection of 53 colours. 


Now, I must admit that when Ros first gave us the pink theme, my mind jumped straight to the entertainer, P!NK. I went to one of her concerts back in July and hadn't scrapped the experience yet, so I thought why not?

scissorspapercard, Stampin' Up!, Art With Heart, Scrapbooking, Swirly Bird, Large Letters Framelits, Silver Embossing Paste, Glimmer Paper

I chose Berry Burst for my colour pink, and complimented it with Basic Black and Silver Glimmer Paper. It's such a fun combo, and what else for an awesome entertainer such as P!NK? To create the title I cut each letter with my Large Letters dies and then simply trimmed of the serifs on each letter. The serifs are the little 'flicks' at the ends of the letters. It changes the look of the font quite a lot! Here's a tip: to adhere the photos and letters over the Glimmer paper, it is best to use a liquid glue as it grips better to the uneven surface of the glitter.

scissorspapercard, Stampin' Up!, Art With Heart, Scrapbooking, Swirly Bird, Large Letters Framelits, Silver Embossing Paste, Glimmer Paper

I had fun making the splatters on the page. I started by stamping the splatters from Swirly Bird in Memento ink. It was good, but not quite the right look. I got out my Silver Embossing Paste, and using my Aqua Painter, I flicked it over the top. Much better!

scissorspapercard, Stampin' Up!, Art With Heart, Scrapbooking, Swirly Bird, Large Letters Framelits, Silver Embossing Paste, Glimmer Paper

To get the spacing right on my text, I wrote it out on a piece of scrap paper, but starting at the bottom of the page and going up. By doing this, I knew where to start my top line so that my writing was perfectly spaced.

scissorspapercard, Stampin' Up!, Art With Heart, Scrapbooking, Swirly Bird, Large Letters Framelits, Silver Embossing Paste, Glimmer Paper

Did you notice the Black Glittered Organdy Ribbon at the top of the photo section? I couldn't resist adding a piece of my favourite ribbon, especially when it has the important purpose of hiding my ticket and a piece of the confetti that fluttered down during the concert. I made a little pocket for them  under the panel so I could keep the photos and ticket together, but keep the ticket hidden.

Well, that's it from me, you're now off to the next participant, the very talented Ros Davidson.  
         

If you find a broken link or have come to this blog hop from a different entry point, you can view the participants below:


Sharon DavernKate MorganAndrea RobertsTina GillespieRos DavidsonCatherine ProctorCaroline ManwaringRachel PalmieriSue MadexRebecca JacovouAlisha WatsonClaire DalyRachel WoollardMonika O’NeillJune Kempster

Bye for now,

Tina