Pages

Wednesday 30 November 2011

Well Worn Need For Speed

Hi!

In my last blog post I mentioned I'd made two cards using the Need For Speed stamp set while I had all my gear out.  This is the second card, made for my brother in law.  He has a little quad bike that the kids all have a fun time riding when we go to visit, so naturally the card had to use the quad bike stamp!


I stamped the quad bike, fussy cut around it and popped it up on dimensionals.  I adhered it to a panel that I'd stamped with the Texture Jumbo wheel.  I thought it looked a bit like the quad bike was hooning through some mud!


I kept the Texture theme going on the inside too.


Stamps: Need For Speed, Happiest Birthday Wishes (Hostess), Texture Jumbo Wheel
Ink: More Mustard, Not Quite Navy, Versamark
DSP/Cardstock: Well Worn DSP, Whisper White, Not Quite Navy, More Mustard
Other: Blue Denim Jean Ribbon, White Embossing Powder, Paper Snips, Dimensionals, Sponge Daubers

Catch you later,

Tina

Monday 28 November 2011

Need For Speed Birthday Card

Hi!

Today I have a card for you that I made for my Uncle's Birthday  I decided to use the new stamp set, Need For Speed, which is perfect for adult male cards.


I kept the layout fairly simple to let the car be the star of the show!


Another car to finish off the inside too. I chose my colour combination based on the Well Worn DSP, as I already had it all out on my desk after making a birthday card for my brother in law.  I'll post his card later in the week.

Stamps: Need For Speed, Happiest Birthday Wishes (Hostess)
Ink: Not Quite Navy, Cajun Craze
DSP/Cardstock: First Edition Speciality DSP, Very Vanilla, Not Quite Navy, Cajun Craze
Other: Blue Denim Jean Ribbon, Jumbo Eyelets (retired), Crop-a-Dile, Dimensionals

Catch you later,

Tina

Saturday 26 November 2011

Christmas Blog Hop

Hi!

Welcome to our last blog hop of the year.  We're doing a Christmas theme this month to give you some inspiration in the final charge into Christmas.  Did you know there are only 29 days to go????

The blog before mine was Ros Davidson's, but you can start anywhere and just keep hopping 'til you get back to where you started.  I'm sure you're going to see a heap of lovely ideas along the way.

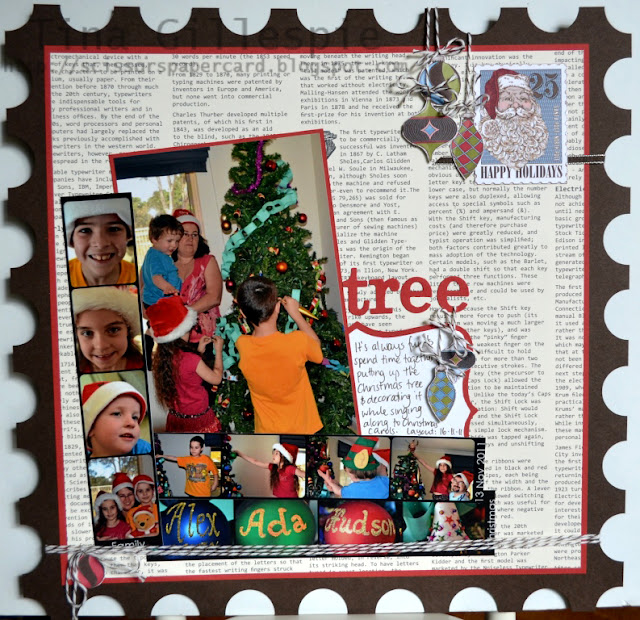
I decided to do a scrapbook layout of the family putting up the Christmas tree. In Adelaide it seems to be the tradition that the tree goes up on Pageant Day (the second Saturday in November).  Most families either go into the city to watch the parade and then come home to put up the tree, or they stay at home and watch the parade on TV while putting up the tree.  The advantage of putting the tree up this early is that you have plenty of time to scrap the photos before the craziness that is December!


There are some sneak peeks on this layout of products coming out in the upcoming Summer Mini Catalogue.  The postage stamp shaped layout was inspired by a new punch.  I just used my 1" Circle punch to create the 'perforations' aroun d the edge of the layout.


I kept the postage stamp theme going with a fussy cut postage stamp image from the Letters To Santa DSP.  The baubles were also fussy cut from the same DSP pack, and there's another peek - some gorgeous Baker's Twine from the Mini catalogue.


More fussy cut baubles and Baker's Twine to decorate the journalling spot.  I decided to 'hang' one of the baubles from the letter 'e' in the title.


A little more Baker's Twine and another bauble to finish off the layout.  Can you tell how much I love the twine?

Ink: Early Espresso Stampin' Write Marker
DSP: Letters To Santa DSP, First Edition Specialty DSP, Early Espresso, Riding Hood Red, Whisper White
Other: Big Shot, Timeless Type Junior Alphabet Dies, Top Note Die, 1" Circle Punch, Early Espresso Baker's Twine, Early Espresso Taffeta Ribbon,  Paper Snips, Dimensionals
Digital: PS5, Photo Booth Photo Frame

I'd love for you to hop off to Nikki Sadler's blog now to continue the Blog Hop.

Catch you later,

Tina

Blogs in the hop:

Nikki Sadler
http://www.inkyart.com.au/

Sue Madex
http://www.madexcreations.com/

Di Dunk
http://www.stampartbydi.typepad.com/

Judy May
http://www/judymay.typepad.com

Kathryn Mangelsdorf
http://klm55.blogspot.com/

Alisha Watson
http://www.ratherbstampin.typepad.com/

Christine Blain
http://www.christineblain.blogspot.com/

Ros Davidson
http://www.rosdavidson.typepad.com/

Sunday 20 November 2011

Sewing with Stampin' Up! Fabric

Hi!

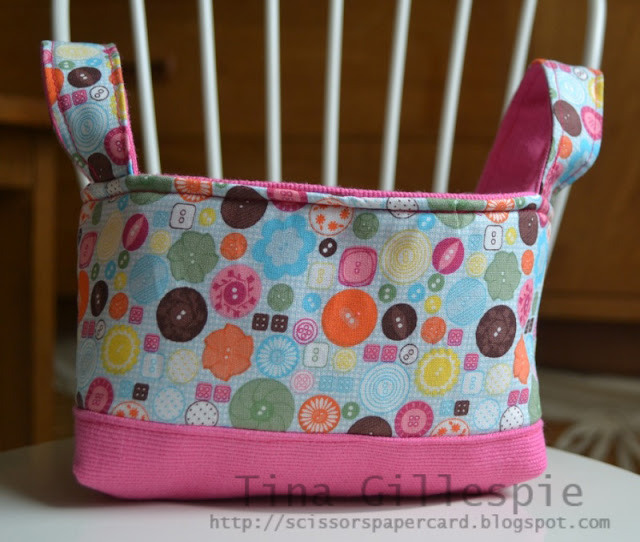
I got a chance on Friday to sit down and do some sewing.  I had a particular project in mind that I've been wanting to sew for about 6 months.  Can't believe it's taken that long for me to find the time to sew it up!


Isn't it a cute little bag?  It's called a project tote, and I think it would look adorable on a craft desk with things like your snail, paper snips, bone folder, etc tucked away inside.


The button fabric is Stampin' Up!, but it is not available in Australia.  You could make this tote with any of the fabrics we stock though.  The tote is quite small, and if you make it as I have with the contrasting fabric you would be able to make 24 of these bags using one pack of fabric.


I popped the ribbons in to give you an idea of the size.  I'm currently using mine to store ribbons, but I think I will use it for bits and pieces at my classes and workshops.  I'm also going to try doubling the measurements to make myself a bigger bag.  Hopefully it won't take another 6 months to find some more sewing time!

If you are a sewer and would like to have a go at this tote you can find the pattern here.

Catch you later,

Tina

Friday 18 November 2011

Just Add Ink 94

Hi!

I needed to make a wedding card today, so I decided to use the sketch at Just Add Ink.  I love the sketch for the challenge, but it just wasn't quite working for me.  I have tried to stay fairly true to the sketch, but I ended up changing it a little.  I hope it's still OK for the challenge!


I changed the sketch from a circle to a square and flipped the elements of the sketch.


The rolled roses are so elegant on a wedding card.  I knew the colour scheme of the wedding was red, black and white so I used those colours with a touch of silver.


The inside I left fairly plain so I could write a message to the bride and groom.

Stamps: A Word For You, Well Scripted (retired)
Ink: Versamark, Real Red
Cardstock: Real Red, Basic Black, Whisper White, Brushed Silver, Old Olive
Other: Big Shot, Little Leaves Sizzlit, Paper Snips, Half Back Pearls (retired Pretties Kit), Dimensionals, Silver Embossing Powder

Catch you later,

Tina

Thursday 17 November 2011

Joy Fold Berry Blossoms

Hi!

Today I have a Joy Fold card for you.  I made it for a very good friend for her birthday.  You can find a tutorial for making this type of card on SplitCoast Stampers.  It's pretty easy - you just make a right side opening card with a half front and then make a smaller left opening card and stick them together!


I fussy cut some of the flowers for the front of the card and adhered them to some Basic Black cardstock.  I  wanted to use something a bit stronger to hold the card closed so I used my 5 Petal Flower and Boho Blossoms punches to create another flower.  I also used a cute little Designer Printed Brad to finish it off.


Here's a look at the inside of the card.  You can see how it opens up.


I used some more fussy cut flowers to liven up the inside panel.

Stamps: Delicate Doilies
Ink: Calypso Coral
DSP/Cardstock: Berry Blossoms DSP, Wisteria Wonder, Calypso Coral, Whisper White, Basic Black
Other: 5 Petal Flower Punch, Boho Blossoms Punch, Designer Printed Brad, Paper Snips, Dimensionals

I'm participating in another blog hop next Saturday (26th).  It's a Christmas themed hop, so if you're stuck for inspiration you should definitely take a look!

Catch you later,

Tina

Monday 14 November 2011

Just Add Ink #93

Hi!

I managed to find some time over the weekend to have a go at the current Just Add Ink challenge.  It's another colour combination this week: Pool Party, Certainly Celery, Whisper White and Melon Mambo.


I white embossed the flower stamp on the Pool Party DSP and then used my blender pen to lightly colour the flowers.  It's a subtle effect, but quite pretty.  I snuck a little Certainly Celery at the top and bottom of the card by using my Dotted Scallop Ribbon Border punch to create a subtle little scalloped border.


I also stamped the same flower on the inside of the card, along with the sentiment.


Stamps: Simply Soft (Hostess), Curly Cute, Happiest Birthday Wishes (Hostess)
Ink: Versamark, Pool Party
DSP/Cardstock: Pool Party Patterns Stack DSP, Pool Party, Certainly Celery, Whisper White, Melon Mambo
Other: Big Shot, Stripes Embossing Folder, Whisper White Taffeta Ribbon, Whisper White Embossing Powder, Heat Gun, Dotted Scallop Ribbon Border Punch, Blender Pen, Paper Snips, Dimensionals

Catch you later,

Tina

Sunday 13 November 2011

Brayered Background Birthday Card

Hi!

Wow - where did that week go?  Actually I know where it went - at the doctors, chemist, laundry and washing line!  Alex has been pretty sick all week with a very nasty virus so I have been very busy dealing with all that comes with a sick child.  Just as I seemed to get to the end with Alex, Ada is showing signs of having the same virus.  Sigh...

So today I have for you a card I made a month or more ago, as I just haven't had the energy for much crafting or blogging this week.


The background for the card is brayered using three of the newest in colours: Island Indigo, Pool Party and Lucky Limeade.  I like the way that brayering gives an uneven layer of colour and also how you can achieve the graduated colours.  I was going for a bit of a dusk feel to the background.  The stars are hand drawn using my white signo gel pen.


The castle punch art is not my invention, but there are lots floating around the internet. It's not tricky to work out how to punch the castle, you just need the retired punches Spiral Border and Designer Label.


Stamps: A Word For You, It's Your Day
Ink: Island Indigo, Pool Party, Lucky Limeade, Soft Suede, Basic Black Stampin' Write Marker, White Signo Gel Pen
Cardstock: Whisper White, Island Indigo, Lucky Limeade, Blushing Bride, Sahara Sand
Other: Word Window Punch, Spiral Border Punch (retired), Designer Label Punch (retired), Brayer, Sponge Daubers, Dimensionals

Catch you later,

Tina

Tuesday 8 November 2011

Stamp A Memory November Layout

Hi!

Today is my day to have a layout featured over at Stamp A Memory.  I hope you can pop on over there to take a look.  While you're there, why don't you check out the current challenge - to scrap a double layout.  Here's a little peek at my layout before you go.


You can see my layout by clicking here.

Catch you later,

Tina

Monday 7 November 2011

Stamp A Memory November Challenge

Hi!

It feels like ages since I've done any scrapping, so I was pleased when it came time to do my submission for Stamp A Memory's November Challenge.  This month we are challenging you to do a double layout.  The subject of the layout can be anything you desire, but it must be a double page layout.


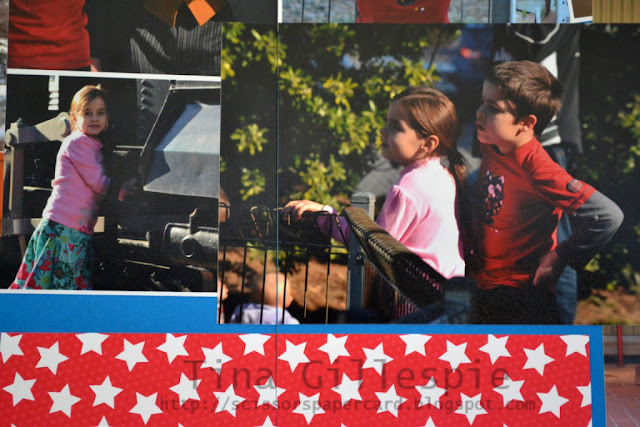
I chose to scrap about my family's recent trip to an event called "A Day Out With Thomas".  Alex loves his Thomas trains, so off we went to the Railway Museum for the afternoon.


When I do a double layout I often like to overlap some elements over the join between the pages.  In the photo above you can see I've used a photo, part of which is on each side of the layout.  It helps the layout flow from one page to the next.


Bunting is quite fashionable on projects at the moment, so I decided to incorporate some into my layout.  I hand cut the flags and used Crystal Effects to glue them to some twine.  I wrapped each end of the twine around a brad and then glued the ends to the page using some more Crystal Effects.  A tip I learned recently (but I can't remember where) was to run a little bead of glue along the twine with your finger and then press the twine to the layout.  I curled the ends of my twine in a loop for a cute little effect.


I found this to be a great method on the twine as you can't see the glue.

I hope you can find time to take part in this month's challenge - I can't wait to see what you scrap!

Ink: White Signo Gel Pen
DSP/Cardstock: Big Top Birthday DSP, Pacific Point
Other: Whisper White Brads, Hemp Twine, Paper Snips, Glue Dots, Crystal Effects

Catch you later,

Tina

Saturday 5 November 2011

Chinese Whispers Stampin' Up! Style

Hi!

Today I have a blog hop for you, but a bit of a different blog hop.  A couple of months ago I was chopping up some DSP for a share and let my mind wander as I chopped.  It wandered to Sarah Klass's blog where she had blogged about how a group of her friends had all created cards one after the other, each inspired by the card before them.  She called it "Chinese Whispers of the Stampin' Up! kind". 

So as my mind wandered I thought it sounded like a great idea and proposed a game of Chinese Whispers to a group of Stampin' Up! friends.  They were keen to get on board and so I began the "whisper".


I made this card, and then emailed a photo to Kathryn Mangelsdorf.  She then made a card based on mine and emailed her photo to the next person on the list, and so on.  Each person only saw the card before theirs.  When the "whisper" reached the last person on the list I was able to reveal all the cards.  It was amazing to see how the "whisper" evolved as it went around the circle, and we wanted to share the fun and gorgeousness we all created.  There are 15 cards to show you, so please join in and hop around the blogs to see how the "whisper" progressed.


Here are the other blogs on the hop.  I recommend that you do the hop in order so that you can follow the evolution of the "whisper".  Some blogs feature more than one card as not all of the ladies who participated have blogs.

Kathryn Mangelsdorf
Sue Madex
Christine Blain
Ros Davidson
Nikki Sadler
Kathryn Ruddick
Di Gill
Alisha Watson

Stamps: Just Believe, Curly Cute
Ink: Basic Black
DSP/Cardstock: First Edition Specialty, Very Vanilla, Basic Black
Other: Basic Black Satin Ribbon, Modern Label Punch, Basic Jewels Pearls, Sponge Dauber

Happy Hopping!  Now you're off to Kathryn Mangelsdorf's blog where you'll find both Kathryn's card and Christine Henderson's card.  Don't forget to leave comments along the way - we'd love to know what you think of our game and our cards!

Catch you later,

Tina

Tuesday 1 November 2011

Fireman Punch Art

Hi!

At the end of last term Hudson and I went on a visit to the local fire station with our playgroup.  Hudson had a fabulous time - he got to sit in the fire engine, he had a play with the hose and got to meet some of the firemen.  Here's a picture of us on the trip.


The best part of the trip was when one of the fireman accidentally saturated himself while showing us the water canon on top of the engine!  We decided that we wanted to thank the firemen so I offered to make a card for us all to sign to give to the station.


My punch art was based on a design by the very talented and generous Ellen Kemper.  You can see her fireman on her blog Blinkin', Thinkin', & Inkin'.  Here's a closer look.


There is so much detail in the fireman, so I kept the rest of the card simple so as to keep attention on the fireman.


I kept the inside of the card simple so that there was plenty of room for everyone to sign the card.

Stamps: A Word For You
Ink: Real Red, White Signo Gel Pen
Cardstock: Basic Black, Whisper White, Real Red, Daffodil Delight, Chocolate Chip, Old Olive, Pacific Point, Blushing Bride
Other: Lots of punches!  Ellen has the full list on her blog here.

Catch you later,

Tina