Hi!
One of my favourite days of the month is Just Add Ink's new Scrapbooking Challenge Day!
This month we are challenging you to scrap a non-traditional layout - so we want to see all kinds of shapes but no 12x12, 8x8, 6x6 or even A4 layouts. I decided to make a jigsaw piece shaped layout to go with my photo of Rob and the kids working on a jigsaw puzzle.
I chose some of the Big Top Birthday DSP because I thought it looked like it could have been a piece from a puzzle. I adhered it to a piece of 12x12 chipboard that I'd trimmed down to the jigsaw puzzle piece.
The title was cut using a Sizzix alpha die and my Big Shot, and the journalling strips were popped up on Dimensionals.
It was lots of fun to make this layout. I hope you have fun designing yours for the Just Add Ink challenge.
Ink: Tempting Turquoise, Daffodil Delight
DSP/Cardstock: Big Top Birthday DSP, Real Red, Whisper White
Other: Big Shot, Sizzix Alpha Die (non SU), Heart To Heart Punch, Paper Snips, Dimensionals, Sponge Dauber
Bye for now,
Tina
Showing posts with label Big Top Birthday DSP. Show all posts
Sunday, 10 June 2012
Wednesday, 7 March 2012
A 3D Project
Hi!
When I applied to become a member of the JAI Design Team I decided to apply for both the card making team and the scrapping team. Part of the application process for the card making team was to design a 3D, off the page item. I decided to alter a shadow box photo frame I bought from Ikea. I"d originally bought it to do something for my daughter's room, but it took on a life of it's own and ended up very differently to what I'd planned.
I love how it turned out, and I think it would look great in a little boy's room. Now I just need someone to have a baby boy so I can give it to them!
I also made a card to match the frame.
Like the frame, I fussy cut one of the balloons from the DSP and popped it up on Dimensionals.
I used the hostess set Ain't Love Grand for the inside. Here's the two projects together.
Overall, I was very pleased with how they turned out, even if they were nothing like what I had originally planned!
Stamps: Ain't Love Grand (hostess), Happiest Birthday Wishes (hostess)
Ink: Tempting Turquoise, Real Red
DSP/Cardstock: Big Top Birthday DSP, Tempting Turquoise, Real Red, Whisper White
Other: Big Shot, Simple Letters Alpha Dies, Paper Snips, Dimensionals, Cherry Cobbler Baker's Twine, Scalloped Ribbon Border Punch, Blender Pen
Bye for now,
Tina
When I applied to become a member of the JAI Design Team I decided to apply for both the card making team and the scrapping team. Part of the application process for the card making team was to design a 3D, off the page item. I decided to alter a shadow box photo frame I bought from Ikea. I"d originally bought it to do something for my daughter's room, but it took on a life of it's own and ended up very differently to what I'd planned.
I love how it turned out, and I think it would look great in a little boy's room. Now I just need someone to have a baby boy so I can give it to them!
I also made a card to match the frame.
Like the frame, I fussy cut one of the balloons from the DSP and popped it up on Dimensionals.
I used the hostess set Ain't Love Grand for the inside. Here's the two projects together.
Overall, I was very pleased with how they turned out, even if they were nothing like what I had originally planned!
Stamps: Ain't Love Grand (hostess), Happiest Birthday Wishes (hostess)
Ink: Tempting Turquoise, Real Red
DSP/Cardstock: Big Top Birthday DSP, Tempting Turquoise, Real Red, Whisper White
Other: Big Shot, Simple Letters Alpha Dies, Paper Snips, Dimensionals, Cherry Cobbler Baker's Twine, Scalloped Ribbon Border Punch, Blender Pen
Bye for now,
Tina
Sunday, 18 December 2011
Layout 85: September
Hi!
Today I have the last (for now) in my monthly double layouts. I haven't yet printed the photos for October, November or December, but I think I will need to do that before Christmas so I can try to finish my 100 layouts.
This layout uses some of my favourite papers from the Big Top Birthday pack. It's so bright and cheerful!
Ink: Tempting Turquoise Stampin' Write Marker
DSP/Cardstock: Big Top Birthday DSP, Daffodil Delight, Real Red, Whisper White
Other: Big Shot, Simple Letters Alphabet Dies, Bird Builder Punch
Catch you later,
Tina
Today I have the last (for now) in my monthly double layouts. I haven't yet printed the photos for October, November or December, but I think I will need to do that before Christmas so I can try to finish my 100 layouts.
This layout uses some of my favourite papers from the Big Top Birthday pack. It's so bright and cheerful!
Ink: Tempting Turquoise Stampin' Write Marker
DSP/Cardstock: Big Top Birthday DSP, Daffodil Delight, Real Red, Whisper White
Other: Big Shot, Simple Letters Alphabet Dies, Bird Builder Punch
Catch you later,
Tina
Saturday, 10 December 2011
Grand Big Top Birthday!
Hi!
Do you have your sunnies on? No? Well, go get them then! Today's card is bright. Very bright!
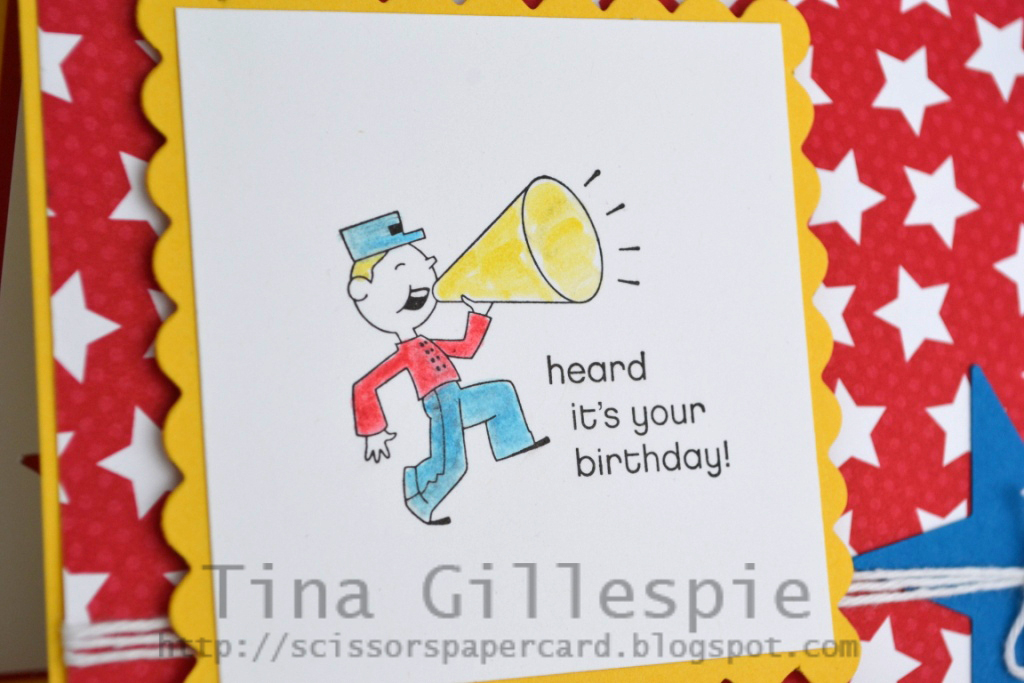
I combined the Big Top Birthday DSP with the Hostess stamp set Ain't Love Grand for this card. It was made for my neighbour who recently celebrated a birthday.
I love the Big Top Birthday DSP. It's so bright and cheerful! I didn't have the Pacific Point star on the card to start with, but I felt like the Baker's Twine was getting a bit 'lost' in amongst all the stars on the DSP. The star punchie was a quick and easy way to give the twine a boost.
I stamped the marching man in Basic Black ink and then coloured him using my Blender Pen and coordinating ink colours.
For the inside I reached for the star punch again. This time I punched through the Whisper White layer so that you can see the Real Red layer through the hole made by the punch. Sadly, the star punches have been retired by Stampin' Up!, but you could just as easily use any of the punches we stock to get a similar effect.
Stamps: Ain't Love Grand (hostess), Happiest Birthday Wishes (hostess)
Ink: Basic Black, Real Red, Pacific Point, Daffodil Delight
DSP/Cardstock: Big Top Birthday DSP, Daffodil Delight, Real Red, Pacific Point, Whisper White
Other: Big Shot, Scallop Square Duo Bigz Die, White Baker's Twine, Dimensionals, Blender Pen, Large Star Punch (retired)
Catch you later,
Tina
Do you have your sunnies on? No? Well, go get them then! Today's card is bright. Very bright!
I combined the Big Top Birthday DSP with the Hostess stamp set Ain't Love Grand for this card. It was made for my neighbour who recently celebrated a birthday.
I love the Big Top Birthday DSP. It's so bright and cheerful! I didn't have the Pacific Point star on the card to start with, but I felt like the Baker's Twine was getting a bit 'lost' in amongst all the stars on the DSP. The star punchie was a quick and easy way to give the twine a boost.
I stamped the marching man in Basic Black ink and then coloured him using my Blender Pen and coordinating ink colours.
For the inside I reached for the star punch again. This time I punched through the Whisper White layer so that you can see the Real Red layer through the hole made by the punch. Sadly, the star punches have been retired by Stampin' Up!, but you could just as easily use any of the punches we stock to get a similar effect.
Stamps: Ain't Love Grand (hostess), Happiest Birthday Wishes (hostess)
Ink: Basic Black, Real Red, Pacific Point, Daffodil Delight
DSP/Cardstock: Big Top Birthday DSP, Daffodil Delight, Real Red, Pacific Point, Whisper White
Other: Big Shot, Scallop Square Duo Bigz Die, White Baker's Twine, Dimensionals, Blender Pen, Large Star Punch (retired)
Catch you later,
Tina
Monday, 7 November 2011
Stamp A Memory November Challenge
Hi!
It feels like ages since I've done any scrapping, so I was pleased when it came time to do my submission for Stamp A Memory's November Challenge. This month we are challenging you to do a double layout. The subject of the layout can be anything you desire, but it must be a double page layout.
I chose to scrap about my family's recent trip to an event called "A Day Out With Thomas". Alex loves his Thomas trains, so off we went to the Railway Museum for the afternoon.
When I do a double layout I often like to overlap some elements over the join between the pages. In the photo above you can see I've used a photo, part of which is on each side of the layout. It helps the layout flow from one page to the next.
Bunting is quite fashionable on projects at the moment, so I decided to incorporate some into my layout. I hand cut the flags and used Crystal Effects to glue them to some twine. I wrapped each end of the twine around a brad and then glued the ends to the page using some more Crystal Effects. A tip I learned recently (but I can't remember where) was to run a little bead of glue along the twine with your finger and then press the twine to the layout. I curled the ends of my twine in a loop for a cute little effect.
I found this to be a great method on the twine as you can't see the glue.
I hope you can find time to take part in this month's challenge - I can't wait to see what you scrap!
Ink: White Signo Gel Pen
DSP/Cardstock: Big Top Birthday DSP, Pacific Point
Other: Whisper White Brads, Hemp Twine, Paper Snips, Glue Dots, Crystal Effects
Catch you later,
Tina
It feels like ages since I've done any scrapping, so I was pleased when it came time to do my submission for Stamp A Memory's November Challenge. This month we are challenging you to do a double layout. The subject of the layout can be anything you desire, but it must be a double page layout.
I chose to scrap about my family's recent trip to an event called "A Day Out With Thomas". Alex loves his Thomas trains, so off we went to the Railway Museum for the afternoon.
When I do a double layout I often like to overlap some elements over the join between the pages. In the photo above you can see I've used a photo, part of which is on each side of the layout. It helps the layout flow from one page to the next.
Bunting is quite fashionable on projects at the moment, so I decided to incorporate some into my layout. I hand cut the flags and used Crystal Effects to glue them to some twine. I wrapped each end of the twine around a brad and then glued the ends to the page using some more Crystal Effects. A tip I learned recently (but I can't remember where) was to run a little bead of glue along the twine with your finger and then press the twine to the layout. I curled the ends of my twine in a loop for a cute little effect.
I found this to be a great method on the twine as you can't see the glue.
I hope you can find time to take part in this month's challenge - I can't wait to see what you scrap!
Ink: White Signo Gel Pen
DSP/Cardstock: Big Top Birthday DSP, Pacific Point
Other: Whisper White Brads, Hemp Twine, Paper Snips, Glue Dots, Crystal Effects
Catch you later,
Tina
Monday, 12 September 2011
Big Top Birthday Cards
Hi!
Today I have not one, but two cards for you! I surprised myself last night and managed to get both made. Given that I'd spent 5 hours doing some pretty heavy gardening during the day I was amazed that I even had the energy to create. I guess when the mojo strikes you just have to go with it!
A couple more strips of the DSP on the inside to finish it off. Easy!
Balloon Card:
Stamps: A Word For You, It's Your Day
Ink: Tempting Turquoise
DSP/Cardstock: Big Top Birthday, Tempting Turquoise, Whisper White
Other: Sponge Dauber, Dimensionals, Stamp Positioner
Happy Card:
Stamps: Curly Cute
Ink: Real Red
DSP/Cardstock: Big Top Birthday, Tempting Turquoise, Real Red, Whisper White
Other: Stamp Positioner
Catch you later,
Tina
Today I have not one, but two cards for you! I surprised myself last night and managed to get both made. Given that I'd spent 5 hours doing some pretty heavy gardening during the day I was amazed that I even had the energy to create. I guess when the mojo strikes you just have to go with it!
I love how the DSP does all the work in this card. I just had to stamp a sentiment at the bottom!
The inside was just as easy! I fussy cut a second balloon from the DSP, mounted it on dimensionals and stamped a sentiment.
The front of this card took a little longer, but only because I used my stamp positioner to line up all the 'Happy' stamps.
A couple more strips of the DSP on the inside to finish it off. Easy!
Balloon Card:
Stamps: A Word For You, It's Your Day
Ink: Tempting Turquoise
DSP/Cardstock: Big Top Birthday, Tempting Turquoise, Whisper White
Other: Sponge Dauber, Dimensionals, Stamp Positioner
Happy Card:
Stamps: Curly Cute
Ink: Real Red
DSP/Cardstock: Big Top Birthday, Tempting Turquoise, Real Red, Whisper White
Other: Stamp Positioner
Catch you later,
Tina
Subscribe to:
Posts (Atom)