Pages

Showing posts with label Happy Birthday Gorgeous. Show all posts

Tuesday, 7 May 2019

So Country With Saffron

Hi!

 
Welcome to tonight's Colour Creations Blog Share. This week we are using So Saffron as a feature colour on our cards. I was happy about this, as I struggled with some of the neutrals we've done in the past few weeks. however, every time I sat down to create I was blanking for ideas! I'm still not totally thrilled with this card, but at least I got something done.

scissorspapercard, Stampin' Up!, Art With Heart, Colour Creations, Happy Birthday Gorgeous, Country Floral DTIEF, Share What You Love Embellishment Kit, Bitty Blooms Punches

I started by inking up the flat side of my Country Floral DTIEF with Night Of Navy Ink and then running it through my Big Shot with a piece of So Saffron cardstock. It's not a technique I use often, but I like the way it turned out on this card. I was too efficient and washed my folder before I realised I should have done a second piece for the inside too. I decided to chop a piece off the front panel tout aside for the inside, which then necessitated chopping up the rest of the panel to stretch it for the front of the card. See, it doesn't alway pay to be too tidy!

scissorspapercard, Stampin' Up!, Art With Heart, Colour Creations, Happy Birthday Gorgeous, Country Floral DTIEF, Share What You Love Embellishment Kit, Bitty Blooms Punches

I matted the sections with Whisper White to help them stand out more. The label for the sentiment was from the Share What You Love Embellishment Kit. I always get to this point of the catalogue and start madly trying to use up all the pretty stuff that I've hoarded all year!

scissorspapercard, Stampin' Up!, Art With Heart, Colour Creations, Happy Birthday Gorgeous, Country Floral DTIEF, Share What You Love Embellishment Kit, Bitty Blooms Punches

The inked/embossed piece didn't look right with just a So Saffron border, so I added a Whisper White one first. I guess it echoes the front, so it's ok!

It's time to pop on over to Catherine's blog now, where you can find the rest of this week's So Saffron links.

Bye for now,

Tina

Sunday, 28 April 2019

CTC #226: CASE A Layout

Hi!


Sob! it's Sunday, which means the school holidays are over, but ti also means it's time for this week's CASEing The Catty Sunday Challenge Blog Hop. Yay! You may have arrived here from Siobhan's blog, or just starting here. It really doesn't matter, just keep hopping 'til you get back to where you started.


This week we are CASEing layouts from the Occasions Catalogue. What does this mean? Simply take a card you like and make a new one based on the placement of all of the elements on the card. Easy!


I decided to CASE the front of the catalogue, treating it like a big card.

scissorspapercard, Stampin' Up!, CASEing The Catty, Bike Ride, Happy Birthday Gorgeous, Stitched Shapes Framelits, Bitty Blooms Punch Pack

I started by using my Stamparatus to create the wreath of flowers on the base. It was a little tricky, as I stamped the Bike Ride image six times (because there are 6 cards on the cover!), but I got it first go! I only used the Stamparatus to stamp the outline, and then the flowers and leaves were stamped by hand.

scissorspapercard, Stampin' Up!, CASEing The Catty, Bike Ride, Happy Birthday Gorgeous, Stitched Shapes Framelits, Bitty Blooms Punch Pack

The punched flowers were created using the Bitty Blooms Punch pack, but I also threw in a few leaves stamped with a leaf from Happy Birthday Gorgeous. After I'd assembled the card I added a scattering of copper sequins to represent the butterflies on the cover.

It wasn't until I was editing these photos that I realised how vintage the colour scheme is. I used Grapefruit Grove, Pear Pizzazz and Soft Suede. I think nearly every kitchen had crockery or bakeware in these colours in the 70's!

scissorspapercard, Stampin' Up!, CASEing The Catty, Bike Ride, Happy Birthday Gorgeous, Stitched Shapes Framelits, Bitty Blooms Punch Pack

I couldn't resist adding another little flower on the inside!

Hopefully I'll see you over in our Facebook group, where you can add your CASEd Layout card to the challenge.


Before you go, though, don't forget to complete the hop! Next up is the lovely Julia.


Thursday, 28 February 2019

JAI #446: Just Add Inspiration

Hi!

Time for the new Just Add Ink challenge! This week Rachael has found this absolutely gorgeous Inspiration photo to guide our crafting.


What a feast for the senses - can you imagine the texture and the scent to go with those glorious colours? So pretty! I went straight for the equally pretty Beautifully Detailed Laser-Cut Specialty Paper for my card.

scissorspapercard, Stampin' Up!, Just Add Ink, Happy Birthday Gorgeous, Beautifully Detailed Laser-Cut Paper, Garden Impressions DSP, Butterfly Elements, Subtle DTIEF, Sponge Brayer

I lightly brayered over the panel I selected for my card with some Bermuda Bay ink to match the card base. It turned out quite patchy with some white areas showing though - exactly as I'd hoped! I then mounted it on a piece of Bermuda Bay Cardstock cut ever so slightly smaller than the panel, and popped the whole piece up on Dimensionals.

scissorspapercard, Stampin' Up!, Just Add Ink, Happy Birthday Gorgeous, Beautifully Detailed Laser-Cut Paper, Garden Impressions DSP, Butterfly Elements, Subtle DTIEF, Sponge Brayer

A few layered pieces on the front and I was done! I tore along the bottom edge of the Mango Melody cardstock for a different look, and then adhered it on top of a length of Melon Mambo cardstock. The DSP underneath is from the Garden Impressions DSP pack. I thought the colours and patterns worked well to represent the vases in the Inspiration photo.

scissorspapercard, Stampin' Up!, Just Add Ink, Happy Birthday Gorgeous, Beautifully Detailed Laser-Cut Paper, Garden Impressions DSP, Butterfly Elements, Subtle DTIEF, Sponge Brayer

I cropped the butterflies on the inside from another sheet of the DSP. I finally caved and purchased the Butterfly Duo punch after I'd fussy cut quite a lot of butterflies!

Is your mind turning over what you're going to do with the Inspiration photo? I hope so! It's a great picture, full of lots of elements to draw ideas from. I can't wait to see what you make! Don't forget to link it up over at the Just Add Ink blog.

Bye for now,

Tina

Monday, 1 October 2018

Springing Into Muddy Puddles

Hi!

Oh dear, the long weekend caught me out, and I'm late with this post. It's a super fun one though, so hopefully that makes up for it's tardiness. Today's card is the one I made for m youngest son, Hudson, who recently turned 11. He's a huge Peppa Pig fan, and we have been watching it lots while he's been recovering from his recent surgery.

scissorspapercard, Stampin' Up!, Happy Birthday Gorgeous, Sunshine Sayings, Little Numbers Thinlits

To make the card I printed two of the same Peppa Pig scenes of the family jumping in muddy puddles - if you know Peppa Pig you know that it's something they do a lot! Here's where it gets super fun - I fussy cut the two groups pigs and popped each one up on a spring that I made. Look:


How fun is that! Hudson took one look at the card and gave it a kiss, so I guess that means that he loved it!

scissorspapercard, Stampin' Up!, Happy Birthday Gorgeous, Sunshine Sayings, Little Numbers Thinlits

The inside is pretty simple. I realised after I'd packed up my printer that I should have printed something to fussy cut for the inside. Oh well! I used an offcut of the front panel that I fussy cut to cut the numbers from so that the colours matched. Waste not, want not!

Bye for now,

Tina

Tuesday, 25 September 2018

Flirting With Flamingo

Hi!

Welcome to the new Colour Creations Blog Share! This week we are creating with Flirty Flamingo.


Despite my blog post title, there are no flamingo on my card tonight. Instead I made a flirty card. 'What's a flirty card?', I hear you ask - to me it's a fun, light and airy card that isn't too serious. That's what I was aiming for with this card, and I think I've succeeded.

scissorspapercard, Stampin' Up!, Art With Heart, Colour Creations, Happy Birthday Gorgeous, Delightfully Detailed LCP, Subtle 3DTIEF

I started by snipping a piece from the gorgeous Delightfully Detailed Laser Cut DSp. It's from the big floral sheet. I took a really big breath before snipping - it's a bit scary!! I then used my sponge brayer to colour it with Flirty Flamingo ink

scissorspapercard, Stampin' Up!, Art With Heart, Colour Creations, Happy Birthday Gorgeous, Delightfully Detailed LCP, Subtle 3DTIEF

I paired the Flirty Flamingo with Soft Sea Foam. It's hard to see in the pic, but the large SSF layer under the flower is embossed with the Subtle 3DTIEF. The flower is then layered on a circle of Vellum, and on top are some cardstock circles with the sentiment from Happy Birthday Gorgeous.

scissorspapercard, Stampin' Up!, Art With Heart, Colour Creations, Happy Birthday Gorgeous, Delightfully Detailed LCP, Subtle 3DTIEF

Speaking of Happy Birthday Gorgeous - have you noticed that the larger two leaf stamps match the leaves in the Delightfully Detailed LCDSP? What a great find, as it helped to extend the smaller floral section I snipped from the DSP.

You can find the rest of this week's Flirty Flamingo cards over at Catherine's blog. I wonder if there'll be any flamingo amongst them?

Bye for now,

Tina

Tuesday, 11 September 2018

Summery Daffodils

Hi!

It's Tuesday evening, so time for another Colour Creations Blog Share.


This week we are working with Daffodil Delight - a fun summery yellow that is always cheerful. I paired it with another colour from the Brights Collection - Bermuda Bay.

scissorspapercard, Stampin' Up!, Art With Heart, Colour Creations, Happy Birthday Gorgeous, Playful Backgrounds, Happy Birthday Thinlit

Once again I have used the smooshing technique. I will stop using the technique soon, I promise. Maybe...

scissorspapercard, Stampin' Up!, Art With Heart, Colour Creations, Happy Birthday Gorgeous, Playful Backgrounds, Happy Birthday Thinlit

I smooshed with the two colours, deliberately using the Bermuda Bay under where I planned to sit the Happy Birthday die cuts so that the Daffodil Delight would pop. The shadow effect created by offset layering the Bermuda Bay die cut underneath helps with that pop.

scissorspapercard, Stampin' Up!, Art With Heart, Colour Creations, Happy Birthday Gorgeous, Playful Backgrounds, Happy Birthday Thinlit

I used my Playful Backgrounds stamp to create a background on the inside that it a little bit like the smooshing on the outside. Close enough for me anyway!

You can see what the rest of the ladies have done with Daffodil Delight over on Catherine's blog. It's worth the look, everyone does such an amazing job each week!

Bye for now,

Tina

Thursday, 6 September 2018

JAI #425: Just Add Inspiration

Hi!


Hello as you join me for the new Just Add Ink challenge. This week Kelly has provided us with this gorgeous garden picture. I'm so jelly - I would love a garden like that but I'm a complete black thumb so it will never happen in my lifetime!


Sigh.... so pretty!

The wonderful thing about our Inspiration challenges is that you can take anything from the picture and turn it into a card. My mind started thinking about how to recreate the scene and I got so overwhelmed I had to put it aside for a while to think some more. In the end I went super simple - just pulling a few of the colours from the picture and running with them.

scissorspapercard, Stampin' Up!, Just Add Ink, Happy Birthday Gorgeous, Best Birds, Subtle DTIEF

I was recently gifted this die by a lovely customer. I've no idea what brand it is, as there was no packaging. I cut the hearts once in Berry Burst and again in Powder Pink, as there are at least two shades of pink flowers in the Inspiration photo. I then glued down the BB outline and pieced the PP hearts into it. Fiddly, but I love the look!

scissorspapercard, Stampin' Up!, Just Add Ink, Happy Birthday Gorgeous, Best Birds, Subtle DTIEF

I popped the oval panel onto a piece of Soft Sea Foam cardstock that has been embossed with the Subtle DTIEF - not that you can see it in the photo! Some ribbon and twine and done!

scissorspapercard, Stampin' Up!, Just Add Ink, Happy Birthday Gorgeous, Best Birds, Subtle DTIEF

I used some of my left over hearts to finish off the inside of the card. The layered hearts are very sweet.

It's always fun seeing what everyone else sees in the same picture. You can find out how the Design Team interpreted it over at the Just Add Ink blog. What do you see? Why not link your card up over there too?

Bye for now,

Tina

Tuesday, 4 September 2018

Beautiful Day For Curry

Hi!

Here we are again with the new Art With Heart Colour Creations Blog Share.


This week we are using Crushed Curry. I must admit that Crushed Curry is a colour I really struggle with. More often than not if I need a yellow I'll reach for Daffodil Delight or So Saffron. It took me weeks to think of something I could make using Crushed Curry. Then I saw this card and the lightbulb clicked on!

scissorspapercard, Stampin' Up!, Art With Heart, Colour Creations, Beautiful Day, Happy Birthday Gorgeous

I started by heat embossing the butterfly from Beautiful Day with White embossing powder on Shimmery White cardstock.  I then used my Aquapainter and Crushed Curry inkpad to colour the area around the butterflies. I went a bit heavier on the colour closest to the butterflies and tried to soften it further out. I didn't paint right to the edge of the cardstock, and was in fact very rough about the edges.

scissorspapercard, Stampin' Up!, Art With Heart, Colour Creations, Beautiful Day, Happy Birthday Gorgeous

I had intended to just used the Crushed Curry ink, but the butterflies looked a little too stark and the embossing got lost in all of the white. To fix this I used my Pool Party ink with the Aquapainter to add the tiniest bit of colour to the butterflies. I love how they turned out!

scissorspapercard, Stampin' Up!, Art With Heart, Colour Creations, Beautiful Day, Happy Birthday Gorgeous

Over all, I'm so pleased with how this card turned out. I'm still on the fence about Crushed Curry, but now I'm sitting a little closer to the 'like it' side!

Why not pop on over to Catherine's blog, where you can see the rest of this week's Crushed Curry cards? You're bound to be inspired!

Bye for now,

Tina

Tuesday, 28 August 2018

A Crumb Cake CASE

Hi!


Here we are with another Colour Creations Blog Share. I've lost track of the week number, but I've managed to play along every week now - Im happy with that! This week we are focussed on one of my very favourite neutrals - Crumb Cake. Is it a colour that you use lots?

scissorspapercard, Stampin' Up!, Art With Heart, Painted Harvest, Happy Birthday Gorgeous, Dragonfly Dream, Eclectic Layers Thinlits

I can't remember why I was flicking through the catalogue, but a card on page 139 caught my eye. I'm sure you will work out which one when you have a look. I don't have the Eastern Beauty suite, so I decided to substitute with other stuff from my stash. I was a bit stumped on what to use for the window part until I came across the piece of Crumb Cake I used on my card. I'd cut it ages ago and not used it. Once I trimmed it for the front it was perfect!

scissorspapercard, Stampin' Up!, Art With Heart, Painted Harvest, Happy Birthday Gorgeous, Dragonfly Dream, Eclectic Layers Thinlits

I went for some lovely bright colours for the flower and leaves - Highland Heather, Gorgeous Grape and Crumb Cake for the flower and Lemon Line Twist with Granny Apple Green for the leaves. The epoxy dots I used on the front are retired, but you'll soon be able to purchase something similar from the Holiday Catalogue 😉

scissorspapercard, Stampin' Up!, Art With Heart, Painted Harvest, Happy Birthday Gorgeous, Dragonfly Dream, Eclectic Layers Thinlits

The flower on the inside was my first attempt. I used Early Espresso on the centre, but thought it turned out too dark. Instead of wasting the effort, I popped it on the inside!

Why not pop on over to Catherine's blog, where you can see the rest of this week's Crumb Cake cards? You can bet I will!

Bye for now,

Tina

Thursday, 23 August 2018

AWH August Blog Hop: Coloured Images

Hi!

Tonight the Art With Heart team are sharing creative projects featuring cards with images that you can colour in. We hope our Blog Hop inspires you to pick up some Stampin’ Write markers, Watercolour pencils, Stampin' Blends or another form of colouring medium and colour in with your stamps.

Don’t forget to contact any of the ladies on the blog hop to order any products, especially the limited edition Colour Your Season products.


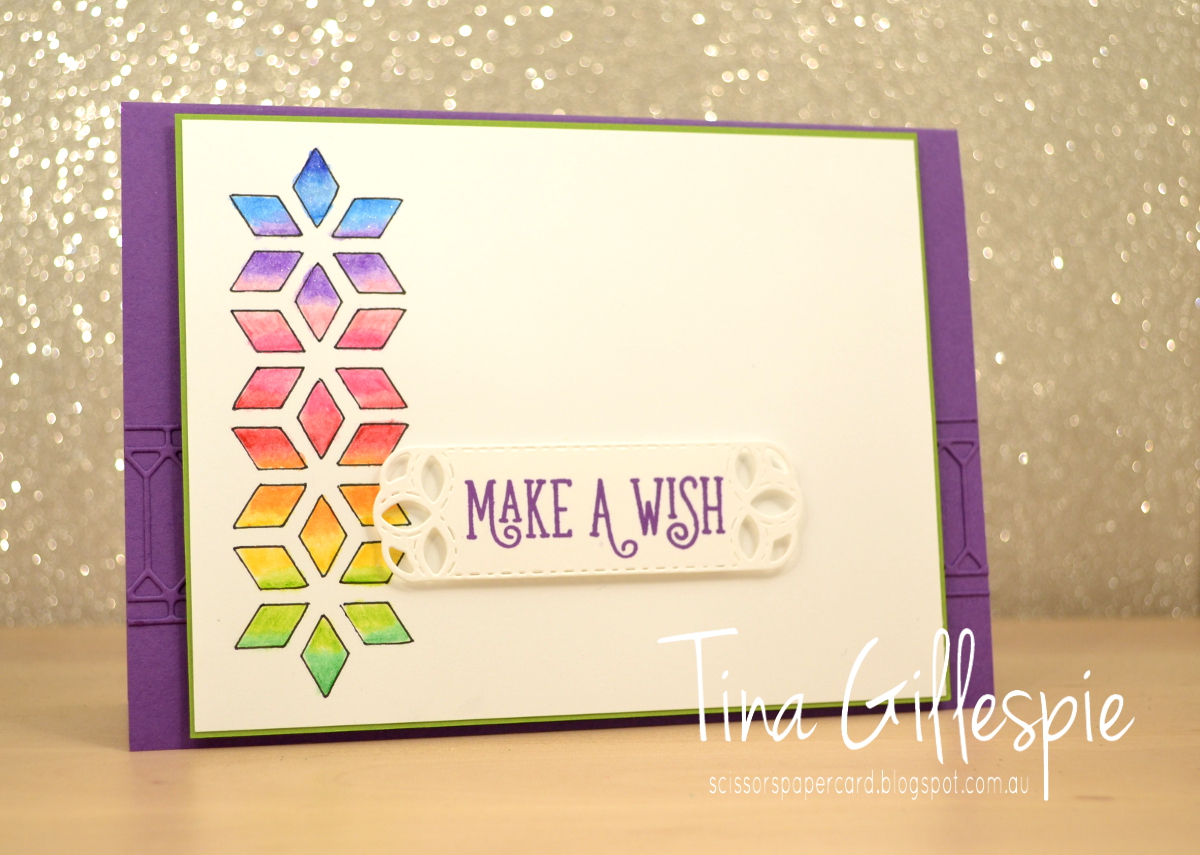
For this month's Blog Hop I decided to stretch the rules a little. The theme is Coloured Images, but instead of stamping and colouring an image I created a mask which I used to draw my own image to colour.

scissorspapercard, Stampin' Up!, Art With Heart, Happy Birthday Gorgeous, Painted Glass, Stained Glass Thinlits, Eclectic Layers Thinlits, Stitched Labels Framelits

Do you recognise it? It's a die from the Eclectic Layers Thinlits set. I cut it from scrap cardstock, trimmed it to the size I was after, used washi to adhere it to my cardstock and then traced through the design with a pen.

scissorspapercard, Stampin' Up!, Art With Heart, Happy Birthday Gorgeous, Painted Glass, Stained Glass Thinlits, Eclectic Layers Thinlits, Stitched Labels Framelits

I then used my watercolour pencils to colour the rainbow of colours in the design. I use a Wink Of Stella pen to blend the colours together. LOL, I don't think I've ever used the pencils with my Aqua Painter! Each of the little sections was coloured with two colours, leaving a little white in the middle. The WOS pen is then used to smooth the colour and to pull it into the white section until the two colours blend nicely.

scissorspapercard, Stampin' Up!, Art With Heart, Happy Birthday Gorgeous, Painted Glass, Stained Glass Thinlits, Eclectic Layers Thinlits, Stitched Labels Framelits

Just in case you were wondering, here's the colours I used. It was a mix of the old and new packs to get the perfect spectrum. The new collection of Watercolour Pencils are available this month, however Stampin' Up! have said that they may be in an upcoming catalogue.

scissorspapercard, Stampin' Up!, Art With Heart, Happy Birthday Gorgeous, Painted Glass, Stained Glass Thinlits, Eclectic Layers Thinlits, Stitched Labels Framelits

I used some of the same colours to colour the butterfly on the inside.

Are you a colourer? What's your preferred medium? Are you keen on pencils, markers or Blends? I love all three!

That' sit for me, so now it’s time for you to hop on over to Ros Davidson's blog. She makes awesome cards, and she's also the one that organises us to do our hops. Thanks, Ros!

Here's a list of all of the hoppers tonight in case you come across a broken link:


Bye for now,

Tina

Monday, 30 July 2018

Polished Stone Dragonflies

Hi!

Remember a little while ago I was playing around with the Polished Stone technique? Well, I found one more card in my 'To Blog' folder using the technique that I hadn't shown you yet. Here it is!

scissorspapercard, Stampin' Up!, Happy Birthday Gorgeous, Dragonfly Dreams, Detailed Dragonfly Thinlits, Flourish Thinlits, Subtle 3D DTIEF

I used Night Of Navy and Mint Macaron ink to create the Polished Stone panel. Isn't it pretty?

scissorspapercard, Stampin' Up!, Happy Birthday Gorgeous, Dragonfly Dreams, Detailed Dragonfly Thinlits, Flourish Thinlits, Subtle 3D DTIEF

Speaking of pretty - how's that Subtle 3D Dynamic Textured Impressions Embossing Folder? I've been using it so much, as it adds that little something extra on so many cards.

scissorspapercard, Stampin' Up!, Happy Birthday Gorgeous, Dragonfly Dreams, Detailed Dragonfly Thinlits, Flourish Thinlits, Subtle 3D DTIEF

That's the last of my Polished Stone cards for now - hopefully I'll get back to the technique some more soon, as it's a fun one!

Bye for now,

Tina

Monday, 2 July 2018

Springtime in Colour

Hi!

Today's card is not one I've CASEd from anyone in particular, but it's similar to a lot of cards that others have made. I've used the new Springtime Impressions Thinlits. I first loved them for the butterfly, but at second glance the other two dies, which I've used on this card, are pretty lovely too.

scissorspapercard, Stampin' Up!, Springtime Impressions Thinlits, Happy Birthday Gorgeous, Dragonfly Dreams

This card was fairly quick and easy to put together. I cut the large flower image with my Big Shot and then used my Stampin' Sponges to add colour to the flowers and leaves. The colours I used were Berry Burst, Calypso Coral, Crushed Curry, Garden Green and Lemon Lime Twist. There's no trick to adding the colour - it's literally jut sponged over the top.

scissorspapercard, Stampin' Up!, Springtime Impressions Thinlits, Happy Birthday Gorgeous, Dragonfly Dreams

Underneath where the die cut was going to lie I also sponged some Pool Party ink. It helps to make the colours in the flowers pop. A few pearls, a sentiment and a die cut flower (the third die in the set) and the card front was done!

scissorspapercard, Stampin' Up!, Springtime Impressions Thinlits, Happy Birthday Gorgeous, Dragonfly Dreams

The little flower die is so sweet that I couldn't help add a couple more to the inside of the card. So now, in the cold depths of winter, I am dreaming about Spring and new flowers!

Bye for now,

Tina