Pages

Monday 31 July 2017

Wood Texture Daisies

Hi!

Today's card was a fun little card that I made as a class sample, mostly to show off the gorgeous new Wood Textures DSP stack. It's one of my favourite DSP's in the new catalogue. I think it's so versatile. My immediate tendency is to hoard it, but I have to squash that impulse and chop it up!


In this case I've paired it with the new Thick Very Vanilla cardstock, a Dapper Denim scalloped border, and a So Saffron and Soft Suede daisy.


I really love this sentiment! Have you noticed it in the catalogue? It's in the new Soft Sayings Card Kit. You don't need to only use the stamps on the kit cards - they are great on any of your cards.


I think these little daisy stamps can be a little overlooked in favour of the large daisy, but they certainly deserve a bit of attention. I will certainly be using them more!

Bye for now,

Tina

Friday 28 July 2017

JAI #370:Just Add A Sketch

Hi!

Oops! I'm a bit late this week - Friday snuck up on me!


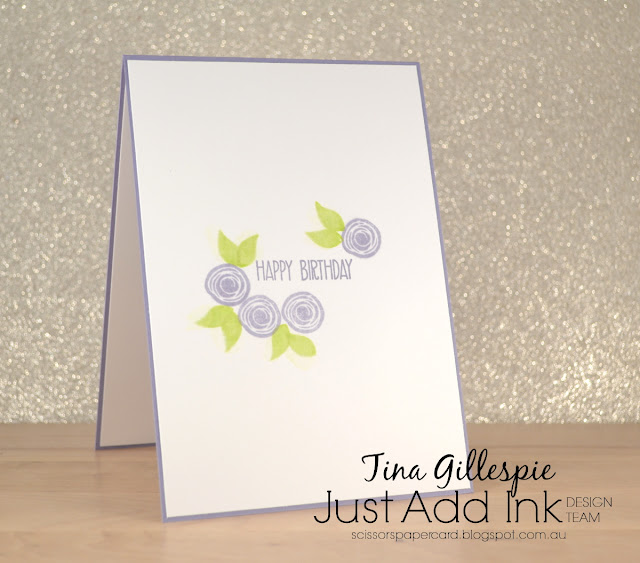
This week Narelle has designed a sketch for us to use in our card making at Just Add Ink. I quite liked this one, and found it difficult to narrow down and settle on one idea.

In the end I decided to have a bit of a play with the returned Glossy cardstock.

scissorspapercard, Stampin' Up!, Just Add Ink, Swirly Bird, Sunshine Sayings, Glossy Cardstock, Expressions Thinlits

I started by using my Aqua Painter to colour the large circle in Lemon Lime Twist. After it dried, I coloured the smaller Wisteria Wonder circles. When dry, I stamped over the top of each of the circles with some of the swirly stamps from Swirly Bird. They looked a little too stark against the watercolour background, so I ended up going over them again with a little water to soften the look.

scissorspapercard, Stampin' Up!, Just Add Ink, Swirly Bird, Sunshine Sayings, Glossy Cardstock, Expressions Thinlits

For the leaves, I dabbed a little bit of water where I was going to stamp each one, and then stamped over the top. You can see how the water and ink pooled differently on each one, giving a lovely, individual look to each leaf.

scissorspapercard, Stampin' Up!, Just Add Ink, Swirly Bird, Sunshine Sayings

I used the smaller flowers and leaves again on the inside. I couldn't get the same look, as I was using Whisper White cardstock, but I still like the way they turned out.

You can play along this week over at the Just Add Ink blog. You can also see the incredible cards the rest of the Design Team have created.

Bye for now,

Tina

Thursday 27 July 2017

AWH Blog Hop: Favourite Colour Combination

Hi!

It's time for the monthly Art With Heart Blog Hop. This month is a fun one, and I'm very keen to see what the rest of the team has created!


The Art with Heart Team ladies are selecting their favourite colour combinations to share with you tonight. Choosing the right colour scheme can be essential to your design and with Stampin’ Up!'s stunning collection, there are 50 colours to choose from. There’s sure to be some combinations that work really well together and you can take inspiration from.
Now sit back and enjoy some time out of your day to cruise through our blog hop and soak up some colour explosion eye candy!

If you're a bit like me, choosing a favourite colour combination is a bit like choosing a favourite child - it depends on the time of the day, the mood of the children, my mood.... I could go on! I've been on a bit of a vintage roll lately, and using a lot of Tranquil Tide. It's one of the colours that I thought was yucky when I first saw it, but I'm a total convert!
As you can see, this time around I've paired it with Fresh Fig, Crumb Cake and Very Vanilla to create my card.

Stampin' Up!, scissorspapercard, Fresh Florals DSP, Sheet Music, Flourishing Phrases, Tranquil Tulips, Timeless Textures

You may notice that the pattern in my Fresh Florals DSP doesn't look white, as it should. I used a clever trick for 'ageing' it - I used my sponge brayer to roll over some Crumb Cake ink. It works a treat for subduing the white in the pattern.

Stampin' Up!, scissorspapercard, Fresh Florals DSP, Sheet Music, Flourishing Phrases, Tranquil Tulips, Timeless Textures

The tulips were stamped in Fresh Fig onto some scrap Very Vanilla, fussy cut and then popped up on Dimensionals. I used my new Sheet Music stamp on the oval, and then went around the edge using one of the stamps in Timeless Textures. I also used the stamp to go around the edge of the sentiment panel.

Stampin' Up!, scissorspapercard, Fresh Florals DSP, Sheet Music, Flourishing Phrases, Tranquil Tulips, Timeless Textures

I think the inside is one of my favourite parts of the card. I selectively inked the Sheet Music stamp, and then pressed parts of the cardstock onto the inked stamp while holding up the rest of the cardstock. I used my fingers to press the cardstock to the stamp so that I got a soft edge to the stamped image. I sponged a little Crumb Cake ink over the top, and then stamped the stamp from Timeless Textures along the edges.

Now it’s time to hop on over to our next participant, the very talented Kathryn Ruddick. 


If you find a broken link or have come to this blog hop from a different entry point, you can view the participants below:


Wednesday 26 July 2017

AWH HOC: Week 9

Hi!

I nearly didn't think I'd make it with my Heart Of Christmas card this week. Now the kids are back at school, I'm doing all of the jobs I couldn't get done while I had them home. I do make crafting a bit of a priority though, so I eventually found a little time.


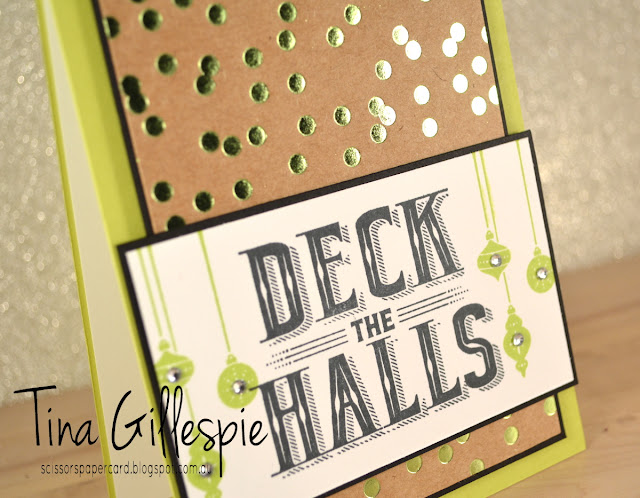
This week I feel like I was a little adventurous. I recently purchased the Foil Frenzy SDSP, even though at first glance I wasn't too thrilled with it. I do like the spotty design, so in the end it won me over.

scissorspapercard, Stampin' Up!, Foil Frenzy SDSP, Carols Of Christmas

Using metallics on a card automatically gives the card a bit of a luxe feel, which is sometimes what you want in a Christmas card. The Lemon Lime Twist gives the card a very modern look - it really is a light, fresh colour.

scissorspapercard, Stampin' Up!, Foil Frenzy SDSP, Carols Of Christmas

After stamped the baubles on either side of the sentiment, I added a rhinestone to each to finish them off. The smallest ones in the packet are just he right size for the little ornaments.

scissorspapercard, Stampin' Up!, Foil Frenzy SDSP, Carols Of Christmas, Santa's Sleigh

I carried the ornaments over to the inside too. They are from a new stamp set that SU will have available to purchase next month. It's called Carols Of Christmas, and has a matching Thinlits set called Card Front Builder Thinlits. I think the name thinker-uperer was having a bad day - it's not a great name for a fabulous set of dies! You'll be seeing lots of cards using them on the 'net I'm sure.

You can pop on over to Claire's blog to see the ret of the cards that the Art With Heart girls have made this week. I always enjoy looking at them, and commenting on each of the blogs. It's a great way to spend an hour or so of a Wednesday.

Bye for now,

Tina

Monday 24 July 2017

A Pretty Tranquil Label CASE

Hi!

Today's card is one that I CASEd from the magazine that Stamping' Up! sends out to all demonstrators. It uses the new Label Me Pretty stamp set and coordinating punch, which I hadn't yet inked up! The card in the magazine was a birthday card, but I'd had a class request for a sympathy card, and I thought this design worked well.


The sentiment is from the Flourishing Phrases stamp set. I was quite surprised at how well the two colours worked together - Tranquil Tide and Powder Pink. I never would have thought to put them together, but quite like it when I did. Do you ever find that?


I really loved the ribbon as a layer under the punched sentiment. I think it can be easy to forget to use ribbon in this way, but it adds so much more to a card than a strip of card or DSP.


Sadly, I had to use this card much sooner than I expected. It was definitely handy to have it in my stash ready to go, than to try to sit and make it when I needed it. What do you think? Do you have sympathy cards ready to go, or do you prefer to make them at the time they are needed?

Bye for now,

Tina

Thursday 20 July 2017

JAI #369: Just Add Inspiration

Hi!

Well, the school holidays are coming to an end for us. It always makes me a bit sad, as I love having the kids home for a couple of weeks R 'n' R.


Being Friday, it's time for the new Just Add Ink challenge. This week Rochelle found this gorgeous image, that is certainly bound to inspire you. I know I found it inspiring - who wouldn't love to float away in a balloon over that lake, forrest and mountains?


You can take anything you like from the picture - the colours, nature, a balloon, whatever you like! I liked the look of the sky (and I wanted to play with my Texture Paste!!), so that's what I based my card on.

Stampin' Up!, scissorspapercard, Texture Paste, Lift Me Up, Up & Away, Sunshine Wishes, Just Add Ink

Have you played with the Texture Paste yet? It's a lot of fun! For this card I just used the paste as is with the cloud mask. I quite like that the clouds didn't come out evenly, as clouds aren't smooth in real life. I made a similar background and I used my palette knife to fluff up the clouds by gently slapping it against the paste. It reminded me of the way I get meringue peaks when I am making a Lemon Meringue Pie. Yum!

Stampin' Up!, scissorspapercard, Texture Paste, Lift Me Up, Up & Away, Sunshine Wishes, Just Add Ink

I saw this trick of having a shorter rectangular matt under a banner on a card recently and quite liked it. I filed it away in the old memory bank, and surprised myself when I actually remembered to use to on a card.

Stampin' Up!, scissorspapercard, Texture Paste, Lift Me Up, Up & Away, Sunshine Wishes, Just Add Ink

'I hope your day is on cloud nine'. It's such a great sentiment for a birthday card, don't you think?

You can see the cards the rest of the Design Team have created over at the Just Add Ink blog. Why not join in the fun by linking up your card that has been inspired by our picture?

Bye for now,

Tina

Wednesday 19 July 2017

AWH HOC Week 8

Hi!

Woo Hoo! I'm back on the Heart Of Christmas blog shares. Having to miss last week was not fun, so I made doubly sure I'd have time this week to make a Christmas card.


AS with my past card, I'm still playing with the Be Merry Suite of products. I was going for a bit of a clean vintage with this card - there's a bit of sponging, but no other ageing type effects.

Christmas Card using Be Merry DSP, Merry Mistletoe, Sheet Music. scissorspapercard, Stampin' Up!, Art With Heart, Heart Of Christmas

The Be Merry DSP has lovely, traditional colours, but I keep finding myself adding Crumb Cake to the mix Don't you think it works beautifully? It really adds to the vintage feel, as does the Sheet Music background stamp.

Christmas Card, Be Merry DSP, Merry Mistletoe, Sheet Music, scissorspapercard, Stamping' Up!, Art With Heart, Heart Of Christmas

I tried something new with the sentiment panel, by having the Garden Green layer only exposed on two sides. I quite like the effect. Here's a confession - I accidentally trimmed too close to the sentiment, so I went for the lopsided look to try to hide it! The twine and the wooden star from the Hearts and Stars Elements help to give the panel balance.

Christmas Card, Be Merry DSP, Sheet Music, Santa's Sleigh, scissorspapercard, Stamping' Up!, Art With Heart, Heart Of Christmas

I used all of the same elements on the inside as I did on the outside, just pared back a little. I wasn't going to include the star, but at the last minute I added him to the card.

You can see what the rest of the Art With Heart team have created by heading over to Claire's blog. She's got all the links to everyone's blogs there.

Bye for now,

Tina

Monday 17 July 2017

A Foxy Coffee CASE

Hi!

Today's card is a CASE of a card made by Jen of World Of Jen Craft. I found the card when I was searching for cards made using the new Coffee Break DSP. I'm not a coffee drinker, so the suite didn't appeal to me until I saw the paper. I immediately fell in love with the colours and patterns in the DSP. It's a fantastic pack for male cards.


Jen's card uses the new This Little Piggy stamp set, which I don't own, so I substituted for A Little Foxy. I was aiming for a card that could be used for a new baby, or a birthday card for a young boy.


I quite like the fox in Pear Pizzazz - it makes me think of a stuffed toy that a young child might have.


Have you seen or purchased the Coffee Break DSP yet? It's a great addition to your stash of paper!

Bye for now,

Tina

Thursday 13 July 2017

JAI #368: Just Add A Twist

Hi!

Here we are again, another Friday, and another Just Add Ink challenge. I love Fridays for that very reason!


This week the challenge is from Kelly. She's dared us to make a Christmas card, with a twist! The twist is that we needed to use a Birthday stamp set to create the Christmas card. What fun!


After perusing my stamp sets, I decided I'd attempt a wreath using stamps in Happy Birthday Gorgeous.


I very lightly traced a circle on the card front and then stamped the leaf around it, overlapping the ends of the branch. I was very pleased with how well the circle turned out. To fill out the spaces between the leaves, I used the dotty stamp from Number Of Years to stamp over the leaves. I really love the effect it gives - a bit of an Australian wattle type look to the wreath.


It still didn't look quite finished, so I scattered some retired Candy Dots in Real Red around the wreath. It gave the card a lovely lift.


I quite happily used all of my Candy Dots on the outside, and then realised I hadn't saved any for the inside. Ooops! Luckily a pencil eraser inked in Real Red ink gives a similar effect, so I was able to recreate parts of the wreath on the inside of the card.

I think the team have had a fun week with Kelly's challenge. You can hop on over to the Just Add Ink blog to see what they've created and to join in the fun.

Bye for now,

Tina

Wednesday 12 July 2017

Guest Blogger: Ada

Hi!

It's school holidays here now, as well as Ada's birthday. It's been a busy start to the break, so I didn't get a chance to create a card for The Heart Of Christmas as I've been doing the past few weeks. Hopefully next week!

Today I have two cards for you - the first was made by Ada for her BFF, Hannah, who celebrated her 12th Birthday last month. I printed the Bugaboo digital stamps and Ada did the rest.


Ada used my Stampin' Write Markers to colour the images. I was very impressed that she manage to get some great shadows/highlights with just the markers - no blender pens or any other tool. Pretty awesome for a 12 year old!


Ada and Hannah are both huge Harry Potter fans. I think Hermoine, and Emma Watson for that matter, is a fabulous role model for young girls, so I'm happy that they love the books and movies.


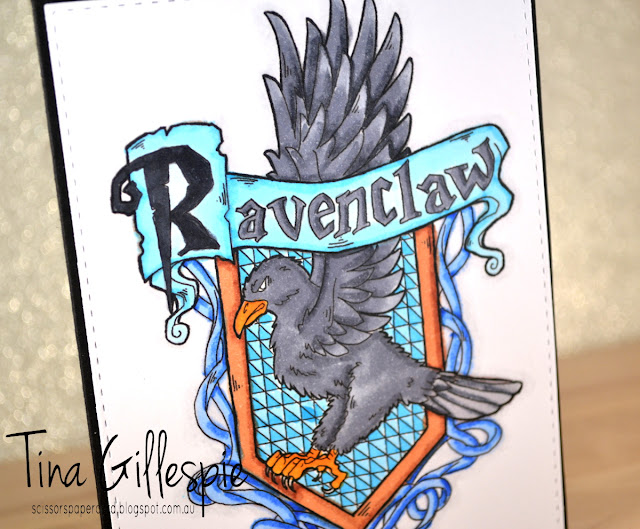
Ada's birthday was yesterday. When I asked her what she wanted on her card, she said she wanted the same as the card she'd made. I decided to overrule her and do something different, but still in the Harry Potter theme. She and Hannah both want to be in Ravenclaw, so that's where I started.


I found an online colouring book site that had Harry Potter images and printed the Ravenclaw crest. I used my Copics to colour it. I haven't coloured for a while and I'm a little rusty, but over all I was pleased with the result.


Sadly, the cardstock I used bled quite badly, despite being meant for Copic markers. I think next time I'll stick to Whisper White, which I've found fabulous with Copics.

So there you go, a pair of Harry Potter themed cards for your enjoyment.  If you'd like to see what the Art With Heart team have created for The Heart Of Christmas, you can pop on over to Claire's blog to check it out.

Bye for now,

Tina

Thursday 6 July 2017

JAI #367: Just Add Colour

Hi!


This week at Just Add Ink Patrice has set the challenge for us, and it's a colour challenge. Lots of lovely neutrals with a fabulous pop of lemon lime.


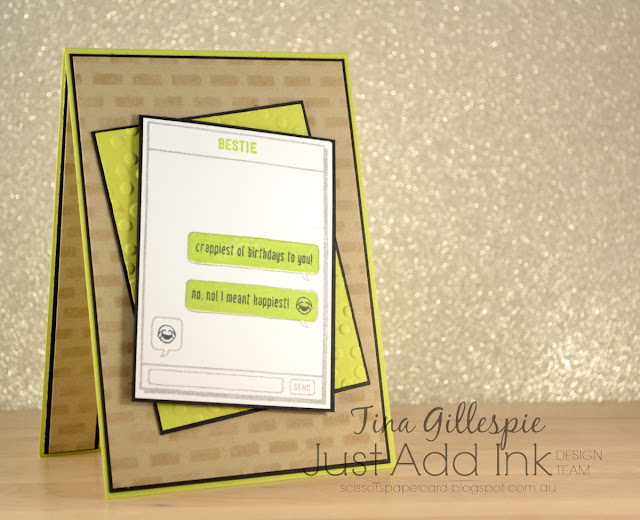
This one was a tricky combo I think! It's good to get the old brain matter working a bit harder sometimes though. I needed to make a card for Ada to give to a friend who was turning 13, so I decided to crack open my new Text Ya Later stamp set, which I think is perfect for teen cards.


I love the text stamps in this set. I knew the birthday girl would get a real giggle out of the 'crappiest of birthdays to you' stamp.


I also love that the set includes some of the commonly used emojis. I've only recently started using them in my texts, and they are a lot of fun.


What will you do with these colours? If you get your thinking cap on, I'm sure you'll have as fun a time with them as I did! Check out the Just Add Ink blog to see what the rest of the Design Team created.

Bye for now,

Tina

Wednesday 5 July 2017

AWH HOC Week 6

Hi!

Welcome to this week's The Heart Of Christmas blog share. Can you believe we are up to Week 6? One more week closer to Christmas!


I've had quite a few weeks where I've gone with less traditional cards, but this week I'm back to a very traditional Christmas colour combo - Garden Green, Cherry Cobbler and Whisper White, with some touches of Early Espresso and Crumb Cake thrown in.


I had a wonderful day stamping with some local demonstrator friends on Sunday (thanks, Kathryn!), and I took to opportunity to stamp some images from sets that I don't own. This card uses some of those images. They are from the new Merry Mistletoe stamp set, which coordinates with the Be Merry DSP.


It can be tricky, stamping without a particular card in mind. Trying to judge how much space to lead around what you've stamped is the hardest! It does make putting together a card difficult, but I think that's sometimes part of the fun.


What do you think? Have I done a good job with my bits and pieces card? I think so!

You can visit Claire's blog and see what the others in the team that are participating this week have created. It's bound to be inspirational!

Bye for now,

Tina