Pages

Wednesday, 11 January 2012

An Enchanting Birthday

Hi!

I'm back with another look at the soon to be available Sale-A-Bration DSP, Everyday Enchantment.


Are you drooling over those papers as much as I am?  They are so pretty!


The very clever Kirsty Brown demonstrated these double butterflies for us at Stampin' Up!'s annual Convention in Melbourne last year.  This was my first go at trying one. They aren't too difficult, it's all in the positioning.


A nice, simple inside to finish the card off.

Stamps: Happiest Birthday Wishes (hostess)
Ink: Crumb Cake, Versamark
DSP/Cardstock: Everyday Enchantment (SAB), Very Vanilla, Peach Parfait, Pool Party
Other: Big Shot, Beautiful Butterflies Bigz Die, White Embossing Powder, Everyday Enchantment Calypso Coral Organdy Ribbon (SAB), Sponge Dauber, Heat Tool

I hope you can pop back on Friday.  I was invited to be a part of the Design Team for a new challenge called Festive Friday and run by Nicole Derendorf.  The first ever Festive Friday Challenge and my first Design Team submission for the challenge will be posted.  I'd love for you to take part in the challenges - it will be a good way to get a head start on your Christmas cards for 2012!

Bye for now,

Tina

Monday, 9 January 2012

December Thank You Tags

Hi!

I always like to make a little thank you for my customers who place an order.  Last month I decided to make a little tag using the Designer Frames Embossing Folders.


I trimmed the Island Indigo cardstock into a tag shape and then ran it through the Big Shot in the Embossing folder.   I then cut an insert to size and attached the butterfly.


I didn't photograph the back as I'd already written on all the tags.  I adhered a Decorative Label punchie with just a little bit of adhesive so that the customer could remove the punchie and reuse the tag.

Stamps: Trendy Trees
Ink: Island Indigo
DSP/Cardstock: In Colour Pattern Stack DSP, Island Indigo, Daffodil Delight
Other: Big Shot, Designer Frames Embossing Folders, Beautiful Wings Embosslit, White Baker's Twine

Bye for now,

Tina

Friday, 6 January 2012

Sale-A-Bration Sneak Peek

Hi!

I'm entering another challenge today from the Sunny Challenges and Creations blog.  The challenge is anything BUT Christmas.  So I made a birthday card that is on it's way to a friend for her birthday.


I went a bit all out with my new Distressing Essentials Kit on this one!  I stamped the Eiffel Tower in Early Espresso ink on Very Vanilla cardstock, then used the Tea Stain distressing ink over the top.  I blended it a little with my Aqua painter and then scrunched the panel and went over the top again with more Tea Stain ink.  When it had dried I distressed the edges with a file.


The crown and the key got a similar treatment, but no scrunching.  I love the loopy bows that can be created with this super fine ribbon.


Some more Tea Stain Distressing ink on the inside!

Stamps: Artistic Etchings, Well Scripted
Ink: Early Espresso, Crumb Cake, Tea Stain Distress Ink
DSP/Cardstock: Everyday Enchantment DSP (SAB), Very Vanilla, Early Espresso
Other: Everyday Enchantment Ribbon and Brad (SAB), Paper Snips, Dimensionals, Distressing Essentials Kit, Sponge Dauber, Glitter Glue (non SU!)

Bye for now,

Tina

Thursday, 5 January 2012

Distressed Doilies

Hi!

I decided to kick start off the New Year with a few challenges.  One of the ones I looked at was Unscripted Sketches.  It's been a while since I've played along with them, life just gets too busy sometimes!


I quite liked the sketch this week, but I don't think I followed it completely.  Instead of a solid block at the bottom I chose to stamp my sentiment on vellum and fold it around the layer to attach it to the card.  For the stamped panel I took some Pink Pirouette, stamped it with the doilies in Soft Suede and then distressed the panel with Tea Stain ink from my new Distressing Essentials kit.  I think I need a little more practice with the distressing, but I'm pretty happy with how it turned out.


More distressing on the inside, but more of a halo around the edges so there is plenty of room to write my message to the recipient.

Stamps: Delicate Doilies, Happiest Birthday Wishes (hostess)
Ink: Soft Suede, Tea Stain (from the Distressing Essentials kit)
Cardstock: Pink Pirouette, Soft Suede, Very Vanilla, Vellum
Other: Soft Suede Taffeta Ribbon, Basic Jewels Pearls, Dimensionals, Distressing Ink Applicator, Paper Snips

Bye for now,

Tina

Wednesday, 4 January 2012

Some Digital Scrapping

Hi!

If you're on FaceBook and like Stampin' Up! you may already know that when they got to 100 000 likers they decided to do something special.  I was very excited to find out it was a FREE set of digital downloads.  I was even more excited when I read that you can use them in any photo editing software.  I downloaded them straight away.  The set is called Day In The Life, and it's just gorgeous.  12 different Designer Series Papers, a heap of coordinating embellishments and a tonne of brushes.  But you need to be quick, you only have a few days to download them before they are gone.  I had a little play tonight and threw this layout together in Photoshop in about 45 minutes.  I can't wait to play some more!


I'm very excited to be finally able to scrap digitally using some Stampin' Up! products.  Here's hoping we get My Digital Studio very soon!

If you aren't sure how to use these products and you live locally to me in Adelaide, go and download them before time runs out and then let's set up a time for me to show you how to use them.  I'd love to share my excitement.

Bye for now,

Tina

Tuesday, 3 January 2012

Just Add Ink Scrapbook Challenge #1

Hi!

After my sprint to the finish of 100 layouts in 2011 I was expecting to have a bit of a rest from scrapbooking for a couple of weeks at least.  Then JAI started doing scrapbooking challenges!  The first challenge is to scrap about firsts, so I chose a photo of my eldest son's first Christmas.


The photo is very green,  so I decided to go very neutral for the layout with just a few little splashes of colour.  I chose Sahara Sand and stamped in the same ink to keep it subtle.


The flowers are paper ones I had in my stash from before I was a Stampin' Up! Demonstrator.  I used a Basics Glimmer Brad for each of the centres.


The title is a combination of a few different rub on packs I had in my stash, also from my pre-demo days.

Stamps: Snow Swirled
Ink: Sahara Sand
DSP/Cardstock: Beau Chateau DSP, Letters To Santa DSP, Sahara Sand
Other: Very Vanilla Velvet Ribbon, Scallop Trim Border Punch, Basics Glimmer Brads, Sponge Dauber, Rub-Ons (non SU) and Paper Flowers (non SU)

Bye for now,

Tina

Monday, 2 January 2012

Just Add Ink 99: Just Add Fancy Packaging

Hi!

I hope everyone had a Happy New Year.  I love the New Year - the new beginnings and new opportunities that await are endless!  I thought I'd start off the New Year by entering the latest challenge at Just Add Ink, which is to Just Add Fancy Packaging.


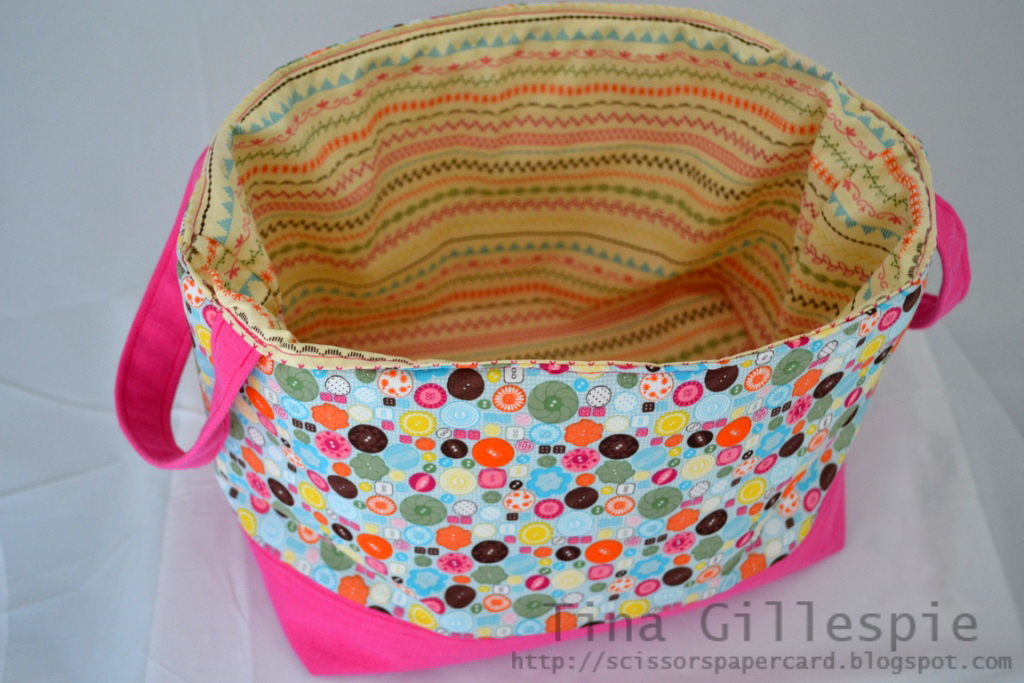
I decided to sew a project tote, which at the moment is the fancy packaging for my unfinished projects. When I no longer have any UFO's (yeah right!) this will become the home for my mini albums.  Here's a look at the inside.


I have already made one of these totes, which you can see the post for here.   You'll find the link for the pattern in the previous post.  In that post I mentioned I wanted to try doubling the measurements, which I did for this newest tote.  Here's the two together for a comparison in size.


I'll be making some more of these when I have some time.  They are so cute and so very useful!

Bye for now,

Tina