Pages

Sunday, 13 December 2020

CTC #298: CASE An Embossing Folder Project

 Hi!


Thanks for joining me again for the new CASEing The Catty Sunday Challenge Blog Hop. 


This week Bec has challenged us to CASE a project that features an embossing folder. You can choose a project from either of the two current catalogues, so there's plenty to choose from!


I chose my project to CASE from the back of the August-December Mini Catalogue. It's a card designed to show off the Coming Home bundle, but it features the Winter Snow Embossing Folder.

scissorspapercard, Stampin' Up!, CASEing The Catty, Tag Buffet Project Kit, Joy To The World Paper Pumpkin, Winter Snow EF, Home Together Dies, Christmas Card

I recently purchased the Tag Buffet Project Kit, and at the end there are 5 of these Christmas Tree laser cut pieces left. I couldn't let them go to waste, so I made a set of cards for them. The sentiment banners were also left over pieces from the kit. I used the plain curved die in the Home Together Dies to cut the Balmy Blue Glimmer Paper. It's the same curve as on the original card, just upsized!

scissorspapercard, Stampin' Up!, CASEing The Catty, Tag Buffet Project Kit, Joy To The World Paper Pumpkin, Winter Snow EF, Home Together Dies, Christmas Card

I used the inked embossing folder technique to add a little something to my card. I simply tapped my Balmy Blue inkpad all over the indented side of my embossing folder, placed my cardstock in it and ran it through my Big Shot. The ink stays on the flat sections of the cardstock, leaving the raised snowflakes white. It's so pretty!

scissorspapercard, Stampin' Up!, CASEing The Catty, Tag Buffet Project Kit, Joy To The World Paper Pumpkin, Winter Snow EF, Home Together Dies, Christmas Card

The stamped sentiments are both from the Joy To The World Paper Pumpkin kit. I am getting so much use out of them!  I also added a little offcut from the embossed panel to the inside.

scissorspapercard, Stampin' Up!, CASEing The Catty, Tag Buffet Project Kit, Joy To The World Paper Pumpkin, Winter Snow EF, Home Together Dies, Christmas Card

I forgot to trim one of the snowflake pieces, so I ended up with one card with a narrow border rather than the wider border, as in the CASEd card. I'm not sure which I like best! What do you think? The Balmy Blue Glimmer Paper looks much nicer in this photo too!

To join in with our challenge, just make your card, take a photo and upload it to our Facebook group. It's that easy!


I'm the last stop on this week's Blog Hop if you started with Julia or in the Facebook group. If you started mid way though, please hop on over to Julia's blog. Her cards are stunning!

Bye for now,

Tina

Thursday, 10 December 2020

JAI #535: Just Add Magical Creatures

 Hi!


Thanks for joining me for the new Just Add Ink challenge. It's one I've been looking forward to doing since we got our schedule of challenges. It was a great idea from Kelly!


Just Add Magical Creatures - that's right up my alley! The hardest part for me was deciding which stamps to use. In the end I settled on a set that I hadn't used yet, called Forrest Elves from Kindred Stamps.

scissorspapercard, Stampin' Up!, Kindred Stamps, Just Add Ink, Forrest Elves, Wizard Friends, Waterfront, Lovely As A Tree, Copic Markers

I started by stamping my Elven Queen on a piece of Whisper White and then used a sticky note to mask her off. The big tree from the retired favourite, Lovely As A Tree, was stamped behind her to create a forrest. I then masked the area for the moon and used a blending brush to add ink for the sky and ground. The sentiment is from another Kindred Stamps set, called Wizard Friends.

scissorspapercard, Stampin' Up!, Kindred Stamps, Just Add Ink, Forrest Elves, Wizard Friends, Waterfront, Lovely As A Tree, Copic Markers

The moon had a tiny bit of Soft Suede ink added. I just used the dirty brush I'd used to create the ground, as I only wanted minimal ink. I then stamped some of the splatters from Waterfront over the top to give the look of craters in the moon. I used the same stamp for the forrest floor. The Queen was coloured using my Copic Markers in the softest blues, greens and yellows that I own. I went a bit bolder for her hair and her amulet. I liked that the masking left a bit of a halo around her, as it looks a little like she is glowing - very elvish!

scissorspapercard, Stampin' Up!, Kindred Stamps, Just Add Ink, Forrest Elves, Wizard Friends, Waterfront, Lovely As A Tree, Copic Markers

The inside sentiment says 'I love you' in Elvish, so I will likely give this card to my daughter or someone very close to me.

Which Magical Creature will you choose to add to your card? I nearly went with Santa, but I'm a little ready to be finished with Christmas cards, so I chose something fun instead. The Design team have had fun with this challenge, and you can see their cards over on the Just Add Ink blog, where you can also link up your card.

Bye for now,

Tina

AWH December Creative Showcase: Summer

 Hi!


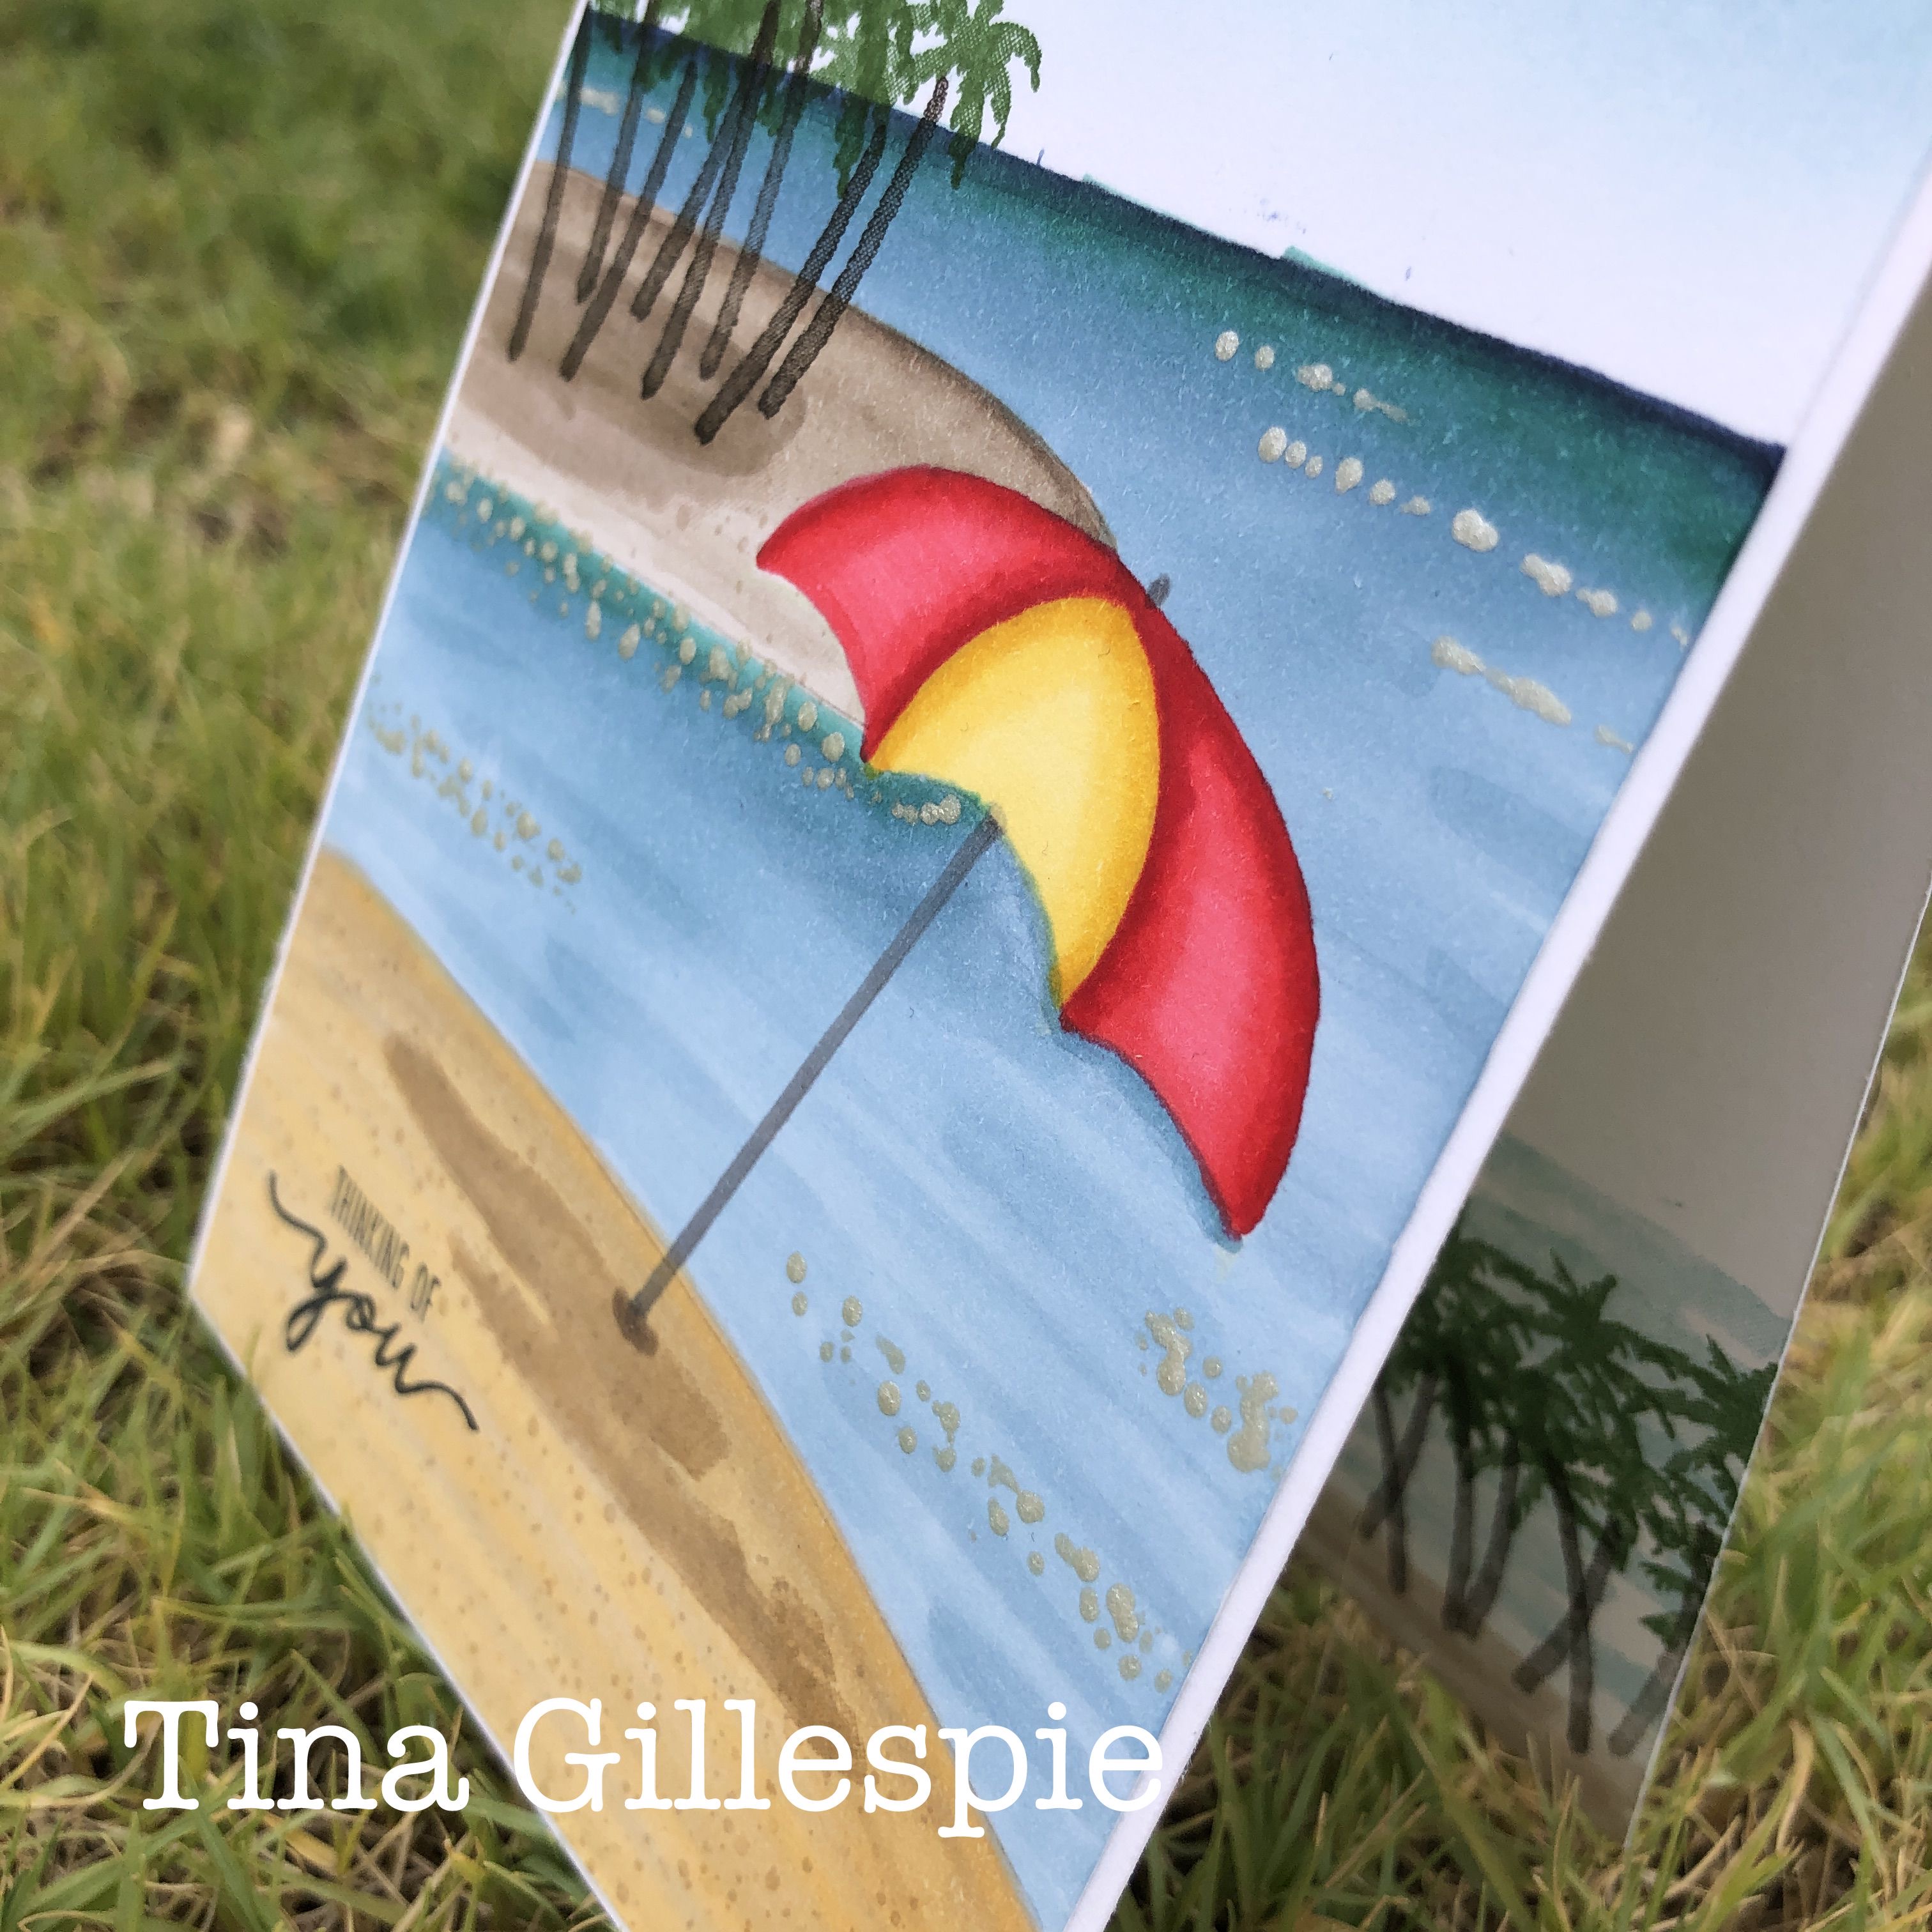
Thanks for joining me for the final Creative Showcase for 2020. Rachel has chosen a Summer theme for our projects tonight. For a lot of people, Summer means lazing on a beach, so that't what I decided to do for my card tonight. I've used a mix of Stampin' Blends, ink blending and stamping on my card.


I started this card by stamping my umbrella in stamped-off Soft Sea Foam. I then used a pencil to lightly draw in my lines for the beach, island and horizon. Then I got to the fun part - colouring! The beach was coloured with my Light Crumb Cake and So Saffron Blends. I stamped the shadow and the dotty stamp from Waterfront over the top with Crumb Cake Ink. The island was coloured with my Crumb Cake Blends, and the palm trees were stamped with Early Espresso and Garden Green, with the shadow in Crumb Cake. The umbrella, from Under My Umbrella, was coloured with Poppy Parade and Daffodil Delight Blends with a Dark Smoky Slate pole. The sky was coloured using my Blending Brush with Balmy Blue and Misty Moonlight inks.

scissorspapercard, Stampin' Up!, Creative Showcase, Waterfront, Under My Umbrella, Beautiful Moments, Stampin' Blends, Shimmer Paint

Finally, the ocean was coloured with lots of Blends. The horizon was drawn with my Light Night Of Navy Blend, and then a small section underneath was coloured with my Light Bermuda Bay Blend. The rest of the ocean was coloured with my Balmy Blue Blends. I finished it off by using my scoring tip to dot some Frost White Shimmer Paint to create some foamy water. I then stamped a few birds and a sentiment from Beautiful Moments.

scissorspapercard, Stampin' Up!, Creative Showcase, Waterfront, Under My Umbrella, Beautiful Moments, Stampin' Blends, Shimmer Paint

On the inside I used the Waterfront stamp set to create a little scene that matches the one on the front.

That's all from me for tonight, please do pop on over to Rachel's blog were you can find the rest of this month's Creative Showcase links.

Bye for now,

Tina

Wednesday, 9 December 2020

Colour Creations: Misty Moonlight

 Hi!


Welcome back for the second last Colour Creations Creative Showcase for 2020. We will be back in 2021 with the remaining colours, but we are taking a well deserved break for Christmas/New Year after we do Mossy Meadow next week. For this week, we are all making cards using Misty Moonlight. It's a gorgeous dirty blue, a bit like denim.

scissorspapercard, Stampin' Up!, Colour Creations, Waterfront, Peace & Joy, Joy To The World Paper Pumpkin, Home Together Dies, Shimmer Paint

I started my card by cutting a Thick Whisper White card base and then two smaller pieces for the front. The curves were cut using the curved die from the Home Together Dies. I laid them over the top of the card and then used a pencil to draw along the top edges to give myself a guide for stamping the trees. The tree stamp is from Waterfront, and was stamped in Memento ink.

scissorspapercard, Stampin' Up!, Colour Creations, Waterfront, Peace & Joy, Joy To The World Paper Pumpkin, Home Together Dies, Shimmer Paint

I then used a sticky note and a 1 3/4" circle punch to mask off the moon. My blending brush was used to apply Misty Moonlight ink to the top half of the card, making sure I kept the colour very light around the moon and darker further out. I then splattered some Frost White Shimmer Paint over the inked area. The hill pieces were glued flat to the card front, after I'd stamped the top one with the sentiments from Peace & Joy.

scissorspapercard, Stampin' Up!, Colour Creations, Waterfront, Peace & Joy, Joy To The World Paper Pumpkin, Home Together Dies, Shimmer Paint

The offcuts from the hills on the front were used on the inside - I rarely waste anything! I related the same process as for the front, I just didn't do a moon. I was thrilled with how the card turned out, and I found it quite easy. The hardest part was waiting for the Shimmer Paint to dry!

That's all from me for tonight, but please do head on over to Catherine's Blog, where you'll find the rest of the links for this week's Misty Moonlight cards.

Bye for now,

Tina

Sunday, 6 December 2020

CTC #297: CASE A 3D Project

 Hi!


It's the end of another busy week, which means it's time for the new CASEing The Catty Sunday Challenge Blog Hop! What a great way to end the week.


This week Bec has set us the challenge of CASEing a 3D project from either of the two current catalogues. I'm still very much in Christmas card making mode, so I went straight for my August-December Mini Catalogue and started flipping from the back.


It didn't take too long to find this cute little gift box using the Christmas Gleaming bundle, seen on page 72 of the Mini. I loved the way that the two baubles overlapped each other, and also the two fonts in the sentiment. I don't actually own this bundle, so I had to look through my stash for something to substitute.

scissorspapercard, Stampin' Up!, CASEing The Catty, Cherish The Season, Joy To The World Paper Pumpkin, Brightly Gleaming SDSP, Stitched Nested Labels Dies

Cherish The Season had the perfect substitute with the bells that overlapped! I stamped them on Whisper White with Memento and coloured them with my Petal Pink Blends. I had the plan of using the same Petal Pink ribbon on my card as is on the box, but the bows were far too big! Instead I had to make do with pink bells and a pink layer under the DSP.

scissorspapercard, Stampin' Up!, CASEing The Catty, Cherish The Season, Joy To The World Paper Pumpkin, Brightly Gleaming SDSP, Stitched Nested Labels Dies

Speaking of the DSP, I used the same DSP as in the sample - Brightly Gleaming SDSP. I just chose a different pattern with the gorgeous Copper designs, hence the extreme sideways photo trying to get a good image of the copper! The sentiment is from the Joy To The World Paper Pumpkin kit, and it stamped in both Mossy Meadow and the retired Celestial Copper Delicata ink. The bows were the last scraps of some copper trim I had left over from a kit a year or so ago - the name escapes me!

scissorspapercard, Stampin' Up!, CASEing The Catty, Cherish The Season, Joy To The World Paper Pumpkin, Brightly Gleaming SDSP, Stitched Nested Labels Dies

I stamped and coloured two of the smaller individual bells for the inside so that it matched the front. Those bows sure were tricky to tie!!

As always, you can play along with our challenge by simply taking a photo of your card or project and upload it into our Facebook group. It really is that easy!


Before you do, please finish the Blog Hop, as there's lots more to see! Next up is Peta and her wonder-cat, Marvi. I wonder what he thinks of Peta's 'pawsome' projects this week?

Bye for now,

Tina

Thursday, 3 December 2020

JAI #524: Just Add Colour

 Hi!


Thanks for joining me for this week's Just Add Ink challenge. I missed last week's challenge, and so I was super keen to get back into it this week!


This week Nikki has set us a very Christmassy colour combination, which also just happens to be the colours used in the Heartwarming Hugs DSP. Convenient!

scissorspapercard, Stampin' Up!, Just Add Ink, Joy To The World Paper Pumpkin, Heartwarming Hugs, Stitched Rectangles Dies, Christmas Card

My Joy To The World Paper Pumpkin stamp set was still floating around on my craft desk, so I decided to use it too! It's a good match for the colours and the DSP. I stamped the wreath in Mossy Meadow and then used my Pear Pizzazz ink pad and a Blender Pen to colour the open leaves. I then stamped some berries over the top in Real Red.

scissorspapercard, Stampin' Up!, Just Add Ink, Joy To The World Paper Pumpkin, Heartwarming Hugs, Stitched Rectangles Dies, Christmas Card

I love the way the sentiments in the Joy To The World set can be mixed and matched to suit the theme of your card. It's such a cute mix of fonts, too.

scissorspapercard, Stampin' Up!, Just Add Ink, Joy To The World Paper Pumpkin, Heartwarming Hugs, Stitched Rectangles Dies, Christmas Card

I stamped the wreath again on the inside, this time in Pear Pizzaz ink which I'd stamped off first. This let the sentiment, stamped in Mossy Meadow, really shine.

You can join in the challenge over on the Just Add Ink blog. Add your card to our gallery to be in the running!

Bye for now,

Tina

Wednesday, 2 December 2020

Colour Creations: Mint Macaron

 Hi!


Welcome back to the new Colour Creations Creative Showcase - isn't that a mouthful to say?! This week we are working with one of my all-time favourite Stampin' Up! colours, Mint Macaron. It was originally an In Colour, and I was very excited to see it back in the line up after a colour refresh. It's a lovely, dusky mid green.

scissorspapercard, Stampin' Up!, Colour Creations, Celebrate Sunflowers, Under My Umbrella, Sunflowers Dies, Stitched Rectangles Dies, Subtle 3DEF

I pulled out the Celebrate Sunflowers stamp set to play with tonight for no other reason than it's been a while since I've played with it. In fact, I'd never used the small sunflower stamp before! I stamped is all over my Mint Macaron cardstock with the matching ink. I'd pre-cut cut the cardstock using the largest Stitched Rectangles Die, and after I'd finished stamping I ran it through my Big Shot twice using the Subtle folder, once in each direction. I love that it gives the cardstock a fabric-like look.

scissorspapercard, Stampin' Up!, Colour Creations, Celebrate Sunflowers, Under My Umbrella, Sunflowers Dies, Stitched Rectangles Dies, Subtle 3DEF

The large sunflower was cut from Silver Foil card. I'd originally intended to just use the outline, but when I pulled it from the die, all the pieces stayed in place. I quickly cut the coordinating solid shape from Mint cardstock and glued it to the back, making sure I got a dot of glue on all of the tiny pieces. I was quite pleased with how it turned out, even if it wasn't what I'd intended! I tucked a few die cut leaves underneath, just to finish it off.

scissorspapercard, Stampin' Up!, Colour Creations, Celebrate Sunflowers, Under My Umbrella, Sunflowers Dies, Stitched Rectangles Dies, Subtle 3DEF

I stamped that cute little sunflower image again on the inside, along with a sentiment from Under My Umbrella. My card base was one of the retired Silver Foil cards, as it has that lovely Silver Foil border to match the foil sunflower.

That's all from me for tonight, but please do head on over to Catherine's blog, where you'll find the rest of this week's Mint Macaron cards. We have two more weeks of 'M' colours before we take a little break over Christmas and the New Year.

Bye for now,

Tina