Pages

Tuesday, 8 September 2020

One More Chapter

 Hi!

Are you a big reader? I sure am, so when I can combine my love of reading with my love of stamping, I am in total heaven! I found a stamp company that made a couple of stamp sets with book quotes and images. The company is called Three Room Studio, and they are based in Canada. They are running a weekly challenge, and I finally had a little time up my sleeve to be able to enter.


Such a cool sketch - there's a lot that could be done with those squares/diamonds. I went fairly literal, although I did change the orientation of my card, as my squares were too big for a landscape card. I used two TRS stamps: One More Chapter and I Heart Books.

scissorspapercard, Stampin' Up!, Three Room Studio, One More Chapter, I Heart Books, Stitched Shapes Dies, Stamparatus

My Stamparatus was absolutely invaluable for stamping the background. I lined the cup, open book and glasses up on the plates and started stamping! The ability to move the plate along the hinge was absolutely essential in doing this. Luckily, too, each of the images was the perfect size for hinge step stamping!

scissorspapercard, Stampin' Up!, Three Room Studio, One More Chapter, I Heart Books, Stitched Shapes Dies, Stamparatus

This sentiment is soooo me! It's actually one stamp, so I masked it off and stamped each line separately on the squares. I then chose an image that I felt suited each part of the sentiment to go with it. Instead of the banner in the sketch I added a length of ribbon. I had intended to pop up each of the squares, but after I'd laid them out, adhered the ribbon under the middle square and then popped the square up, I liked the look of the ribbon laying over the top of the other two. So, flat to the card they stayed!

scissorspapercard, Stampin' Up!, Three Room Studio, One More Chapter, I Heart Books, Stitched Shapes Dies, Stamparatus

While I had the Stamparatus all set up with the image stamps, I decided I'd stamp a row across the bottom of my inside. I added the cute little heart to just one cup for a touch of whimsy. Of course, I then had to go back and carefully add a few hearts to the front of the card!

Bye for now,

Tina

Sunday, 6 September 2020

CTC #284: CASE The Die Bundle Section

 Hi!


Thanks for joining me for the new CASEing The Catty Sunday Challenge Blog Hop. This week we are looking at the Die Bundle Section of the Annual Catalogue. I love this new section of the Catalogue, which shows the stamps and dies, and another sample for Inspiration.


After flicking through the section, I settled on this card, made using the World Of Good bundle. I softly chose it, as it's been a while since I've played with it.


I quite liked the stripes down the side of the card. I realised I haven't ever used the stripy die in the bundle, so I used it for the stripes instead. BTW - does anyone know what the die is meant to be? Some sort of ruler, maybe? I cropped two thin strips of Misty Moonlight cardstock using the die and then adhered some Brass Foil to the back so that it peeped through the stripes.

scissorspapercard, Stampin' Up!, CASEing The Catty, Beautiful World, World Map, Brass Foil, Masculine Card

The centre section of the card was made to be an Easel Card, sort of like a Center Panel Easel Card. These are usually made to be landscape orientation, but I thought that portrait suited the globe a bit better.

scissorspapercard, Stampin' Up!, CASEing The Catty, Beautiful World, World Map, Brass Foil, Masculine Card

The compass image is stamped on Whisper White, punched out and then layered on another circle of Brass Foil. I didn't want to pop it up, so that the card would sit better when closed, but it wasn't high enough to hold the easel open, so popped up it is!

scissorspapercard, Stampin' Up!, CASEing The Catty, Beautiful World, World Map, Brass Foil, Masculine Card

I didn't specifically make this card as a Father's Day card, but looking at it now, it would be great to give to a dad on their special day. It would also work as a masculine thank you or thinking of you card.

That's all from me for tonight, but the fun is just starting for you! Check out pages 173-179 of the Annual Catalogue, make your card and pop it up in our Facebook group. Done!


There's plenty of inspiration still to be found though, so don't forget to finish the Blog Hop. Next up is the lovely Sandra, with her wonderful card.


Bye for now,

Tina

Thursday, 3 September 2020

JAI #521: Just Add Inspiration

 Hi!


Yay! Today marks the start of a super long weekend, well, for me and the kids! Poor Rob still has to work on Friday and Monday, but the kids have pupil free days. It should have been the start of the Royal Adelaide Show, and even though it was cancelled, the kids still get the pupil free days. Hooray for a good weather forecast, so we can spend some time outside.


But let's get on with the show. This week at Just Add Ink Rachael has challenged us with this fabulous Inspiration Photo. I say fabulous, because who wouldn't want to sit and celebrate at such a pretty table? However, I really struggle with these photos, as I don't tend to make super girly cards. Then I remembered that I had some retired Blushing Bride Glimmer Paper and off I went!

scissorspapercard, Stampin' Up!, Uniquely Creative, Just Add Ink, Happy Birthday To You, Stitched 3 Window Frame Die, Birthday Dies, In Good Taste DSP, Glimmer Paper, Stampin' Blends

I started by cropping the Glimmer Paper using a Uniquely Creative Die, called Stitched 3 Window Frame. I backed it with a piece of In Good Taste DSP that is probably meant to be plaster, but could also pass as cake icing!

scissorspapercard, Stampin' Up!, Uniquely Creative, Just Add Ink, Happy Birthday To You, Stitched 3 Window Frame Die, Birthday Dies, In Good Taste DSP, Glimmer Paper, Stampin' Blends

The cake was from last year's SAB offering. There's no cake in the Inspiration Photo, but it looks like a celebration to me, and there has to be cake at a party - right? I coloured with with my Rococo Rose, Shaded Spruce and Granite Grey Blends with a Gold Foil stand. The Inspiration Photo uses Rose Gold, but I don't have anything in Rose Gold, so plain old Gold it is!

scissorspapercard, Stampin' Up!, Uniquely Creative, Just Add Ink, Happy Birthday To You, Stitched 3 Window Frame Die, Birthday Dies, In Good Taste DSP, Glimmer Paper, Stampin' Blends

I created a softer version of the cake for the inside. This one was stamped in second generation Blushing Bride ink and coloured using a Blender Pen and my Blushing Bride, Soft Sea Foam and Grey Granite Ink Pads. I quite like how the softer flowers turned out!

What elements do you like in the Inspiration Photo? You could explore the colours, the theme, the glitter - the possibilities are endless! Pop on over to the Just Add Ink blog, where you can see what the rest of the Design team have created. You can also link up your card to enter our challenge.

Bye for now,

Tina

Wednesday, 2 September 2020

Colour Creations: Daffodil Delight

 Hi!


Thank you for joining me once again for another week of the Colour Creations Showcase. This week we are looking at Daffodil Delight. As I said last week, I'm not a huge fan of yellow, but I do like the cheerful yellow that is Daffodil Delight.

scissorspapercard, Stampin' Up!, Colour Creations, Beautiful Friendship, Itty Bitty Birthdays, Subtle 3DEF, Dainty Diamonds 3DEF

I saw a card recently, where the top panel was cut on the angle like I have done.I quite liked the look and wanted to try it out. I chose to use the roses from Beautiful Friendship to use along the edge. I love how big and bold they are - they really make a statement!

scissorspapercard, Stampin' Up!, Colour Creations, Beautiful Friendship, Itty Bitty Birthdays, Subtle 3DEF, Dainty Diamonds 3DEF

Would you believe I've only just purchased the Dainty Diamonds 3DEF? I've been using it on nearly every card since! I embossed the Daffodil Delight card front and adhered it to the Thick Whisper White base. A smaller piece of Whisper White was embossed using the Subtle 3DEF and layered over the top using Dimensionals. The leaves peeking out from underneath have a coat of Wink Of Stella for a little bit of bling.

scissorspapercard, Stampin' Up!, Colour Creations, Beautiful Friendship, Itty Bitty Birthdays, Subtle 3DEF, Dainty Diamonds 3DEF

I repeated the look for the inside, minus the Subtle 3DEF and the leaves. 

The lovely Catherine is once again hosting the Showcase, so please do pop on over to her blog, where you'll find the rest of this links for our Daffodil Delight cards. They are always a fabulous collection of cards, well worth the look.

Bye for now,

Tina

Sunday, 30 August 2020

CTC #283: CASE The Colours Of The Trimming The Town DSP

 Hi!


Thanks for joining me on a cold and wet Sunday evening, or at least it's cold and wet here in Adelaide, which is doubly rude of the weather gods after giving us a very Spring-like day yesterday! Hopefully we starting having more of those sorts of days as we come out of Winter.


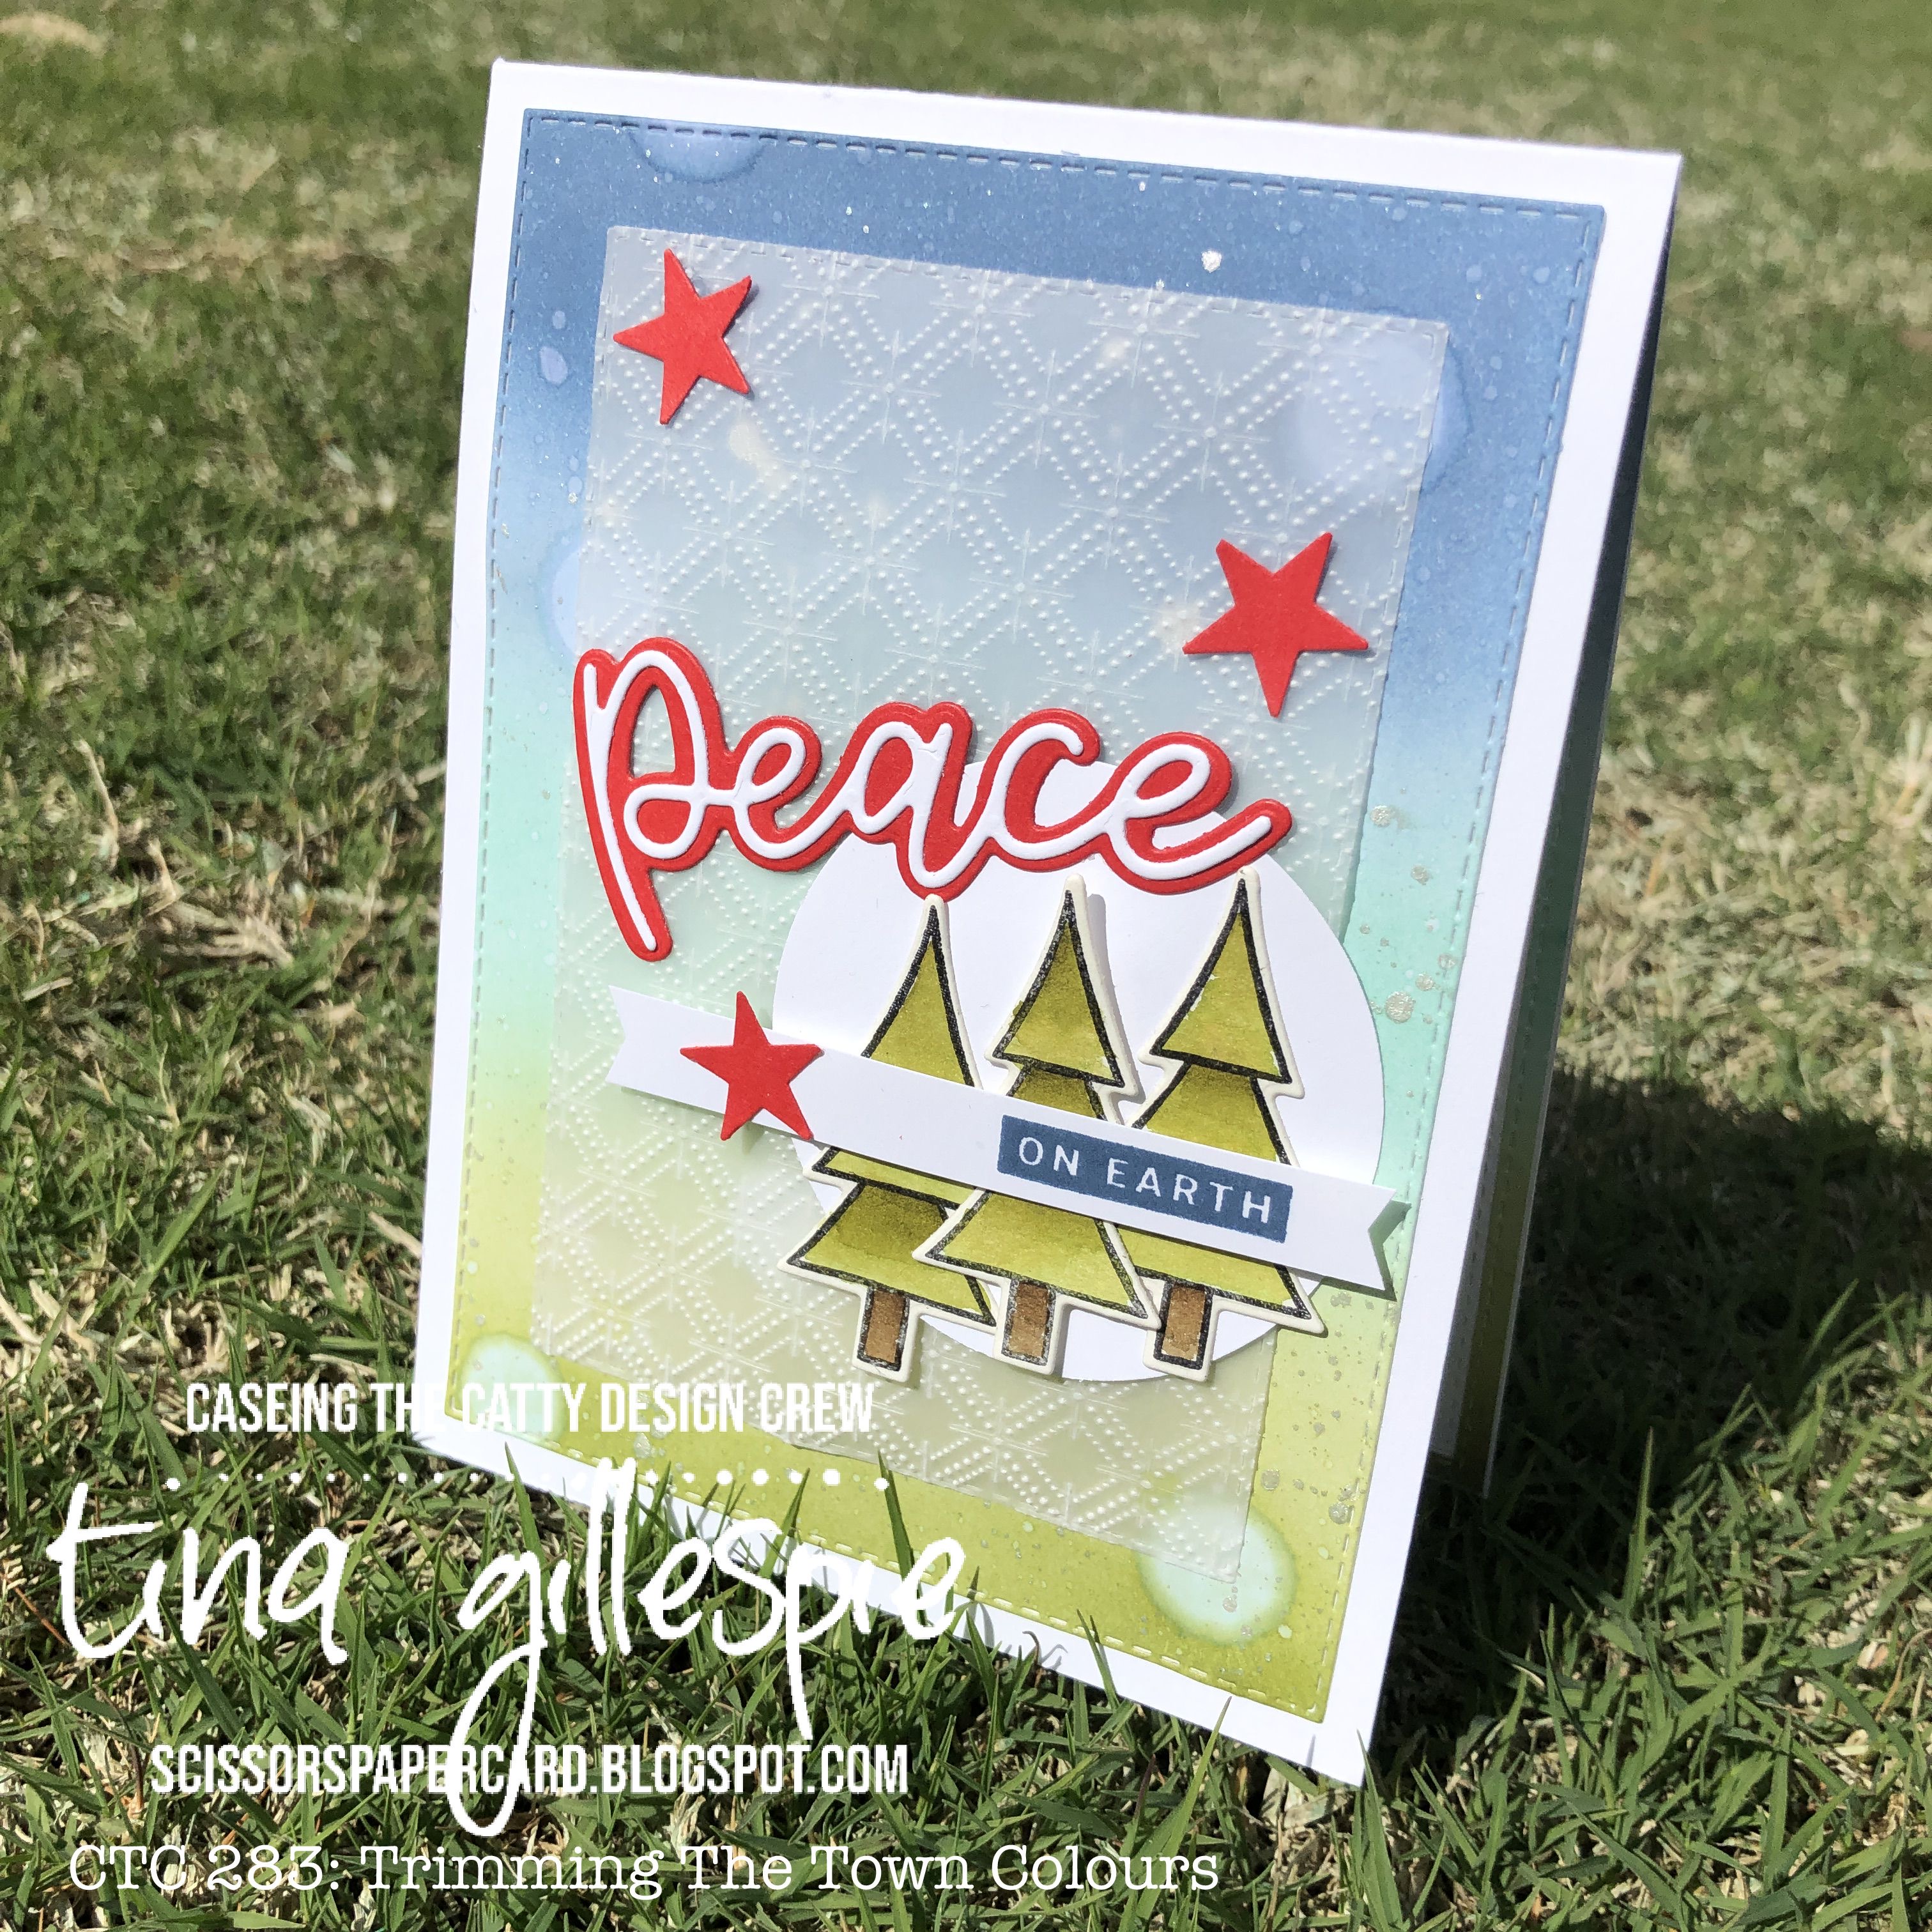
This week the CASEing The Catty Sunday Challenge Crew are asking you to CASE the colours in the Trimming The Town DSP. This simply means make something using Misty Moonlight, Old Olive, Pool Party, Poppy Parade, Early Espresso and Whisper White. You can use all of the colours, or just a few. I managed to get all the colours on my card.

scissorspapercard, Stampin' Up!, CASEing The Catty, Peace & Joy Bundle, Coming Home Bundle, Stitched Rectangles Dies, Dainty Diamonds 3DEF, Stampin' Blends

I started by creating my background, which used blending brushes to apply ink to Whisper White card. I started with Pool Party in the middle third, then added Old Olive to the bottom third and Misty Moonlight to the top third. I then splattered some water over the top, followed by some Frost White Shimmer Paint. I did some big blobs of water, which I regretted straight away, so I've tried to hide them under my Dainty Diamonds embossed Vellum layer!

scissorspapercard, Stampin' Up!, CASEing The Catty, Peace & Joy Bundle, Coming Home Bundle, Stitched Rectangles Dies, Dainty Diamonds 3DEF, Stampin' Blends

I had originally planned to have the 'peace on earth' sentiments on my circle layer, but then I realised that the only colour I hadn't used was Early Espresso. The trees from Coming Home solved that problem! They were stamped on watercolour paper and watercoloured, as there aren't Early Espresso Blends.

scissorspapercard, Stampin' Up!, CASEing The Catty, Peace & Joy Bundle, Coming Home Bundle, Stitched Rectangles Dies, Dainty Diamonds 3DEF, Stampin' Blends

When I was making my background for the front, I made it slightly larger so that I could use the offcut for the inside. I die cut a Whisper White Stitched Rectangle the same size as the background and then nestled it inside the offcut on the inside of the card. This time I used Blends on the trees on the inside. I cheated a little and used Bronze for the trunks!

That's all from me for tonight. As always, you can join in with the fun over in our Facebook Group. You just need to make a card based on the challenge, take a photo and upload it to the group. Easy!


Please do continue on with the Blog Hop. Next you're off to see the absolutely adorable card that Siobhan has made. It really is cute!


Bye for now,

Tina

Thursday, 27 August 2020

JAI #520: Just Add Guys

 Hi!


Phew! I just squeaked in for this week's Just Add Ink challenge. I've had a busy week, with several appointments for Hudson. I was a little sad to come away from the dentist, as he's now lost all his baby teeth. He's my youngest, so no more tooth fairy in my house.


Anyway, on with the challenge! This week Nikki has challenged us to Add Guys to our cards. Now, I know she meant masculine cards, just in time for Father's Day next month, but I had some new pop culture stamps land in my mailbox this week and one set had the perfect sentiment for this challenge!

scissorspapercard, Stampin' Up!, Ink Road Stamps, The Sassy Club, Just Add Ink, I Smell Ice Cream, Pirate's Gold, Treasure Hunters, World Of Good SDSP

The sentiment, logo and skulls are all from a set by Ink Road Stamps, called I Smell Ice Cream. The logo was stamped on some DSP from the World Of Good SDSP pack that was conveniently already distressed. All I had to do was sponge some extra ink around the edges! The character was from a Sassy Club stamp set, called Treasure Hunters.

scissorspapercard, Stampin' Up!, Ink Road Stamps, The Sassy Club, Just Add Ink, I Smell Ice Cream, Pirate's Gold, Treasure Hunters, World Of Good SDSP

The pirate ship and 'x marks the spot' image are from another Sassy Club set, called Pirate's Gold. As. fun fact, the x literally marks the spot on the map where this story was set! The map DSP is also from the World Of Good SDSP, also sponged and stamped with the pirate images.

scissorspapercard, Stampin' Up!, Ink Road Stamps, The Sassy Club, Just Add Ink, I Smell Ice Cream, Pirate's Gold, Treasure Hunters, World Of Good SDSP

Hehe, I had to finish off the inside with another classic quote and character. The character and his pile of gold are Sassy Club stamps, and the sentiment is from Ink Road Stamps. It's awesome when stamps from two different companies work together so seamlessly!

Now to decide if Rob gets this one for Father's Day or not... LOL! He would love it, so I reckon it will end up in his collection of cards!

That's all rom me today, but please do head on over to the Just Add Ink blog, where you can see the rest of this week's 'Guy' cards from the Design Team. You can also add your card to our gallery. 

Bye for now,

Tina

Wednesday, 26 August 2020

Colour Creations: Crushed Curry

Hi! 


It's Colour Creations Showcase time! Yay! Although, I must admit that I find it difficult to get excited about this week's colour - Crushed Curry. I really am not a big fan of yellow, so I found it difficult to start creating this week. In the end I was inspired by my own card from last time we did the Colour Creations, where I used Crushed Curry Ink to colour the negative space on the card.

scissorspapercard, Stampin' Up!, Colour Creations, Ornate Style, Peaceful Moments

Last time I watercolored to apply the ink - this time I masked the large floral image from Ornate Style and used a blending brush to apply the ink, but just in a 'halo' around the flowers.

scissorspapercard, Stampin' Up!, Colour Creations, Ornate Style, Peaceful Moments

Making the masks was quite fiddly. I had to make two so that I could cover both sets of flowers. I stamped the image on two fully adhesive sticky notes. If you can find these they are fabulous, as the entire mask will stick down, not just one edge. The masks were fiddly because I snipped out all the tiny sections without flowers so that the colour would be applied there too. Fiddly, but worth it, I think!

scissorspapercard, Stampin' Up!, Colour Creations, Ornate Style, Peaceful Moments

I repeated the technique again on the inside. You can see that on each set of flowers I coloured the centres with my Crushed Curry Marker. The white of the flowers was a little too white, and needed a touch of something to break up all the white.

Even though I find Crushed Curry a tricky colour, I'm very pleased with this card! You can find the rest of this week's Crushed Curry cards over on Catherine's Blog. She does a wonderful job of keeping us all organised every week!

Bye for now,

Tina