Pages

Tuesday, 9 April 2019

Beautifully Detailed Razzleberry Cake

Hi!


Hi and welcome to this week's Colour Creations Blog Share. As this goes live, I should be heading to bed as I have a very early start tomorrow on my NZ trip, but knowing me I will still be packing and trying to get all those last minute things done. Oh well, I can sleep on the plane!

This week we are creating with Rich Razzleberry. I can remember way back when it was a new In Colour that we got in Australia at the start of the process of bringing our market into line with the USA market. We also got Melon Mambo and Soft Suede at the same time. Ahh, the memories!

scissorspapercard, Stampin' Up!, Art With Heart, Colour Creations, Well Said, Amazing Life Bundle, Beautifully Detailed DSP, Subtle DTIEF, Stampin' Blends

I've paired the colour with the Beautifully Detailed Laser Cut Paper and the Rectangle Stitched Framelits. I stared by cutting the frame using the rectangle dies. I added adhesive around the back of the frame and then laid it over the sheet of laser cut paper, lining up the two edges. I then trimmed off the excess laser cut paper and adhered the whole piece to the Rich Razzleberry card base, which I had embossed with the Subtle DTIEF.

scissorspapercard, Stampin' Up!, Art With Heart, Colour Creations, Well Said, Amazing Life Bundle, Beautifully Detailed DSP, Subtle DTIEF, Stampin' Blends

I pulled out my Rich Razzleberry Blends to colour the cake from Amazing Life, which is in a bundle with the Stitched Rectangle Framelits. To get a rounded look on the cake layers I coloured about a third of the way in from each edge with the Light Blend. I then coloured about half of each of those thirds with the Dark Blend. I used the Light Blend to smooth the lines, but not to go over the middle section. Finally, I coloured over the middle section very lightly and quickly the the Light Blend, applying as little colour as possible to the cardstock. You could probably even use the Colour Lifter in this middle section to get a 'shine' line.

scissorspapercard, Stampin' Up!, Art With Heart, Colour Creations, Well Said, Amazing Life Bundle, Beautifully Detailed DSP, Subtle DTIEF, Stampin' Blends

I stamped the cake on the inside and coloured it the same way as the front. The candle is Light Bermuda Bay and the flame is Dark Daffodil Delight.

Time now to pop on over to Catherine's blog, where you can find the rest of this week's cards.

Bye for now,

Tina

Sunday, 7 April 2019

CTC #223: Classic Garage

Hi!


Yay! It's just three more sleeps until I fly out for Auckland and Stampin' Up!'s OnStage event, and it's starting to get really exciting! I can't wait to see all my demo friends and to get the goss on all the new SU stuff being released. In the meantime though, it's time for the new CASEing the Catty Sunday Challenge Blog Hop. You may ave arrived here from Sandra's blog, or be starting here - it doesn't matter, just keep hopping until you've seen everyone's blog.


This week we are CASEing projects from the Classic Garage section of the Occasions Catalogue. I have really enjoyed making cards using the Classic Garage DSP, but this time I decided to go the complete opposite direction.


I started with the layout of the grey card above, but pulled out my Petal Promenade DSP to make it as girly as possible. Do you think I've succeeded?

scissorspapercard, Stampin' Up!, CASEing The Catty, Petal Promenade DSP, Label Me Pretty, Bike Ride, Incredible Like You, Stitched Labels Framelits

You can see how I've kept everything as much the same as I can in terms of the layout and elements, I've just swapped for very feminine alternatives. The rose paper that forms the larger banner was distressed around the edges, scrunched and then smoothed to create some texture and dimension. The smaller banner already looked scrunched, so it was just adhered as is!

scissorspapercard, Stampin' Up!, CASEing The Catty, Petal Promenade DSP, Label Me Pretty, Bike Ride, Incredible Like You, Stitched Labels Framelits

I stamped the flowers from Bike Ride in Sahara Sand, stamped off once, around the Stitched Labels die cut. The flowers in the Label Me Pretty image were stamped in Tranquil Tide and then coloured with my Blushing Bride marker. I had to be careful to not colour over the TT lines, as this would pull the colour into the BB and make it look muddy.

scissorspapercard, Stampin' Up!, CASEing The Catty, Petal Promenade DSP, Label Me Pretty, Bike Ride, Incredible Like You, Stitched Labels Framelits

A strip of that gorgeous rose DSP was used to finish off the inside. It's such pretty paper - it reminds me of a bridal bouquet.

Don't forget to pop on over to our Facebook group to join in the fun each week.


Before you do, don't forget to finish the hop! Michelle's blog is next.


Bye for now,

Tina

Thursday, 4 April 2019

JAI #451: Just Add Inspiration

Hi!


Welcome to the new Just Add Ink challenge. This week Jo has found this gorgeous Inspiration photo for us to use to spark our creativity. Wouldn't your heart sigh when you met a friend at this cafe? It's so pretty!


I was particularly taken by the colours in the photo, so I pulled out my Petal Pink, Call Me Clover, Melon Mambo and Whisper White cardstock and off I went!

scissorspapercard, Stampin' Up!, Just Add Ink, Beautifully Detailed SDSP, Painted Seasons DSP, Humming Along, Dragonfly Dreams, Everyday Label Punch, Sprig Punch, Bitty Blooms Punches

I started with the Beautifully Detailed Laser Cut panel. It's so pretty, and the opening in the middle made me think of a window like the one in the Inspiration Photo. I popped it up over a panel of Petal Pink and then set all that over lots of Call Me Clover layers.

scissorspapercard, Stampin' Up!, Just Add Ink, Beautifully Detailed SDSP, Painted Seasons DSP, Humming Along, Dragonfly Dreams, Everyday Label Punch, Sprig Punch, Bitty Blooms Punches

I was very excited to realise that the Everyday Label punch is the perfect match for the opening in the  laser cut paper. I don't know why I was surprised, as coordination is one of Stampin' Up!'s hallmarks! The Whisper White label on it's own wasn't enough, so I cropped an extra two from Call Me Clover card and layered them underneath to give a narrow border.

scissorspapercard, Stampin' Up!, Just Add Ink, Beautifully Detailed SDSP, Painted Seasons DSP, Humming Along, Dragonfly Dreams, Everyday Label Punch, Sprig Punch, Bitty Blooms Punches

I used the Sprig punch on both the front and inside to provide a base for the flowers. Did you know that the punch had carried over from the Holiday Catalogue? Not long now 'til we know if it will appear in the new Annual Catalogue!

Why not pop on over to the Just Add Ink to see the rest of the Design Team's cards, and to link up yours? Can't wait to see how your creativity is sparked by the Inspiration photo.

Bye for now,

Tina

Tuesday, 2 April 2019

Gettin' Real, Red.

Hi!


It's time for a new Colour Creations Blog Share. We are up to the R's this week - starting with Real Red. I'm a bit of a red fan, so I enjoyed pulling out some Real Red things and getting inky this week. Not that I don't enjoy getting inky anytime, it's just, as I'm sure you'll agree, some colours are way easier than others to get inspired by!

scissorspapercard, Stampin' Up!, Art With Heart, Colour Creations, Classic Garage DSP, Jar Of Love, Amazing Life, Colour Spritzer

My first stop is usually to check what DSP has the feature colour, and this week I chose the Classic Garage DSP. I don't have any of the other coordinating products, but it's easy enough to make a great card if you don't mind a bit of fussy cutting.

scissorspapercard, Stampin' Up!, Art With Heart, Colour Creations, Classic Garage DSP, Jar Of Love, Amazing Life, Colour Spritzer

I started by dusting off my long retired Stampin' Spritzer and using it to splatter some Basic Black ink over the Real Red DSP. I then layered some fussy cut cogs, dials and car over the top. I also added a strip of the road sign pattern as an anchor for all the other 'bits'. The 'For You' is from Jar Of Love on Very Vanilla cardstock, but it looked too clean compared to the rest, so it got the spritzer treatment too!

scissorspapercard, Stampin' Up!, Art With Heart, Colour Creations, Classic Garage DSP, Jar Of Love, Amazing Life, Colour Spritzer

While I had the spritzer out, I also added some splatters to the inside. Another strip of the Real Red DSP and I was nearly done. The car was fussy cut from the DSP, but I used a car that was along the edge of the paper. I didn't want the whole car, so why waste a whole one when I could use a partial car?

Why not pop on over to Catherine's blog, where you can find the links to the rest of this week's Colour Creations cards featuring Real Red?

Bye for now,

Tina

Sunday, 31 March 2019

CTC #222: Sale-A-Bration

Hi!


Time for the new CASEing The Catty Sunday Challenge Blog Hop. You may have come to my blog from my friend  Judy May, or you may be starting here. Doesn't matter - just keep hopping until you get back to where you started.


This week we are CASEing the Sale-A-Bration Catalogue for the last time. Sniff! SAB ends today, so I hope you got lots of lovely freebies from the promotion. I sure did!


This week my inspiration came from the front cover of the catalogue - to be more specific, the background photo on the first release catalogue. I love the unfocussed shot of balloons, and after looking at the card bases in the Incredible Like You kit, I realised that one of the bases had a similar look. It's the card that you'd usually put the citrus laser cut paper over.

scissorspapercard, Stampin' Up!, CASEing The Catty, Incredible Like You Kit, Jar Of Love, Birthday Cheer, Butterfly Elements, Everyday Label Punch, Butterfly Duet Punch

Instead of popping the laser cut paper over the top, I cropped a piece of vellum with my Rectangle Stitched Framelits and adhered that over the top. It softened the colourful circles and made them look more like the cover.

scissorspapercard, Stampin' Up!, CASEing The Catty, Incredible Like You Kit, Jar Of Love, Birthday Cheer, Butterfly Elements, Everyday Label Punch, Butterfly Duet Punch

The layering on the front was made using the bits from the kit that would normally go with this card. As I have done on other cards recently, I also used a wooden butterfly, but I went over the top of it with my Silver Sharpie. It was then glued over the top of the silver edged circle label that came with the kit. The bottom piece was cropped from some Grapefruit Grove Cardstock with my Everyday Label punch, to which I added a strip of Silver foil top and bottom.

scissorspapercard, Stampin' Up!, CASEing The Catty, Incredible Like You Kit, Jar Of Love, Birthday Cheer, Butterfly Elements, Everyday Label Punch, Butterfly Duet Punch

While I had the Silver Foil handy, I cropped some small butterflies using my Butterfly Duet Punch. I love the way they look fluttering around the inside sentiment.

That's it fr me for this week. Don't forget to join our Facebook group so that you can participate in the challenges each week. We'd love to have you!


For now though, don't forget to finish the Blog Hop. Next is the lovely Sandra Collett.


Bye for now,

Tina

Thursday, 28 March 2019

JAI #450: Just Add Babies

Hi!


Hello and welcome to the new week's challenge at Just Add Ink! This week Rochelle has challenged us to Just Add Babies to our cards. Sadly, my baby days are long gone, but I do enjoy making a sweet baby card every now and then.


I actually made this card a couple of months ago for a card class, but as we get the JAI schedule several months ahead, I was able to save it to use for this week. As my friend Rachel says - work smarter, not harder!

scissorspapercard, Stampin' Up!, Just Add Ink, Well Written Bundle, Elephant Builder Punch, Starburst Punch, Baby Card

I didn't usually buy the baby DSP in the catalogue, but I'm a bit of a sucker for stars, and this paper has the cutest star papers. I love this soft pastel version, perfect for a baby card.

scissorspapercard, Stampin' Up!, Just Add Ink, Well Written Bundle, Elephant Builder Punch, Starburst Punch, Baby Card

I've had the elephant punch since it was released, but hadn't used it yet. This challenge was the perfect time to add a cute elephant to my card. I've used Night Of Navy and  Soft Sea Foam, as they coordinate with the colours in the Twinkle Twinkle DSp. I thought the green made it a neutral card, but my class ladies thought it was more a boy card. What do you think?

scissorspapercard, Stampin' Up!, Just Add Ink, Well Written Bundle, Elephant Builder Punch, Starburst Punch, Baby Card

I used the smaller elephant on the front, so the large elephant was left for the inside. The eyes were drawn on with a Night Of Navy marker. I think the punch comes with a circle section for the eyes, but I find it easier to draw them on than fiddle with something so tiny!

How will you add Babies to your card? I can't wait to see! You can link your card over at the Just Add Ink, where you'll also find the rest of the Design Team cards.

Bye for now,

Tina

AWH BLog Hop: Easter

Hi!

Tonight the Art With Heart team are sharing creative projects with an Easter theme. Do you make Easter cards or gifts? I usually don't, but I decided to join in the Blog Hop anyway!


Don’t forget, Sale-A-Bration ends on March 31st! There is still time to earn free product with purchase or even join our Stampin’ Up! team. Ask any of the girls on the hop for more details.

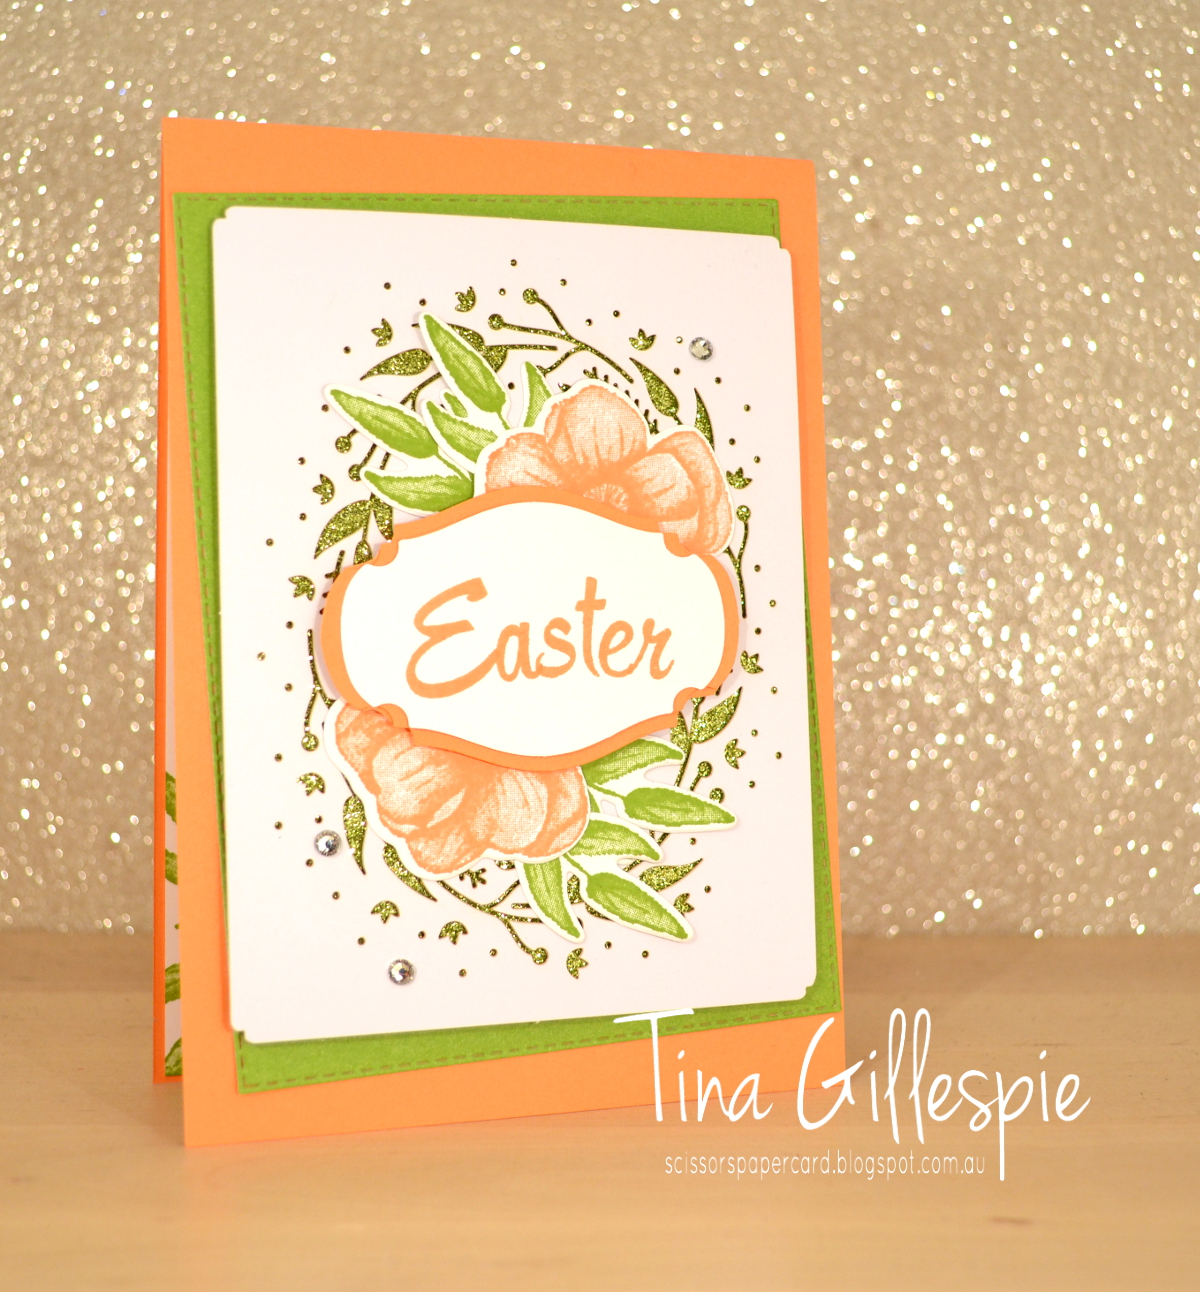
I was a bit short for time this week, so I turned to a kit for inspiration. The Incredible Like You kit turned out to be fabulous for this hop. I chose the wreath card, but ended up chopping it up and making two cards. So much for time poor!

scissorspapercard, Stampin' Up!, Art With Heart, Incredible Like You Kit, Painted Seasons Bundle, Brushwork Alphabet, Rectangle Stitched Framelits, Easter

This card uses the front of the kit card with the Granny Apple Green Glimmer paper peeking out from behind the wreath laser cut piece. Under that is part of the kit card base, cropped with the largest Rectangle Stitched Die. I originally cropped the front of the card, not realising that the back go the card was also printed. The front has a subtle wash effect and I didn't want to cover it with the wreath, so I ended up cropping the back and using it instead.

scissorspapercard, Stampin' Up!, Art With Heart, Incredible Like You Kit, Painted Seasons Bundle, Brushwork Alphabet, Rectangle Stitched Framelits, Easter

The word Easter was stamped using the Brushwork Alphabet stamp set, as I don't have any current stamp sets with an easter sentiment. I layered the Story Label Punch over a flower and foliage from the Painted Seasons Stamp set. You may notice there are two flowers, but I said 'a flower'. That's because I snipped one in half, as I'd already cleaned and put away the stamp before I realised I wanted a second flower for the front. A quick snip and it was problem solved!

scissorspapercard, Stampin' Up!, Art With Heart, Incredible Like You Kit, Painted Seasons Bundle, Brushwork Alphabet, Rectangle Stitched Framelits, Easter

I don't have Easter suitable inside sentiments, so I left the inside of this card blank, apart from some more Painted Seasons leaves and a flower.

So now I had one finished card and a cropped Rectangle Stitched panel, so I decided t make a second Easter card, using the other pieces of the kit card that I didn't use on the first card.


scissorspapercard, Stampin' Up!, Art With Heart, Incredible Like You Kit, Labeler Alphabet, Rectangle Stitched Framelits, Butterfly Elements, Easter

I wanted to keep the front of this card a bit more simple so that you can see the wash effect on the Granny Apple Green piece. It's subtle, but very nice! This time I used my Labeler Alphabet stamp set to make the front sentiment. The label, Twine and Grapefruit Grove striped circle were all parts from the kit, I just added a few Wooden Elements Butterflies.

scissorspapercard, Stampin' Up!, Art With Heart, Incredible Like You Kit, Labeler Alphabet, Rectangle Stitched Framelits, Butterfly Elements, Easter

The label has a silver border, so I decided to make the butterflies silver too. I simply took a silver Sharpie and coloured the wood. Done! It's a matte silver, but it looks really nice in real life.

scissorspapercard, Stampin' Up!, Art With Heart, Incredible Like You Kit, Labeler Alphabet, Rectangle Stitched Framelits, Butterfly Elements, Easter

I'll probably send this card to my mum, so I added the 'with love' to the inside. Now I just have to remember to send it!

Well, that's it from me, now it’s time to hop on over to our next participant, the very talented, Vicki Boucher.


If you find a broken link or have come to this blog hop from a different entry point, you can view the participants below:

Catherine Proctor 

Caroline Manwaring 
Sue Madex
Kate Morgan
Ros Davidson
Kathryn Mangelsdorf
Rachel Palmieri
Rebecca Jacovou
Judy May
Rachel Woollard 
Christina Barnes
Tina Gillespie 
Vicki Boucher 

Bye for now,

Tina