Hi!
One of the comments left on my blog for the Sale-A-Bration asked for the instructions for the little purse I made. I will do my best! I did NOT design this purse myself, but I cannot give credit for it. I have a notebook that I scribble ideas and instructions in and this is one such scribbling. I did not however scribble the designer's details - not very clever of me! If you know who designed it, please let me know so I can link to it. It was a free template I found while surfing somewhere on the www.
Anyway, you need cardstock cut to 9 13/16 inches by 12 inches for the base. With the 9 13/16 inch side at the top and scoring down the cardstock score at almost 4 inches and again at a fraction over 6 inches. The 'almost' and 'fraction' equates to about 3/32of an inch (not quite 1/8th of an inch).
Rotate the cardstock so the 12 inch side is at the top. Score at 4 inches and 8 inches, but ONLY in between the score lines in the first step.
Also, along both of the 12 inch sides, draw a little mark at 3 inches and 9 inches. Cut from these points in a straight line to where the closest score lines intersect. This should give you the shape of the front and back of the box. You now need to cut in from the shorter sides. Cut about 1 inch away from each of the score lines and parallel to the score lines. You should now have a kind of 't' shaped piece.
Fold and burnish all score lines. Apply double sided tape to the flaps and assemble the purse base.
For the flap of the purse you need a piece of cardstock cut to 4 1/4 inches by 7 1/2 inches. With the 4 1/4 inch side at the top, score down the cardstock at 1/2 and 2 1/2 inches. Turn and score again at 1 1/4 and 7 1/4 inches.
You now need to cut the flap into the right shape. Along the 7 1/2 inch side with the widest scored area draw little marks at 2 inches and 5 1/2 inches. Cut from these marks to where the nearest score marks intersect. This section forms the front flap of the box. You now need to make similar cuts on the remaining 3 sides of the flap. These don't need to be as precise as the tuck into the box.
Fold and burnish all score lines. The flap adheres to the inside of the back of the base section, so apply double sided tape to the correct section of the flap piece. BEFORE you adhere the flap to the base you will need to cut 2 slots into the top of the flap to hold the handle. These need to be 1 1/8 inch long and parallel to the sides of the purse.
The handle is a piece of cardstock cut to 1 inch by 10 1/2 inches and scored at 1 inch from either end. Slide the handle into the slots as far as the score lines and adhere to the inside of the flap. Adhere the flap to the inside of the back of the purse.
To close, the side flaps get tucked into the box and the front flap is on the outside. I held mine closed with some ribbon, but you could also use velcro or magnets, or anything else really!
I hope these instructions are clear enough. If not either email me or leave a comment with your email address and I will try to make them clearer for you.
Catch you later,
Tina

Monday, 28 February 2011
Saturday, 26 February 2011
Sale-A-Bration Blog Hop
Hi!
Welcome to another inspirational blog hop. Some very talented Stampin' Up! Demonstrators have put together a bunch of wonderful projects to inspire you to stamp, stamp, stamp! (As if you needed an excuse!) There are 11 beautiful projects for you to feast your eyes on as you hop your way around the circle. Di Dunk owns the blog before mine in the hop - her creations are always amazing!
My project uses a stamp from the Punch Bunch set. Totally loving the way every image matches a punch as it makes cutting out a breeze! Anyway, here's my creation.

I decided to go 3D for this hop so I made a cute little purse using the For You stamp as a tag on the front. Isn't the Sweet and Sour Speciality DSP wonderful? It is a heavier weight than our regular DSP so it is perfect for 3D projects, and the gloss on some of the patterns is gorgeous.

I also decided to make a little set of 5 cards to match the purse. They all use the same stamp and DSP and are sized at 3 1/2" square to fit inside the purse. I also made envelopes but forgot to photograph them. Oops!

Here's a closer look at one of the cards. A simple design - I just stamped the image in Pumpkin Pie and again in Rose Red and then punched them with the Scallop Circle or 1 1/4" Circle punches to give a two colour image. A dimensional between the two layers for a bit of pop, a piece of ribbon and it's done! The tag on the purse was made the same way.
Stamps: Punch Bunch
Ink: Pumpkin Pie, Rose Red
DSP/Cardstock: Sweet and Sour Speciality DSP, Very Vanilla, Pumpkin Pie, Rose Red
Other: Pumpkin Pie 5/8" Satin Ribbon, Pumpkin Pie 1/4" Grosgrain Ribbon, Very Vanilla 1/4" Grosgrain Ribbon, 1 3/4" Scallop Circle XL Punch, 1 1/4" Circle L Punch, Crop-A-Dile, Dimensionals, Paper Snips, Beige Embroidery Cotton
Now you're off to see what wonderful creation the lovely Kathryn Mangelsdorf has for you. I'm sure you'll be inspired!
Catch you later,
Tina
Here are the other blogs in case a link is broken along the way:
Kathryn Mangelsdorf
Judy May
Amy Buchanan
Kathryn Ruddick
Alisha Watson
Ros Davidson
Nikki Sadler
Christine Blain
Sue Madex
Di Dunk
Welcome to another inspirational blog hop. Some very talented Stampin' Up! Demonstrators have put together a bunch of wonderful projects to inspire you to stamp, stamp, stamp! (As if you needed an excuse!) There are 11 beautiful projects for you to feast your eyes on as you hop your way around the circle. Di Dunk owns the blog before mine in the hop - her creations are always amazing!
My project uses a stamp from the Punch Bunch set. Totally loving the way every image matches a punch as it makes cutting out a breeze! Anyway, here's my creation.

I decided to go 3D for this hop so I made a cute little purse using the For You stamp as a tag on the front. Isn't the Sweet and Sour Speciality DSP wonderful? It is a heavier weight than our regular DSP so it is perfect for 3D projects, and the gloss on some of the patterns is gorgeous.

I also decided to make a little set of 5 cards to match the purse. They all use the same stamp and DSP and are sized at 3 1/2" square to fit inside the purse. I also made envelopes but forgot to photograph them. Oops!

Here's a closer look at one of the cards. A simple design - I just stamped the image in Pumpkin Pie and again in Rose Red and then punched them with the Scallop Circle or 1 1/4" Circle punches to give a two colour image. A dimensional between the two layers for a bit of pop, a piece of ribbon and it's done! The tag on the purse was made the same way.
Stamps: Punch Bunch
Ink: Pumpkin Pie, Rose Red
DSP/Cardstock: Sweet and Sour Speciality DSP, Very Vanilla, Pumpkin Pie, Rose Red
Other: Pumpkin Pie 5/8" Satin Ribbon, Pumpkin Pie 1/4" Grosgrain Ribbon, Very Vanilla 1/4" Grosgrain Ribbon, 1 3/4" Scallop Circle XL Punch, 1 1/4" Circle L Punch, Crop-A-Dile, Dimensionals, Paper Snips, Beige Embroidery Cotton
Now you're off to see what wonderful creation the lovely Kathryn Mangelsdorf has for you. I'm sure you'll be inspired!
Catch you later,
Tina
Here are the other blogs in case a link is broken along the way:
Kathryn Mangelsdorf
Judy May
Amy Buchanan
Kathryn Ruddick
Alisha Watson
Ros Davidson
Nikki Sadler
Christine Blain
Sue Madex
Di Dunk
Thursday, 24 February 2011
Craft Caddy
Hi!
I came across a pattern for making this cute craft caddy while browsing the Crafty Storage blog. It's so cute, and folds up flat when it's not in use. It uses the Big Shot and the Scallop Square die, currently available in the Summer Mini Catalogue.

Here it is with a few things in it:

Don't forget the Sale-A-Bration blog hop on Saturday!
Catch you later,
Tina
Wednesday, 23 February 2011
Layout 16: Pony Ride
Hi!
Some more scrapbooking for you today. I used some photos I'd taken at the Novita Christmas Party. Novita is a wonderful charity that supports a lot of South Australian children who have disabilities. The kids had a wonderful time doing a whole range of activities but I think their favourite was the pony rides.

I went a bit all out with the stitching on this layout! I was trying to use up the last of my scraps of Jolly Holiday DSP so I punched a whole lot of circles. I traced a circle template on the 12x12 cardstock several times. Each time I moved it slightly to get a rougher look to the layout. I then adhered the circle punchies around the circle and used my sewing machine to stitch another large circle in a straight stitch. I also used a zig zag stitch to stitch down the circles behind the main photo and also some stitching in each corner.

I also used my colour spritzer to spritz the cardstock before I started adhering things to the page. In a few places I spritzed really close to the page to give a different, rougher effect. You can see this under the letter 'd' in the title.
Ink: Old Olive Marker
DSP/Cardstock: Jolly Holiday DSP, Cherry Cobbler, Very Vanilla, Pear Pizzazz
Other: Big Shot, Timeless Type Alphabet Die, 1 1/4" Circle L Punch, 1" Circle M Punch, Crystal Effects, Paper Snips, Sewing Machine
Don't forget Saturday's Sale-A-Bration blog hop!
Catch you later,
Tina
Some more scrapbooking for you today. I used some photos I'd taken at the Novita Christmas Party. Novita is a wonderful charity that supports a lot of South Australian children who have disabilities. The kids had a wonderful time doing a whole range of activities but I think their favourite was the pony rides.

I went a bit all out with the stitching on this layout! I was trying to use up the last of my scraps of Jolly Holiday DSP so I punched a whole lot of circles. I traced a circle template on the 12x12 cardstock several times. Each time I moved it slightly to get a rougher look to the layout. I then adhered the circle punchies around the circle and used my sewing machine to stitch another large circle in a straight stitch. I also used a zig zag stitch to stitch down the circles behind the main photo and also some stitching in each corner.

I also used my colour spritzer to spritz the cardstock before I started adhering things to the page. In a few places I spritzed really close to the page to give a different, rougher effect. You can see this under the letter 'd' in the title.
Ink: Old Olive Marker
DSP/Cardstock: Jolly Holiday DSP, Cherry Cobbler, Very Vanilla, Pear Pizzazz
Other: Big Shot, Timeless Type Alphabet Die, 1 1/4" Circle L Punch, 1" Circle M Punch, Crystal Effects, Paper Snips, Sewing Machine
Don't forget Saturday's Sale-A-Bration blog hop!
Catch you later,
Tina
Tuesday, 22 February 2011
Punch Bunch For You
Hi!
As promised, I'm back with another Sale-A-Bration card. This one uses a stamp from the Punch Bunch set. I love the way all the images in this set coordinate with Stampin' Up! Punches - makes cutting them out a breeze!

I stamped the image twice - once in Chocolate Chip and again in Baja Breeze. I punched the Baja Breeze image using the 1 1/4" Circle punch and layered it over the Choc Chip image with a dimensional.

Nice and easy!
Stamps: Punch Bunch
Ink: Chocolate Chip, Baja Breeze
DSP/Cardstock: Elegant Soiree DSP, Chocolate Chip, Very Vanilla
Other: Chocolate Chip 1/4" Grosgrain Ribbon, Very Vanilla 5/8" Satin Ribbon, Dimensionals, 1 3/4" Scallop Circle XL Punch, 1 1/4" Circle L Punch
Don't forget to pop back on Saturday for the Sale-A-Bration blog hop.
Catch you later,
Tina
As promised, I'm back with another Sale-A-Bration card. This one uses a stamp from the Punch Bunch set. I love the way all the images in this set coordinate with Stampin' Up! Punches - makes cutting them out a breeze!

I stamped the image twice - once in Chocolate Chip and again in Baja Breeze. I punched the Baja Breeze image using the 1 1/4" Circle punch and layered it over the Choc Chip image with a dimensional.

Nice and easy!
Stamps: Punch Bunch
Ink: Chocolate Chip, Baja Breeze
DSP/Cardstock: Elegant Soiree DSP, Chocolate Chip, Very Vanilla
Other: Chocolate Chip 1/4" Grosgrain Ribbon, Very Vanilla 5/8" Satin Ribbon, Dimensionals, 1 3/4" Scallop Circle XL Punch, 1 1/4" Circle L Punch
Don't forget to pop back on Saturday for the Sale-A-Bration blog hop.
Catch you later,
Tina
Monday, 21 February 2011
Layout 15: Jean & Keith
Hi!
Back again with some more Sale-A Bration inspiration - this time some scrapbooking. I have used the Bliss set again, but this time I have used the adorable little flower image. My layout is about my paternal grandparents.

Love the Basic Black and Very Vanilla with a few splashes of Riding Hood Red!

I'm not sure when a lot of these photos were taken, they were chosen as I loved each photo. My Grandma looks like a movie star and my Grandfather fought in the RAAF during WW2.

It was a bit hard to juggle the odd sized photos. I would have preferred to arrange them in a more chronological manner, but I just couldn't get it to look right on the DSP. I finally settled for what you see.
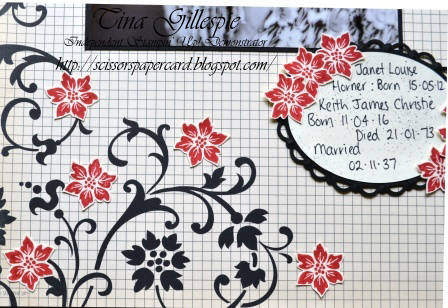
I couldn't believe it when I placed the stamped and fussy cut Bliss flower images amongst the flourish on the Love Letter DSP. The flowers in each are a perfect match! It was a very happy coincidence as I had chosen the DSP and stamp set without noticing they were a match.
I also used my colour spritzer and Basic Black marker on the journalling boxes to give them a more vintage feel.
Stamps: Bliss
Ink: Riding Hood Red, Basic Black Marker
DSP/Cardstock: Love Letter DSP, Very Vanilla, Basic Black
Other: Big Shot, Timeless Type Alphabet Dies, Paper Snips, Scallop Edge Border Punch, Colour Spritzer
Catch you later,
Tina
Sunday, 20 February 2011
Bliss Butterfly Card
Hi!
I finally got my first Sale-A-Bration order last week. One of the free sets I chose was Bliss. It's such a pretty set - what a shame it will retire forever at the end of March. The Bliss sets seems to be quite popular and my card was inspired by lots of cards I have seen in blogland.

I love the way the gorgeous flourish can be used as both a background stamp and a feature image. After I cut out the butterfly I sponged around the edge with Marina Mist ink. I did this to soften the edges of the image. The Very Vanilla cardstock looked a little stark around the edges of the butterfly without the sponging.

I'll be back in the next few days with some more Sale-A-Bration creations. If you're after a whole lot of inspiration please pop back on Saturday - a few demonstrators are doing a Sale-A-Bration blog hop that's bound to have you reaching for your stamps and inkpads!
Stamps: Bliss (SAB)
Ink: Crumb Cake, Marina Mist
Cardstock: Crumb Cake, Marina Mist, Very Vanilla
Other: Sponge Daubers, Dimensionals, Paper Snips
Catch you later,
Tina
Subscribe to:
Posts (Atom)