Pages

Wednesday, 22 July 2020

Colour Creations: Calypso Coral

Hi!


Welcome back once again for the new Colour Creations Showcase. Today's colour is one that I don't particularly like - Calypso Coral. It's a colour that can't make up it's mind if it's pink or if it's orange. It reminds me a lot of the 70's era, which prompted me to finally get out my Nothing's Better Than bundle to have a play.

scissorspapercard, Stampin' Up!, Colour Creations Showcase, Nothing's Better Than, Love You More Than Dies, Subtle 3DEF, Banners Pick A Punch, Stamparatus

The images and fonts in this bundle scream retro to me. I think of old fashioned diners from lots of movies I've seen. I was only alive for half of the 70's, so I don't remember it personally! Anyway, I started the card by stamping the coffee cup and saucer on some Calypso Coral card in the matching ink. The Stamparatus and it's ability to move the plates along the hinge was invaluable for this process!

scissorspapercard, Stampin' Up!, Colour Creations Showcase, Nothing's Better Than, Love You More Than Dies, Subtle 3DEF, Banners Pick A Punch, Stamparatus

I used my new Banners Pick A Punch to flag the ends of the sentiment pieces - oh how I love this punch, and I think you will too. Hopefully you can see that I've embossed the Whisper White and Calypso Coral backgrounds with my Subtle 3DEF, deliberately doing them in different directions just because I can. The 'coffee' die cut was stacked, with a Whisper White layer on top of three basic Black layers. The cups were just popped up with Dimensionals.

scissorspapercard, Stampin' Up!, Colour Creations Showcase, Nothing's Better Than, Love You More Than Dies, Subtle 3DEF, Banners Pick A Punch, Stamparatus

I was clever this time, and thought ahead. When I stamped the piece of Calypso Coral for the front, I cut the piece of card slightly larger so that I could trim off a strip for the inside. It makes life so much easier! And who says that inside sentiments always have to go in the centre? Not me!

That's all from me tonight, please do head on over to Catherine's Blog, where you can find the links for the rest of this week's Showcase blog posts. I'm interested in seeing what everyone has made with Calypso Coral.

Bye for now,

Tina

Monday, 20 July 2020

Heart Of Christmas: July

Hi!


Thanks for joining me for the first of this year's Heart Of Christmas Creative Showcase. This is the fourth year the Art With Heart team have been doing the Heart Of Christmas. This year, we are starting earlier, but it will be a monthly event, not weekly.

scissorspapercard, Stampin' Up!, Heart Of Christmas, Trimming The Town DSP, Home Together Dies, Peace & Joy, Christmas

I was a little time short this week, so I've made a quick and easy Christmas card, using the new Trimming The Town DSP. The whole suite is my clear favourite from the upcoming August-December Mini Catalogue. The trees were cropped from the DSP using the matching Home Together Dies. I used my friend, Judy's trick and roughly cut the trees, glued them to some Whisper White card, and then cropped them. I knew I was going to pop some of them up, and this gives them extra thickness, so they are less likely to sag.

scissorspapercard, Stampin' Up!, Heart Of Christmas, Trimming The Town DSP, Home Together Dies, Peace & Joy, Christmas

One of the dies in the set is a long curved line, designed to make a snowy hill. I used the die itself as a mask before sponging a little Balmy Blue ink for a bit of sky. I couldn't quickly lay my hands on my large sticky notes, but the die worked as a mask in a pinch! The sentiment was also cropped from the DSP - no stamping required!

scissorspapercard, Stampin' Up!, Heart Of Christmas, Trimming The Town DSP, Home Together Dies, Peace & Joy, Christmas

The DSP also has smaller sized trees, so I cropped a few of them for the inside. I also repeated the sponging with the hill die, just on a smaller scale. The inside sentiment is from another new stamp set, Peace & Joy. I think it works well with the DSP sentiments.

To see the rest of July's Heart Of Christmas Creative Showcase, you will need to head on over to Judy's blog. You will find the rest of the links there.

Bye for now,

Tina

Sunday, 19 July 2020

CTC #277: CASE The Colours Of The Flowers For Every Season DSP

Hi!


Thanks for joining me for the new CASEing The Catty Sunday Challenge Blog Hop. Just this week Rebecca realised that this week is the challenge's 6th anniversary! I'm one of the newer Crew members, but there are quite a few who have been around for the entire 6 years. What an achievement!


This week the Crew are challenging you to CASE the Colours of the Flowers For Every Season DSP. The DSP includes all of the new 2020-22 In Colors, plus Poppy Parade and Whisper White. There's a great range of colours to choose from. I managed to fit all but Magenta Madness on my card.

scissorspapercard, Stampin' Up!, CASEing The Catty, Trimming The Town Suite, Peace & Joy, In Colour DSP, Christmas Card, Watercolouring

This scene was created using an upcoming August-December Mini Catalogue bundle, called Coming Home. It was one of the first bundles to catch my eye, and I loved it so much that I ordered the whole suite - stamps, dies, DSP, ribbon and embellishments. Best of all, a portion of the purchase price will be donated by SU to charities devoted to adoption, foster care and infertility. A doubly good reason to purchase it!

scissorspapercard, Stampin' Up!, CASEing The Catty, Trimming The Town Suite, Peace & Joy, In Colour DSP, Christmas Card, Watercolouring

One of the things I love most is that you can layer the houses in the set. I've used three different houses and layered them to create one larger house. I've stamped on watercolour paper using Stazon ink and watercoloured each of the pieces using my Water Painters.

scissorspapercard, Stampin' Up!, CASEing The Catty, Trimming The Town Suite, Peace & Joy, In Colour DSP, Christmas Card, Watercolouring

I had a few trees left over from the front, so they were the natural option for the inside. I'd also coloured the car image from he stamp set in Magenta Madness, but I couldn't make it work in any logical way o the card, so I opted to leave it off. The sentiment is from another upcoming stamp set, called Peace & Joy. It works perfectly with this suite, as it is similar to the sentiment on the front, which was cropped from the Trimming The Town DSP.

All you need to do to join in our challenge is to make a card using the Colours of the Flowers For Every Season DSP and upload it into our Facebook Group. Easy! You could choose all of the colours, or just a few - whatever takes your fancy.


Before you go, please do finish the Blog Hop, as there's lots of lovely inspiration still to be seen. Next up is my wonderful friend, and original Crew member, Rachel. She's used Magenta Madness (that I find so challenging!) to create a gorgeous card.


 Bye for now,

Tina

Thursday, 16 July 2020

JAI #514: Just Add Colour

Hi!


Hooray for Friday! We've had a lovely, sunny week here in Adelaide, which has been fabulous for the school holidays. Only a few more days to go until they are back to school though. I like having the kids home, but I especially like that first week of term, and the quiet in the house! 

But, we do need to get onto the challenge! This week at Just Add Ink Kelly has put together this gorgeous colour combination. It's right up my alley!


I've been keeping busy this week sewing cloth face masks to send to my sister, who lives in Melbourne. She doesn't go out much, but I thought they'd be useful for her when she has no other option. I'm also a big fan of reusable options where possible. Anyway, I couldn't send her a parcel without adding a card!

scissorspapercard, Stampin' Up!, Uniquely Creative, Just Add Ink, Share Sunshine PDF, Subtle 3DEF, Stitched 3 Window Frame Die, Dog Builder Punch

I finally got around to using the Sharing Sunshine digital stamps that SU sold waaaaaayyyyy back at the start of the pandemic. It feels like years ago, but was probably only March! I chose this saying because I thought it was Pretty Peacock, but now that I see it in the photo, I think it's probably Bermuda Bay. Oh well, close enough!

scissorspapercard, Stampin' Up!, Uniquely Creative, Just Add Ink, Share Sunshine PDF, Subtle 3DEF, Stitched 3 Window Frame Die, Dog Builder Punch

I used my trusty Subtle 3DEF on the Pretty Peacock cardstock - I just can't stop using it! I also used the gorgeous new Sheer Pool Party ribbon, which arrived in the mail just this morning. Good timing! The rounded stitched rectangle is a die from Uniquely Creative, called Stitched 3 Window Frame Die.

scissorspapercard, Stampin' Up!, Uniquely Creative, Just Add Ink, Share Sunshine PDF, Subtle 3DEF, Stitched 3 Window Frame Die, Dog Builder Punch

The sentiment on the front had a paired sentiment,  that could either be used with it on the front, or on the inside as I have done. It's a bit tricky to use a printed sentiment on the inside, as it needs to be cropped. I decided to make it a feature by adding a Pool Party layer underneath and situating it at the bottom of the card.

That's all from me today, please head on over to the Just Add Ink where you can find the rest of this week's Design team cards. We've all had a wonderful time playing with the colours this week. You can also link up your card after you've had a wonderful time playing with them too!

Bye for now,

Tina

July Creative Showcase: Colouring Techniques

Hi!

The Art With Heart Team are back with another Creative Showcase, this time featuring different colouring techniques. The Stampin’ Up! range contains a bevy of functional and effective colouring tools that include Water Painters, Blender Pens, Watercolour Pencils, sponges, daubers and even paint.

For a previous Creative Showcase, I created a card that used Stampin' Blends to create a scene that was mostly hand drawn. I decided I had so much fun making that card that I would have another go. This time I decided to use my Beautiful Moments stamp set.

scissorspapercard, Stampin' Up!, Creative Showcase, Beautiful Moments, A Good Guy, Stampin' Blends, Shimmer Paint

I started by stamping the girls and Rangitoto in stamped off Sahara Sand. I then coloured the sand part of the image. I started with a layer of Light So Saffron, not particularly caring if the colouring was streaky - in fact, streaky is better! I also added Light Crumb Cake over the top. A little Dark Crumb Cake was added around their feet to give shadows. Finally, some Dark So Saffron was used over the top of the Crumb Cake to soften the colour a little.

Rangitoto Island was coloured using my Light and Dark Mossy Meadow Blends. The girls have Bronze hair, with Dark Soft Suede shading, and Ivory skin. The older girl's dress is Highland Heather and her bucket is Granny Apple Green. The little girl has a Rococo Rose dress and a Pumpkin Pie bucket.

scissorspapercard, Stampin' Up!, Creative Showcase, Beautiful Moments, A Good Guy, Stampin' Blends, Shimmer Paint

Next up was the ocean. I coloured it in a similarly streaky manner as the sand, starting with a layer of Dark Seaside Spray, followed by Light Night Of Navy. I also used my Colour Lifter to lighten parts of the blue. I watched a video by Sandy Allnock to guide my colouring of the sand and sea. She finished her sea by using a white gel pen to add the white areas on the breaking waves. I don't have a white gel pen, so I used Frost White Shimmer Paint instead.

I finished the card with a Light Balmy Blue sky. Again, I didn't worry too much about it being streaky, but I did put a little more effort into smoothing the colour. A few birds in the sky and a sentiment and I was done!

scissorspapercard, Stampin' Up!, Creative Showcase, Beautiful Moments, A Good Guy, Stampin' Blends, Shimmer Paint

I kept the inside super simple by just stamping the girls again in stamped off Balmy Blue. No sentiment, as I don't know yet how I will use this card.

That's all from me tonight, so now you're off to the next blog which belongs to my lovely friend, Sharon.


If you have a broken link or have come to this blog hop midway, you can view all the participants below:


Vicki Boucher

Rebecca Jacovou

Kate Morgan

Andrea Sargent

Amie McIlroy

Rachel Woollard

Tina Gillespie

Sharon Davern

Kimberly Hern

Caroline Manwaring

Catherine Proctor


Thank you for viewing our Showcase tonight, we’ll be back next month with more inspiration for you.


Bye for now,


Tina


Wednesday, 15 July 2020

Colour Creations: Cajun Craze

Hi!


Wowee, it's Wednesday evening already! The school holidays are flying by! Thankfully I've had lots of time for crafting and even sewing while the kids are home. Speaking of crafting, this week the Colour Creations Showcase is featuring a colour that we all find difficult to use - Cajun Craze. For a long time it kind of sat out there, all on it's own in the colour range, a little unloved. Now we have Terracotta Tile and Cinnamon Cider as fabulous companions. I decided to play with just Cajun Craze tonight, though. 

scissorspapercard, Stampin' Up!, Colour Creations, Celebrate Sunflowers, Subtle 3DEF, Seaside Notions, Masking

I stared with a piece of Very Vanilla card, and masked off the stripe along the bottom. I then used my sponge brayer to lay dow the Cajun Craze ink. While it was still masked, I stamped the larger leaf from Celebrate Sunflowers along the strip, leaving space for the two leaves that extend beyond the stripe. I had to lay the sentiment stamp on the card so that I knew exactly where the top leaf would go!

scissorspapercard, Stampin' Up!, Colour Creations, Celebrate Sunflowers, Subtle 3DEF, Seaside Notions, Masking

I used my Stamparatus to stamp the sentiment with Memento ink. It needed to be as straight as I could make it, and the Stamparatus is the perfect tool to achieve it. Finally, I ran the whole piece through my Big Shot using the Subtle 3DEF, and then popped it up over a VV card base.

scissorspapercard, Stampin' Up!, Colour Creations, Celebrate Sunflowers, Subtle 3DEF, Seaside Notions, Masking

I repeated the process for the inside, except that the stripe ran along the very bottom of the card. This was actually my second go, as I got a bit too enthusiastic with the sponge brayer on the first try, and ended up with ink going over the other edge of the masking tape. Oops! Thankfully, I could just flip the cardstock over and use the reverse side.

Thanks for joining me again tonight. Please head on over to Catherine's blog to see the rest of this week's Cajun Craze cards. I can't wait to see what everyone has made with this colour.

Bye for now,

Tina

Sunday, 12 July 2020

CTC #276: CASE The Animals

Hi!


Thanks for joining me once again for the new CASEing The Catty Sunday Challenge Blog Hop. This week we are CASEing the Animals of the Annual Catalogue. There are so many to choose from! All you need to do is choose a project that features an animal in some way and CASE it. There is DSP, stamp sets, dies and punches that all feature animals. I think that the hardest part will be narrowing it down to one.


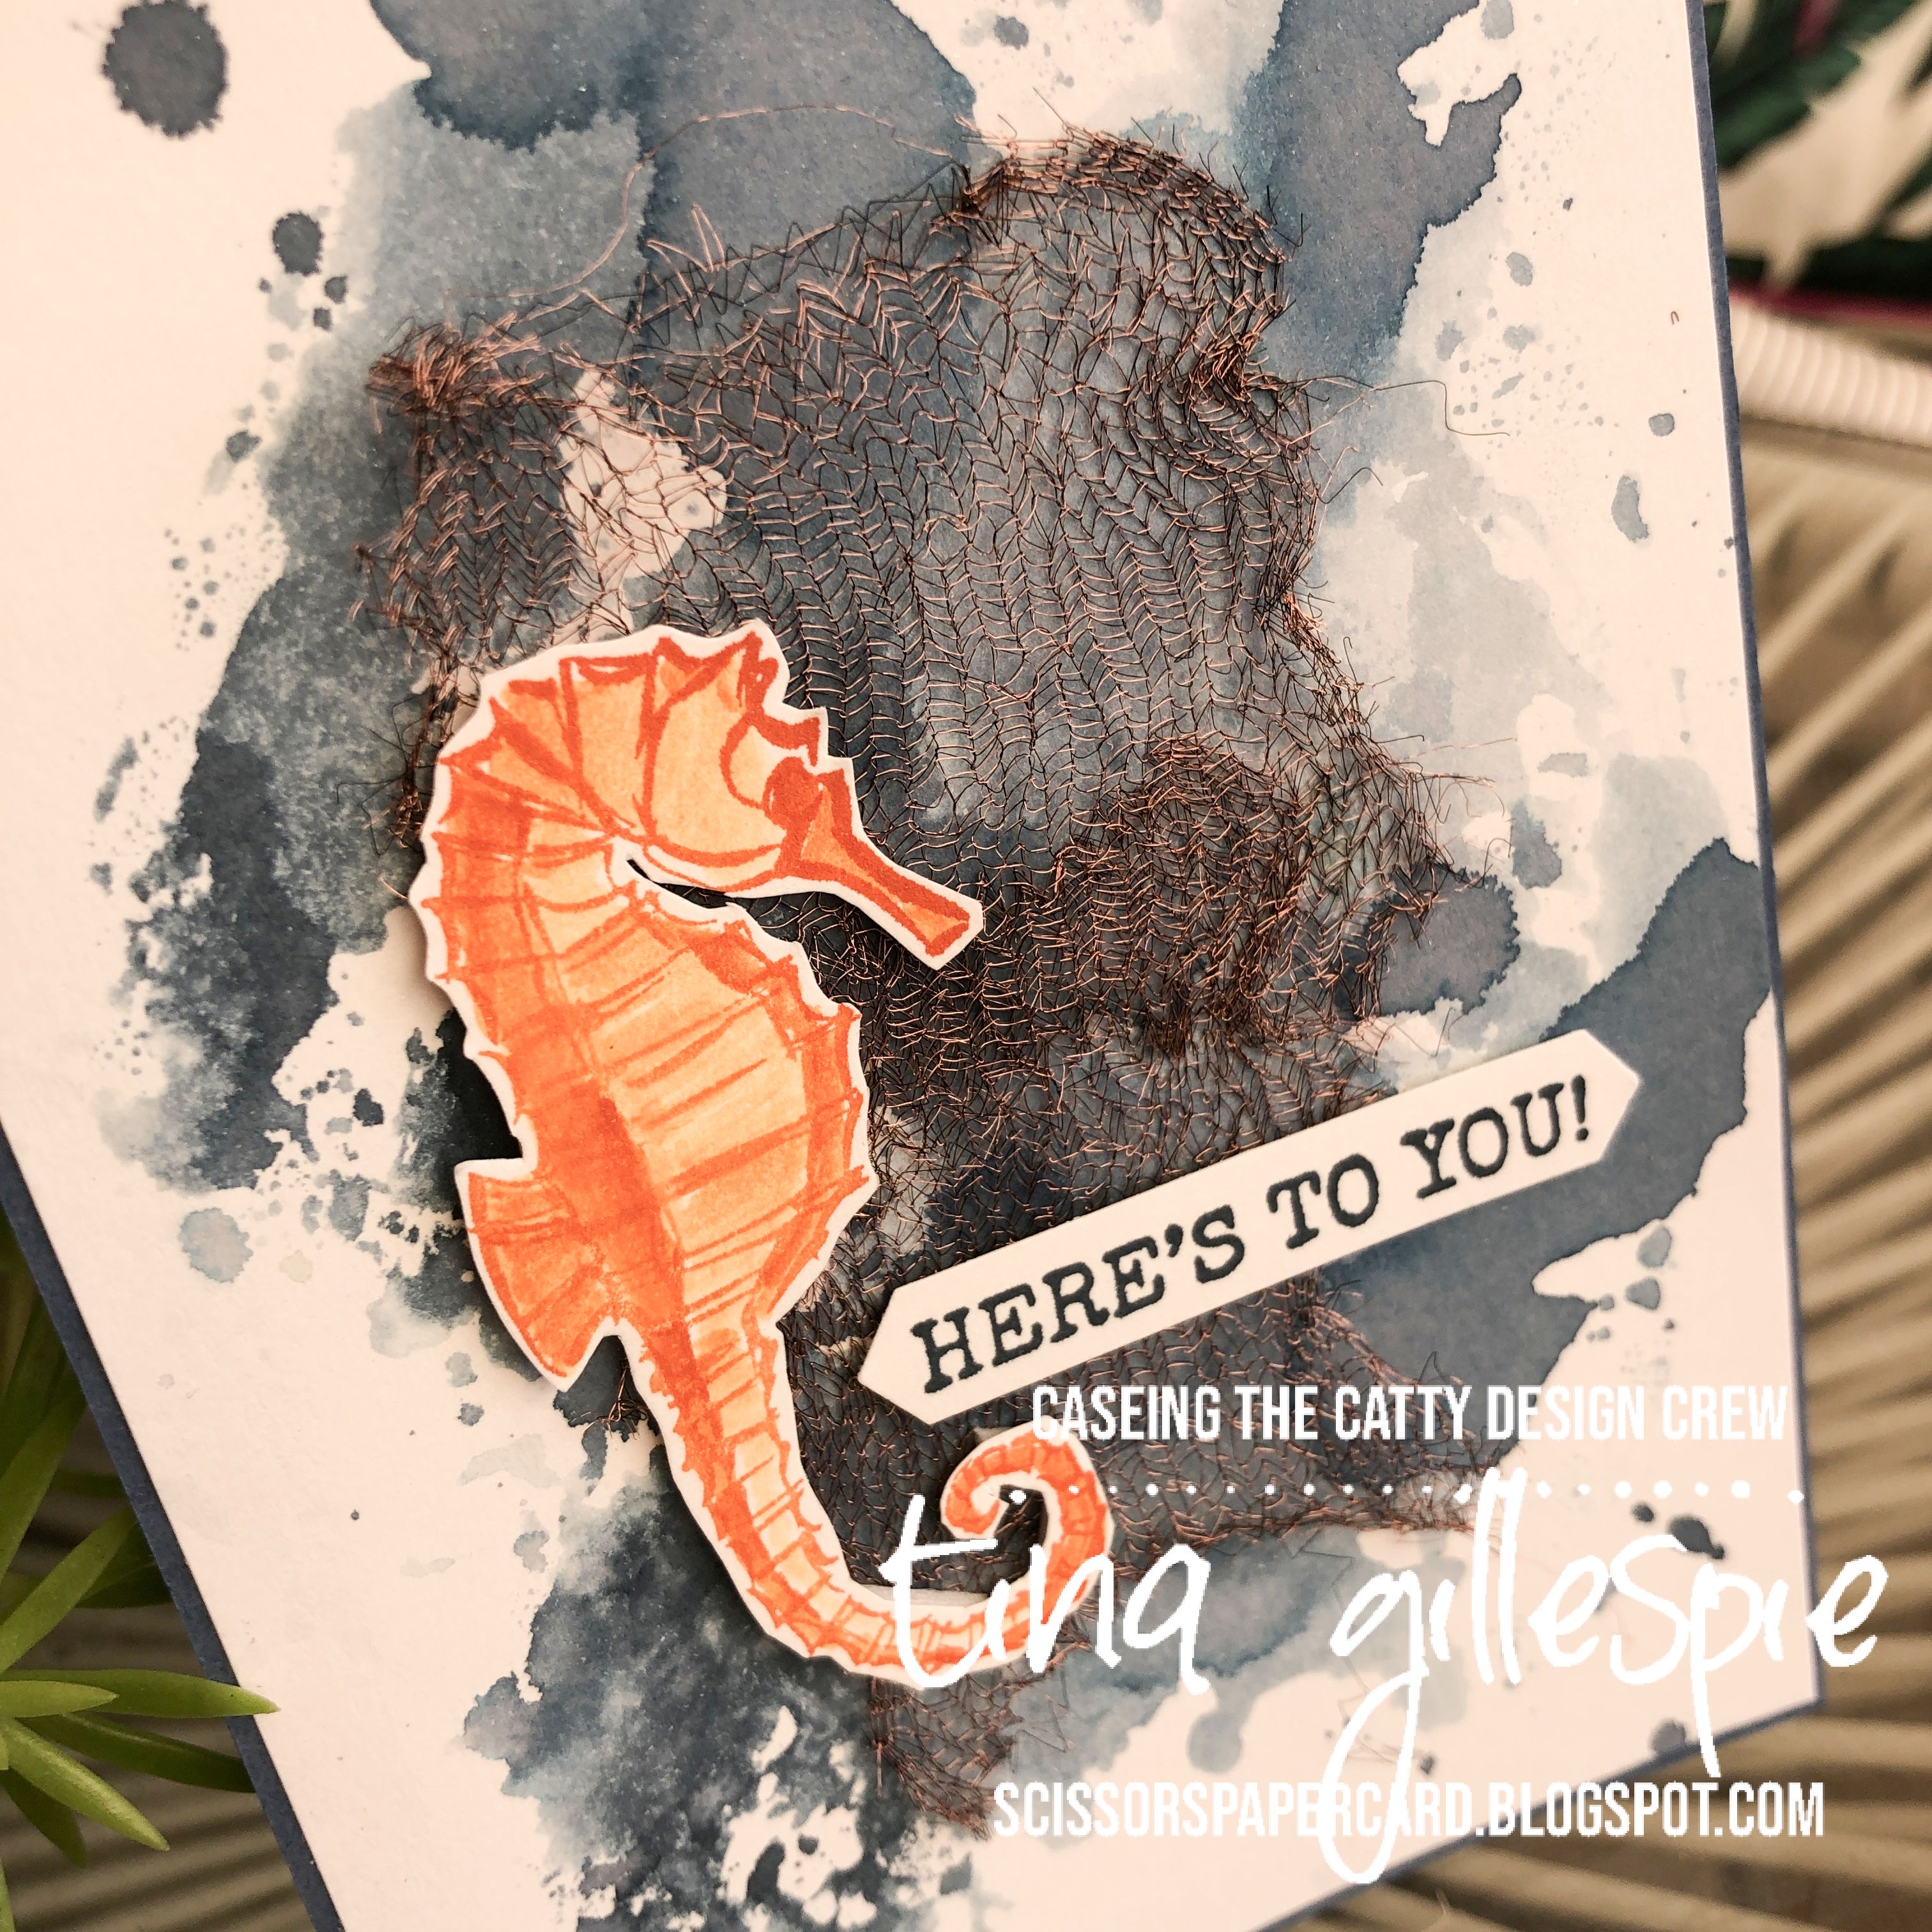
Flicking through the back of the catalogue, I came across this cute card featuring the Whale Done stamp set and punch bundle. I don't have either, but it did make me think about what I could make with another underwater animal, the seahorse in Seaside Notions.


I started by creating my background. The stamped hearts on the original card are cute, but it's been a while since I've made a smooshed background, so I decided to do that again. I love how it looks a bit like water.

scissorspapercard, Stampin' Up!, CASEing The Catty, Seaside Notions, Smooshing

I had intended to use a mix of blues and greens, but I started with Misty Moonlight and liked it enough on it's own so I stopped. There's touches of purple and grey in the colour that are quite pretty.

scissorspapercard, Stampin' Up!, CASEing The Catty, Seaside Notions, Smooshing

The next layer on the original card is vellum. I tried a bit of that, but didn't like how much of my smooshing it covered. My retired Copper Trim was the next logical choice. I snipped it open and spread it out so that it looks like a net before adhering it to the card base. I used Fine Tip glue, which is a strong, but invisible, hold. Finally, I finished the front with a Pumpkin Pie seahorse. I used a Blender Pen to colour him by picking up ink from the lid of my inkpad.

scissorspapercard, Stampin' Up!, CASEing The Catty, Seaside Notions, Smooshing

My inside seahorse was coloured the same way, however, she was first stamped in Misty Moonlight ink. I'm not sure which version I prefer - how about you?

Our Challenge is run through our Facebook group. It's where you upload a photograph of your card for each week's challenge. It's so easy to do - I'd love to see you give it a try. No blog necessary!


Time now to head on over to the lovely Rebecca's blog, where she's used another 'old favourite' stamp set.


Bye for now,

Tina