Pages

Friday, 6 February 2015

JAI #249: Just Add A Sketch

Hi!

Ooh, these Fridays are rolling around so quickly! I can't believe my children are finishing their second week at school - where is the time going?


We have a sketch challenge this week at Just Add Ink, designed by me!  I quite enjoy designing sketches, and then seeing how others interpret them.


Hexagons are so much fun to play with, but I decided to take a less literal approach to the sketch.


This card was made with someone specific in mind,  I knew she was a fan of neutrals with splashes of green and orange, so that's where I started from.


I think that sunburst from Kinda Eclectic is becoming one of my most used stamps! It's fab for adding just that little extra something to a card.


So there you have it!  What do you see in my sketch?  The Design Team at Just Add Ink have interpreted it in many beautiful ways - can't wait to see what you do with it!

Bye for now,

Tina
Monday, 2 February 2015

A UFO?

Hi!

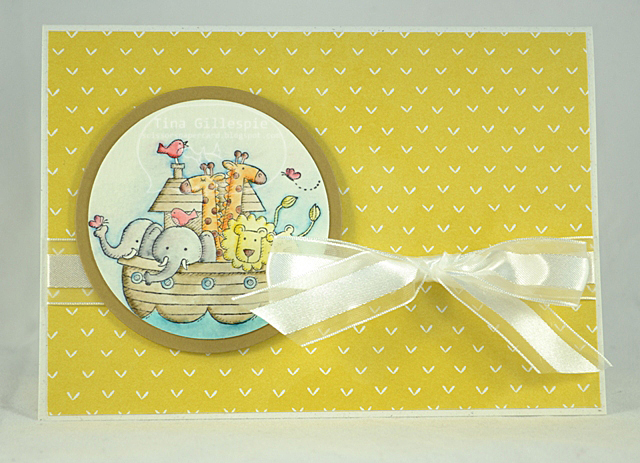
No, I'm not sharing blurry pictures of strange lights in the sky! In the crafting world a UFO is an UnFinished Object!  In this case, while tidying my desk I came across a stamped image that I'd coloured and then set aside to finish later, and well, later took a long time to come around!


I really love the Two By Two stamp, and was a little sad when it retired.  I was excited to find out I could purchase it as an MDS Download though, so it never really retires.


Don't ask me which colours I used, I can't remember now!  I do know that I stamped with Stazon on wartercolour paper and coloured it using my Stampin' Write Markers and Blender Pen. I coloured this so long ago it was before we had our range of Blendabilities!


Do you have many UFO's lying around on your craft desk?  I have quite a few! Hopefully they will become FO's in the near future!

Bye for now,

Tina

Friday, 30 January 2015

JAI #248: Just Add Colour!

Hi!

Did you enjoy last week's Just Add Ink Blog Hop?  I hope you were able to complete the Hop and see all of the gorgeous Design Team projects.

We are back this week with a Colour Challenge suggested by Kim.


I really enjoyed making my card for this week's challenge, even though it was quite time consuming to stamp.


I used the Mosaic Madness stamp to create the background panel for my card.  I was a bit naughty and just eyeballed the placement of the images  -I probably should have used my Stamp-A-Ma-Jig but I really couldn't be bothered.  I just used the 4 mosaic stamps and the 4 colours and stamped away.


I eyeballed the stamps on the bottom of the main panel too.  I lined up the blues ok, but I was a bit off with the Sahara Sand.  Oh well!


I tried using the larger mosaic stamps on the inside but it didn't look right, so I ended up using the straight stamp again, which didn't look too bad.

I hope you can find time to play along with us this week over at Just Add Ink.

Bye for now,

Tina

Wednesday, 28 January 2015

Easel Calendars

Hi!

During January I made a few Easel Calendars as class samples.  My daughter saw my two samples after the class and instantly claimed them - one for her and one for her bestie.  I guess that's just as good as a seal of approval!


I used the DSP from the Painted Blooms pack to provide a background for the gorgeous butterfly.


Even with the Post-It Note pad, the calendars fold down flattish so that they could be posted if necessary.


Here are the two samples side by side.  I didn't have enough of either paper for the whole class to make the same calendar, so they got a choice between the two.  I can't decide which one is my favourite!

Bye for now,

Tina


EDITED TO ADD INSTRUCTIONS: I've had a few recent requests for instructions. They are pretty simple to make, I just made an easel card at a regular card size. This will vary depending on where you live in the world! You can find a tutorial on making Easel Cards here, just adjust the base cardstock to be half of an A4 sheet, and the front to be a quarter of an A4 sheet.

Monday, 26 January 2015

Irresistibly Painted Petals

Hi!

Happy Australia Day!

Today I have a card for you that I made as a sample for one of my January classes. I made it to show off the new Irresistibly Yours DSP that is one of the freebies you can choose during Sale-A-Bration.


We used a piece of the floral Irresistibly Yours DSP and sponged it with Soft Sky ink.  The DSP has the patterns pre-embossed, so all you need to do is add some colour for spectacular results.


The flowers from Painted Petals were stamped in Soft Sky and Wild Wasabi (stamped off once first).  Some of my ladies found it a little tricky to line up the flowers with the stems.  I think it just takes a little practice.


The flowers look fabulous again on the inside.

Well, it's back to school again tomorrow!  Hopefully I can keep up the blogging while we get back into the school routine, but if I drop off for a while you know why!

Bye for now,

Tina

Friday, 23 January 2015

JAI #247: Just Add A Blog Hop!

Hi!

I hope you've had a great January so far.  I've had a nice break from my Just Add Ink Design Team duties, but now we are back with our first challenge for the year.  We have decided to kick off the new year and this challenge with a blog hop around the Design Team.  If you get lost just click on the badge to go back to the Just Add Ink blog.


So, what's the challenge?  It's a challenge with a twist this week!  The theme is Just Add Love, and the twist is that you need to incorporate the following sketch.  You can use the whole sketch, or just use the tag part of the sketch on a bag or a box.  Easy!


I decided to use the whole sketch as the basis for my card.  My first step was to make the tag.  I used some of the SAB Specialty DSP Irresistibly Yours and sponged it in Blushing Bride, Pink Pirouette and Rose Red.  I love the effect it gives!


I don't tend to make 'Love' cards, so I struggled a bit finding a sentiment for the front of the card.  I finally settled on the stamp from Itty Bitty Banners.  I didn't want the banner part of it, so I just coloured the text with my Rose Red marker.


I had the same struggle with finding a sentiment for the inside, so in the end I just left it out.  Doesn't the effect of the sunburst behind the hearts look great?


Well, that's me done! You can continue on to Shona's blog to see her fabulous card by clicking on the badge below.


Bye for now,

Tina

Wednesday, 21 January 2015

First Play With Butterfly Basics

Hi!

One of the first things I had to have from the new Occasions Catalogue was the Butterfly Bundle.  I loved both the stamps and the Thinlits.  When I sat down to stamp with them I was a bit intimidated though! I wanted to create a card that did justice to the products.  I hope I succeeded!


I really liked the colour combination I used on this card too - Rose Red, Crumb Cake, Always Artichoke and Very Vanilla.  I don't often use Always Artichoke, but it's great in combination with Rose Red.


The Butterfly Thinlits are fabulous! I love the intricate shapes they make.  You do need to be careful in getting them out of the die though - they tear easily, as you may see in the above picture.


I'm sure you'll be seeing much more of the Butterfly Bundle on my blog in coming months!

Bye for now,

Tina