Pages

Wednesday, 16 October 2013

A Quick Card Today!

Hi!
 
A quick and simple card for you today.  I made it early on when the current Annual Catalogue was released. I love the Wildflower Meadow bundle - it's great to have on hand for simple, fast and effective cards.
 

I combined Crumb Cake with Baked Brown Sugar for this card - they work beautifully together for a tonal effect.

Sorry, I didn't photograph the inside before I wrote in it!!

Stamps: Wildflower Meadow, Label Love
Ink: Baked Brown Sugar
Cardstock: Very Vanilla, Baked Brown Sugar, Crumb Cake
Other: Big Shot, Wildflower Meadow Embossing Folder, Artisan Label Punch, Crumb Cake Seam Binding Ribbon, Dimensionals

Bye for now,

Tina

Monday, 14 October 2013

A Wedding Card

Hi!

Another one of my nieces got married a couple of weeks ago so the card I have for you today is the card I gave her and her new husband on their happy day.


It was also a card I'd made as a sample for a recent "Hatches, Matches and Dispatches" class. We stamped the Flowering Flourishes image in Illuminate Ink to give a lovely, subtle shimmer to the top of the card.  The embossing along the bottom adds an elegant touch.


I really love white on white wedding cards, and the touch of silver in the sentiment and card base adds a little touch of class.


I kept the inside fairly simple as I usually like to write a fair bit on wedding cards.

Stamps: Flowering Flourishes, Sweet Essentials
Ink: Illuminate Glimmer Watermark, Platinum Shimmer Paint (retired)
Cardstock: Whisper White, Brushed Silver
Other: Big Shot, Delicate Designs Embossing Folder, Large Scallop Edgelit, Organza Ribbon

Bye for now,

Tina

Friday, 11 October 2013

JAI #186: Just Add Inspiration

Hi!

Yes, it's Friday again - must be Just Add Ink time!


This week Delys found this gorgeous picture to inspire your papercrafting.  Yes, the challenge is to Just Add A Wreath.


The amount of work in that is just incredible!


I went with the wreath but decided to make a Christmas card. It was still time consuming, but nowhere near as time consuming as the Inspiration Picture I'd bet!


I cut some strips of Gumball Green cardstock that measured around 0.5mm by 15cm and then quilled them by rolling them around the tip of my paper piercer.  I let each one loosen a little before gluing the end down with a little Tombow Glue. I then glued the rolls down around the edge of a Very Vanilla 2 1/2" Circle punchie.  This is really important unless you are expert in creating freehand circles!


Stamps: Sweet Essentials, Christmas Messages, Daydream Medallions
Ink: Gumball Green, Cherry Cobbler
Cardstock: Gumball Green, Cherry Cobbler, Very Vanilla
Other: 2 1/2" Circle Punch, Cherry Cobbler Seam Binding Ribbon, Simply Scored Scoring Board, Paper Piercing Tool, Tombow Glue

Will you play along this week at Just Add Ink? How does the Inspiration Picture inspire you?

Bye for now,

Tina

Wednesday, 9 October 2013

A Catalogue CASE

Hi!

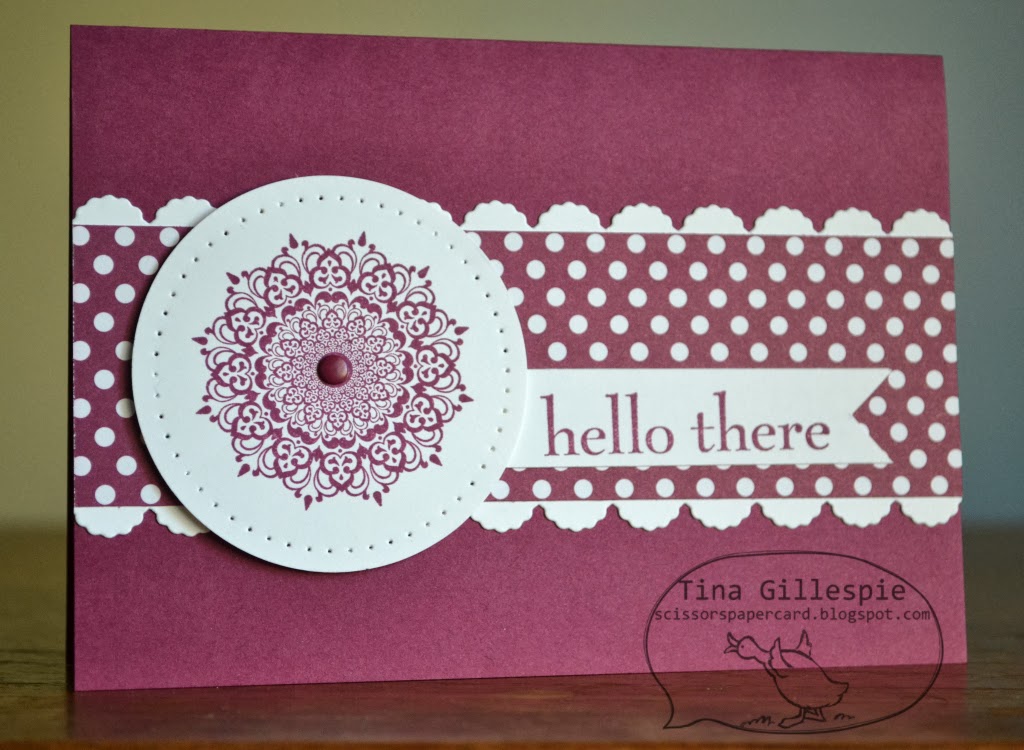
Sometimes I see a card somewhere that I really like and I end up CASEing it exactly. Other times I see a card, set out to CASE it exactly and it ends up looking very little like the original card.  This is one of those types of cards.


The card that inspired this card is from page 33 of the Annual Catalogue.  You can still see some elements of the original - the pierced circle, the Polka Dot strip. After that it's quite different.


I really love the Happy Day stamp set.  I really should use it more!


Stamps: Happy Day
Ink: Rich Razzleberry
DSP/Cardstock: Polka Dot Parade DSP, Rich Razzleberry, Whisper White
Other: Big Shot, Adorning Accents Edgelit, Paper Piercing Mat and Tool, Essentials Paper Piercing Pack, Candy Dots, Dimensionals

Bye for now,

Tina

Monday, 7 October 2013

A Christmas Gift

Hi!

Last month for my Holiday Catalogue launch I decided to prepare a 3D item for my guests to make. With Christmas not too far away a little Post-It Note Holder was the perfect project.


These were quite easy to put together, once we'd sorted out all the pieces.  I like my layers so there were quite a few!


I kept the stamp on the front fairly occasion-neutral so that if my guests wanted to give this away on an occasion other than Christmas it was still possible.


We also stamped on the first Post-It Note, but of course that's not the sample I photographed!!

I think I'll be making lots more of these for the kid's teachers at the end of the year.  Teachers always need more Post-It Notes!

Stamps: Label Love
Ink: Cherry Cobbler, Old Olive
DSP/Cardstock: Season Of Style DSP Stack, Cherry Cobbler, Old Olive, Very Vanilla
Other: Artisan Label Punch, Cherry Cobbler Seam Binding Ribbon, Sticky Strip, Simply Scored Scoring Tool, Dimensionals, Post-It Notes, Pencil

Bye for now,

Tina

Sunday, 6 October 2013

JAI Scrap #22: Just Add A Sketch

Hi!

A bonus post for you this week, as it's time for the new Just Add Ink Scrapbooking Challenge.


This month Delys has given us this gorgeous sketch to work with.  I really love it and I can see myself using it again.


Remember, the sketch it a starting point - you don't have to copy it exactly, just as long as we can still see the basic sketch.


You can see how I changed bits and pieces of the sketch to suit my theme. The photo was one taken at a Narnia Exhibition we went to in Docklands, Melbourne in December last year.


I used some Thickers from my stash for the title.  You can see that I stamped some splodges under the banner.


I used this Smoky Slate DSP from the Eastern Elegance pack as I wanted to create the feel of a snowy winter.  If you know your Narnia you would know that we were photographed at the Lamp Post that Lucy found when she first ventured into Narnia.  It was cold and snowy then, hence the feel of the layout.


Narnia fans would also know why I snipped off one of the posts on the Lamp Post!  I coloured the chipboard with my Chalk Marker from the Holiday Catalogue.  I had to apply several layers to get the right colour, but it's worth the effort as it too looks lovely and snowy. I used some hand cut cardstock to create a glow for the light and more splodges stamped behind it to create a snowy effect.

I had more photos from out visit to the exhibition, so I ended up scrapping a second page for the layout.  I'll show you that another time.

Stamps: Gorgeous Grunge
Ink: Basic Grey, Chalk Marker
DSP/Cardstock: Eastern Elegance DSP, Textured Basic Grey (retired), Smoky Slate, Daffodil Delight
Other: Corner Rounder Punch, Thickers, Chipboard Lamp Post

I hope you can scrap along with us at Just Add Ink this month.

Bye for now,

Tina

Friday, 4 October 2013

JAI #185: Just Add Colour

Hi!

Is it really Friday? What happened to Tuesday, Wednesday and Thursday?  I think school holidays and sick kids swallowed up those days.  Oh well, better late than never!


This week Delys has given us a gorgeous Colour Combination to work with.  I really loved this combo - so very pretty and feminine.


I was commissioned to make a card for a bride to be on her hen's night.  The wedding theme is vintage, so the card needed to be vintage too. I thought the colours suited the look perfectly.


I didn't have any "Happy Hen's Night" type sentiments, so I decided to leave the front without a sentiment.  I really don't think it needs on anyway.


To 'age' the background DSP I stamped my Dictionary stamp over the top with Sahara Sand ink and then sponged it quite heavily around the edges.

 
You can see the difference between the starting point and the end result.  It's quite a difference, but quite simple to achieve.
 

I also used the Dictionary stamp on the flower panel.  To get the rough look I inked up the stamp, leaving it face up on my desk. I then laid the circle punchie on top and pressed lightly with my fingertips to get an uneven image. Love the effect!


I used the same technique to decorate the inside of the card.

Stamps: Dictionary, Simply Sketched, Well Scripted
Ink: Sahara Sand, Raspberry Ripple, Coastal Cabana
DSP/Cardstock: Eastern Elegance DSP, Raspberry Ripple, Sahara Sand, Very Vanilla
Other: Big Shot, Paper Doily Die, Circles Collection Framelits, 2 1/2" Circle Punch, Victoria Lace Trim, Pearls, Dimensionals, Sponge Dauber, Blender Pen

I hope you can play along this week with us at Just Add Ink. It's such a beautiful colour combination, it's sure to inspire.

Bye for now,

Tina