Pages

Wednesday, 20 January 2021

Colour Creations: Pacific Point

 Hi!


Welcome back to the new Colour Creations Creative Showcase. This week we are up to Pacific Point, a lovely bright mid-blue from the Brights colour family. I was scrolling through google images this week, looking for inspiration for my card, and I noticed a few cards that had used floral images to create a sort of china-like pattern. Delft, I think it's called? Hopefully you know what I'm talking about - the blue and white designs on crockery.

scissorspapercard, Stampin' Up!, Colour Creations, Ornate Style, Pretty Perennials, Itty Bitty Birthdays, Stitched Shapes Dies, Stamparatus

I didn't have any suitable floral images, so I settled on this scroll image from Ornate Style. I used my Stamparatus to stamp the image repeatedly on a piece of Whisper White cardstock. I made the cardstock slightly longer and wider than I wanted to that I could trim it down. This allowed me to get the piece nice and symmetrical.

scissorspapercard, Stampin' Up!, Colour Creations, Ornate Style, Pretty Perennials, Itty Bitty Birthdays, Stitched Shapes Dies, Stamparatus

I used my new Pretty Perennials stamp set for the sentiment. The rhinestones aren't Pacific Point, they are retired Blueberry Bushell rhinestones, as they were the closest match that I had.

scissorspapercard, Stampin' Up!, Colour Creations, Ornate Style, Pretty Perennials, Itty Bitty Birthdays, Stitched Shapes Dies, Stamparatus

The bonus to making your DIY DSP a little bigger that you need is that you have left over pieces that you can use to decorate the inside! Just a simple strip was all I needed, matted on a scrap of Pacific Point cardstock.

Don't forget to head on over to Catherine's blog now, where you'll find the rest of this week's Pacific Point cards.

Bye for now,

Tina

Sunday, 17 January 2021

CTC #301: CASE The Sale-A-Bration Catalogue

 Hi!


Thanks for joining me for the new CASEing The Catty Sunday Challenge Blog Hop. Sunday evening has rolled around very quickly this weekend, probably because my littlest boy is in respite for the weekend! We took our big kids to the drive in cinema last night, which was a whole lot of fun.


This week we are challenging you to CASE any project from the Sale-A-Bration Catalogue. It's a little catalogue, at only 20ish pages, but it packs a lot of samples into those pages!


I absolutely adore the colours in this sample, from page 17. I love the bright pop of colour against the dark background. It's such a sweet, happy card! I used exactly the same colours on my card, but I opted for a fresh, white background.

scissorspapercard, Stampin' Up!, CASEing The Catty, Pretty Perennials, Perennial Petals Dies, Stitched Shapes Dies, Stamparatus

I used my new Pretty Perennials bundle to create my card. I kept the base to a Night Of Navy square, but layered a piece of White cardstock on top. The background was stamped using my Stamparatus and the stamping in the round technique. It makes stamping backgrounds like this so much easier!

scissorspapercard, Stampin' Up!, CASEing The Catty, Pretty Perennials, Perennial Petals Dies, Stitched Shapes Dies, Stamparatus

I stamped an extra Real Red flower, which I die cut using the coordinating die. You can just see an extra set of leaves tucked under the flower too.

scissorspapercard, Stampin' Up!, CASEing The Catty, Pretty Perennials, Perennial Petals Dies, Stitched Shapes Dies, Stamparatus

I stamped the inside of the card by hand rather than using my Stamparatus, but I stuck to a similar arrangement as on the front. I decided to omit an inside sentiment, as it's a small card (4 inches square), and I didn't want to take away from space for writing my message.

Has a particular project from the SAB Catalogue caught your eye? Perhaps prompted you to place an order so that you can earn the product? Why not CASE the project and join in our challenge? You can do that in our Facebook Group.


Before you do, please do finish the Blog Hop! I was first cab off the rank this week, so there's plenty of inspiration to go before you get to the end. Next up is the lovely Sandra. Her card is gorgeous!


Bye for now,

Tina

Thursday, 14 January 2021

JAI #537: Family

 Hi!


It's time for Just Add Ink to resume for 2021! Yay! As always, we start the new year of challenges with a Blog Hop featuring the entire Design Team.


This year our chosen theme is Family. 2020 was such a crazy year for most of us, whether you spent more time with family due to lockdowns, or you were separated from family by border closures and travel restrictions. For me personally, I enjoyed the time at home. We were very lucky in South Australia that it was for a relatively short time. I also had weekly zoom calls with my mum and sisters, as we are scattered all over Australia. It was wonderful to connect with them more regularly.

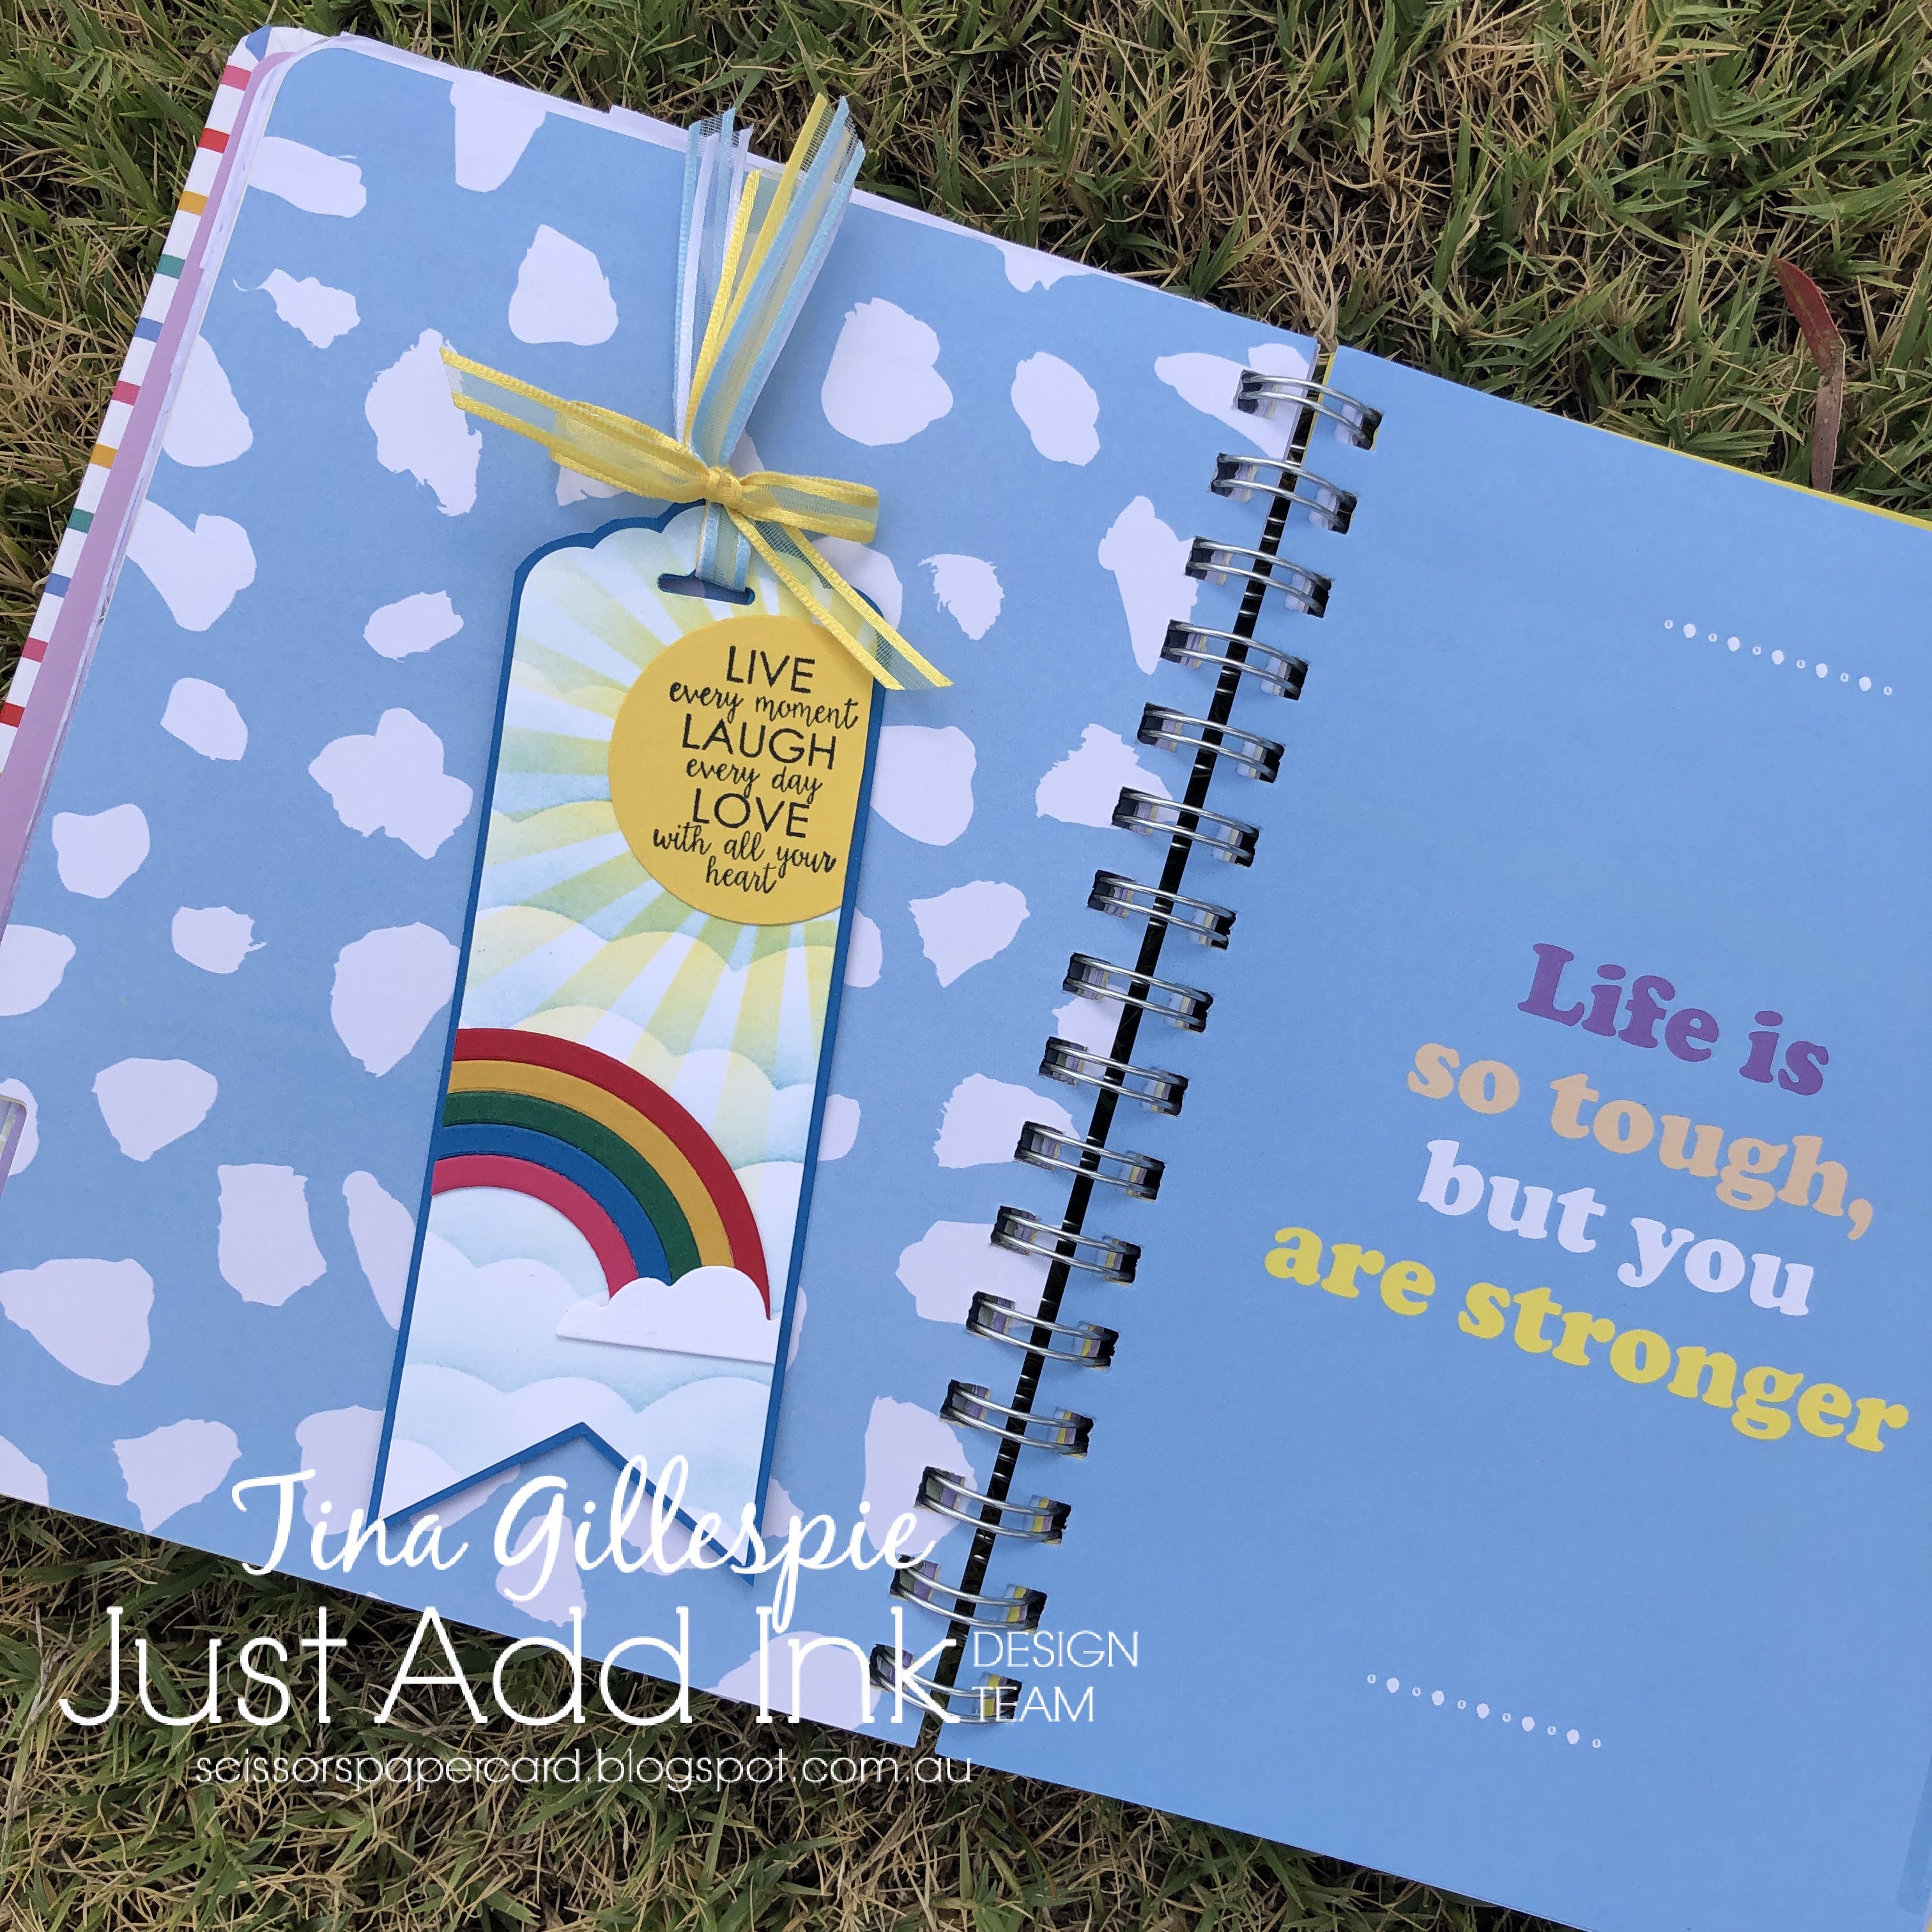
I thought for a long time about what I could make for the Blog Hop, and then I saw a bookmark that a friend had made for her diary and though that it would be the perfect choice for the theme. My diary is a vital part of my life, and my family's life, as I keep track of everyone's appointments and schedules. The number of times that I get asked "Can you check your diary?" or, "Am I free on xxx day?" is huge!

scissorspapercard, Stampin' Up!, Just Add Ink, Rainbow Builder Dies, Ribbon Of Courage

I started by looking at the outside cover of the diary, and particularly the colours of the stripes. I thought that they would work well for a rainbow, so that's where I started. I used the retired Rainbow Builder Dies to cut the arcs. Real Red, Bumblebee, Shaded Spruce, Pacific Point and Melon Mambo were the colours that matched the best.

scissorspapercard, Stampin' Up!, Just Add Ink, Rainbow Builder Dies, Ribbon Of Courage

I used an old SU stencil to create the sun's rays with a Blending Brush and Daffodil Delight ink. Have you used the new brushes yet? They are lovely to use, and I quite like the larger head. The clouds were created using one of the lines of cloud dies in the Rainbow Builder Dies and another Blending Brush with my Balmy Blue ink. The die cut rainbow was adhered over the top, with a die cut cloud hiding the ends of the arcs.

scissorspapercard, Stampin' Up!, Just Add Ink, Rainbow Builder Dies, Ribbon Of Courage

The phrase I stamped in the sun is from the retired stamp set, Ribbon Of Courage. I thought that it was very uplifting, and a good reminder every time I open my dairy. The sun and the rainbow are also a reminder that after the storms come the rainbows. The sun will always shine again.

Next up on your Blog Hop is the wonderful Narelle. You won't want to miss her gorgeous cards, nor the rest of the Blog Hop, so do keep hopping around until you get back to where you started. I hope you can join in with our Just Add Family challenge, too.


Bye for now,

Tina

Wednesday, 13 January 2021

Colour Creations: Old Olive

 Hi!


Welcome back to the latest Colour Creations Creative Showcase. This week we are looking at Old Olive, an earthy green from the Regals colour family. The temptation was strong to describe it as a dirty green, but I get in trouble for using that word! LOL!! Old Olive has been a SU colour for a very long time, I think it was the first green I purchased when I joined SU nearly 11 years ago. Although I use other greens, I find myself reaching for Old Olive most often.

scissorspapercard, Stampin' Up!, Colour Creations, Blossoms In Bloom, Many Layered Blossoms Dies, Stitched Rectangles Dies

I wanted to make a floral card, but that was proving a little tricky, as I have limited myself to just using the focal colour with black/white/metallics this year. Then I had the idea to heat emboss the flowers using white embossing powder, and what better stamp to use than Blossoms In Bloom? I took it one step further and created a split card front, so that I got two cards from the one stamped and heat embossed image.

scissorspapercard, Stampin' Up!, Colour Creations, Blossoms In Bloom, Many Layered Blossoms Dies, Stitched Rectangles Dies

I liked the flowers on the left, so I flipped the second card front to keep the flowers in my preferred position. One big hint is to lay the outline die cut over the stamp before stamping using the Stamparatus.  The die cut extends beyond the stamped image, so you get a much better idea of the proportions by also including the die in the planning stage.

scissorspapercard, Stampin' Up!, Colour Creations, Blossoms In Bloom, Many Layered Blossoms Dies, Stitched Rectangles Dies

My first attempt at the card was messed up because I forgot to put the foam mat back into my Stamparatus. Parts of the image didn't emboss fully, and I nearly chucked it in the bin. Then I realised that I could use the parts of it that did stamp nicely on the inside of my card. I just used my snips to trim around the outside of the black border and adhered it to the inside of the card.

You can find the links for the rest of this week's cards over on the lovely Catherine's blog. I can't wait to see what the rest of the ladies have made!

Bye for now,

Tina

Sunday, 10 January 2021

CTC #300: CASE Any Mini Catalogue Project

 Hi!


Thanks for joining me for the newest CASEing The Catty Sunday Challenge Blog Hop. This week Bec has set the challenge for us to CASE any project from the new January-June Mini Catalogue. There's over 90 pages of delightful inspiration to choose from!


Have you guessed yet? Yep, I started my flicking from the back of the catalogue 😂. It wasn't long until I found this beauty on page 88.


I loved the way the card layered two patterns - DSP and a stamped DSP layer. A also adored the layering around  the sentiment and the focal bloom. I think it's a hydrangea? LOL, I am soooo not a gardener! I don't have any of the products used in the catalogue card, so I had to get inventive.

scissorspapercard, Stampin' Up!, CASEing The Catty, Dandy Garden DSP, Seaside Notions, Dragonflies Punch, Banners Pick A Punch

I had some Dandy Garden bits and pieces floating around on my desk, so I decided that they would work nicely for this card. I used two pieces of the DSP for my background, layered on a Calypso Coral card base. I changed the layers from the original by making them smaller and gluing each one at an angle.

scissorspapercard, Stampin' Up!, CASEing The Catty, Dandy Garden DSP, Seaside Notions, Dragonflies Punch, Banners Pick A Punch

The Coral dragonfly was punched from another piece of the DSP, I layered him over a piece of Seaside Spray cardstock that I'd stamped the sentiment on in Misty Moonlight ink. I punched the piece using my Banners Pick A Punch, which I was excited to see was a carry over product. Yay! A length of white ribbon from the Flowers For Every Season combo pack, some more Calypso card and a circle of Vellum completed the front of the card.

scissorspapercard, Stampin' Up!, CASEing The Catty, Dandy Garden DSP, Seaside Notions, Dragonflies Punch, Banners Pick A Punch

I finished off the inside with another strip of DSP to match the front. It's one of my favourite pieces from the DSP pack. The sentiment is from Seaside Notions, as is the one on the front. 

That's all from me for tonight, but now it's your turn to get creative! Make your card and upload it into our Facebook group to be in the running!


Before you dash off, though, please do finish our Blog Hop! Next up is the wonderful Rose! I wonder which card she's CASEd tonight?


Bye for now,

Tina

Wednesday, 6 January 2021

Colour Creations: Night Of Navy

 Hi!


Welcome back to the Colour Creations Creative Showcase for 2021. We are continuing our alphabetical tour through the Stampin' Up! colour range, resuming with Night Of Navy. It's a lovely dark blue, with purple undertones, and is a part of the Neutrals family.

scissorspapercard, Stampin' Up!, Colour Creations, Creative Showcase, Pretty Perennials, Joy To The World, Perennial Petals Dies, Painted Labels Dies

I had yet to play with any of my new catalogue goodies, so I pulled out the Pretty Perennials Bundle for my card. I was keen to see how the flowers would go with the blue and white colour scheme - and I love it! I stamped the three watercolourish flowers on the front of my card in Night Of Navy ink and layered it over a Night Of Navy base.

scissorspapercard, Stampin' Up!, Colour Creations, Creative Showcase, Pretty Perennials, Joy To The World, Perennial Petals Dies, Painted Labels Dies

The sentiment label is from the Painted Labels dies, with the Silver Foil layer hand-cut to match the corner notches. I also cut the leaf spray from the Perennial Petals Dies from Silver Foil. The full die cut is to the left of the label, with just a single leaf to the bottom right.

scissorspapercard, Stampin' Up!, Colour Creations, Creative Showcase, Pretty Perennials, Joy To The World, Perennial Petals Dies, Painted Labels Dies

A few more flowers were stamped on the inside to finish off the card. Do you recognise the sentiment? I used it a *lot* at the end of last year! I was very excited to realise that the font in Pretty Perennials nearly perfectly matches the font in the Joy To The World Paper Pumpkin kit stamp set. Yay!

scissorspapercard, Stampin' Up!, Colour Creations, Creative Showcase, Pretty Perennials, Joy To The World, Perennial Petals Dies, Painted Labels Dies

I simply masked off the word 'Christmas' before stamping the sentiment. The single word 'Birthday' fits in the gap perfectly. I'm so excited to realise that the sentiment works equally as well for Birthdays as it does for Christmas! If you missed it last year, the Joy Of Christmas Paper Pumpkin kit is still available 😉

Thanks for joining me tonight, please head on over to the very lovely Catherine's blog, where you'll find the rest of this week's Night Of Navy links.

Bye for now,

Tina

Sunday, 3 January 2021

CTC #299: Step Up An Annual Catalogue Project

 Hi!


Welcome back to CASEing The Catty Sunday Challenges for 2021! This year we are kicking off by asking you to CASE any project from the current Annual Catalogue. Hmmm, which one to pick?


As always, I started at the back and only got as far as the Punch Bundles section before I found this beauty.


I loved the simple stamped grass and flowers, and the sweet dragonflies in the background. I don't have this bundle, but the Friend Like You bundle is a very good alternative, especially as I needed to Step Up the card.

scissorspapercard, Stampin' Up!, CASEing The Catty, Friend Like You, Itty Bitty Birthdays, Friendly Silhouettes Dies

I stepped up the stamping by using a die cut instead. This die from the Friendly Silhouettes Dies was perfect! I cropped some Watercolour Paper and then used my ink pads and a Water Brush to colour the diecut. I realised after I'd glued it down that I should have flipped it and coloured the other side so that I didn't have to flip the layout of the whole card, but I think that this layout works too.

scissorspapercard, Stampin' Up!, CASEing The Catty, Friend Like You, Itty Bitty Birthdays, Friendly Silhouettes Dies

I continued to Step Up the card by adding a few layers, heat embossing in Silver rather than White, adding some Silver Foil paper and a few Rhinestones.

scissorspapercard, Stampin' Up!, CASEing The Catty, Friend Like You, Itty Bitty Birthdays, Friendly Silhouettes Dies

I watercoloured another little section of the die to use the inside. It finishes off the card nicely, don't you think? I couldn't resist adding a few more dragonflies too!

Our challenge is run through our Facebook group, so once you've joined the group all you need to do is add a photo of your card to the group before the challenge deadline on Sunday evening. Easy!


Before you dash off to get creating, please do finish our Blog Hop! Next up is my fellow South Aussie, the wonderful Michelle. Hmm, I wonder which card she chose to CASE?

Bye for now,

Tina