Pages

Wednesday, 15 July 2020

Colour Creations: Cajun Craze

Hi!


Wowee, it's Wednesday evening already! The school holidays are flying by! Thankfully I've had lots of time for crafting and even sewing while the kids are home. Speaking of crafting, this week the Colour Creations Showcase is featuring a colour that we all find difficult to use - Cajun Craze. For a long time it kind of sat out there, all on it's own in the colour range, a little unloved. Now we have Terracotta Tile and Cinnamon Cider as fabulous companions. I decided to play with just Cajun Craze tonight, though. 

scissorspapercard, Stampin' Up!, Colour Creations, Celebrate Sunflowers, Subtle 3DEF, Seaside Notions, Masking

I stared with a piece of Very Vanilla card, and masked off the stripe along the bottom. I then used my sponge brayer to lay dow the Cajun Craze ink. While it was still masked, I stamped the larger leaf from Celebrate Sunflowers along the strip, leaving space for the two leaves that extend beyond the stripe. I had to lay the sentiment stamp on the card so that I knew exactly where the top leaf would go!

scissorspapercard, Stampin' Up!, Colour Creations, Celebrate Sunflowers, Subtle 3DEF, Seaside Notions, Masking

I used my Stamparatus to stamp the sentiment with Memento ink. It needed to be as straight as I could make it, and the Stamparatus is the perfect tool to achieve it. Finally, I ran the whole piece through my Big Shot using the Subtle 3DEF, and then popped it up over a VV card base.

scissorspapercard, Stampin' Up!, Colour Creations, Celebrate Sunflowers, Subtle 3DEF, Seaside Notions, Masking

I repeated the process for the inside, except that the stripe ran along the very bottom of the card. This was actually my second go, as I got a bit too enthusiastic with the sponge brayer on the first try, and ended up with ink going over the other edge of the masking tape. Oops! Thankfully, I could just flip the cardstock over and use the reverse side.

Thanks for joining me again tonight. Please head on over to Catherine's blog to see the rest of this week's Cajun Craze cards. I can't wait to see what everyone has made with this colour.

Bye for now,

Tina

Sunday, 12 July 2020

CTC #276: CASE The Animals

Hi!


Thanks for joining me once again for the new CASEing The Catty Sunday Challenge Blog Hop. This week we are CASEing the Animals of the Annual Catalogue. There are so many to choose from! All you need to do is choose a project that features an animal in some way and CASE it. There is DSP, stamp sets, dies and punches that all feature animals. I think that the hardest part will be narrowing it down to one.


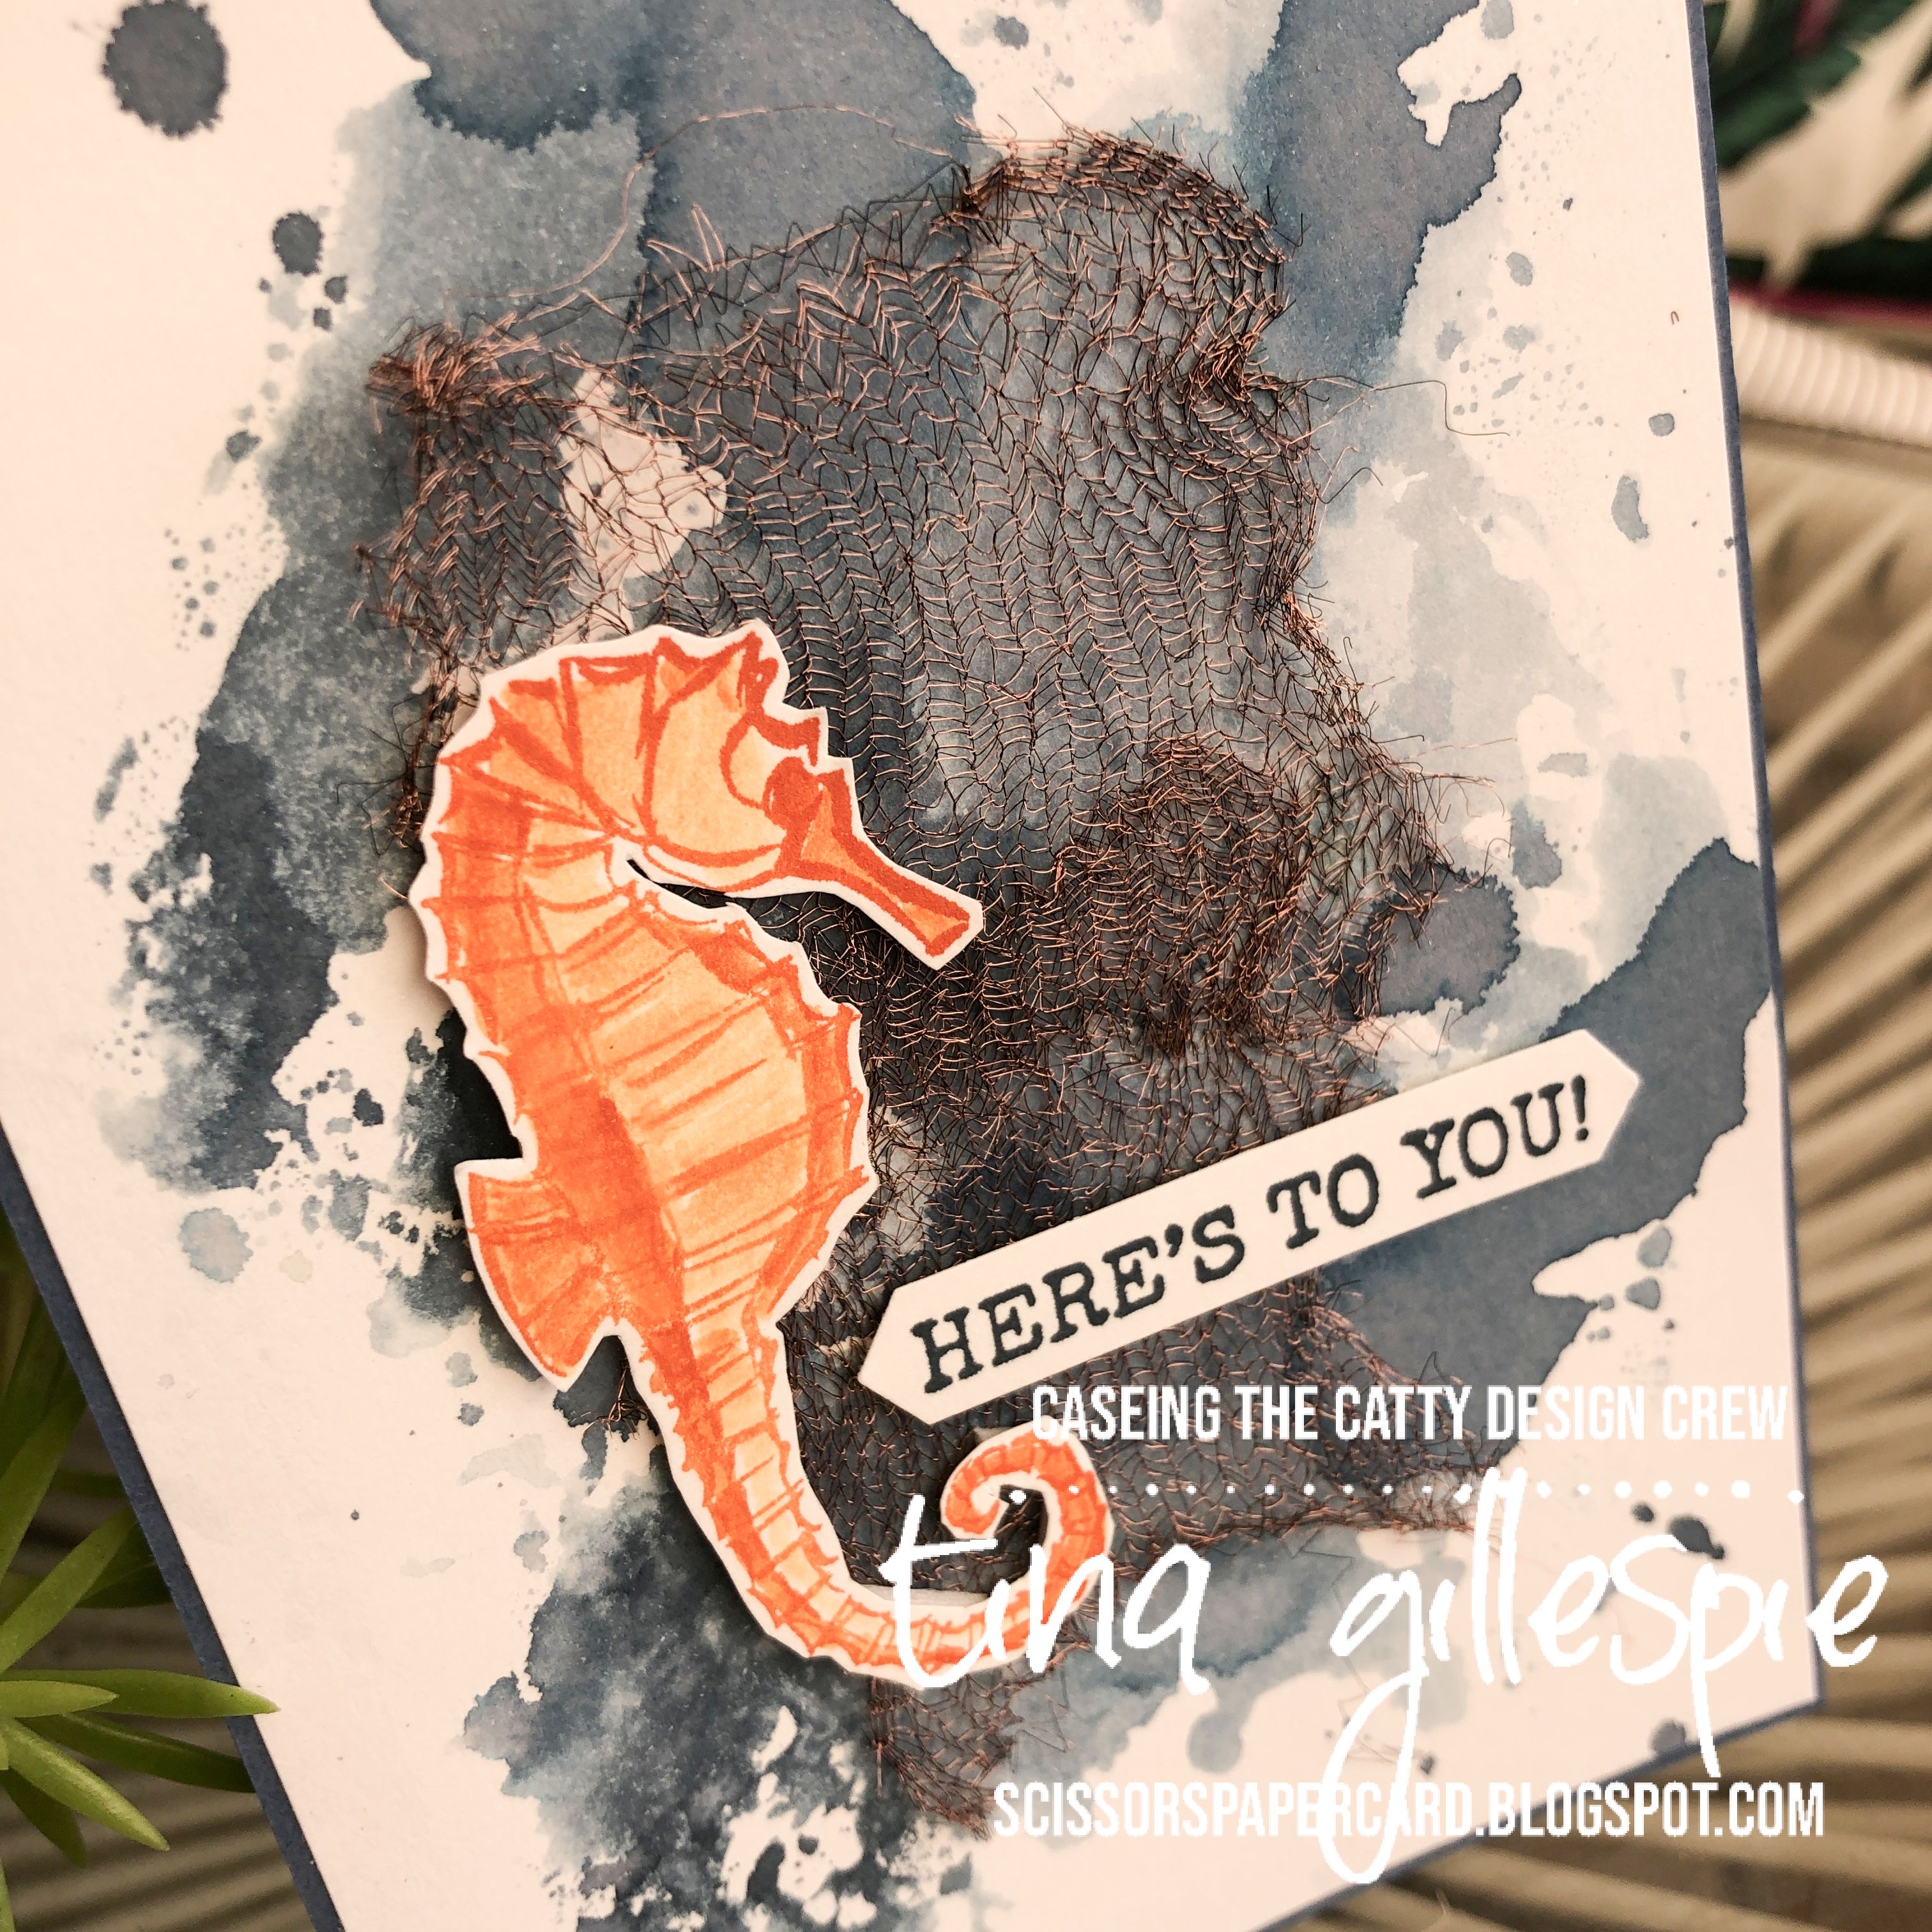
Flicking through the back of the catalogue, I came across this cute card featuring the Whale Done stamp set and punch bundle. I don't have either, but it did make me think about what I could make with another underwater animal, the seahorse in Seaside Notions.


I started by creating my background. The stamped hearts on the original card are cute, but it's been a while since I've made a smooshed background, so I decided to do that again. I love how it looks a bit like water.

scissorspapercard, Stampin' Up!, CASEing The Catty, Seaside Notions, Smooshing

I had intended to use a mix of blues and greens, but I started with Misty Moonlight and liked it enough on it's own so I stopped. There's touches of purple and grey in the colour that are quite pretty.

scissorspapercard, Stampin' Up!, CASEing The Catty, Seaside Notions, Smooshing

The next layer on the original card is vellum. I tried a bit of that, but didn't like how much of my smooshing it covered. My retired Copper Trim was the next logical choice. I snipped it open and spread it out so that it looks like a net before adhering it to the card base. I used Fine Tip glue, which is a strong, but invisible, hold. Finally, I finished the front with a Pumpkin Pie seahorse. I used a Blender Pen to colour him by picking up ink from the lid of my inkpad.

scissorspapercard, Stampin' Up!, CASEing The Catty, Seaside Notions, Smooshing

My inside seahorse was coloured the same way, however, she was first stamped in Misty Moonlight ink. I'm not sure which version I prefer - how about you?

Our Challenge is run through our Facebook group. It's where you upload a photograph of your card for each week's challenge. It's so easy to do - I'd love to see you give it a try. No blog necessary!


Time now to head on over to the lovely Rebecca's blog, where she's used another 'old favourite' stamp set.


Bye for now,

Tina

Thursday, 9 July 2020

JAI #513: Just Add Two

Hi!


Just Add Ink time means that it's nearly the weekend. Woo Hoo! This week Di has challenged us to Choose Two of Flowers, Trees and Texture to add to our cards. Hmmm, what to choose?


When I first started thinking about what I was going to make for this challenge, I had ideas of stencilling some trees, both with ink and Texture Paste. As it always seems to be lately, time got away from me and I had to adjust my plans. I still stuck with trees and texture, but I opted to colour my images.

scissorspapercard, Stampin' Up!, My Favorite Things, Just Add Ink, Sun-Lovin' Santa, Tropical Oasis DSP, Copic Markers, Subtle 3DEF

I used a cute stamp set I purchased a while ago when I was wanting a more Summery Christmas stamp set. It's from My Favorite Things and is called Sun-Lovin' Santa. Palm trees are probably not your first thought when you think of trees, but you really can't have a sun-lovin' Santa without a palm tree. I coloured both images with my Copics, using bright colours. I sort of imagined Santa as being a fan of crazy colour/pattern combos when it comes to his vacation wardrobe!

scissorspapercard, Stampin' Up!, My Favorite Things, Just Add Ink, Sun-Lovin' Santa, Tropical Oasis DSP, Copic Markers, Subtle 3DEF

The texture part of my card is the background. I used the Subtle 3DEF to emboss a large Whisper White oval and then, using Blending Brushes, applied So Saffron, Pacific Point and Balmy Blue ink to represent the beach, the ocean and the sky. It gives a really cool effect, I think!

scissorspapercard, Stampin' Up!, My Favorite Things, Just Add Ink, Sun-Lovin' Santa, Tropical Oasis DSP, Copic Markers, Subtle 3DEF

I used the same palm tree image on the inside, but added some gifts so that it becomes a Christmas Tree. I'm looking forward to making more Christmas cards with this stamp set, as it also has a flamingo and a Combi van, all decked out for Christmas in the sun.

It's time now to head on over to the Just Add Ink blog, where you can see the rest of this week's Design Team cards. You can also link your card for the challenge, once you've decided which two of Flowers, Texture and Trees you will use.

Bye for now,

Tina

Wednesday, 8 July 2020

Colour Creations: Bumblebee

Hi!


Thanks for joining me once again for the new week of the Colour Creations Showcase. This week we are up to Bumblebee, the first of our new In Colours. It's been around for a little longer than the other new In Colours, as we got access to it with the early release of the Ornate Garden suite. It's what I'd call a dirty yellow - maybe dusty yellow is a nicer description though!

scissorspapercard, Stampin' Up!, Colour Creations, Friend Like You, Well Said, Friendly Silhouettes Dies, Subtle 3DEF, Layering Ovals Dies

I started this week's card by sponging some Bumblebee ink onto a piece of Whisper White cardstock, making it darker at the bottom and lighter at the top. I then stamped some of the reeds from Friend Like You on either side of the sponging, followed by some dragonflies.

scissorspapercard, Stampin' Up!, Colour Creations, Friend Like You, Well Said, Friendly Silhouettes Dies, Subtle 3DEF, Layering Ovals Dies

To create the top layer, I die cut an oval window into the cardstock and then embossed it with my Subtle 3DEF. I used the reeds die from the Friendly Silhouettes Dies to crop a piece of Basic Black card, which was adhered to the back of the window. The whole piece was popped up over the sponged piece. The sentiment panel and a couple of popped up dragonflies (thank you Foam Adhesive Sheets!) finished off the front.

scissorspapercard, Stampin' Up!, Colour Creations, Friend Like You, Well Said, Friendly Silhouettes Dies, Subtle 3DEF, Layering Ovals Dies

I created a similar scene on the inside by sponging and stamping before adhering the die cut over the top. I quite like the look of the dragonflies flitting among the reeds! Hopefully the Bumblebee sky looks a little like a sunset.

Please head on over the Catherine's blog, where you can find the rest of the links for this week's Showcase. I'm looking forward to seeing what everyone has done with Bumblebee, as it's a colour I haven't really used yet.

Bye for now,

Tina

Sunday, 5 July 2020

CTC #275: CASE A Sketch

Hi!


Woo Hoo for Sunday, and tomorrow being school holidays! My kids are old enough to entertain themselves a lot of the time, which means more crafting time for me. My biggest goal is to complete the back of the quilt I'm making for Mr 17 so that I can finally send it off to be quilted.


Tonight though, I have some papercrafting for you. This week the CASEing The Catty Crew are all CASEing a sketch, based on a card from page 130 of the Annual Catalogue. I quite like this sketch - there's lots of room for interpretation.

I have had my Stitched Stars on my mind, ever since playing with them for last week's CTC card. I decided to play to see if I could use the stars to make the shape of a sun. What do you think?

scissorspapercard, Stampin' Up!, CASEing The Catty, Under My Umbrella, Stitched Stars Dies, Stitched Shapes Dies, Subtles DSP

I cropped three of the third largest stars from Daffodil Delight cardstock and then adhered them together, finishing with the smallest Stitched Shapes Circle. I think it makes a fabulous sun! The sentiment is from Under My Umbrella. I used some washi to mask off parts of the sentiment so that I could get it they way I wanted it - the stamp has the 'hello' on top of the 'sunshine'. I used a scattering of sequins to help hide the adhesive under the vellum layer. It's a great trick!

scissorspapercard, Stampin' Up!, CASEing The Catty, Under My Umbrella, Stitched Stars Dies, Stitched Shapes Dies, Subtles DSP

Did you notice the sponged clouds? I watched a video several months ago, in which Paula Dobson showed how to create the clouds. I used the retired Rainbow Builder Dies to create a mask from a piece of Window Sheet. I then just laid the sheet over the Whisper White cardstock and used a blending brush to add a little Balmy Blue ink along the edge of the mask. I repeated this down the length of the card. Such a cool effect, I will certainly be trying this again!

scissorspapercard, Stampin' Up!, CASEing The Catty, Under My Umbrella, Stitched Stars Dies, Stitched Shapes Dies, Subtles DSP

I used the same sponging technique again on the inside of the card to go with the second sun. One tip for the cloud mask - flip it over to get a different cloud line - just make sure you wipe off any remaining ink first!

That's all from me tonight. To participate in our challenge, all you need to do is join our Facebook group and post a photo of the card you've made for the challenge. Easy!


For now, though, it's time to head on over to see what the lovely Julia has made. She has 'delivered' a gorgeous, floral card 😉


Bye for now,

Tina

Thursday, 2 July 2020

JAI #512: Just Add A Sketch

Hi!


Yay, it's Friday, and the last day of term for my kids. Two weeks of holidays coming up, even my hubby who is having a well earned break from his work. Hehehe, little do they all know that I've started compiling a 'to-do' list of things that need to be done. Don't worry, there's some fun stuff on the list too!


This week at Just Add Ink we have a sketch challenge for you, and it's one designed by me! It's a fun one, with a few angles to play with. I toyed with the idea of doing a herringbone style background, but in the end I pulled out a pop culture stamp set that I've had for a while but hadn't yet seen ink. It's called Eat Your Heart Out, and is from Ink Road Stamps.

scissorspapercard, Stampin' Up!, Ink Road Stamps, Eat Your Heart Out, SSS Double Stitched Rectangle Dies

LOL, it shouldn't be too hard to work out which movie it references! I started by cutting a card front in Whisper White, Melon Mambo and Basic Black. Here's where I went wrong: I stacked them and used my guillotine to cut through all three layers at once. This way they are all the same shape and should fit back together easily when you mix and match the colours. My mistake? I should have stamped them first, before cutting! Oh well.

scissorspapercard, Stampin' Up!, Ink Road Stamps, Eat Your Heart Out, SSS Double Stitched Rectangle Dies

The rest of the plan worked perfectly - the pieces fit together very well. I glued them onto a piece of copy paper cut to card front size. I now have three card fronts, so I will have to play with the other two over the weekend and make them into cards. I cropped this front with my largest Stitched Rectangle Die and mounted it on my very last Silver Foil card. Sob! I will miss those cards - very handy when you need a silver foil border.

scissorspapercard, Stampin' Up!, Ink Road Stamps, Eat Your Heart Out, SSS Double Stitched Rectangle Dies

How fun is this hairdo of one of the main characters in the movie? I'm not sure what this style of artwork is called, but it's very cool. You'll notice that this card doesn't have a 'happy birthday' in sight. I'm not sure yet what I'll use it for, but it could be for nearly anything!

That's a wrap from me, I might go and watch the movie (and sequel!) now. You can head on over to the Just Add Ink blog, where you can see the rest of this week's Design Team cards inspired by my sketch. You can also link up your card for our challenge. Can't wait to see what you make!

Bye for now,

Tina

Wednesday, 1 July 2020

Colour Creations: Blushing Bride

Hi!


Thanks for joining me once again for the new Colour Creations Showcase. This week we are looking at the second Subtle on the alphabetical list of colours - Blushing Bride. It's a soft pink, that I'd describe as dusty pink. What about you?

scissorspapercard, Stampin' Up!, Colour Creations, Stitched be Mine Dies, Well Written Dies, Subtle 3DEF, Shimmer Paint

I recently purchased the Be Mine Stitched Dies, mostly because they were the old style dies and were fairly heavily discounted. I don't make many hearts cards, but they are handy to have on the odd occasion that I really need them. Blushing Bride week seemed to be a good week to crack them open for the second time. The connected hearts die that I've used was the die that appeals to me most in the set. I cut it four times from Blushing Bride cardstock and then glued them together in a stack. I'd originally planned to sponge some Blushing Bride ink on Whisper White card and lay the hearts over the top, but at the last minute I changed my mind.

scissorspapercard, Stampin' Up!, Colour Creations, Stitched be Mine Dies, Well Written Dies, Subtle 3DEF, Shimmer Paint

I used some gorgeous Frost White Shimmer Paint on a layer of Subtle embossed Blushing Bride card instead. It looks so pretty in real life, but is very hard to photograph! I used some Whisper White backed with an adhesive sheet to cut the word 'love' from the Well Written dies. There was a bit of card left over, so I cropped a few little hearts from the WW and inset them in the linked hearts.

scissorspapercard, Stampin' Up!, Colour Creations, Stitched be Mine Dies, Well Written Dies, Subtle 3DEF, Shimmer Paint

I purposely let the inside without a sentiment, as it's a more versatile card that way. I cut the linked hearts once again from Blushing Bride, but this time I left the hearts intact. I already had a million of them left over from the front, and I liked the way that it looked with the hearts still in place.

That's all from me this week! Time now to pop on over to Catherine's blog to see what the rest of the team have got up with with Blushing Bride.

Bye for now,

Tina