Hi!
Welcome to a new week's challenge at Just Add Ink. This week it's one of my alphabet challenges, this time using the letter K. It took a bit of thinking to work out what I was going to do. Ideas I came up with and discarded were a kaleidoscope card, a kite card and the kangaroo from Animal Outing. I just wasn't happy with any of them - but there's a list of ideas for you!
In the end I used a stamp set from Kindred Stamps for my K element. Kindred does some fantastic pop culture sets. This card was made a few weeks ago for my kids to give to my hubby for Father's Day. It snuck up on me this year - I thought it was a week later than it actually was. Oops! Luckily for my pop culture loving hubby, I had just the right stamps.
There's a little bit of a not-so-secret K on this card, and if you're scratching your head at the sentiment, then you probably wouldn't get the K reference either. The character this stamp set is based on is from a very famous movie franchise, and he, very shockingly, kills his father. Don't worry if you didn't get it, my hubby and kids did, so that's what really matters I guess!
The background was done with Brushos on some retired Naturals Ivory cardstock. It handles the water very well without warping too much. I used some of the blue and yellow powders. Once is dried I heat embossed a Neat & Tangled stamp called Time Warp over the top using Silver Embossing powder. It's such a cool, spacey looking background, don't you think?
Maybe the image on the inside will help you to work out which movie franchise the character is from? How awesome is the Labeler Alphabet stamp set for creating custom sentiments? It's a bit of extra work, but the results are worth it.
What K ideas do you have for this week's challenge? You can see what the rest of the team did this week over at the Just Add Ink blog. Don't forget to link up your card when you're done!
Bye for now,
Tina
Thursday, 20 September 2018
AWH September Blog Hop: Holiday Catalogue
Hi!
Tonight the Art With Heart team are sharing creative projects featuring products from the Holiday Catalogue. We hope our Blog Hop inspires you to get creative and make some fabulous Christmas creations. If you would like a copy of the Holiday Catalogue, contact any of the girls on the blog hop and we will get in touch with you.
One of my absolute favourite products from the Holiday Catalogue is the super cute Santa's Workshop SDSP. You've probably seen it a lot on my blog if you're a regular visitor!
I've fussy cut a Santa from the paper and layered him on some of my circle dies. What do you think about using black on a Christmas card? I don't usually, but I think it works well with this paper.
Are you thinking - where did the 'joy' die cut come from? It's actually the 'you' from the Celebrate You Thinlits with a bit trimmed off and adhered to the card flipped over. You may also have noticed that Santa is popped up off of the circles. I didn't use Dimensionals, rather I made a spring to go underneath so that Santa wobbles when he's given a bit of a shake. I love the effect - it looks like he's laughing!
Isn't that soooo cute? I used Bibi Cameron's YouTube video to learn how to make the springs. I wound my wire around the white neck of the scoring tool part of the Take Your Pick, so it was quite a thick coil.
I fussy cut another piece of the same DSP to go on the inside. If you don't mind a bit of fussy cutting, this DSP is fabulous for easy Christmas cards.
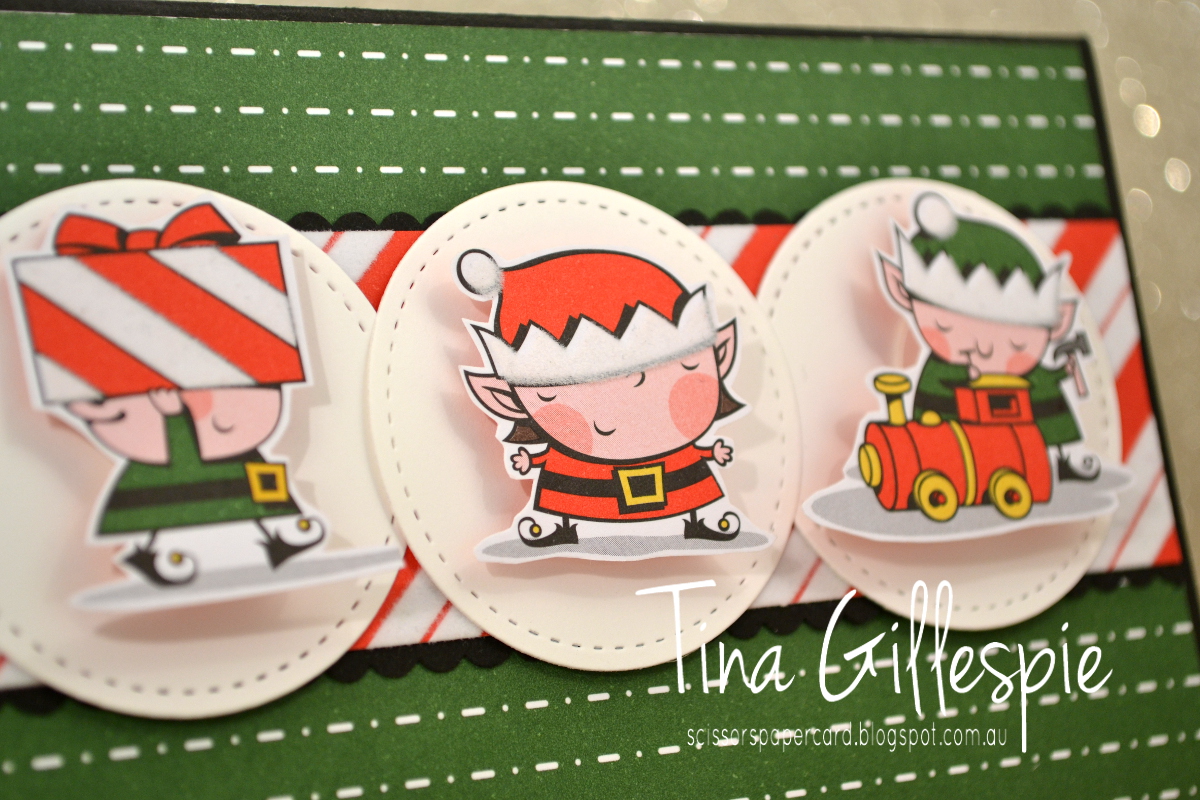
Because I had so much fun with the spring on the first card, I decided to make a second using them too. I couldn't resist bringing the cheeky elves to life!
Each one has a little spring behind him, which was made by winding the wire around the metal part of the scoring tool on my Take Your Pick. Because the springs are smaller there's not as much movement as there is with Santa, but it's still a fun effect. I think there are some children in my family who are going to LOVE these cards when I send them!
Well, that's it for me. Have you enjoyed my fun cards? I'm sure you'll love the card Ros Davidson has made for the Hop!
One of my absolute favourite products from the Holiday Catalogue is the super cute Santa's Workshop SDSP. You've probably seen it a lot on my blog if you're a regular visitor!
I've fussy cut a Santa from the paper and layered him on some of my circle dies. What do you think about using black on a Christmas card? I don't usually, but I think it works well with this paper.
Are you thinking - where did the 'joy' die cut come from? It's actually the 'you' from the Celebrate You Thinlits with a bit trimmed off and adhered to the card flipped over. You may also have noticed that Santa is popped up off of the circles. I didn't use Dimensionals, rather I made a spring to go underneath so that Santa wobbles when he's given a bit of a shake. I love the effect - it looks like he's laughing!
I fussy cut another piece of the same DSP to go on the inside. If you don't mind a bit of fussy cutting, this DSP is fabulous for easy Christmas cards.
Because I had so much fun with the spring on the first card, I decided to make a second using them too. I couldn't resist bringing the cheeky elves to life!
Each one has a little spring behind him, which was made by winding the wire around the metal part of the scoring tool on my Take Your Pick. Because the springs are smaller there's not as much movement as there is with Santa, but it's still a fun effect. I think there are some children in my family who are going to LOVE these cards when I send them!
Well, that's it for me. Have you enjoyed my fun cards? I'm sure you'll love the card Ros Davidson has made for the Hop!
If you find a broken link or have come to this blog hop from a different entry point, you can view the participants below:
Caroline Manwaring
Sharon Davern
Tina Gillespie
Ros Davidson
Caroline Manwaring
Sharon Davern
Tina Gillespie
Ros Davidson
Bye for now,
Tina
Wednesday, 19 September 2018
Dashing Away With Christmas Traditions
Hi!
Welcome to the newest Heart Of Christmas Blog Share.
On today's card I have paired the Dashing Along DSP (free this month with a $400 order!) with a stamp from the Christmas Traditions tin in the Holiday Catalogue.
I've actually had the base of this card sitting on my desk for nearly a month. I made the piece with the Dashing Along DSP, attached it to the card base and then got stuck. I just couldn't work out how to finish it off with a sentiment. Nothing really worked over the background. As a last ditch effort before I tossed the card, I tried the Christmas Traditions tin stamp set. Bingo!
The tricky part though, was making such a small stamp stand out on the front and not get lost. The answer was layers! I'd seen somewhere on Facebook the idea of layering the punch with the Pretty Label punch, but it still wasn't quite enough. I punched another Christmas Traditions punch in Cherry Cobbler and trimmed it to matt the circle part of the WW layer. I next added the doily to complete the layering and then completed the whole piece with a couple of the new Frosted Epoxy Droplets, which you can find in the Holiday Catalogue.
Phew! Saved from the bin!
You can imagine that I just wanted this card done by now, so I kept the inside super simple. Gotta Ove those big sentiments that do all of the work for you! This one is from Merry Christmas To All, which is another great bundle from the Holiday Catalogue,
You can see the rest of this week's cards over on Claire's blog. You're bound to be inspired to start your Christmas cards if you haven't already. Or maybe to pin the ideas for later use.
Bye for now,
Tina
Welcome to the newest Heart Of Christmas Blog Share.
On today's card I have paired the Dashing Along DSP (free this month with a $400 order!) with a stamp from the Christmas Traditions tin in the Holiday Catalogue.
I've actually had the base of this card sitting on my desk for nearly a month. I made the piece with the Dashing Along DSP, attached it to the card base and then got stuck. I just couldn't work out how to finish it off with a sentiment. Nothing really worked over the background. As a last ditch effort before I tossed the card, I tried the Christmas Traditions tin stamp set. Bingo!
The tricky part though, was making such a small stamp stand out on the front and not get lost. The answer was layers! I'd seen somewhere on Facebook the idea of layering the punch with the Pretty Label punch, but it still wasn't quite enough. I punched another Christmas Traditions punch in Cherry Cobbler and trimmed it to matt the circle part of the WW layer. I next added the doily to complete the layering and then completed the whole piece with a couple of the new Frosted Epoxy Droplets, which you can find in the Holiday Catalogue.
Phew! Saved from the bin!
You can imagine that I just wanted this card done by now, so I kept the inside super simple. Gotta Ove those big sentiments that do all of the work for you! This one is from Merry Christmas To All, which is another great bundle from the Holiday Catalogue,
You can see the rest of this week's cards over on Claire's blog. You're bound to be inspired to start your Christmas cards if you haven't already. Or maybe to pin the ideas for later use.
Bye for now,
Tina
Tuesday, 18 September 2018
The Early Bird Catches The Espresso
Hi!
Welcome to the new Colour Creations Blog Share.
This week we are all using Early Espresso on our cards. It's a rich brown that works fabulously as an alternative to Basic Black when you're wanting a dark neutral colour. It took me a little while to warm to Early Espresso when it first came out - I was a Chocolate Chip girl - but now it's a colour I use a lot.
For my card today I've paired it with Grapefruit Grove and Very Vanilla. I recently purchased the Botanical Tags Thinlits, and thought that they'd look great as a silhouette effect on my card.
It might be a little difficult to see, but I've painted the two birds and the word 'amazing' with a layer of Wink Of Stella. Can you see the new Tin Tile Dynamic Textured Impressions Embossing Folder on my card? It's so pretty!
Again, it's difficult to see in the photo, but instead of using Very Vanilla cardstock on my card I've actually used a sheet of DSP from the Petal Promenade DSP pack. It's got a very subtle pattern that's perfect for stamping on. Can you see the swirls through the paper on the inside of my card? I also used it under the sentiments on the front of the card. It's a quick and easy way of creating a subtle effect on a card.
You can see the rest of this week's cards over at Catherine's Blog. Now I'm off to get stuck into making next week's card.
Bye for now,
Tina
Welcome to the new Colour Creations Blog Share.
This week we are all using Early Espresso on our cards. It's a rich brown that works fabulously as an alternative to Basic Black when you're wanting a dark neutral colour. It took me a little while to warm to Early Espresso when it first came out - I was a Chocolate Chip girl - but now it's a colour I use a lot.
For my card today I've paired it with Grapefruit Grove and Very Vanilla. I recently purchased the Botanical Tags Thinlits, and thought that they'd look great as a silhouette effect on my card.
It might be a little difficult to see, but I've painted the two birds and the word 'amazing' with a layer of Wink Of Stella. Can you see the new Tin Tile Dynamic Textured Impressions Embossing Folder on my card? It's so pretty!
Again, it's difficult to see in the photo, but instead of using Very Vanilla cardstock on my card I've actually used a sheet of DSP from the Petal Promenade DSP pack. It's got a very subtle pattern that's perfect for stamping on. Can you see the swirls through the paper on the inside of my card? I also used it under the sentiments on the front of the card. It's a quick and easy way of creating a subtle effect on a card.
You can see the rest of this week's cards over at Catherine's Blog. Now I'm off to get stuck into making next week's card.
Bye for now,
Tina
Monday, 17 September 2018
A Little More Smooshing
Hi!
OK, OK, one more smooshing card! This one was made as a class sample to try out the technique. I kept it simple - just one colour - so that my ladies could get the hang of the technique.
I ove the way that the background looks like it's got water splashed all over. It turned out much better than I'd hoped! I used Pacific Point ink as it's a nice mid-blue from our colour range.
I paired the Pacific Point with Night Of Navy, Daffodil Delight and Real Red for a more masculine feel to the card.
Have you tried smooshing yet? Surely I've inspired you with all of the fun cards I've made!
Bye for now,
Tina
OK, OK, one more smooshing card! This one was made as a class sample to try out the technique. I kept it simple - just one colour - so that my ladies could get the hang of the technique.
I ove the way that the background looks like it's got water splashed all over. It turned out much better than I'd hoped! I used Pacific Point ink as it's a nice mid-blue from our colour range.
I paired the Pacific Point with Night Of Navy, Daffodil Delight and Real Red for a more masculine feel to the card.
Have you tried smooshing yet? Surely I've inspired you with all of the fun cards I've made!
Bye for now,
Tina
Labels:
Big Shot,
Bottles & Bubbles Framelits,
Bubble Over,
Technique
Thursday, 13 September 2018
JAI #426: Just Add A Sketch
Hi!
Hooray for Friday!
This week at Just Add Ink we have a fabulous sketch challenge, designed by Kim. I love this one, because there's so much scope to play.
When I sat down to make a card for this challenge I'd just received my Holiday Catalogue preorder, which included the super cute Santa's Workshop SDSP. It's a Specialty DSP because it has flocking on some of the sheets.
I chose the image of Santa in his sleigh. The trim on Santa's hat and the white present at the top of the pile all have flocking on them. I had better stop running my fingers over it, or there'll be none left by Christmas!
The sentiment is also a new stamp set called Merry Christmas To All. It comes with matching dies and I'm sure you'll see a lot more of it on my blog!
I fussy cut Mrs Claus from another piece of DSP from the Santa's Workshop pack. Her apron is also flocked - it's such a fun element to the paper!
The rest of the Design Team have used this sketch so creatively! You can see their cards over at the Just Add Ink blog, where you can also link up your card. I can't wait to see it!
Bye for now,
Tina
Hooray for Friday!
This week at Just Add Ink we have a fabulous sketch challenge, designed by Kim. I love this one, because there's so much scope to play.
When I sat down to make a card for this challenge I'd just received my Holiday Catalogue preorder, which included the super cute Santa's Workshop SDSP. It's a Specialty DSP because it has flocking on some of the sheets.
I chose the image of Santa in his sleigh. The trim on Santa's hat and the white present at the top of the pile all have flocking on them. I had better stop running my fingers over it, or there'll be none left by Christmas!
The sentiment is also a new stamp set called Merry Christmas To All. It comes with matching dies and I'm sure you'll see a lot more of it on my blog!
I fussy cut Mrs Claus from another piece of DSP from the Santa's Workshop pack. Her apron is also flocked - it's such a fun element to the paper!
The rest of the Design Team have used this sketch so creatively! You can see their cards over at the Just Add Ink blog, where you can also link up your card. I can't wait to see it!
Bye for now,
Tina
Wednesday, 12 September 2018
Dashing Along In Gold
Hi!
Welcome to a new week's Heart Of Christmas.
In September you can earn the Dashing Along DSP pack FREE with a qualifying order. Us lucky demonstrators got to get our hands on it a month early, and I have had a little (OK, a lot) of fun with it. I think the paper I have used on today's card is my favourite in the pack.
Isn't that design in tonal Cherry Cobbler just luscious? I layered it on a Cherry Cobbler cardstock base, as any other colour looked a bit jarring with the design I was going for. I love the look, and will certainly be doing it again!
To stretch the crafting dollar a bit further, I die cut the star from the Gold Foil layer that's under the main panel. No-one would ever know, and it's a very handy trick! I washed under the star with Cherry Cobbler ink, deliberately making the section that sits under the centre of the star a little darker.
There's more of that lovely DSP and Gold Foil on the inside. It's always worth doing your insides, it doesn't take much more effort, but it really lifts your cards to the next level.
How are you going with your Christmas cards? You can find lots of inspiration with the rest of this week's cards over at Claire's blog.
Bye for now,
Tina
Welcome to a new week's Heart Of Christmas.
In September you can earn the Dashing Along DSP pack FREE with a qualifying order. Us lucky demonstrators got to get our hands on it a month early, and I have had a little (OK, a lot) of fun with it. I think the paper I have used on today's card is my favourite in the pack.
Isn't that design in tonal Cherry Cobbler just luscious? I layered it on a Cherry Cobbler cardstock base, as any other colour looked a bit jarring with the design I was going for. I love the look, and will certainly be doing it again!
To stretch the crafting dollar a bit further, I die cut the star from the Gold Foil layer that's under the main panel. No-one would ever know, and it's a very handy trick! I washed under the star with Cherry Cobbler ink, deliberately making the section that sits under the centre of the star a little darker.
There's more of that lovely DSP and Gold Foil on the inside. It's always worth doing your insides, it doesn't take much more effort, but it really lifts your cards to the next level.
How are you going with your Christmas cards? You can find lots of inspiration with the rest of this week's cards over at Claire's blog.
Bye for now,
Tina
Subscribe to:
Posts (Atom)