Hi!
It's an Inspiration Challenge this week at Just Add Ink!
Kelly selected this fabulous photo of the flowers in a gorgeous copper jug. I struggled a bit to incorporate the copper into my card, as I don't have any of the metallic paper or embossing powder, but then I remembered I have some of the stunning new Copper Trim.
I was very excited to see the brick wall in the background of the photo, as it gave me a good excuse to break open my new Embossing Paste and Pattern Party Decorative Masks. I mixed a drop of Basic Grey reinker into the paste to get the darker colour. It's quite easy to use, and makes a great textural addition to a card.
I stamped a heap of flowers from the Jar Of Love stamp set to create a bouquet for the front of the card. I also punched two strips of the new Decorative Ribbon Border punch. I love that they look like a lacy ribbon when they are laid down back to back like I have. The overlap was hidden under the Copper Trim.
I had a few extra flowers left over, so I added a smaller bouquet to the inside. I used the new In Colour, Fresh Fig as the base of my card and the feature colour. It's a colour I'm still warming to, but I love how it pairs with Sweet Sugarplum on my flowers.
What do you take inspiration from in the photo? You can see what the rest of the team have done with it, and link your creation over at Just Add Ink. See you there!
Bye for now,
Tina
Thursday, 15 June 2017
Wednesday, 14 June 2017
Heart Of Christmas: Week 3
Hi!
Wow, can you believe it? I'm three for three with The Heart Of Christmas. I certainly didn't think I'd be this organised!
Having said that, this week I cheated a little and CASEd a card from the new Annual Catalogue. I was running a little short on time and creativity, so CASEing seemed like a good option. The original card is on page 122 of the catalogue.
I've made a few changes, including changing the card from a square base to a full sized base. I also used a larger star die cut, and stamped on the base in Crumb Cake rather than Bermuda Bay.
Here's a closer look at the star. Like the card in the catalogue, I also used one of the new Clear Faceted Gems in the centre of the star. It's a lovely, big chunk of bling to use as a feature on the card.
I received my new Decorative Ribbon Border punch on Friday, and I couldn't resist using it on my card. Can you see the cute little scalloped border at the bottom of the inside? That's it!
How's your Christmas card stash going? You can pop on over to Claire's blog to see the other cards in this week's blog share.
Bye for now,
Tina
Wow, can you believe it? I'm three for three with The Heart Of Christmas. I certainly didn't think I'd be this organised!
Having said that, this week I cheated a little and CASEd a card from the new Annual Catalogue. I was running a little short on time and creativity, so CASEing seemed like a good option. The original card is on page 122 of the catalogue.
I've made a few changes, including changing the card from a square base to a full sized base. I also used a larger star die cut, and stamped on the base in Crumb Cake rather than Bermuda Bay.
Here's a closer look at the star. Like the card in the catalogue, I also used one of the new Clear Faceted Gems in the centre of the star. It's a lovely, big chunk of bling to use as a feature on the card.
I received my new Decorative Ribbon Border punch on Friday, and I couldn't resist using it on my card. Can you see the cute little scalloped border at the bottom of the inside? That's it!
How's your Christmas card stash going? You can pop on over to Claire's blog to see the other cards in this week's blog share.
Bye for now,
Tina
Labels:
Art With Heart,
Big Shot,
Christmas,
Star Of Light,
Starlight Thinlits
Monday, 12 June 2017
Pop Of Pink Flourishes
Hi!
Today's card is one I made for one of my nieces for her recent birthday. She's a big fan of a certain AFL football club. Can you tell which one from the background DSP I used? It's a piece from the recently retired Pop Of Pink SDSP pack.
I used the Flourish Thinlits, which carried over, and also three new In Colours on the card. Yes, once again I have used my favourite Powder Pink and Berry Burst, but this time I added Lemon Lime Twist. It adds a real pop to the card I think.
Can you believe I've had these dies for a year and only ever used the flourish? It was well beyond time I used the flowers! They layer together so nicely, and the rhinestone nestles perfectly in the centre.
Did you guess which AFL team? Why it's Collingwood, of course!
Bye for now,
Tina
Today's card is one I made for one of my nieces for her recent birthday. She's a big fan of a certain AFL football club. Can you tell which one from the background DSP I used? It's a piece from the recently retired Pop Of Pink SDSP pack.
I used the Flourish Thinlits, which carried over, and also three new In Colours on the card. Yes, once again I have used my favourite Powder Pink and Berry Burst, but this time I added Lemon Lime Twist. It adds a real pop to the card I think.
Can you believe I've had these dies for a year and only ever used the flourish? It was well beyond time I used the flowers! They layer together so nicely, and the rhinestone nestles perfectly in the centre.
Did you guess which AFL team? Why it's Collingwood, of course!
Bye for now,
Tina
Saturday, 10 June 2017
Scrappy Saturday: Colour Theory
Hi!
While you've been looking at the catalogue, did you notice that Stampin' Up! now has it's own line of pocket scrapbooking products? It's called Memories And More, and I think it was a fabulous move by SU. The company is well known for coordinating products, and Memories and More allow a greater range of coordination than before.
On to my pages. This was my first layout completed with the new Colour Theory Collection. Many of the cards have a seasonal theme in this collection, and they are designed to coordinate with the Colourful Theory suite of products (page 146). I have selected some of the more generic cards for my layout though.
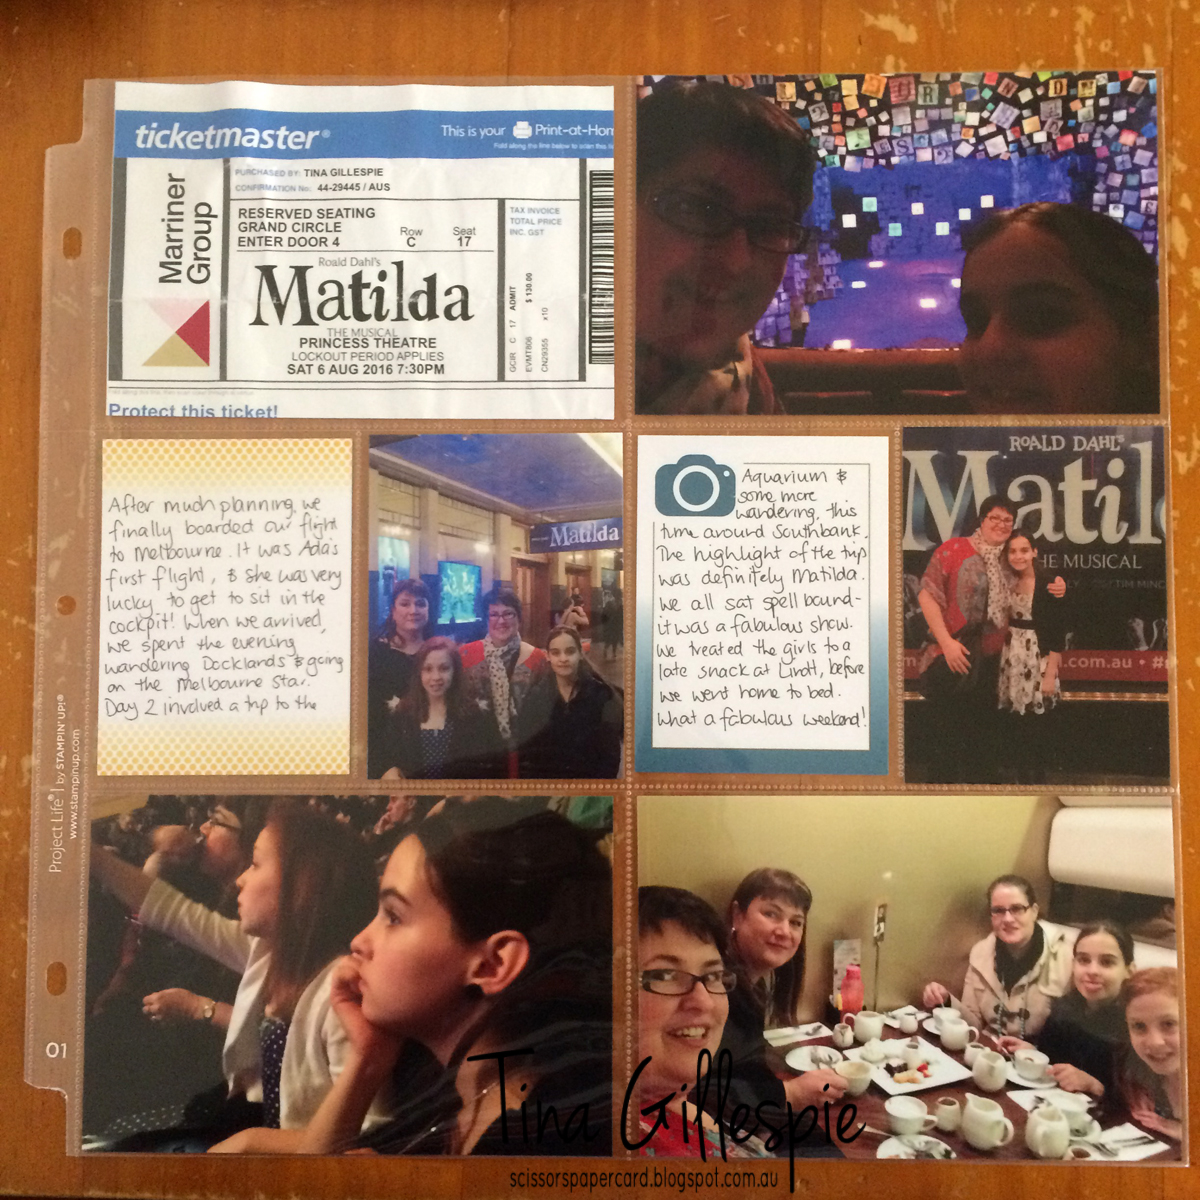
I've put together a quick double page of a trip to Melbourne that my daughter, her bestie and her mum, and myself took last August to see Matilda The Musical.
We had a full weekend in Melbourne, seeing the sights. It was the girl's first time in a plane, and they were lucky enough to get to sit in the cockpit after we landed.
I wanted to keep the layout symmetrical, but I was struggling to find a suitable card to put in the top left pocket on this page. Thankfully I'd saved my ticket, and as it contained similar blues to the Colour Theory cards, I decided to chop it and use it in the pocket.
I'm looking forward to scrapping more with this range, and also the other three packs. What about you?
Bye for now,
Tina
While you've been looking at the catalogue, did you notice that Stampin' Up! now has it's own line of pocket scrapbooking products? It's called Memories And More, and I think it was a fabulous move by SU. The company is well known for coordinating products, and Memories and More allow a greater range of coordination than before.
On to my pages. This was my first layout completed with the new Colour Theory Collection. Many of the cards have a seasonal theme in this collection, and they are designed to coordinate with the Colourful Theory suite of products (page 146). I have selected some of the more generic cards for my layout though.
I've put together a quick double page of a trip to Melbourne that my daughter, her bestie and her mum, and myself took last August to see Matilda The Musical.
We had a full weekend in Melbourne, seeing the sights. It was the girl's first time in a plane, and they were lucky enough to get to sit in the cockpit after we landed.
I wanted to keep the layout symmetrical, but I was struggling to find a suitable card to put in the top left pocket on this page. Thankfully I'd saved my ticket, and as it contained similar blues to the Colour Theory cards, I decided to chop it and use it in the pocket.
I'm looking forward to scrapping more with this range, and also the other three packs. What about you?
Bye for now,
Tina
Thursday, 8 June 2017
JAI #363: Just Add An Anniversary
Hi!
Are you ready for a new Just Add Ink challenge? I am!
This week Chantell has challenged us to Just Add Anniversary. It could be the anniversary of anything you like, as long as it celebrates an Anniversary.
I recently hosted an ATC swap, and I had a stamped and cut butterfly left over, as well as a 'love' die cut from vellum. I decided to put them to good use for this challenge while they were still floating on the surface of my desk. If I left them too long, they may have been lost forever!
The butterfly was stamped using the solid stamp from Watercolour Wishes in Powder Pink ink. I then inked the flourish from Timeless Textures in Berry Burst ink and 'kissed' the two stamps together. I then repeated on the other wing before stamping the butterfly image on my cardstock. It's such a pretty look, isn't it?
Do you have an upcoming Anniversary to celebrate? I've only just celebrated mine, so this card will go into my stash until such time as I require an anniversary card. They are always handy to have on hand. Why don't you pop on over to the Just Add Ink blog so that you can join in the fun?
Bye for now,
Tina
Are you ready for a new Just Add Ink challenge? I am!
This week Chantell has challenged us to Just Add Anniversary. It could be the anniversary of anything you like, as long as it celebrates an Anniversary.
I recently hosted an ATC swap, and I had a stamped and cut butterfly left over, as well as a 'love' die cut from vellum. I decided to put them to good use for this challenge while they were still floating on the surface of my desk. If I left them too long, they may have been lost forever!
The butterfly was stamped using the solid stamp from Watercolour Wishes in Powder Pink ink. I then inked the flourish from Timeless Textures in Berry Burst ink and 'kissed' the two stamps together. I then repeated on the other wing before stamping the butterfly image on my cardstock. It's such a pretty look, isn't it?
Do you have an upcoming Anniversary to celebrate? I've only just celebrated mine, so this card will go into my stash until such time as I require an anniversary card. They are always handy to have on hand. Why don't you pop on over to the Just Add Ink blog so that you can join in the fun?
Bye for now,
Tina
Wednesday, 7 June 2017
The Heart Of Christmas: Week Two
Hi!
I wasn't sure if I'd have the time to make a card for this week's The Heart Of Christmas Blog Share, but a last minute appointment cancellation meant that I had all day yesterday home on my own with no plans at all. So I whacked Mamma Mia in the DVD player and sat and stamped.
It wasn't intentional, but once again I have made a card with non-traditional Christmas colours. This week I used Fresh Fig, Crumb Cake and Very Vanilla. I think it's a great vintage-y colour combo.
I tried colouring some pearls with a permanent marker to match the Fresh Fig, but they turned out rather pink, more like Berry Burst. I went with them anyway, as they add a cute touch to the gingerbread man from Cookie Cutter Christmas.
So there you have it - a second card added to my Christmas card stash! If you'd like to see what the other ladies in the Art With Heart team have created, pop on over to Claire Daly's blog for the full list of links.
Bye for now,
Tina
I wasn't sure if I'd have the time to make a card for this week's The Heart Of Christmas Blog Share, but a last minute appointment cancellation meant that I had all day yesterday home on my own with no plans at all. So I whacked Mamma Mia in the DVD player and sat and stamped.
It wasn't intentional, but once again I have made a card with non-traditional Christmas colours. This week I used Fresh Fig, Crumb Cake and Very Vanilla. I think it's a great vintage-y colour combo.
I tried colouring some pearls with a permanent marker to match the Fresh Fig, but they turned out rather pink, more like Berry Burst. I went with them anyway, as they add a cute touch to the gingerbread man from Cookie Cutter Christmas.
So there you have it - a second card added to my Christmas card stash! If you'd like to see what the other ladies in the Art With Heart team have created, pop on over to Claire Daly's blog for the full list of links.
Bye for now,
Tina
Monday, 5 June 2017
Tranquil Tulips in Watermelon
Hi!
Today I have a card for you that uses a lot of new product from the new Annual Catalogue. It's always such an exciting time of year when you get to see all of the new stamps and papers.
Today's card features a new Hostess set called Tranquil Tulips. I think it's going to be a favourite! I've paired it with the new Delightful Daisy DSP.
Tranquil Tulips is a photopolymer set, so lining up the layers is a breeze. There are 5 layers in this main panel: The stems, leaves, two different layers to the tulips, and finally the stamens.
Today I have a card for you that uses a lot of new product from the new Annual Catalogue. It's always such an exciting time of year when you get to see all of the new stamps and papers.
Today's card features a new Hostess set called Tranquil Tulips. I think it's going to be a favourite! I've paired it with the new Delightful Daisy DSP.
Tranquil Tulips is a photopolymer set, so lining up the layers is a breeze. There are 5 layers in this main panel: The stems, leaves, two different layers to the tulips, and finally the stamens.
I can really see myself having fun with this set!
Bye for now,
Tina
Subscribe to:
Posts (Atom)