Hi!
Waaaaaayyyyy back in January I challenged myself to complete 100 layouts in 2011. I was going really well until November got swallowed into a black hole of sickness. So here I am, mid way through December, and I'm up to layout 79. Not too bad considering, but I still want to complete my challenge. You're going to be seeing a lot of layouts before the end of the year!
This layout has been floating around on my desk half finished for about 2 months. I had the DSP and the photos stick down, but I just couldn't finish it. I think I was stuck on a title. I eventually settled on The Boy In The Box for the title and then the rest of the layout was easy to finish. It's so frustrating getting stuck on one little detail like that!
I got out an old favourite stamp set for this layout - Baroque Motifs. It was one of the very first stamp sets I purchased, but it hasn't seen much ink lately. I love the way the textured cardstock has an effect on the image. I was after this rough kind of look and it worked perfectly!
The shape of the DSP came from a piece of paper I had in my stash. I just traced it onto the DSP and hand cut it out. I liked the curves in the paper and how they offset the angular photos and title.
Stamps: Baroque Motifs
Ink: Basic Black
DSP: First Edition Speciality DSP, Real Red Textured 12 x 12, Basic Black, Very Vanilla, Real Red
Other: Big Shot, Timeless Type Alpha Dies, Decorative Label Punch, Spiral Border Punch (retired), Small Alpha Stickers (non SU)
Catch you later,
Tina
Monday, 12 December 2011
Saturday, 10 December 2011
Grand Big Top Birthday!
Hi!
Do you have your sunnies on? No? Well, go get them then! Today's card is bright. Very bright!
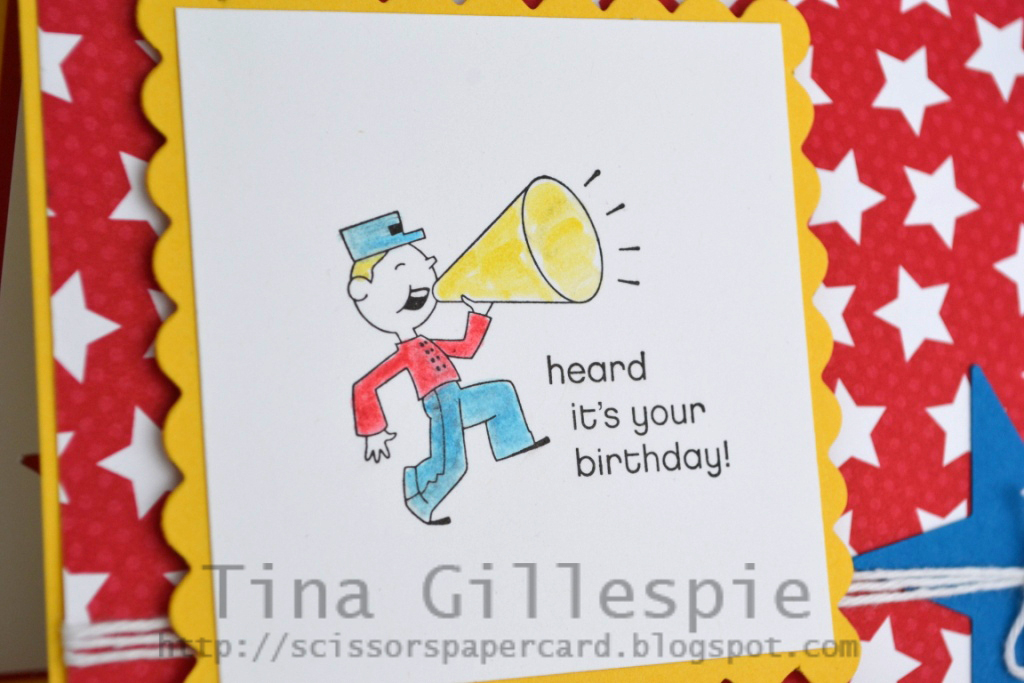
I combined the Big Top Birthday DSP with the Hostess stamp set Ain't Love Grand for this card. It was made for my neighbour who recently celebrated a birthday.
I love the Big Top Birthday DSP. It's so bright and cheerful! I didn't have the Pacific Point star on the card to start with, but I felt like the Baker's Twine was getting a bit 'lost' in amongst all the stars on the DSP. The star punchie was a quick and easy way to give the twine a boost.
I stamped the marching man in Basic Black ink and then coloured him using my Blender Pen and coordinating ink colours.
For the inside I reached for the star punch again. This time I punched through the Whisper White layer so that you can see the Real Red layer through the hole made by the punch. Sadly, the star punches have been retired by Stampin' Up!, but you could just as easily use any of the punches we stock to get a similar effect.
Stamps: Ain't Love Grand (hostess), Happiest Birthday Wishes (hostess)
Ink: Basic Black, Real Red, Pacific Point, Daffodil Delight
DSP/Cardstock: Big Top Birthday DSP, Daffodil Delight, Real Red, Pacific Point, Whisper White
Other: Big Shot, Scallop Square Duo Bigz Die, White Baker's Twine, Dimensionals, Blender Pen, Large Star Punch (retired)
Catch you later,
Tina
Do you have your sunnies on? No? Well, go get them then! Today's card is bright. Very bright!
I combined the Big Top Birthday DSP with the Hostess stamp set Ain't Love Grand for this card. It was made for my neighbour who recently celebrated a birthday.
I love the Big Top Birthday DSP. It's so bright and cheerful! I didn't have the Pacific Point star on the card to start with, but I felt like the Baker's Twine was getting a bit 'lost' in amongst all the stars on the DSP. The star punchie was a quick and easy way to give the twine a boost.
I stamped the marching man in Basic Black ink and then coloured him using my Blender Pen and coordinating ink colours.
For the inside I reached for the star punch again. This time I punched through the Whisper White layer so that you can see the Real Red layer through the hole made by the punch. Sadly, the star punches have been retired by Stampin' Up!, but you could just as easily use any of the punches we stock to get a similar effect.
Stamps: Ain't Love Grand (hostess), Happiest Birthday Wishes (hostess)
Ink: Basic Black, Real Red, Pacific Point, Daffodil Delight
DSP/Cardstock: Big Top Birthday DSP, Daffodil Delight, Real Red, Pacific Point, Whisper White
Other: Big Shot, Scallop Square Duo Bigz Die, White Baker's Twine, Dimensionals, Blender Pen, Large Star Punch (retired)
Catch you later,
Tina
Thursday, 8 December 2011
Meeting Shelli
Hi!
Today I have a layout featured on Stamp A Memory. It records the evening when I met Shelli Gardner, the founder and CEO of Stampin' Up! at the annual Convention in May this year. Here's a little sneak peek:
I hope you can pop over and take a look at the whole layout. Click on the photo to take you there.
Catch you later,
Tina
Today I have a layout featured on Stamp A Memory. It records the evening when I met Shelli Gardner, the founder and CEO of Stampin' Up! at the annual Convention in May this year. Here's a little sneak peek:
I hope you can pop over and take a look at the whole layout. Click on the photo to take you there.
Catch you later,
Tina
Tuesday, 6 December 2011
Just Add Tania Gould!
Hi!
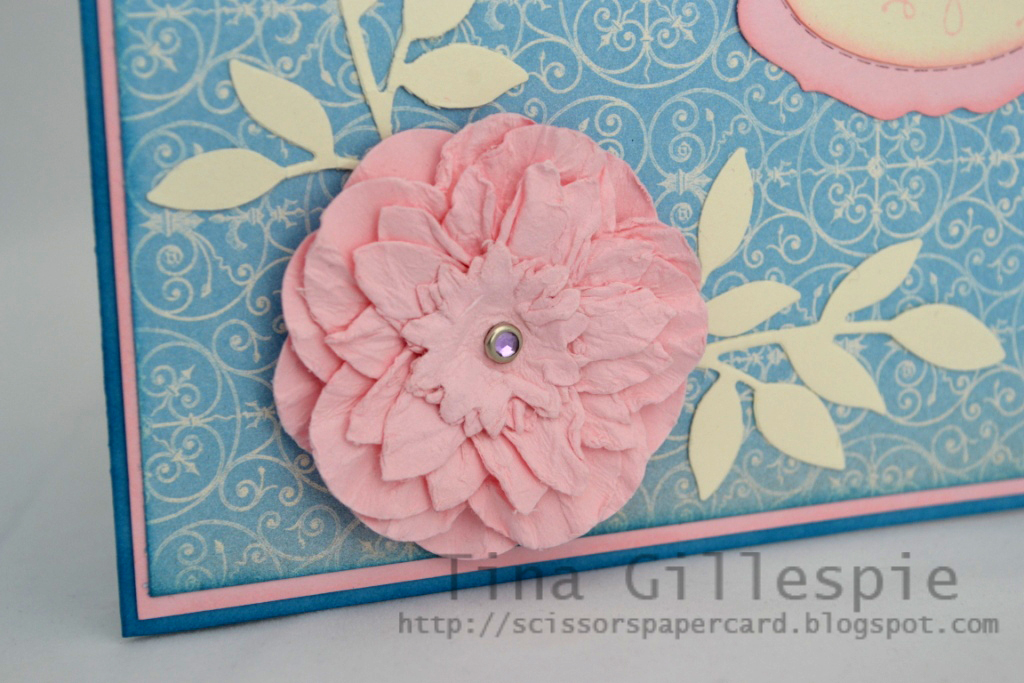
The team at Just Add Ink have come up with a new challenge - to CASE a card from a selected Design Team member, in this case Tania Gould. So off I popped to look through her blog for inspiration, and boy did I find some! Tania is one very clever papercrafter. The card I finally settled on to CASE was this card. I loved the 3D flower she'd made, and since I wanted to have a go at a similar flower it was the perfect card to CASE. Here's my version.
I love these flowers, but a bit of forward planning is necessary to make them. You need to wet the cardstock, and so you have to wait for them to dry before you can use them on a project. You can find the tutorial for making them here on Joanne Leddy's blog.
A bit hard to see because it's stamped in Pink Pirouette, but the greeting is from Happiest Birthday Wishes.
Stamps: Happiest Birthday Wishes (Hostess), Perfect Punches
Ink: Pink Pirouette, Marina Mist
DSP/Cardstock: Beau Chateau DSP, Marina Mist, Pink Pirouette, Very Vanilla
Other: Big Shot, Little Leaves Die, Lots Of Tags Die, Large Oval Punch, Fancy Flower Punch, 5-Petal Flower Punch, Boho Blossoms Punch, Scallop Circle Punch, Pink Circle Rhinestone Brad, Basic Jewels Pearl, Sponge Daubers
Catch you later,
Tina
The team at Just Add Ink have come up with a new challenge - to CASE a card from a selected Design Team member, in this case Tania Gould. So off I popped to look through her blog for inspiration, and boy did I find some! Tania is one very clever papercrafter. The card I finally settled on to CASE was this card. I loved the 3D flower she'd made, and since I wanted to have a go at a similar flower it was the perfect card to CASE. Here's my version.
I love these flowers, but a bit of forward planning is necessary to make them. You need to wet the cardstock, and so you have to wait for them to dry before you can use them on a project. You can find the tutorial for making them here on Joanne Leddy's blog.
A bit hard to see because it's stamped in Pink Pirouette, but the greeting is from Happiest Birthday Wishes.
Stamps: Happiest Birthday Wishes (Hostess), Perfect Punches
Ink: Pink Pirouette, Marina Mist
DSP/Cardstock: Beau Chateau DSP, Marina Mist, Pink Pirouette, Very Vanilla
Other: Big Shot, Little Leaves Die, Lots Of Tags Die, Large Oval Punch, Fancy Flower Punch, 5-Petal Flower Punch, Boho Blossoms Punch, Scallop Circle Punch, Pink Circle Rhinestone Brad, Basic Jewels Pearl, Sponge Daubers
Catch you later,
Tina
Monday, 5 December 2011
Stamp A Memory December Challenge
Hi!
Wow! I can't believe another month has flown by! I guess at this time of year time does seem to speed up and catch us out. The last month has certainly flown past in a blur for me.
Anyway, the challenge this month at Stamp A Memory is to scrap a layout that is inspired by this photo:
Can't you just imagine sitting down to Christmas lunch at a table like that? I took inspiration from a couple of different elements of the photo. Firstly, that's it Christmas, and secondly the colour scheme. Having said that though, I took a few liberties with the colours! Here's my layout:
I turned the colour scheme around. The inspiration photo is mostly white with a splash of green and gold. I changed this to be green with a splash of white and sliver. I'm much more of a silver person! The big white space is for this year's Santa photo. The plan was to have it done before now so that it could go on the layout but I have had a very sick household for the past month, so Santa photos just didn't happen yet. You'll just have to imagine one there for now!
The tree was inspired by a card made by the very clever Judy May. You can see her card here. It's a whole lot of circle punchies arranged in the shape of a Christmas tree and then popped up on Dimensionals. If you look closely you can see that some of the Glimmer circles are a little darker than the others. I coloured these punchies using my Lucky Limeade reinker. I saw this technique for colouring Sliver Glimmer paper on Mary Fish's blog. You can watch her video here.
The title of the layout was die cut out or more of the Silver Glimmer Paper. Can you tell how much I love this stuff? I'm almost half way through my first pack of it!
I hope you can find time to play along this month - take some time out from the craziness that is Christmas and find an hour or so to scrap a Christmas photo. You can find the challenge here, along with the rest of the design team entries.
Ink: Lucky Limeade reinker
Cardstock: Silver Glimmer Paper, Garden Green Textured 12 x 12, Whisper White
Other: Big Shot, Simple Letters Alphabets Dies, White Baker's Twine, Dimensionals, Paper Snips, Sponge Dauber, Heat Tool, Circle Punches (Itty Bitty Circle, 1/2", 1", 1 1/4", 1 3/8", 1 3/4"), Small Star Punch (retired)
Catch you later,
Tina
Wow! I can't believe another month has flown by! I guess at this time of year time does seem to speed up and catch us out. The last month has certainly flown past in a blur for me.
Anyway, the challenge this month at Stamp A Memory is to scrap a layout that is inspired by this photo:
Can't you just imagine sitting down to Christmas lunch at a table like that? I took inspiration from a couple of different elements of the photo. Firstly, that's it Christmas, and secondly the colour scheme. Having said that though, I took a few liberties with the colours! Here's my layout:
I turned the colour scheme around. The inspiration photo is mostly white with a splash of green and gold. I changed this to be green with a splash of white and sliver. I'm much more of a silver person! The big white space is for this year's Santa photo. The plan was to have it done before now so that it could go on the layout but I have had a very sick household for the past month, so Santa photos just didn't happen yet. You'll just have to imagine one there for now!
The tree was inspired by a card made by the very clever Judy May. You can see her card here. It's a whole lot of circle punchies arranged in the shape of a Christmas tree and then popped up on Dimensionals. If you look closely you can see that some of the Glimmer circles are a little darker than the others. I coloured these punchies using my Lucky Limeade reinker. I saw this technique for colouring Sliver Glimmer paper on Mary Fish's blog. You can watch her video here.
The title of the layout was die cut out or more of the Silver Glimmer Paper. Can you tell how much I love this stuff? I'm almost half way through my first pack of it!
I hope you can find time to play along this month - take some time out from the craziness that is Christmas and find an hour or so to scrap a Christmas photo. You can find the challenge here, along with the rest of the design team entries.
Ink: Lucky Limeade reinker
Cardstock: Silver Glimmer Paper, Garden Green Textured 12 x 12, Whisper White
Other: Big Shot, Simple Letters Alphabets Dies, White Baker's Twine, Dimensionals, Paper Snips, Sponge Dauber, Heat Tool, Circle Punches (Itty Bitty Circle, 1/2", 1", 1 1/4", 1 3/8", 1 3/4"), Small Star Punch (retired)
Catch you later,
Tina
Sunday, 4 December 2011
The Nicest Things Card
Hi!
I've been showing you a lot of male cards this week, so I thought I'd balance that out a bit by showing you a girly card I made for one of Ada's friends who was turning 6. She and Ada are very good friends, so I thought the main image from The Nicest Things stamp set would be perfect for the card.
I stamped it on some watercolour paper and coloured it using my inkpads and blender pen. It was a little while ago and I forgot to write down the colours at the time, so I can only guess at what I might have used.
I think that on the blonde girl I used So Saffron and More Mustard for her hair, Wisteria Wonder and So Saffron for her dress and Blushing Bride for the skin. On the Brunette I used More Mustard and Chocolate Chip for her hair, Lucky Limeade for her dress and More Mustard for her basket. The ground was Lucky Limeade and I think I used Rose Red for the apron and the flowers. It may be Melon Mambo though!
I wasn't entirely sure about the Lucky Limeade/So Saffron colour combo for the card, but in the end I like the softness of the colours.
Stamps: The Nicest Things, Happiest Birthday Wishes (hostess)
Ink: Stazon, Versamark and the colours listed above
DSP/Cardstock: In Colour Lucky Limeade Patterns Stack, Lucky Limeade, So Saffron, Whisper White, Watercolour Paper
Other: Whisper White Satin Ribbon, Blender Pen, White Embossing Powder, Itty Bitty Shapes Punch, Sponge Dauber, Paper Snips
Tomorrow I have a new layout for you for the December Stamp A Memory challenge. I hope you can find a moment amongst the Christmas preparations to play along!
Catch you later,
Tina
I've been showing you a lot of male cards this week, so I thought I'd balance that out a bit by showing you a girly card I made for one of Ada's friends who was turning 6. She and Ada are very good friends, so I thought the main image from The Nicest Things stamp set would be perfect for the card.
I stamped it on some watercolour paper and coloured it using my inkpads and blender pen. It was a little while ago and I forgot to write down the colours at the time, so I can only guess at what I might have used.
I think that on the blonde girl I used So Saffron and More Mustard for her hair, Wisteria Wonder and So Saffron for her dress and Blushing Bride for the skin. On the Brunette I used More Mustard and Chocolate Chip for her hair, Lucky Limeade for her dress and More Mustard for her basket. The ground was Lucky Limeade and I think I used Rose Red for the apron and the flowers. It may be Melon Mambo though!
I wasn't entirely sure about the Lucky Limeade/So Saffron colour combo for the card, but in the end I like the softness of the colours.
Stamps: The Nicest Things, Happiest Birthday Wishes (hostess)
Ink: Stazon, Versamark and the colours listed above
DSP/Cardstock: In Colour Lucky Limeade Patterns Stack, Lucky Limeade, So Saffron, Whisper White, Watercolour Paper
Other: Whisper White Satin Ribbon, Blender Pen, White Embossing Powder, Itty Bitty Shapes Punch, Sponge Dauber, Paper Snips
Tomorrow I have a new layout for you for the December Stamp A Memory challenge. I hope you can find a moment amongst the Christmas preparations to play along!
Catch you later,
Tina
Friday, 2 December 2011
Soccer Ball Birthday Card
Hi!
Today's card is another male card, but this time for a 6 year old. The card was a commission and my brief was a birthday card for a six year old soccer mad boy. He is a big fan of the local Adelaide United team, so I was asked to include their colours.
I decided to make a soccer ball shaped card, and after a bit of googling to see how a soccer ball was constructed this is how it turned out. I used a hexagon punch to recreate the ball, which is not strictly accurate but it is the only way to flatten a soccer ball for a card. The word 'six' is popped up on some dimensionals.
I used the Adelaide United colours on the inside - white, red and blue. Their logo is a group of stars that are in a soccer ball shape, so I added the stars as the best approximation I could do!
Stamps: Curly Cute
Ink: Not Quite Navy, Basic Black Stampin' Write Marker
Cardstock: Whisper White, Basic Black, Real Red, Not Quite Navy
Other: Big Shot, Timeless Type Alphabet Dies, Small Star Punch (retired), Circle Cutter, Hexagon punch (non SU)
Catch you later,
Tina
Today's card is another male card, but this time for a 6 year old. The card was a commission and my brief was a birthday card for a six year old soccer mad boy. He is a big fan of the local Adelaide United team, so I was asked to include their colours.
I decided to make a soccer ball shaped card, and after a bit of googling to see how a soccer ball was constructed this is how it turned out. I used a hexagon punch to recreate the ball, which is not strictly accurate but it is the only way to flatten a soccer ball for a card. The word 'six' is popped up on some dimensionals.
I used the Adelaide United colours on the inside - white, red and blue. Their logo is a group of stars that are in a soccer ball shape, so I added the stars as the best approximation I could do!
Stamps: Curly Cute
Ink: Not Quite Navy, Basic Black Stampin' Write Marker
Cardstock: Whisper White, Basic Black, Real Red, Not Quite Navy
Other: Big Shot, Timeless Type Alphabet Dies, Small Star Punch (retired), Circle Cutter, Hexagon punch (non SU)
Catch you later,
Tina
Subscribe to:
Posts (Atom)